
Related Manuals for ROEQ TMC300Ext


Summary of Contents for ROEQ TMC300Ext
- Page 1 ROBOTIC EQUIPMENT TMC300Ext Instruction Manual Valid from serial number 5110265A200000391 2020-12-17...
- Page 2 In addition, the contents of the document are subject to change without prior notice. Every precaution has been taken in the preparation of this manual. Nevertheless, ROEQ assumes no responsibility for errors or omissions or any damages resulting from the use of the information contained.
-
Page 3: Table Of Contents
Alleviating crushing hazards ....................... 13 Use .............................. 14 TMC300Ext mounting ......................... 15 SICK setup (Applies for ROEQ Cart300 solutions) ..............17 3.6.1 Connecting to the Sick Safe laser scanner system ..............17 3.6.2 Setting up COM settings (Sick scanners) ..................17 3.6.3 Backup of existing laser scanner configuration (front/rear scanners) Recommended ..... - Page 4 Revision: 2.01 Publicly available TMC300Ext specifications ......................48 5.1.1 TMC300Ext – dimensions drawing ..................... 49 Cart300 with rails – specifications ..................... 50 5.2.1 Cart300 with rails – dimensions drawing ................... 51 DS100/200P Ext Floor docking station – specifications ............. 51 5.3.1 DS100/200P Ext Floor docking station –...
-
Page 5: Introduction
The purpose of this instruction manual is to support the system integrator. It assumes a basic level of knowledge regarding the setup process of the MiR robot and software interface. Furthermore, the installation process of both the TMC300Ext and Cart300 requires some level of software knowledge and craftmanship. -
Page 6: Safety
Before installation and operation read the information in this section carefully and pay attention to the safety instructions and warnings. The CE-approval has been given to the ROEQ system as delivered from ROEQ and installed on MiR100/MiR200. Any additional modifications will require a new risk assessment of the specific configuration. -
Page 7: General Safety Instructions
TMC300Ext Instruction Manual Revision: 2.01 Publicly available 2.3 General safety instructions This section contains general safety notes. Some safety notes are repeated or further specified in other sections of the manual and further safety notes are present throughout the manual. -
Page 8: Caution Notes
Unstable surface caused by moving vessel may cause the robot to skid. • Turn off the robot before removal or installation of the TMC300Ext Risk of personal injury and/or damage to the robot or ROEQ equipment. p. 8 of 55... -
Page 9: Notices
TMC300Ext Instruction Manual Revision: 2.01 Publicly available 2.3.3 Notices • Indoor use only Risk of damage to the robot and/or cart. The robot and cart are made for indoor use only and should never be used outdoor. • Avoid small objects on the floor in the robot’s area Risk of property damage and/or minor damage to the robot. -
Page 10: Safety Circuit
The TMC300Ext employs the safety circuit installed in the MiR robot. The same safety principles apply when a ROEQ top module is installed, as are valid when the robot operates in isolation. That is the robot is installed with optical safety zones so that if a person or other moving object enters these zones, the robot will be forced into emergency stop. -
Page 11: Foreseeable Misuse
2.9.2 Low speed collision hazards The ROEQ TMC300Ext module is larger than the footprint of the robot. The size of the TMC300Ext thus implies that it is installed with an overhang with respect to the robot. To allow the robot to dock into... -
Page 12: Directive Conformity
2.10 Directive conformity The TMC300Ext has been designed and manufactured in accordance to EU directive 2006/42/EF - Directive of Machinery. p. 12 of 55... -
Page 13: Commissioning
Please note, that after installing the TMC300Ext on the MiR, the Emergency-Stop and the Reset button are now operated from the TMC300Ext. There are two (2) Emergency stop buttons on the TMC300Ext, one on the front panel and one on the rear panel. The Reset button is located on the rear panel. -
Page 14: Use
Figure 3. Marking of potential hazard zones. 3.4 Use After setting up the ROEQ system including generating missions by using the ROEQ program all general operations of the ROEQ system are controlled by missions in the MiR standard interface. Figure 4. ROEQ software in the MiR interface. -
Page 15: Tmc300Ext Mounting
4 top module cables. NOTE: Never lift the TMC300Ext in the Emergency Stops. NOTE: Due to the size and weight of the TMC300Ext it is recommended that two persons lift it up from the packaging. Carefully lift the... - Page 16 TMC300Ext Instruction Manual Revision: 2.01 Publicly available Place the TMC300Ext on top of the MiR100/MiR200 robot. To connect the 10-pin connector and Wi-Fi cable, the TMC300Ext must initially be placed slightly towards the front of the robot as illustrated until adequate accessibility has been obtained.
-
Page 17: Sick Setup (Applies For Roeq Cart300 Solutions)
TMC300Ext. 3.6 SICK setup (Applies for ROEQ Cart300 solutions) This describes the Sick Safe s300 laser scanner configuration to get started with the ROEQ cart system. Step Instruction Log on to the robots Wi-Fi. Connect to the robot via web browser: mir.com 3.6.1 Connecting to the Sick Safe laser scanner system... - Page 18 TMC300Ext Instruction Manual Revision: 2.01 Publicly available The connection settings window will appear. A TCP/IP connection is required between the PC and the scanners. Click “Add TCP/IP connection profile”. To create the new profile, fill out the entry name and set the IPv4 address to 192.168.12.9,...
-
Page 19: Backup Of Existing Laser Scanner Configuration (Front/Rear Scanners) Recommended
3.6.3 Backup of existing laser scanner configuration (front/rear scanners) Recommended This section describes the procedure for taking backup of existing Sick configurations before transferring the ROEQ Sick configuration from the enclosed USB-drive to the Sick Safe laser scanner system. Step Instruction Illustration Click “Connect”... - Page 20 TMC300Ext Instruction Manual Revision: 2.01 Publicly available Double click the front laser (S300.CPU1[0].EFI1.1) Select “Read configuration from device” Repeat step 3 and 4 for taking backup of the rear scanner Double click the rear laser (S300.CPU1[0].EFI2.1) p. 20 of 55...
- Page 21 TMC300Ext Instruction Manual Revision: 2.01 Publicly available Finally select “Save as” in the project drop down window and save the original configuration on the PC. p. 21 of 55...
-
Page 22: Uploading Laser Scanner Configuration To Sick Safe Laser Scanners
Publicly available 3.6.4 Uploading laser scanner configuration to Sick Safe laser scanners This section describes the procedure for transferring ROEQ configurations from the enclosed USB-drive to the Sick Safe laser scanner system. It is highly recommended that the files stored on the enclosed USB-drive are saved in a local folder on the PC used for the SICK setup, before continuing with the following step. - Page 23 TMC300Ext Instruction Manual Revision: 2.01 Publicly available Make sure that both S300 scanners and the main Module are marked and click “OK”. The password for uploading the new safety zones is: SICKSAFE Please check the configuration protocol carefully for both scanners and proceed by clicking “Release”.
- Page 24 TMC300Ext Instruction Manual Revision: 2.01 Publicly available Although the old main Module is verified, click “yes” to download the new configuration, and run the new head device. p. 24 of 55...
- Page 25 TMC300Ext Instruction Manual Revision: 2.01 Publicly available Verify the new checksum by clicking “yes”. Mark the option for Authorized Client user group and click “OK”. p. 25 of 55...
- Page 26 Select “Upload and verify result” And “Yes” to finalize the process. Remark: If you have previously uploaded a ROEQ safety configuration to the robot, the “Upload and verify result” button may not be visible. In this case, confirm that the configuration is already verified.
-
Page 27: Roeq Cart And Docking Station Mounting
TMC300Ext Instruction Manual Revision: 2.01 Publicly available 3.7 ROEQ cart and docking station mounting This section describes the unpacking and mounting process of the ROEQ cart and docking station. Step Instruction Illustration Fasten the docking station firmly to floor. The docking station must be anchored to an even/smooth surface. - Page 28 TMC300Ext Instruction Manual Revision: 2.01 Publicly available The bottom plate of the docking station has 6xØ8,2 mm anchor holes. To access these, the back Remove plate of the docking plate station must be removed. If manual undocking is needed, turn the two handles on the docking station 90°...
-
Page 29: Setting Parameters In The Mir Robot
Revision: 2.01 Publicly available 3.8 Setting parameters in the MiR robot A few parameters need to be updated in order to optimize the docking with the ROEQ system. 3.8.1 Setting the distance to marker (for disabling collision checks) Step Instruction... -
Page 30: Setting Docking Parameters In Mir - Only For Mir Firmware After 2.4.1
TMC300Ext Instruction Manual Revision: 2.01 Publicly available 3.8.2 Setting Docking parameters in MiR – only for MiR firmware after 2.4.1 Step Instruction Illustration In the MiR web interface, go to: System → Settings → Docking and click “Show advanced settings”. -
Page 31: Calibration Of The Mir Robot Front Laser (Optional)
TMC300Ext Instruction Manual Revision: 2.01 Publicly available 3.9 Calibration of the MiR robot front laser (Optional) It might be necessary to perform a calibration of the front laser scanners (Sick) to obtain a more stable docking performance. These steps are also described in a video enclosed on the USB-drive. -
Page 32: Create Docking Station Position
X is the name of the station, and can be both letter and numbers If this naming convention is not followed, the ROEQ program for calibrating docking stations will not be able to find the new docking station. - Page 33 TMC300Ext Instruction Manual Revision: 2.01 Publicly available Choose “TMC300Ext” from the drop- down menu Remark: The rest of the options refer to other ROEQ products. Contact ROEQ sales department for information on these products. Select the docking station you created in step 3.
-
Page 34: Global Offset Adjustment (Optional)
TMC300Ext Instruction Manual Revision: 2.01 Publicly available In the MiR interface, mir.com. Go to setup/missions. Select the “ROEQ Utility” mission group and run the “ROEQ_OS_Footprint mission” This mission will change the current footprint of the robot to fit the TMC300Ext. - Page 35 TMC300Ext Instruction Manual Revision: 2.01 Publicly available Measure out a distance of 35 mm from the bended black steel edge and make a mark on the top plate of the module Repeat the process on both right and left side in the front end of the TMC300Ext.
- Page 36 Mark the centre of the Docking station. Measure the a-value. a-value = distance from point marked on the TMC300Ext front left corner to the docking station. (Robot x-direction) p. 36 of 55...
- Page 37 TMC300Ext Instruction Manual Revision: 2.01 Publicly available Measure the b-value. b-value = distance from the point marked on the TMC300Ext front right corner to the docking station. (Robot x-direction) Measure the c-value. y ← positive direction (positive c- value) c-value = distance from...
- Page 38 TMC300Ext Instruction Manual Revision: 2.01 Publicly available Use the supplied ROEQ program. Note: The ROEQ program v4.9.5 is for MiR v2.6.0 and up. For a version of the ROEQ program compatible with older MiR versions, contact the ROEQ support team.
-
Page 39: Calibration Of Individual Docking Station Offsets (Optional)
Step Instruction Illustration Use the supplied ROEQ program. Note: The ROEQ program v4.9.5 is for MiR v2.6.0 and up. For a version of the ROEQ program compatible with older MiR versions, contact the ROEQ support team. p. 39 of 55... - Page 40 TMC300Ext Instruction Manual Revision: 2.01 Publicly available Click “Update existing docking station”. From the dropdown menu choose the docking station selected for calibration. (If you have chosen an ID above 30, you will need to modify the range of stations the program searches for.
-
Page 41: Test Of Roeq Supplied Sick Safety Zones
TMC300Ext Instruction Manual Revision: 2.01 Publicly available 3.13 Test of ROEQ supplied SICK safety zones Step Instruction Illustration Run the “ROEQ_Get cart ID“ mission. The mission can be found under Setup → Missions and in the ROEQ cart mission group. -
Page 42: Test Of Roeq Supplied Docking Sequence
TMC300Ext Instruction Manual Revision: 2.01 Publicly available 3.14 Test of ROEQ supplied docking sequence Step Instruction Illustration Drive the robot to a random position a few meters away from the VL- marker. Use the joystick, located in the upper right... -
Page 43: Detailed Presentation
4 Detailed presentation 4.1 Product description The TMC300Ext is an accessory for the MiR100/200 which allows the robot to transport ROEQ carts and other ROEQ products. The TMC300Ext works in conjunction with the software embedded on the MiR robot and acts as an extension of the robot’s autonomous capabilities. -
Page 44: Tmc300Ext
TMC300Ext Instruction Manual Revision: 2.01 Publicly available 4.3 TMC300Ext Pos. Description Pos. Description Emergency stop button Top plate Protective guard Access lid Mounting bolt access plug Lock bolt Wi-Fi antenna Protective side fender Pos. Description Pos. Description Lock bolt homing button... -
Page 45: Lock Bolt Homing Button
Picture A Picture B Table 1:Top view of ROEQ Top Module with locking bolts in retracted position (picture A) and in extracted position (picture B): Note: The depicted product is TMC300. If needed, the lock bolts can manually be retracted by using the lock bolt homing button. -
Page 46: Roeq Cart Components
Caster wheel Corner attachment point Cart main frame Locking mechanism attachment point Docking bolt interface (optional) Ball docking interface (optional) 4.6 ROEQ docking station components Pos. Description Pos. Description Docking bolt Docking station front plate Docking bolt housing V-marker for MiR Docking bolt release handle p. -
Page 47: Troubleshooting
This is done by pressing and holding the homing button for 5 seconds. Release the homing button and the TMC300Ext will begin to determine the lock bolts point of origin. If this procedure has been carried out successfully, the homing button is now functional. -
Page 48: Technical Specifications
TMC300Ext Instruction Manual Revision: 2.01 Publicly available 5 Technical specifications 5.1 TMC300Ext specifications General specifications related to the dimensions and performance of TMC300Ext installed on MiR100 or MiR200 Dimensions Length 1200 mm (emergency stop buttons not included) Width 606 mm... -
Page 49: Tmc300Ext - Dimensions Drawing
TMC300Ext Instruction Manual Revision: 2.01 Publicly available 5.1.1 TMC300Ext – dimensions drawing Figure 5. p. 49 of 55... -
Page 50: Cart300 With Rails - Specifications
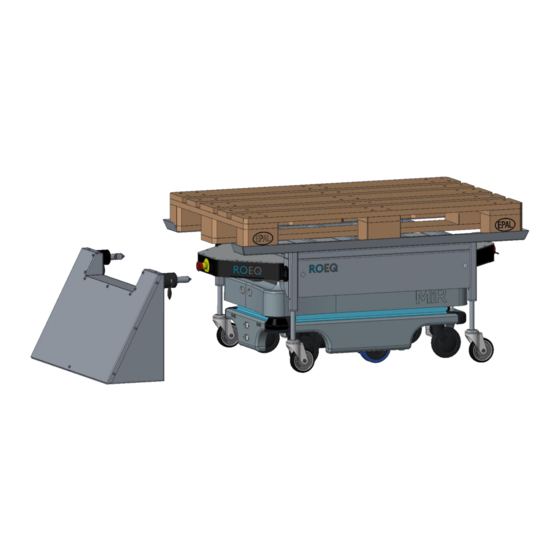
Publicly available 5.2 Cart300 with rails – specifications The TMC300Ext works in a setup were the cargo extends up to 1200 mm. E.g. with the ROEQ Cart300 with rails mounted on top: The following specifications are additions to the general specifications stated in section 5.1... -
Page 51: Cart300 With Rails - Dimensions Drawing
TMC300Ext Instruction Manual Revision: 2.01 Publicly available 5.2.1 Cart300 with rails – dimensions drawing Figure 6. 5.3 DS100/200P Ext Floor docking station – specifications The following specifications are additions to the general specifications stated in section 5.1 Dimensions Length 250 mm (383 mm including docking bolts) -
Page 52: Ds100/200P Ext Floor Docking Station - Dimensions Drawing
TMC300Ext Instruction Manual Revision: 2.01 Publicly available 5.3.1 DS100/200P Ext Floor docking station – dimensions drawing Figure 7. p. 52 of 55... -
Page 53: Maintenance
NOTE: The stated intervals are indicative and depend on the operating environment and frequency of usage of the robot. 6.1.1 Regular cleaning and inspection This table gives an overview of maintenance tasks for all ROEQ products. Part Maintenance Interval... -
Page 54: Appendices
ROEQ designed carts and pallets and thereby executing multiple logistic tasks with the use of one robot. To be able to operate with a ROEQ cart attached a modified version of the laser scanner software is installed on the robot. -
Page 55: Formulas For Calculating The Global Offsets Of The Robot
TMC300Ext Instruction Manual Revision: 2.01 Publicly available 7.2 Formulas for calculating the global offsets of the robot These formulas are used for calculating the global offsets of the robot in relation to the calibration. �� ̅ − �� ̅ −1 ����������������������...
Need help?
Do you have a question about the TMC300Ext and is the answer not in the manual?
Questions and answers