Table of Contents
Advertisement
Quick Links
Advertisement
Table of Contents

Related Manuals for Canberra UltraRadiac


Summary of Contents for Canberra UltraRadiac
- Page 1 UltraRadiac™ Personal Radiation Monitor User’s Manual 9236123G...
- Page 2 Body: 9236048G Copyright 2006, Canberra Industries, Inc. All rights reserved. The material in this document, including all information, pictures, graphics and text, is the property of Canberra Industries, Inc. and is protected by U.S. copyright laws and international copyright conventions.
-
Page 3: Table Of Contents
Table of Contents 1. Introduction....1 2. Basic Functions ... . . 4 Powering the Unit ....4 Turning Off an Alarm . - Page 4 Sleep Mode Test ....21 Completing the Tests ... . . 22 GM Tube Failure Indication ..22 Operation at Low Temperatures .
- Page 5 Exiting the Sleep Mode ... 38 The Data Logging Mode... . 38 Capturing Data Pairs ... . 38 Viewing the Data Log.
- Page 6 B. Default Alarm Settings ..52 C. Display Units ....54 D. Glossary ....55 E.
-
Page 7: Introduction
Indicators. These cover the basics of using the UltraRadiac™ Personal Radiation Monitor. Note: Operational procedures are the respon- sibility of the UltraRadiac’s users. In- structions provided in this manual are “how to’s”, not procedural recommen- dations. Your UltraRadiac can measure and display... - Page 8 LED will blink and/or an audible alarm will sound. Some units also include a vibrator alarm. The Radiation Units Depending on the model, your UltraRadiac is factory-set to display the Rate and the Dose in one of these units of radiation measurement: •...
- Page 9 Setting Up the Unit The UltraRadiac has five modes: Rate, Dose, Source Finder, Sleep, and Data Logging. Chapter 5, Setting Up the Unit, describes them and tells you how to set and enable the Rate alarms and the Dose alarms.
-
Page 10: Basic Functions
2. Basic Functions The first time you take your UltraRadiac™ out of its shipping carton, you’ll have to in- stall its batteries. See “The Batteries” on page 41 for instructions. Powering the Unit To turn the unit on, press ON/OFF until is displayed. - Page 11 If any alarm sounds, the next four sections tell you how you turn it off. • Clearing the Low Rate Alarm Press the CLR/TEST key to turn off the vibrator and the audio alert. The visual alerts will continue until the rate falls below the Low Rate Alarm threshold.
-
Page 12: Checking Your Stay Time
• Clearing the High Dose Alarm Press the CLR/TEST key to turn off the vibrator. The audio (if enabled) and visual alerts will continue until the Dose falls below the High Dose Alarm threshold. To turn off the alerts, you’ll have to clear the dose memory. -
Page 13: Clearing The Accumulated Dose
To return to the Rate Mode, press the RATE key. Clearing the Accumulated Dose Press and hold DOSE + CLR/TEST. The display will flash for a few seconds, then clear the accumulated dose. To return to the Rate Mode, press the RATE key. -
Page 14: Changing The Alarm Indicators
Changing the Alarm Indicators Press the ALARM + RATE keys or the ALARM + DOSE keys. You’ll see an H, for High Level Alarm, displayed. To change the Low Level indicators, press the RATE (DOSE) key again; the display will show an L. Press the CLR/TEST key to access the selected (Hor L) indicators. -
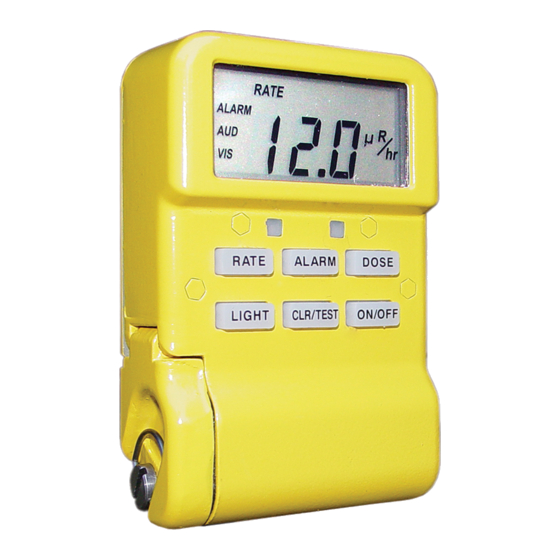
Page 15: Controls And Indicators
3. Controls and Indicators This is a brief overview of the UltraRadiac’s™ controls and indicators and its protective case. Each of the controls and indicators is covered in detail in the remaining sections of the manual. Figure 1 The UltraRadiac Front Panel... -
Page 16: The Function Keys
The Function Keys The primary function of each of the function keys is briefly described below. The program- ming functions of these keys are covered in Chapter 5, “Setting Up the Unit” (page 24). ON/OFF Press and hold to turn the unit on or off. -
Page 17: The Battery Life Indicators
In the Rate Mode, press and hold to enable the Display Test Sequence (page 17). The Battery Life Indicators The UltraRadiac has two battery life indica- tors. See “The Batteries” on page 41 for in- structions on changing the batteries. •... -
Page 18: Attaching The Belt Clip
Do not overtighten. The Carrying Case If the belt clip is installed, remove it from the back of the UltraRadiac by unscrewing its two captive retaining screws and lifting the clip off the unit. Now put the UltraRadiac into the carrying case with the display toward the bottom (closed) end of the case. - Page 19 Fold the top flap down over the front of the case. Pull the narrow strap across the top flap. Secure the narrow strap to both the top flap and the side of the case. Thread your belt through the slots in the belt loop.
-
Page 20: Operational Verification Tests
These Operational Verification Tests should be performed periodically, as required by your departmental procedures. Installing the Batteries The first time you take your UltraRadiac™ out of its shipping carton, you’ll have to in- stall its batteries. See “The Batteries” on page 41 for instructions. - Page 21 Figure 3 The Rate Display • AUD and VIS indicate that the Audio and Visual alarms are both enabled. • The unit will start counting and display- ing the instantaneous Rate. Naturally occuring background radiation will cause the unit to display a low reading. •...
-
Page 22: Turning The Unit Off
Note: Because the UltraRadiac automatically adjusts its display to accomodate the amount of data, the units (R, for in- stance) may be displayed with a pre- fix. For instance, at natural background levels, you’ll see µR, microroentgens. At higher exposure rates, the display will change to mR (milliroentgens). -
Page 23: Instrument Test
Instrument Test While in the Rate Mode, press and hold the CLR/TEST key until you see the test display in Figure 4, then release the key Figure 4 The Test Display Display Test Sequence • A set of numbers in the following order will appear. - Page 24 (blinking) • The blinking indicates that the unit passed all tests. A blinking indicates a failure; contact your local Canberra Service Center. • Press the CLR/TEST key to return to Rate Mode (or wait about 10 seconds). Checking the Alarm...
- Page 25 hand one below the display, should turn • Press the DOSE key – the audio alarm should sound and the Dose LED, the right hand one below the display, should turn on. • Press the ALARM key – the audio alarm should sound and both LEDs should turn on.
-
Page 26: Ending The Display Test
At the end of the test sequence, the blinking will appear, indicating that the Rate Mode is operational. A blinking indicates a failure; contact your local Canberra Service Center. The unit will return to the Rate Mode in about ten seconds. Backlight Test Press the LIGHT key;... -
Page 27: Sleep Mode Test
Sleep Mode Test Press and hold the RATE key, then press the ON/OFF key. • The characters will be displayed briefly. • – – – When you see , release both keys. • You’ll see the SLEEP indicator at the top of the screen (Figure 5). -
Page 28: Completing The Tests
Completing the Tests When the UltraRadiac has passed all tests, the unit is ready for operation. If the unit fails any of these Operational Veri- fication Tests, contact your local Canberra Service Center. GM Tube Failure Indication If the unit’s Geiger-Mueller tube should stop counting, the display will flash, showing three rows of three dashed lines each (Figure 6). -
Page 29: Operation At Low Temperatures
Operation at Low Temperatures At temperatures below –22 °F (–30 °C), it takes somewhat longer for characters to form on the display. The UltraRadiac automatically corrects for this by sensing the ambient tem- perature and increasing the display refresh time from two to five seconds. Operation of the UltraRadiac is otherwise unchanged. -
Page 30: Setting Up The Unit
This is applicable only if the functions were not disabled by the optional Model S900 UltraRadiac Setup Software. CAUTION To make your changes permanent, you must go through the entire setup sequence outlined in this chapter. -
Page 31: The Rate Mode
The Rate Mode To turn the UltraRadiac on, press and hold ON/OFF key until you see the Rate display in Figure 7. Figure 7 The Rate Display The Rate Alarms There are two Rate Alarm Thresholds: Low Rate, for a minor hazard, and High Rate, for a severe hazard. -
Page 32: Low Threshold
• Visual Enabled – The entire display and the left LED will flash quickly. • Audio Enabled – The audio will beep quickly. • Optional Vibrator Enabled – The unit will vibrate. Low Threshold There are several indicators for the Low Rate Alarm Threshold (Figure 7). -
Page 33: Changing The Rate Alarm Indicators
• To read the Low Level Alarm setting, press the RATE key again; the display will show an L. • Press the CLR/TEST key; the flashing display will show the selected (Hor L) alarm threshold setting. • If the optional Vibrator Alarm has been activated, the display will alternate be- tween the threshold value and a verti- cally scrolling horizontal bar (–... - Page 34 • Press the ALARM and RATE keys. • You’ll see an H, for High Level Alarm, displayed. • To access the Low Level Alarm set- tings, press the RATE key again; the display will show an L. • Press the CLR/TEST key; the flashing display will show the selected alarm level (H or L) settings.
- Page 35 Figure 8 Changing the Rate Alarm Threshold • Repeatedly press the RATE key until the desired decimal point location and threshold unit indication are displayed. • Press the CLR/TEST key. This action will lock in the selected decimal point location and threshold unit indication. •...
-
Page 36: The Dose Mode
• When the last digit has been set, the en- tire threshold value and unit will flash. • Press the CLR/TEST key to return to the Rate Mode or wait about 10 sec- onds. The Dose Mode When the unit is on, dose data is continuously accumulated and updated every two seconds. -
Page 37: The Dose Alarms
The AUD and VIS display indicators will be seen only if the corresponding Dose Alarm mode and its indicator have been enabled. See “Selecting the Dose Alarm Indicator” on page The Dose Alarms There are two Dose Alarm thresholds: Low Dose, for a minor hazard, and High Dose, for a severe hazard. -
Page 38: Low Threshold
Low Threshold There are several indicators for the Low Rate Alarm Threshold (Figure 9). • Visual Enabled – The indica- ALARM tor and the right LED will flash slowly. • Audio Enabled – The audio will beep slowly. • Optional Vibrator Enabled – The unit will vibrate. -
Page 39: Changing The Dose Alarm Indicators
• The unit will automatically return to the Rate Mode display about 10 seconds af- ter the last keypress. Changing the Dose Alarm Indicators • Press the ALARM and DOSE keys. • You’ll see an H, for High Level Alarm, displayed. - Page 40 • To access the Low Level Alarm set- tings, press the DOSE key again; the display will show an L. • Press the CLR/TEST key; the flashing display will show the selected alarm level (Hor L) settings. • If the optional Vibrator Alarm has been activated, the display will alternate be- tween the threshold value and a verti- cally scrolling horizontal bar (–...
-
Page 41: The Source Finder Mode
• Press the CLR/TEST key to lock in the digit’s value. The next digit will begin to flash. • Repeat the above two steps to select and lock in each of the two remaining digits. • When the last digit has been set, the en- tire threshold value and unit will flash. -
Page 42: Enabling The Source Finder Mode
Enabling the Source Finder Mode • Press and hold the RATE key until the display changes to a flashing • Release the RATE key. Exiting the Source Finder Mode • Press and hold the RATE key until the display changes to a flashing •... -
Page 43: When The Unit Wakes Up
• – – – When you see , release both keys. You’ll see the SLEEP indicator at the top of the screen (Figure 10). Figure 10 The Unit is Asleep When the Unit Wakes Up • It compares the current Rate with the Rate Alarm thresholds. -
Page 44: Exiting The Sleep Mode
Note: The unit does not accumulate Rate or Dose data while asleep. Exiting the Sleep Mode To exit the Sleep Mode: • Press and hold the ON/OFF key until 0–4 the unit starts cycling through the startup sequence. • The unit will then enter the Rate Mode. The Data Logging Mode The Data Log lets you record up to 300 indi- vidual dose/rate data pairs, each with an index... -
Page 45: Viewing The Data Log
• Release both buttons. The unit will save the data pair and its index, then return to the Rate Mode. This process takes about 10 seconds. • To record another reading, point the unit at the location to be recorded and repeat the process. -
Page 46: Clearing The Data Log
• Scrolling will wrap around the memory, from first index entry to last, or last to first. To return to normal operation, the unit must be turned off and then on again (normal turn on sequence). When the 300 sequence number has been re- corded, the unit will cycle back to the first se- quence number and any new data records will overwrite the previously recorded data in that... -
Page 47: Maintenance Procedures
Cleaning the Unit Remove dust, moisture and loose dirt from the outside surfaces of the UltraRadiac™ with a clean soft cloth. If necessary, the unit may be cleaned with a mild solution of ordinary deter- gent and water, rinsed, and thoroughly dried. -
Page 48: Installing Or Replacing The Batteries
Installing or Replacing the Batteries • To open the battery compartment door, turn its fastener a quarter-turn counter- clockwise, swing the door open and slide out all four batteries. • Install fresh batteries in the order shown in Figure 11. CAUTION Be sure to observe the polarity next to each of the four battery... - Page 49 Figure 11 Location of the Batteries • With the batteries correctly installed, close and latch the door. See “Latching the Compartment Door” on page 46.
-
Page 50: The Battery Compartment
Figure 12 The Battery Polarity Indicators The Battery Compartment To open the battery compartment door, turn its latch a quarter-turn counterclockwise and swing the door open. • Inspect the four battery contacts on the inside of the door (Figure 13). If any corrosion is seen, clean it off with a pencil eraser. - Page 51 Figure 13 The Inside of the Battery Door • For repair, contact your local Canberra Service Center. • When the inspection is complete, close and latch the door. See the following section “Latching the Compartment...
-
Page 52: Latching The Compartment Door
Latching the Compartment Door Swing the battery cover closed, press it firmly against the unit and turn the fastener a quar- ter-turn clockwise. Note: It may be necessary to turn the fas- tener slightly to line it up with the latch post before latch will engage. -
Page 53: Specifications
A. Specifications Features DOSE RATE – MRADxy1: 1 µSv/h to 5 Sv/h; MRADxy3: 1.0 µR/h to 500 R/h. DOSE – MRADxy1: 0.001 µSv to 999 Sv; MRADxy3: 0.1 µR to 999 R. PRESETTABLE AUDIBLE AND VISUAL ALARMS – User-defined and -set dose and dose rate alarms. -
Page 54: Detector
CASE – Die-cast aluminum; available in black or yellow. EMI SUSCEPTIBILITY – Will not be af- fected, or cause other equipment to be af- fected, by its use. OPERABLE AND READABLE – By persons wearing protective clothing. Detector DETECTOR – Energy compensated GM tube. -
Page 55: Alarms
UNITS – MRADxy1 provides data in units of µSv, mSv, Sv, µSv/h, mSv/h and Sv/h; MRADxy3 provides data in units of µR, mR, R, µR/h, mR/h and R/h. Alarms SELECTABLE ALARMS – Has selectable Visual and Audible indicators for day or night use;... -
Page 56: Environmental
LOW BATTERY INDICATION – Triggered when the remaining battery life is approxi- mately 10 hours; allows display of remaining time in minutes. Environmental OPERATING TEMPERATURE: –22 °F to 141 °F (–30 °C to +61 °C). STORAGE/TRANSPORT TEMPERATURE: –40 °F to 158 °F (–40 °C to +70 °C). HUMIDITY –... -
Page 57: Qualification Testing
VOLUME – 12.2 in. (199 cm Qualification Testing The UltraRadiac™ is a commercial version of Canberra’s Models AN/UDR-13 and AN/UDR-14 Radiac Set which were designed and qualified to meet the requirements of MIL-STD-810E. Details available upon re- quest. Ordering Information Model MRADxyz UltraRadiac Personal Radi- ation Monitor. -
Page 58: Default Alarm Settings
B. Default Alarm Settings The Dose and Rate alarm settings (thresholds) for the UltraRadiac™ are factory set to the values in the following tables. High Setting Setting Rate 500 µR/hr 2 R/hr Dose 100 mR 10 R High Setting Setting... - Page 59 CAUTION The System Administrator is responsible for determining and setting the proper operational alarm thresholds for each UltraRadiac.
-
Page 60: Display Units
. Any unit can have larger and smaller subunits, which are indicated by prefixes. As the Rate and Dose change, the UltraRadiac™ will au- tomatically adjust its displayed units. For example: The Rate may start with µR/h (natural background radiation is less than 20 µR/h). -
Page 61: Glossary
The average rate (in time) of radiation; e.g., Roentgen per hour. Also called Rate. Rate The amount of radiation measured by the UltraRadiac™ every 2 seconds, then extrapo- lated to and displayed as units per hour. Roentgen (R) Unit of measure of radiation exposure; moni- tors the amount of radiation received. - Page 62 Stay Time is calculated by dividing (the High Dose Alarm Setpoint minus the already accu- mulated Dose) by the current Dose Rate, then converting the result to minutes. If the display reads 999, the maximum, your Stay Time is at least 16.5 hours. WARNING If the Dose Rate goes up, your remaining Stay Time will go...
-
Page 63: Disposing Of This Equipment
Therefore, following the provisions of COUNCIL DIRECTIVE 2002/96/EC on waste electrical and electronic equipment (WEEE), we ask that you contact your nearest CANBERRA office for instructions on the proper disposal of this equipment. - Page 64 Notes...
- Page 65 Canberra (we, us, our) warrants to the customer (you, your) that for a period of ninety (90) days from the date of shipment, software provided by us in connection with equipment manufactured by us shall operate in accordance with applicable specifications when used with equipment manufactured by us and that the media on which the software is provided shall be free from defects.
- Page 66 EXCLUSIONS Our warranty does not cover damage to equipment which has been altered or modified without our written permission or damage which has been caused by abuse, misuse, accident, neglect or unusual physical or electrical stress, as determined by our Service Personnel. We are under no obligation to provide warranty service if adjustment or repair is required because of damage caused by other than ordinary use or if the equipment is serviced or...
Need help?
Do you have a question about the UltraRadiac and is the answer not in the manual?
Questions and answers