Table of Contents
Advertisement
Quick Links
V1.0
RUNGU Electric Juggernaut LE User Manual
®
rungu
electric juggernaut
le owners manual
1
Congratulations on purchasing the Electric Juggernaut LE
! Before you ride and make new tracks, please
read the following instructions carefully. The team at Standard Bearer Machines, LLC has partnered with
Hi-Power Cycles, LLC to provide you with an off-road electric Rungu with more than 4,000 Watts of
power. There are references throughout this document to Hi-Power Cycles. In case of trouble, contact
Rungu Support first.
WARNING: The Electric Juggernaut LE is designated for OFF-ROAD use only
(Mandated by federal law due to the 750W/20 MPH limit in the US. Please check with your government
to ensure you follow all local laws and ordinances). Standard Bearer Machines and Hi-Power Cycles are
not liable for those who choose not to follow their local laws.
Standard Bearer Machines and Hi-Power Cycles will not be held responsible for people who choose to
disregard the law!
IMPORTANT- Standard Bearer Machines and Hi-Power Cycles will not be liable for any damage or injury
that may occur due to operation of our kits or bicycles. By using the Electric Juggernaut LE, you are
agreeing to Standard Bearer Machines Terms and Conditions and the warnings and conditions of the
Generic Bike Manual which are included with other files in the USB key accompanying the Electric
Juggernaut LE.
1
As the owner, you agree and are bound by all sales and transfer conditions as defined in "SBM Rungu Sales Terms
and Conditions US 2017a" or "SBM Rungu Sales Terms and Conditions US 2017 – Demo Model." Copies of these
documents are available on the USB drive that ships with the product or upon request by e-mailing
sales@riderungu.com.
Copyright 2018 Standard Bearer Machines, LLC
1
Advertisement
Table of Contents

Subscribe to Our Youtube Channel
Related Manuals for Rungu Juggernaut LE


Summary of Contents for Rungu Juggernaut LE
- Page 1 Juggernaut LE. As the owner, you agree and are bound by all sales and transfer conditions as defined in “SBM Rungu Sales Terms and Conditions US 2017a” or “SBM Rungu Sales Terms and Conditions US 2017 – Demo Model.” Copies of these documents are available on the USB drive that ships with the product or upon request by e-mailing sales@riderungu.com.
-
Page 2: Table Of Contents
Rungu Maintenance ..........................37 Getting the Stated Range out of Your System ..................38 Using your E-Bike Computer ........................39 Electric Juggernaut Computer System Settings ..................39 Recommended settings for Electric Juggernaut LE (4000w system) ............39 Copyright 2018 Standard Bearer Machines, LLC... -
Page 3: Parts Identification
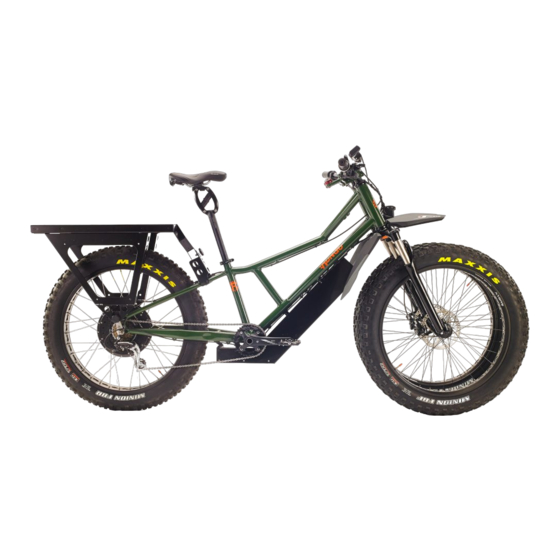
RUNGU Electric Juggernaut LE User Manual Troubleshooting ............................40 Getting more information ........................... 41 Parts identification The following images show the names of various components on the Electric Juggernaut LE Figure 1 Side View Copyright 2018 Standard Bearer Machines, LLC... - Page 4 V1.0 RUNGU Electric Juggernaut LE User Manual Copyright 2018 Standard Bearer Machines, LLC...
- Page 5 V1.0 RUNGU Electric Juggernaut LE User Manual Figure 4 Battery Access View Copyright 2018 Standard Bearer Machines, LLC...
-
Page 6: Unpacking And Assembly Instructions
V1.0 RUNGU Electric Juggernaut LE User Manual Unpacking and Assembly Instructions Warning: Failure to follow instructions may lead to incomplete or faulty assembly that can result in accidental rider injury or death. Before you ride and make new tracks, please follow the assembly instructions carefully. The team at Standard Bearer Machines recommends that you have the assembly performed by a qualified bike mechanic. -
Page 7: Unpacking And Assembly Instructions
1. The Rungu comes in a cardboard carton. After you have removed the binding straps and tape from the top cover, remove the top cover on the front of the Rungu. If you intend to ship or return the Rungu, please keep all packing materials. - Page 8 V1.0 RUNGU Electric Juggernaut LE User Manual 4. Disconnect the front wheels from the frame packaging and remove the protective packaging from the forks. 5. Open the accessory box to remove the two quick release skewers from the packaging. 6. Select which wheel will be the right-side wheel and the left-side wheel. Unscrew the retention nut from one of the quick-release skewers and insert the skewer into the left wheel from the side of the brake disc as shown below.
- Page 9 V1.0 RUNGU Electric Juggernaut LE User Manual 9. Mount the wheel to the left fork as shown in the two pictures below. For the Juggernaut, insert the wheel into the fork at an angle to clear the tire width as pictured.
- Page 10 V1.0 RUNGU Electric Juggernaut LE User Manual 11. Place the Rungu aside while performing the next two assembly steps. 12. Unscrew the retention nut from one of the quick-release skewers and insert the skewer into the right wheel from the side opposite to the brake disc, as shown below.
- Page 11 V1.0 RUNGU Electric Juggernaut LE User Manual 16. On a level surface, stand the Rungu upright and remove the packaging from the front steering assembly, then remove the handlebars from the frame and packaging. 17. Use the 5mm hex wrench to loosen the handlebar retention screws as shown below 18.
- Page 12 V1.0 RUNGU Electric Juggernaut LE User Manual Caution: 45mm is the minimum distance that prevents the tire on the outside of a turn from touching the fork on the inside of the turn. Tires rubbing on fork stanchions can result in damage to the forks and danger to you the rider.
- Page 13 V1.0 RUNGU Electric Juggernaut LE User Manual 23. Install the left pedal first – the left pedal is marked with an “L” as shown below. 24. The left pedal is threaded backwards, so thread the shaft into the crank arm in a counterclockwise motion as depicted below.
- Page 14 V1.0 RUNGU Electric Juggernaut LE User Manual 25. Use a 6mm Hex wrench to tighten the pedal. 26. Install the right pedal and finger tighten the pedal clockwise – the right pedal is marked with an “R” as shown below.
-
Page 15: Additional Assembly Instructions
V1.0 RUNGU Electric Juggernaut LE User Manual Additional assembly instructions Cycle Analyst Computer Installation Install the Cycle Analyst on the left stem. Carefully unpack the Cycle Analyst from wrapping and follow the instructions to mount it to the left stem. Tool required – 5mm Hex wrench. - Page 16 V1.0 RUNGU Electric Juggernaut LE User Manual 4. Place the mounting ring of the Cycle analyst onto the top of the stem spacer. 5. Replace the stem retainer on top of the mounting ring. Fasten the retainer with retention bolt.
- Page 17 2. Enable the Parking Brake on the Rungu to stop it from moving while you complete the next steps. Replace the battery case into the controller case at an angle with the connector end facing towards the top.
- Page 18 V1.0 RUNGU Electric Juggernaut LE User Manual 4. When the battery case tab is at the bottom of the case and the battery case cannot slide any further, pivot the battery case into the controller case as far as it will go.
-
Page 19: Cautions And Safety
WARNING: Being a tricycle, the Electric Juggernaut has a tie-rod that connects the two front forks. DO NOT USE the tie-rod to lift the Rungu. The steering uses the tie rod as a hard stop so the forks don’t rub against the front wheels. Grasping the tie rod when lifting WILL RESULT IN A PINCH TO THE HAND AND FINGERS THAT MAY LEAD TO HAND OR FINGER INJURY. -
Page 20: Battery Safety (Brief Overview)
RUNGU Electric Juggernaut LE User Manual Battery Safety (Brief Overview) NOTE: If you ever suspect a battery problem, please contact Rungu Support immediately by email or phone so we can go through the appropriate steps/procedures to make sure everything is okay with the battery system. -
Page 21: Battery Safety Precautions
BMS which you will need to contact Rungu directly to take care of. If you notice that your battery system has a puffed, damaged, or leaking cell, contact Rungu Support immediately and we will walk you through the appropriate steps to take in this instance. -
Page 22: Battery Safety (In Depth)
V1.0 RUNGU Electric Juggernaut LE User Manual Battery Safety (In Depth) Main reasons a battery pack can fail: • Short-circuit • Over Charging • Forced over-discharge • Excessive heat or incineration • Crush, puncture, or disassembly While Hi Power Cycles have designed their cells and batteries to be tolerant of adverse conditions, these very active chemical systems have limitations. -
Page 23: Response Procedure
V1.0 RUNGU Electric Juggernaut LE User Manual Response Procedure • Monitor the temperature from a safe distance using a non-contact thermometer or thermal imager • If temperature monitoring equipment is not available, keep the area evacuated and secure and do not handle the cell/battery for at least 24-hours •... -
Page 24: How To Use Your New Rungu Rungu
Electric Juggernaut LE b. Leave the removable battery case locked in the controller case and charge the battery while it is in place on the Electric Juggernaut LE. 2. Charging the battery away from the LE. - Page 25 V1.0 RUNGU Electric Juggernaut LE User Manual iii. Use two hands to carefully remove the battery case by sliding it up and forward from the battery and controller case. Caution: the battery case weighs more than 15 lbs. (6.8 kg) – be careful not to drop the case as it may bend the casing making battery replacement difficult or impossible without repair.
- Page 26 O.K. Call Rungu immediately if a battery begins to “puff.” Do not attempt to use a battery after it has swelled and expanded or “puffed”.
- Page 27 V1.0 RUNGU Electric Juggernaut LE User Manual Replace the battery case into the controller case i. Replace the battery case into the controller case at an angle with the connector end facing towards the top. ii. Slide the battery case so that the tab at the back of the case slides into the controller case.
- Page 28 V1.0 RUNGU Electric Juggernaut LE User Manual iii. When the battery case cannot slide any further, pivot the battery case into the controller case as far as it will go. iv. Use the key to lock the battery case in position.
- Page 29 V1.0 RUNGU Electric Juggernaut LE User Manual 3. Charging your battery while mounted on the LE a. Plug in the charger plug into the circular connector on the front of the Battery Case. The connector is keyed, so there is only one way that the plug will fit.
- Page 30 O.K. Call Rungu immediately if a battery begins to “puff.” Do not attempt to use a battery after it has swelled and expanded or “puffed”.
-
Page 31: Before Riding Your Electric Juggernaut
1. As explained in the unpacking and assembly instruction, Standard Bearer Machines recommends the Juggernaut to be assembled professionally once you receive it Note: We tune every Rungu prior to shipping. During shipping, shifters, brakes and other mechanical parts may move out of alignment. - Page 32 7. Once you have taken it for a spin, you should now have what is called “EV grin!” -- pass it on!!! 8. ENJOY your Rungu! A lot of time and hard work is spent getting your Electric Juggernaut LE just right.
-
Page 33: Riding The Electric Juggernaut
WARNING: Standard Bearer Machines and Hi Power Cycles will not be responsible for burnt motors due to willful neglect. 9. Ride the Rungu at a level and speed you are comfortable with. Do not push the boundaries of your skill level or the Rungu! 10. -
Page 34: Using The Optional Front Suspension
The switch holds the brake lever in place, which holds the rotor in place and prevents the Rungu from moving when parked. The parking brake is very useful when parking on angle. REMEMBER to switch off the parking brake before riding. -
Page 35: Low Temperature Operation Limitations
60% when operating at -4 degrees Farenheit (-20 degrees Celsius). Battery capacity relates directly to the range of your Rungu. If you achieve 20 miles per charge during a warm spring day, you should expect to achieve 60% (12 miles) when the temperature drops to -4 degrees Farenheit. -
Page 36: Battery Care
After riding your Rungu, store the Rungu in an UNCHARGED STATE (40-60% of full charge capacity) to prolong the life of the battery. Avoid fully recharging the battery unless you expect to ride your Rungu soon after (within the next 48 hours). -
Page 37: Rungu Maintenance
V1.0 RUNGU Electric Juggernaut LE User Manual Rungu Maintenance 1. ALWAYS check rear axle nuts BEFORE AND AFTER riding to make sure nothing is loose. Riding at high speeds induces vibrations which may loosen components on the bike. This includes wheels, the battery case, brake system, etc. -
Page 38: Getting The Stated Range Out Of Your System
Getting the Stated Range Out of Your System Rungu estimates a maximum range at 30 watt hours per mile for an electric system. This is in the BEST CASE SCENARIO in the real world, with little to no pedaling. When giving our range estimates, Standard Bearer Machines references a 170lb rider, totally flat ground, smooth surface, no wind and cruising in the most efficient range of the system at around 15 miles per hour. -
Page 39: Using Your E-Bike Computer
Electric Juggernaut Computer System Settings CAUTION: The Electric Juggernaut LE is set up for off-road use. It is up to the end user to alter these settings for legal use on the road. Standard Bearer Machines, LLC will not be held responsible for those who elect to ride on public roads and break local or federal laws! - Using your Ebike computer, you do NOT need to set maximum current if you do not need it. - Page 40 Rungu to a qualified bike mechanic for repair. Problem: I drove my Rungu until it went completely dead and now it will not charge. This is a problem that occurs when you fully deplete the battery. The BMS on the battery protects the battery from discharging any further and shuts itself off.
- Page 41 Rungu Support a call at +1 949.877.9755 and we can get help get you going. You can also reach Rungu at support@riderungu.com.
Need help?
Do you have a question about the Juggernaut LE and is the answer not in the manual?
Questions and answers