Table of Contents
Advertisement
Quick Links
Advertisement
Table of Contents

Related Manuals for LV switch SIP-T780


Summary of Contents for LV switch SIP-T780
- Page 2 Copyright Copyright © Shanglu Network Technology Co., Ltd. 2019. All rights reserved. No unit or individual may extract or copy the contents of this document without the written statement of the company, and may not transmit it in any form. In accordance with the law, reproduction includes translation into other languages or conversion to other formats.
- Page 3 should be aware of the implications of this mark in order to avoid possible environmental and human health effects. For WEEE products, they cannot be disposed of together with other household wastes, and should be collected separately and disposed separately. Client feedback We are working hard to improve the quality of our documentation and we are happy to hear from you.
-
Page 4: Table Of Contents
Catalog ................... 错误!未定义书签。 About this manual ..................6 1.Overview ....................... 6 1.1 Hardware Introduction ..............................6 1.2 Label Introduction ................................ 7 1.3 Indicator introduction ..............................8 1.4 User Interface ................................8 2. An introduction to ..................9 2.1 Packing list ..................................9 2.2 Installation ................................... - Page 5 4.2 Answer the call ................................28 4.3 End call ..................................29 4.4Redial.................................... 29 4.5 Mute..................................... 29 4.6 Do not disturb ................................30 4.7 Call hold/resume ................................31 4.8 Call waiting ................................. 31 4.9 Auto Answer ................................32 4.10 Call forwarding ................................32 4.11 Blind transfer ................................
-
Page 6: About This Manual
This guide is designed to help you quickly use the SIP-T780 IP handset. Before using, please read the packing list and security instructions in this guide, and confirm with the system administrator whether the current network environment meets the requirements of phone configuration. -
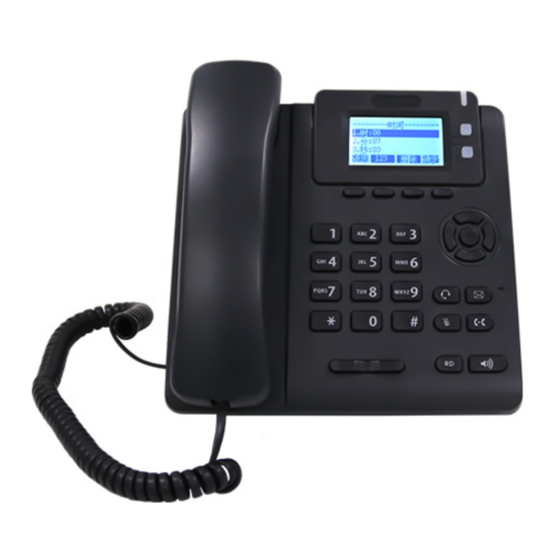
Page 7: Label Introduction
1.2 Label Introduction Function status Icon The icon displayed on the phone's LCD status bar is as follows: Icon Instruction Speaker phone mode Handset mode Icon Instruction Headset mode Do not disturb Mute Unanswered call Account key icon Account key icon (account registration) -
Page 8: Indicator Introduction
Icon Instruction Private line registered successfully Registering Registration failed Other Icon ICONS displayed on the LCD screen (history) Icon Instruction Received call Dialed call Unanswered call 1.3 Indicator introduction Power Indicator Indicator Status Instruction Yellow flash The phone is in a ringing state. The phone is out of power. -
Page 9: An Introduction To
The table above lists only some of the main features of the phone, you can refer to the relevant sections for more information 2. An introduction to This chapter introduces the basic operation of the SIP-T780 IP phone, including the following contents: ... - Page 10 Stand Handset Handset cord Ethernet cable Power adaptor(5.5mm DC plug)...
-
Page 11: Installation
Quick Use Guide Please check the packing list before installing the phone. If missing any accessories, please contact your system administrator. 2.2 Installation If the phone has been installed successfully, initiate the phone according to page 13. The chapter introduces how to install the phone: (1)Attach the stand (2)Connect handle and handset(optional) (3)Connect network and power... -
Page 12: Phone Initialization
(3)Connect network and power AC power(Optional) 1.Connect one end of the power adapter to the DC5V interface of the phone and the other end to the power socket. Indication We require the use of the original power supply of Shanglu (5V/600mA), and the use of a third party power supply may lead to phone damage 2.3 Phone initialization After the phone is powered on, the following steps will be performed:... - Page 13 account details, select <more options> and press the “enter” soft key View the phone status through the web interface: Open the website browser on the PC Enter the IP adress in the bar of browser (IPV4 Address:http://192.168.17.22 press the OK button can check the IPv4 of the machine) then press enter Enter the user name and password on the loading page (Default user name and password are admin/admin)
-
Page 14: Basic Network Setting
Indication If the IP mode is set to IPv4, you can enter the IP address to check the status of the phone. For more information, please consult your system administrator. 2.5 Basic network setting If the DHCP server cannot be reached by the phone, you need to set it manually. The phone supports IPv4 address mode,set the IP mode through the phone interface: Press Menu-Settings- Advanced settings(Press enter and no need to enter password)- Network-WAN... -
Page 15: Register
Normally, the system administrator will pre-configure the parameters and centralize the deployment of all the phones. In this case, the phone is registered. The SIP-T780 IP phone supports the registration of two accounts. If the phone does not have an account, you need to register manually. - Page 16 Input method Button 2abcABC 3defDEF 4ghiGHI 5jklJKL 6mnoMN 7pqrsPQR 8tuvTUV 9wxyzWX...
-
Page 17: Customize The Phone
3.1.2 Time and date The standby screen for the SIP-T780 IP phone displays the current time and date. You can set the time and date automatically from the SNTP server, or you can set the time and date manually. If the phone cannot get the time and date from the SNTP server, consult your system administrator. -
Page 18: Call Out Button
2. Set the time and date in the corresponding areas. 3. Press save soft key to save the operation 4. The standby interface will show the manual set time and date. 3.1.3 Call out button You can set ”#” button or “*” button as call out button Set the call out button through the phone interface: 1. -
Page 19: Ring
3.2.2 Ring Ring tones are used to alert incoming calls. You can set different tones for the SIP-T780 IP phone to distinguish incoming calls from nearby phones. You can also set different ring tones for different accounts or contacts on your phone. -
Page 20: Add A Group
can store up to 50 contacts (including blacklists). You can add groups and add contacts for different groups. You can also add, edit, delete, search, or call contacts from local contacts. 3.3.1 Add a group Add a group through the phone 1. -
Page 21: Delete A Group
.Select the corresponding group and press <option> soft key. 3.Select <detail> option. 4.Press to edit the group information. 5..Press <save> soft key to save the operation or <back> soft key to cancel the operation. 3.3.3 Delete a group Delete a group through the telephone: 1. -
Page 22: Add A Contact
5. If want to delete all the groups,select <delete all> options. 3.3.4 Add a contact You can add contacts by: Manual add Add from the phone call records Manually add the contacts Manually add contacts from local contacts through the phone interface 1. -
Page 23: Delete A Contact
3.3.6 Delete a contact Delete contacts in the local phone book through the phone interface: 1.Press <dir>softy key If only the local contact list be enabled ,the phone goes directly to the list If you disable the local contacts list among contacts (see contacts on page 36), press menu -> DIR -> local directory to enter the list. -
Page 24: History Management
P ress SEND button 3.4 History management The history of the SIP-T780 IP phone contains a list of dialed Numbers, incoming calls, missed calls, and transferred calls. All lists can store up to 50 records. You can view the call history, the contacts in the history, or delete the call history record. -
Page 25: Add To Contact
4.Press send button 3.4.3 Add to contact Add contact from the call records list via the telephone interface: 1.Press<Cdrs> button .Press to select the call record. 3.Press option soft key and select <add to contacts> 4.Enter the contactor’s name,lanline number,mobile phone number and the group. 5.Press the <save>... -
Page 26: System Customization
Press again,the LCD label will change again. 3.6 Account Management You can register one or two accounts on the SIP-T780 IP phone Register an account Register your account through the phone interface: 1.Press menu-setting-advanced settings(no need password directly press enter default password:admin)- Account 2.Select the account you want to set and press the enter soft key. -
Page 27: Make A Call
4.Basic Functions The SIP-T780 IP phone is as simple and convenient to use as a traditional phone. You can use basic functions such as making a call, answering a call, transferring a call, or holding a conference call etc basic functions. -
Page 28: Answer The Call
Use one of the following methods: Connect the headset and activate the headset mode. Press the account button to enter the dialing interface. Enter the number. Press or the send soft key. Connect the headset and activate the headset mode. Enter the number. -
Page 29: End Call
Press the Answer soft key. Answer the new call and the current call is on hold. Press to view the new calls Press or the Answer soft key. Answer the new call and the current call is on hold. 4.3 End call Use any of the following methods If you are using the handle to answer an incoming call, press the Endcall softkey or put back the handle. -
Page 30: Do Not Disturb
Cancel call mute: 1. Press again to un-mute. 4.6 Do not disturb You can activate DND mode to have the phone automatically reject incoming calls and send a busy tone. The LCD screen of the phone will prompt “n new missed call” (n indicates the number of unread calls) message, and the called user will receive a busy message. -
Page 31: Call Hold/Resume
4.7 Call hold/resume You can place a call on hold. In any case, the phone can only have one line active. When the phone receives a new call, the current call is placed in the hold state. The held party may hear music from the server while waiting. -
Page 32: Auto Answer
4.9 Auto Answer You can enable automatic answering for the phone, when the number received a call, the phone will automatically answer the call 1.Press menu-Features-Auto Answer 2.Press to select the account that needs to enable 3.Press change soft key to enable or disable the auto answer function. 4.10 Call forwarding You can set up call forwarding on your phone to transfer incoming calls to the specified number. -
Page 33: Blind Transfer
2.Enter the number you want to transfer to in the Target Number field. b) If you choose to have a busy transfer: 1) The change soft key selects Enable in the Busy Transfer area. 2) Enter the number to transfer to in the Target Number field. c) If you choose no answer transfer: 1) Press the Switch soft key to select Enable in the No Answer Transfer area. -
Page 34: Tripartite Conference
3.Press the <Transfer> soft key to complete the transfer 4.12 Tripartite conference You can use the conference function to hold a three-way conference call and add two separate calls to the meeting by pressing the conference soft key. Create local meeting: 1. -
Page 35: Programmable Key Management
After exiting the voice message prompt window, the unread voice message prompt window will pop up again until there is a new voice message Indication You can also configure your phone not to display the voice mail prompt window. For more information, please consult your system administrator. -
Page 36: Advanced Features
Advanced Features This chapter describes the advanced features of the SIP-T780 IP phone, including the following: Register an account on the phone through the web interface: 1.Register account number 1. 2.Click Confirm to save Register the account 2 on the web interface: 1. - Page 37 1.Enter the URL: http://www.zmcu.com/peizhi/tp5/index.php/admin/index/loginout.html 2. Enter the group number / account / password: 9999 / admin / 123123 The super administrator can view all phone configuration items. Other administrators can view the phone configuration items of themselves and their sub-managers. 3.Support for adding phone configurations in batches.
- Page 38 4.After the addition is complete, you can assign the phone configuration item to a user or a region in batches. 5.Note: After performing the above operations, refresh the page to get the latest data. Generate XML. The super administrator generates an XML file for all phone configuration items.
- Page 39 Non-super administrators can only generate XML files for phone configuration items belonging to themselves and their sub-admins.
-
Page 40: Safety Instructions
6.Safety instructions Service agreement For information on the service agreement of the product, please consult the authorized agent of Shanglu. Limitation of Liability To the fullest extent permitted by law, whether in accordance with the contract or the tort (including negligence infringement) law, the company and its suppliers have problems with the performance, failure of sales, installation, maintenance, use of commercial products or due to commercial products. -
Page 41: Appendix
Do not step on, pull or over-bend the cable to cause equipment failure. Stop using the device during thunderstorms, turn off the power, and unplug all the cables connected to the device, such as the power cord and telephone line. ...
Need help?
Do you have a question about the SIP-T780 and is the answer not in the manual?
Questions and answers