Unitech RH767 User Manual
Rfid handheld reader
Hide thumbs
Also See for RH767:
- Quick reference manual (50 pages) ,
- User manual (40 pages) ,
- Specifications (4 pages)
Table of Contents
Advertisement
Quick Links
Advertisement
Table of Contents

Related Manuals for Unitech RH767


Summary of Contents for Unitech RH767
- Page 1 RH767 RFID Handheld Reader User’s Manual 400558G Rev. G...
-
Page 2: Preface
Preface About This Manual This manual explains how to install, operate and maintain the RH767. No part of this publication may be reproduced or used in any form, or by any electrical or mechanical means, without permission in writing from the manufacturer. This includes but is not limited to photocopying, recording, or information storage and retrieval systems. -
Page 3: Fcc Radiation Exposure Statement
Use only the AC Adapter supplied. Using the wrong AC Adapter may damage the RH767 and will void the warranty. -
Page 4: Battery Notices
The Backup Battery will receive power from an external power source, or through the main battery (But, only if the main battery has adequate power). In order to prevent data loss due to Backup Battery failure, connect the RH767 to the main Battery Pack or an external power source. -
Page 5: Table Of Contents
Charging the Battery with the Docking Station ........... 8 Checking the Battery Status ................9 Connecting the RH767 to a PC ................9 Turning the RH767 on for the First Time ..............10 Powering On ....................10 Using the Stylus ....................11 Calibrating the RH767 Screen ................. - Page 6 Chapter 2 ................14 Using Function keys ....................14 Using the Hardware ................14 Toggle to Alpha Mode and CAPS ................15 Using the Windows CE Keyboard ................16 Entering Characters ..................16 Moving the Keyboard ..................16 Adjusting Settings ......................17 Checking the Main and Backup Battery Status ............18 Using the Laser Scanner .....................19 Scanner Settings ......................20 Scan2Key ........................21...
-
Page 7: Chapter 1
UHF RFID and bar code reader. It can read both EPC Gen 1 and Gen 2 RFID tags and the device is embedded with RFID middleware and Windows CE 5.0. The RH767 has a battery life of up to 12 hours. Connectivity options include WLAN 802.11b/g and Bluetooth. -
Page 8: Package Contents
CD-ROM Cable Quick Reference Guide Cradle (Optional) Please contact a regional Unitech service representative if anything is missing or appears damaged. Copyright 2009 Unitech Electronics Co., Ltd. All rights reserved. Unitech is a registered trademark of Unitech Electronics Co., Ltd. -
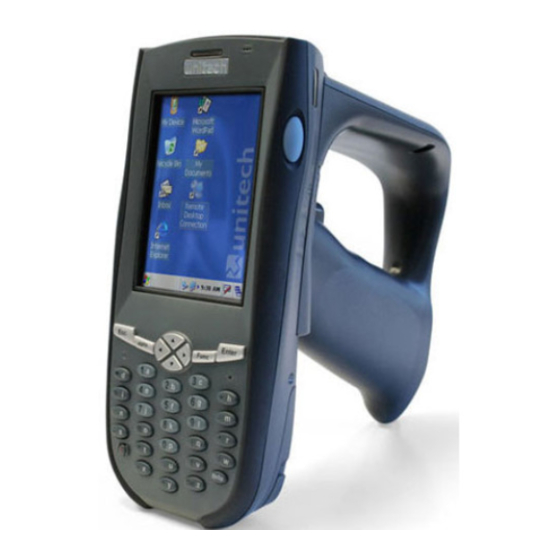
Page 9: A Tour Of The Rh767
Keypad interface for controlling the RH767. See Using the Hardware on page 14 for more information. Power Button. Press this button to start the RH767. Alternatively, this key must be pressed down for at least two seconds to turn off the RH767. -
Page 10: Back View
Houses the removable and rechargeable 7.4V Lithium- Ion 4050mAh Battery Pack. Strap Hook. Secures the strap to the RH767. RFID Antenna. Receives data from an RFID tag. Copyright 2009 Unitech Electronics Co., Ltd. All rights reserved. Unitech is a registered trademark of Unitech Electronics Co., Ltd. -
Page 11: Bottom View
PCMCIA Card, but only with the HF model.) Setting up the RH767 Install and charge the battery, check the battery status, connect the RH767 to a PC, turn on the RH767 for the first time, install an optional Wireless Local Area Network PCMCIA card... - Page 12 2. Locate the Backup Battery Switch and turn it to the ON position. Backup Battery Switch 3. Align the Battery Contacts with the Battery Compartment Contacts as shown below: Battery Contacts Copyright 2009 Unitech Electronics Co., Ltd. All rights reserved. Unitech is a registered trademark of Unitech Electronics Co., Ltd.
- Page 13 Chapter 1 Getting Started 4. Place the Battery Pack into the Battery Compartment and press the battery securely into place. 5. Replace the Battery Compartment cover, push down the tabs and slide them back into the lock position as shown below:...
-
Page 14: Charging The Battery
1. Plug the AC Adapter cable into the Docking Station's power jack, then connect the AC Adapter into an electrical outlet. Copyright 2009 Unitech Electronics Co., Ltd. All rights reserved. Unitech is a registered trademark of Unitech Electronics Co., Ltd. -
Page 15: Checking The Battery Status
Chapter 1 Getting Started 2. Slide the RH767 into the Docking Station until it clicks into place. 3. The connection is secure when the bottom edge of the device aligns with the docking station. (The Docking Station's LED indicator lights up green, while the RH767's LED indicator lights up red.) -
Page 16: Turning The Rh767 On For The First Time
1. Turn on the device by pressing the Power Button on the RH767's front panel. 2. The Unitech RH767 welcome screen appears followed by the calibration screen. Power Button Copyright 2009 Unitech Electronics Co., Ltd. All rights reserved. Unitech is a registered trademark of Unitech Electronics Co., Ltd. -
Page 17: Using The Stylus
Getting Started Using the Stylus CAUTION! Never use anything other than the RH767 Stylus on the screen. 1. Remove the Stylus from its holder. 2. Hold the stylus like a pencil. 3. Lightly tap the tip of the Stylus to make a menu choice. - Page 18 Continue to tap the target mark as it stops along the corners of the screen. Press Enter to confirm the calibration or press ESC to cancel. Copyright 2009 Unitech Electronics Co., Ltd. All rights reserved. Unitech is a registered trademark of Unitech Electronics Co., Ltd.
-
Page 19: Setting The Time And Date
Setting the Time and Date In the Date/Time Properties window, use the stylus to select the current date and time, time zone and daylight saving time option. Adjusting the Screen Brightness Adjust the screen brightness by pressing Func to enable the soft key function and press the left arrow (decrease brightness) or right arrow (increase brightness) cursor buttons. - Page 20 Using the Hardware The following table describes the main keypad keys. Main Function Press this button to turn the RH767 on. And hold this button for two seconds to turn the RH767 off. Pressing this button corresponds to tapping cancel or X.
Need help?
Do you have a question about the RH767 and is the answer not in the manual?
Questions and answers