Table of Contents

Related Manuals for Schumacher Proseries PSW-7700


Summary of Contents for Schumacher Proseries PSW-7700
- Page 1 Model : PSW-7700 Outdoor Approved Manual Battery Charger Voltage: 6, 12, 24 Amperage: 15, 30, 35, 70 • OWNER’S MANUAL • READ THE ENTIRE MANUAL BEFORE USING THIS PRODUCT. FAILURE TO DO SO CAN RESULT IN SERIOUS INJURY OR DEATH.
-
Page 2: Table Of Contents
TABLE OF CONTENTS SECTION PAGE IMPORTANT SAFETY INSTRUCTIONS PERSONAL PRECAUTIONS PREPARING TO CHARGE CHARGER LOCATION DC CONNECTION PRECAUTIONS FOLLOW THESE STEPS WHEN BATTERY IS INSTALLED IN VEHICLE FOLLOW THESE STEPS WHEN BATTERY IS OUTSIDE VEHICLE BATTERY CHARGING – AC CONNECTIONS FEATURES ASSEMBLY INSTRUCTIONS CONTROL PANEL... - Page 3 IMPORTANT: READ AND SAVE THIS SAFETY AND INSTRUCTION MANUAL. SAVE THESE INSTRUCTIONS – The PSW-7700 offers a wide range of features to accommodate your needs. This manual will show you how to use your charger safely and effectively. Please read, understand and follow these instructions and precautions carefully, as this manual contains important safety and operating instructions.
-
Page 4: Important Safety Instructions
Keep out of reach of children. Use only recommended attachments. Use of an attachment not recommended or sold by Schumacher® Electric Corporation may result in a risk of fire, electric shock or injury to persons or damage to property. To reduce the risk of damage to the electric plug or cord, pull by the plug rather than the cord when disconnecting the charger. -
Page 5: Preparing To Charge
NEVER smoke or allow a spark or flame in the vicinity of a battery or engine. Be extra cautious to reduce the risk of dropping a metal tool onto the battery. It might spark or short-circuit the battery or other electrical part that may cause an explosion. Use this charger for charging LEAD-ACID batteries only. It is not intended to supply power to a low voltage electrical system other than in a starter-motor application. -
Page 6: Charger Location
CHARGER LOCATION Risk of explosion and contact with battery acid. Locate the charger as far away from the battery as the DC cables permit. Never place the charger directly above the battery being charged; gases from the battery will corrode and damage the charger. Do not set the battery on top of the charger. -
Page 7: Follow These Steps When Battery Is Outside Vehicle
When disconnecting the charger, turn all switches to off, disconnect the AC cord, remove the clip from the vehicle chassis and then remove the clip from the battery terminal. See CALCULATING CHARGE TIME for length of charge information. FOLLOW THESE STEPS WHEN BATTERY IS OUTSIDE VEHICLE A spark near the battery may cause a battery explosion. -
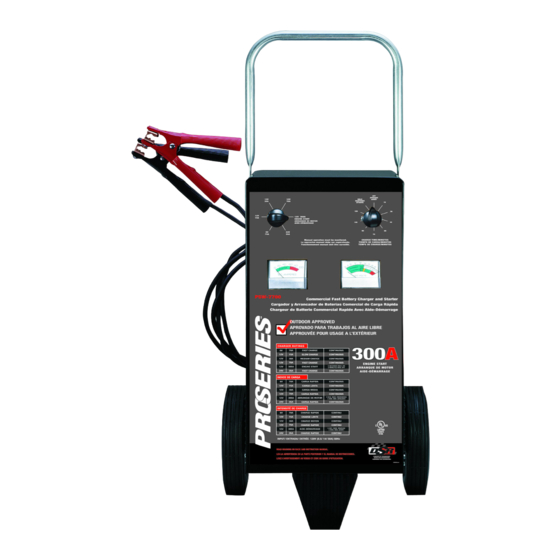
Page 8: Features
Recommended minimum AWG size for extension cord: • 100 feet long or less - use a 10 gauge extension cord. • Over 100 feet long - use an 8 gauge extension cord. FEATURES Ammeter Voltmeter Clips Charge Rate Selector Switch Timer Wheel ASSEMBLY INSTRUCTIONS... -
Page 9: Control Panel
10.2 Attach the Handle : Remove the two top screws from each side of the charger. Align the handle so the screw holes are aligned with the screw holes on each side of the charger. Attach the handle using the same screws you previously removed. -
Page 10: Operating Instructions
Voltmeter The voltmeter indicates the voltage at the battery terminals. The charger need not be plugged into an AC outlet. The timer should be in the OFF position. Then connect the charger following the instructions in Sections 6 and 7. Observe the meter indication. - Page 11 With the charger plugged in and connected to the battery of the vehicle, set the charge rate selector switch to the engine start position. Crank the engine until it starts or 4 seconds pass. If the engine does not start, wait 5 minutes before cranking again. This allows the charger and battery to cool down.
-
Page 12: Calculating Charge Time
CALCULATING CHARGE TIME The Hydrometer or Electronic Method To find the time needed to fully charge your battery, determine the battery’s charge level with a hydrometer or electronic Percent-of-Charge Tester. The following table will help you convert hydrometer readings to percent of charge values. PERCENT OF CHARGE SPECIFIC GRAVITY PERCENT OF CHARGE NEEDED 1.265 100%... -
Page 13: Maintenance Instructions
The Chart Method Use the following table to more accurately determine the time it will take to bring a battery to full charge. First, identify where your battery fits into the chart. NR means that the charger setting is NOT RECOMMENDED. Find your battery’s rating on the chart below, and note the charge time given for each charger setting. -
Page 14: Troubleshooting
TROUBLESHOOTING PROBLEM POSSIBLE CAUSE REASON/SOLUTION No reading on the ammeter. Charger is not plugged in. Plug the charger into an AC outlet. No power at the receptacle. Check for open fuse or circuit breaker supplying AC outlet. Clips are not making a good Check for poor connection connection to the battery. - Page 15 PROBLEM POSSIBLE CAUSE REASON/SOLUTION Short or no start cycle when Drawing more than 300 Crank time varies with the cranking engine. amps (12V). amount of current drawn. If cranking draws more than 300 amps, crank time may be less than 3 seconds. Failure to wait 5 minutes Wait 5 minutes of rest time (300 seconds) between...
Need help?
Do you have a question about the Proseries PSW-7700 and is the answer not in the manual?
Questions and answers