Dynalog C-SCAN 2000 Series Operator's Manual
Hide thumbs
Also See for C-SCAN 2000 Series:
- Operator's manual (41 pages) ,
- System manual (91 pages) ,
- Survey procedure manual (40 pages)
Table of Contents
Advertisement
Quick Links
Advertisement
Table of Contents

Related Manuals for Dynalog C-SCAN 2000 Series


Summary of Contents for Dynalog C-SCAN 2000 Series
- Page 1 Leaders in Pipeline Survey Systems Issue 4.04 - 1207 OPERATOR’S MANUAL...
-
Page 2: Introduction
Leaders in Pipeline Survey Systems Equipment Serial Number: Dynalog Job/Contract Number: OPERATING INSTRUCTIONS Part 1 – OPERATION INTRODUCTION This folder includes full instructions and data for unpacking, setting-up, commissioning, and operating the above referenced C-Scan Model 2010 Survey & Monitoring System for buried pipelines. Part 1 of the Manual –... -
Page 3: Table Of Contents
Leaders in Pipeline Survey Systems OVERVIEW 2.1. Introduction This section described the C-Scan Pipeline Survey System model 2010: what the system comprises, how to unpack it, set it up and get it started. A detailed contents list for this section appears below. -
Page 4: Unpacking And Activating The C-Scan 2010 Detector Unit (Du)
Leaders in Pipeline Survey Systems 2.2. Unpacking and activating the C-Scan 2010 Detector Unit (DU) 2.2.1. Unpacking For shipping safety the Detector Unit is shipped with its batteries packed separately. Unpack the entire system from its yellow transportation case and make sure all the items, including those stored in the lid of the Signal Generator, are present in accordance with the packing list. -
Page 5: Charging The Detector Unit (Du)
Leaders in Pipeline Survey Systems 2.2.3. Charging the Detector Unit (DU) The DU can be powered by C cells or D cells depending on the model. The picture below shows the two types. D Cells 4.5Ahr NiCd On/Off Switch C Cells 4.5Ah NiMH On/Off Switch The DU can be powered either by re-chargeable NiCad, NiMH batteries OR by alkaline... - Page 6 Leaders in Pipeline Survey Systems WARNING - WARNING - WARNING DO NOT USE THE CHARGER WHEN ALKALINE BATTERIES ARE INSTALLED • IN THE DU – overheating and possible damage will occur! NEVER use carbon/zinc or lithium-based batteries AT ANY TIME! •...
- Page 7 Leaders in Pipeline Survey Systems NOTE: Subsequent removal/ replacement of the batteries will necessitate this same date/time setting procedure because these batteries power the clock. Hence the clock settings are lost every time the batteries are removed or replaced or the Main Power Switch in the battery compartment is turned to ‘OFF’.
- Page 8 Leaders in Pipeline Survey Systems This indicates a timer that counts backwards, the time displayed being the maximum time allowed to charge the batteries. If the batteries are charged before that time has expired (counted down to zero) charging will be terminated and the unit switched off automatically. If it is necessary to terminate the charging cycle before the batteries are fully charged and the unit has turned itself off, the charging cycle may be ended by pressing the X key.
- Page 9 Leaders in Pipeline Survey Systems General Guidance Notes on the batteries used in the C-SCAN System. GGN 1 C-Scan Signal Generator (SG) The power supply for the SG can be augmented by connecting an external 12 volt vehicle type battery via the connecting cables (black and red leads with fuses and ‘crocodile’ clips) supplied and stored in the lid of the SG casing.
-
Page 10: Getting Started
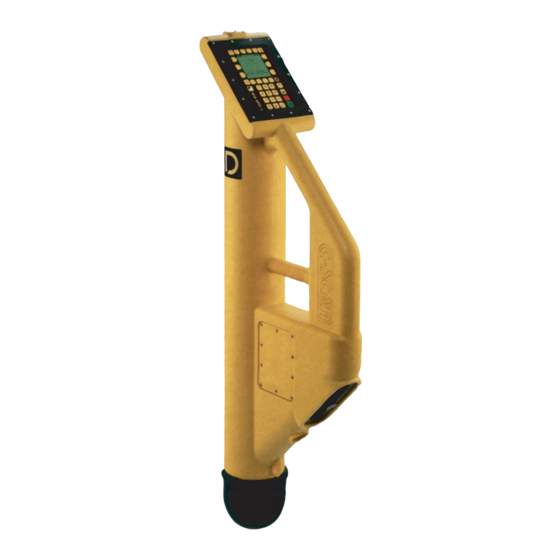
Leaders in Pipeline Survey Systems 2.3. Getting Started 2.3.1 The display screen and keypad The C-SCAN 2010 is the next generation design in the 2000 series Pipeline Survey System. The system increases the speed and accuracy and includes more statistical features for noise reduction, including: •... - Page 11 Leaders in Pipeline Survey Systems Where possible, all displays are language independent, with graphic icons representing features or functions: Depth to Centre Depth to top (cover) Current Attenuation Chainage Distance Symbols relating to landscape features such as trees, walls, fences, roads, rivers, pylons, etc Symbol for GPS Pipeline Diameter Approx.
- Page 12 Leaders in Pipeline Survey Systems ON / OFF Download key GPS Indicator (not available on all models) 14 Function keys LCD contrast key Help key NO key ( ) Back key YES key ( ) Enter key Fig. 7 – Keypad layout Issue 4.04 - 1207 OPERATOR’S MANUAL...
-
Page 13: Quick Start
Leaders in Pipeline Survey Systems 2.3.2. Quick Start 2.3.2.1 Start-up Screen (GPS Off) Fig. 8 (right) shows the Start-up screen. Note the GPS sub-system is turned Off at this stage. To switch the GPS ON press the key adjacent to the GPS symbol After a few seconds the screen will change to GPS ON: note this does not mean the GPS has acquired the signal, only that it is searching. - Page 14 Leaders in Pipeline Survey Systems 2.3.2.3. Pipeline Specification Confirmation The final pipeline specification selection will now be shown – see Fig. 10 right. If correct, press the key adjacent to the sign again to continue. If further editing of the specification is required, press the key adjacent to the sign to return to the Pipeline Specification screen.
-
Page 15: Search
Leaders in Pipeline Survey Systems 2.3.3. Search In this example, from the Search screen display – see Fig 13 right – it can be seen that the pipeline is located behind and to the right of the current position of the Detector Unit (DU) –... - Page 16 Leaders in Pipeline Survey Systems Pressing the key adjacent to the GPS POS box (bottom RH corner) will change the display from the number of satellites to the Latitude & Longitude position of the DU – see Figs. 14 & 15 below.
-
Page 17: Calculate
Leaders in Pipeline Survey Systems 2.3.4. Calculate After a small delay (indicated by the hour-glass symbol with a count to 300) the screen will display the calculated figures – see Fig. 16 right. Statistical analysis shows the error function for depth and current (shown as +/- 0.00 in this example). -
Page 18: Entering Distance
Leaders in Pipeline Survey Systems Press the STORE [ key now. This is the final screen before data is permanently stored – see Fig. 18 right. Pressing the key below the X box will revert to the previous screen. Pressing the key below the box will return to the Start-up screen. - Page 19 Leaders in Pipeline Survey Systems The distance from the start point (#000→#001) is now entered as 16m – see Fig 20 right. NOTE: you may change your mind at this point and enter the distance manually by pressing they key below the go-back arrow box (←).
-
Page 20: Graphs
Leaders in Pipeline Survey Systems 2.3.7. Graphs The next screen allows graphs to be plotted on the screen to provide the operator with a quick method of viewing the data so far acquired, without having to download to a computer. The newly available keys are now: GPS POSITION PLOT [ ] –... -
Page 21: Summary Specification
Leaders in Pipeline Survey Systems SUMMARY SPECIFICATION 3.1. Detector Unit (DU) C-SCAN model 2010 - Detector Unit specifications Weight 7.5 kgs (16lbs) Size 18 x 47 x 120cm (7 x 18 x 47”) Construction One-piece Polyethylene (PE) moulding Sealing (Protection Class) IP65 (total immersion for 500mm) Antenna array Symmetrical multi-axis Maximum detection depth 9+ metres (30+ feet) in good conditions +/- 2.5% to 3 metres (10 feet) -
Page 22: Signal Generator (Sg)
Leaders in Pipeline Survey Systems 3.2. Signal Generator (SG) Signal Generator specifications Weight 14.5 kgs (32lbs) Size 33 x 26 x 23cm (13 x 10 x 9”) Construction Aluminium drawn case with hinged storage lid Sealing (Protection Class) IP66 (closed) / IP65 (open) Rechargeable batteries 3 x 12v –... -
Page 23: Operation
Leaders in Pipeline Survey Systems OPERATION 4.1. Introduction This section describes the C-Scan Pipeline Survey System model 2010 in normal operation by using a detailed familiarisation practice session in the System’s built-in DEMO MODE. Please refer to the accompanying SURVEY PROCEDURE manual for more detailed information 4.1.1. -
Page 24: Demo Mode
Leaders in Pipeline Survey Systems 4.2. Demo Mode Demo Mode enables all functions within the C-Scan model 2010 to be simulated. Four ‘standard’ surveys have been stored in the unit’s memory. The tables below show the data for these surveys: Survey 1 Current Depth... -
Page 25: Starting Demo Mode
Leaders in Pipeline Survey Systems 4.2.1 Starting DEMO MODE Switch on the C-SCAN: Press Press Menu Press SETUP Press Demo Screen will show DEMO ON Press X to return to main screen. NOTE: since we are in DEMO mode GPS cannot be used. -
Page 26: Creating A New Survey
Leaders in Pipeline Survey Systems We have now completed the first ‘virtual’ survey. In a real situation, a surveyor may do a number of surveys before downloading the data. As the first survey is complete, we now need to know how to create a ‘new’ survey. The start screen should be shown and still be in Demo Mode: if it isn’t, re-select Demo Mode as explained above. -
Page 27: Notes On Entering Distances
Leaders in Pipeline Survey Systems Continue the survey. NOTE: on the next SEARCH screen the survey number has been incremented to S#01 (the first survey is survey S#00). The point counter increments and does not reset to zero. Referring to the survey list, continue through to Survey 4. Note that on Survey 4 there is no GPS data. -
Page 28: Chainage
Leaders in Pipeline Survey Systems There are three ways of entering distance. The first two we already know – GPS and direct distance i.e. the distance between points. The third way is chainage. 4.5. Chainage Chainage is the term given to incremental distance from the survey start point. As an example, a survey has 4 points taken 100m apart. -
Page 29: Direction Change Within A Survey
Leaders in Pipeline Survey Systems NOTE: We may freely switch between CHAINAGE and DISTANCE. When we enter a distance, the chainage is automatically stored (it is displayed on the attenuation display). The chainage start point is used to start a new survey. This point does not have to be zero. As an example, consider a survey of four points. -
Page 30: Notes On Graphs
Leaders in Pipeline Survey Systems The graph on the left shows attenuation as the points were gathered (sequenced in time). The graph on the right shows the points sequenced for chainage. To switch between the two, press Use the ‘◄# and #►’ arrow keys to choose a section of the survey. As we can see the attenuation between #02 and #04 is 19.25 mB/m. - Page 31 Leaders in Pipeline Survey Systems Use the ◄# and #►arrow keys to select which survey to display, then press the tick key. The survey number is shown (S#000) and the survey points are also shown (#000 - #006) Once you have selected your chosen survey, you can view the stored information as you would during a survey –...
-
Page 32: Close Interval Survey
Leaders in Pipeline Survey Systems 4.8. Close Interval Survey When a normal survey is proceeding, it is desirable to find the position of a fault. Close interval mode is used to pin-point a fault to within +/-1m (or better depending on conditions). - Page 33 Leaders in Pipeline Survey Systems The UP and DOWN keys allow zooming in on the graph. Press X to ignore the sample and retake the reading. Press to accept the reading. Move along the pipeline the next interval point (in this case 5m) and use the circle and overhead bars at the top of the screen to ensure you are correctly sited over the pipeline.
-
Page 34: Notes On Gps
Leaders in Pipeline Survey Systems 4.9. Notes on GPS GPS is an abbreviation for Global Positioning System. There are 24 satellites in low-earth orbit. The GPS receiver in C-Scan receives data from a number of these (maximum 12) depending on which satellites are ‘in-view’. -
Page 35: Battery Life/Power Modes
Leaders in Pipeline Survey Systems When a survey is conducted in the open where the operator walks between survey points, it would make sense not to turn off the unit; however, this reduces battery life. A power saving mode has been introduced that enables the GPS unit to remain on whilst all other devices are switched off. - Page 36 Leaders in Pipeline Survey Systems There are messages that are displayed to tell the user which part of C-Scan is active. This can be summarised at the start screen Antennae OFF Antennae ON All menu functions switch off the Antennae. Similarly, if the unit has been idle on the START screen for more than 3 minutes, the antennae is switched off.
-
Page 37: Printing Out A Survey
Leaders in Pipeline Survey Systems 4.11. PRINTING OUT A SURVEY After a survey has been completed it is probable that a printed report is required. There are two methods for doing this: 1. Use any PC based terminal program (e.g. Hyperterminal with windows). 2. - Page 38 Leaders in Pipeline Survey Systems Print Cnvrt The key ‘Print cnvrt’ allows data to be paced correctly for a Patton electronics (www.patton.com) model 2029 serial-to-parallel converter, for direct connection to a parallel printer. Use this key when using the converter. DO NOT use the other keys. As a printer expects line-feeds, using the other keys will print out on ONE line.
-
Page 39: Clearing Memory
Leaders in Pipeline Survey Systems 4.12. Clearing Memory To clear all memory locations (erase data) press menu from the start up screen, then press clear. (‘Browse’ key may appear if a survey is in memory) Press YES ( ) to erase all data, Pressing NO (X) will abort and all data will remain in memory. Issue 4.04 - 1207 OPERATOR’S MANUAL...
Need help?
Do you have a question about the C-SCAN 2000 Series and is the answer not in the manual?
Questions and answers