
Related Manuals for Atomic Zombie StreetFox


Summary of Contents for Atomic Zombie StreetFox
- Page 1 Build the StreetFox Recumbent Trike Another Atomic Zombie™ Extreme Machines Adventure All content copyright Atomic Zombie Extreme Machines. All rights reserved. www.ATOMICZOMBIE.com...
-
Page 2: Table Of Contents
Front Brakes........................103 Basic Seat Design ......................105 Trim Excess Main Boom and Paint ................114 Final Adjustments and First Ride ................... 116 Showing Off Your New Wheels!..................123 All content copyright Atomic Zombie Extreme Machines. All rights reserved. www.ATOMICZOMBIE.com... -
Page 3: About The Streetfox
Not one single machined part is needed. The StreetFox also includes an adjustable bottom bracket so it can fit riders of just about any height from 5 feet to well over 6 feet tall. Due to the rugged construction and use of sturdy 14 mm axle, 48 spoke front wheels, the StreetFox can accommodate riders over 250 pounds. - Page 4 All content copyright Atomic Zombie Extreme Machines. All rights reserved. www.ATOMICZOMBIE.com...
- Page 5 You can expect to pay between $100 and $200 for a pair of suitable wheels complete with smooth tread tires from a bicycle shop. Figure 3 - Hub axles. Yes, size does matter All content copyright Atomic Zombie Extreme Machines. All rights reserved. www.ATOMICZOMBIE.com...
-
Page 6: Forks, Crowns And Head Tubes
When you are sourcing steering parts for the front of a tadpole trike, you will basically need two of everything when it comes to the front wheels. As you can see in the completed StreetFox photos, the steering system is made using bicycle components so you do not need any expensive machine shop work done, and the resulting steering system is much smoother than the traditional kingpin bolt style steering system often found on go-carts. - Page 7 As shown in Figure 5, fork hardware consists of two bearing cups, a pair of bearings, and at least two locking nuts. Bearings are inserted into the cups "balls first", and the fork All content copyright Atomic Zombie Extreme Machines. All rights reserved. www.ATOMICZOMBIE.com...
- Page 8 Tap all the way around the ring until it falls off so you can work on the fork legs without risk of damaging the bearing race with our hacksaw or angle grinder. All content copyright Atomic Zombie Extreme Machines. All rights reserved. www.ATOMICZOMBIE.com...
- Page 9 (sanding) disc. Keep the fork legs around for some other project; they make good head rest supports or seat frames. All content copyright Atomic Zombie Extreme Machines. All rights reserved. www.ATOMICZOMBIE.com...
- Page 10 The cut line should be 1 inch from the top of the crown where the underside of the bearing race would have been sitting. All content copyright Atomic Zombie Extreme Machines. All rights reserved. www.ATOMICZOMBIE.com...
- Page 11 If you look ahead to Figure 11, you will see that I have done this as shown on the underside of the fork crown. All content copyright Atomic Zombie Extreme Machines. All rights reserved. www.ATOMICZOMBIE.com...
- Page 12 A few passes around the outside of the hole will fill it with weld metal so you can grind the area flush. All content copyright Atomic Zombie Extreme Machines. All rights reserved. www.ATOMICZOMBIE.com...
- Page 13 The bolt and bushing system is easier and would be less expensive to manufacture, but you don't have to cut corners when it comes to your own quality work. All content copyright Atomic Zombie Extreme Machines. All rights reserved. www.ATOMICZOMBIE.com...
-
Page 14: Axles And Mounting Tabs
Figure 12 shows the four pieces I cut from the scrap 1/4 inch plate to make the two 1/2 inch axle mounting tabs. All content copyright Atomic Zombie Extreme Machines. All rights reserved. www.ATOMICZOMBIE.com... - Page 15 7/16 inch. 1/2 inch thickness is your best bet as the weight savings is almost zero. All content copyright Atomic Zombie Extreme Machines. All rights reserved. www.ATOMICZOMBIE.com...
- Page 16 1/4 inch scrap plate welded together to form a 1/2 inch part. Figure 14 – Drilling the 9/16 or 14mm axle holes All content copyright Atomic Zombie Extreme Machines. All rights reserved. www.ATOMICZOMBIE.com...
- Page 17 I previously used is that the axle does not need to be taken out and moved to one side of the hub. Not all axles are threaded all the way through, so this became a bit of an issue. All content copyright Atomic Zombie Extreme Machines. All rights reserved. www.ATOMICZOMBIE.com...
- Page 18 You may also want to paint the bare metal where the axle has been cut, or add a bit of lock-tight just to be safe. Figure 17 – Mounting the axle tabs to the fork crown All content copyright Atomic Zombie Extreme Machines. All rights reserved. www.ATOMICZOMBIE.com...
- Page 19 Read ahead a bit so you can understand how this axle mounting tab angle is derived directly from your wheel. All content copyright Atomic Zombie Extreme Machines. All rights reserved. www.ATOMICZOMBIE.com...
- Page 20 StreetFox Tadpole Trike Making Axles and Mounting Tabs Drawing 2 – Center point steering geometry All content copyright Atomic Zombie Extreme Machines. All rights reserved. www.ATOMICZOMBIE.com...
- Page 21 Figure 18 shows how I derived my axle mounting tab angle. By using a wheel with a fully inflated tire, I initially held the fork stem in place and All content copyright Atomic Zombie Extreme Machines. All rights reserved. www.ATOMICZOMBIE.com...
- Page 22 I copied the angle from one part to the next, so I would not have to go though all that guesswork again. While laying side-by-side, the fork stems and axle mounting tabs should look All content copyright Atomic Zombie Extreme Machines. All rights reserved. www.ATOMICZOMBIE.com...
- Page 23 Of course, losing a few ounces of weight to drill shavings is not really important, but the parts do look more professional like this. All content copyright Atomic Zombie Extreme Machines. All rights reserved. www.ATOMICZOMBIE.com...
- Page 24 All content copyright Atomic Zombie Extreme Machines. All rights reserved. www.ATOMICZOMBIE.com...
-
Page 25: The Frame
Figure 22. Basically, you will be taking any parts needed to re-fasten the swingarm to the trike frame, so cut them from the original mountain bike frame. Figure 23 – The main boom tube All content copyright Atomic Zombie Extreme Machines. All rights reserved. www.ATOMICZOMBIE.com... - Page 26 The overall length of the main boom is determined by the size of the tallest rider that will use the StreetFox, so it can be cut down to a maximum length based on rider height rather than having it stick out way past the bottom bracket.
- Page 27 Again, your swingarm parts may differ, but the idea is the same. Before welding, tap out the swingarm bearings, as they are most likely just plastic plugs and would melt instantly during the welding process. All content copyright Atomic Zombie Extreme Machines. All rights reserved. www.ATOMICZOMBIE.com...
- Page 28 To ensure that the tube is welded inline with the boom, place a straight edge across one end of the pivot tube and check it against the length of the boom. All content copyright Atomic Zombie Extreme Machines. All rights reserved. www.ATOMICZOMBIE.com...
- Page 29 If distortion is extreme, you may need to work the tube back into shape using a large hammer - you know the routine! All content copyright Atomic Zombie Extreme Machines. All rights reserved. www.ATOMICZOMBIE.com...
-
Page 30: Seat Tube
Currently, there is nothing to connect the suspension spring to, but that is going to change in the next few steps. Seat Tube Figure 28 – Cutting the seat tube All content copyright Atomic Zombie Extreme Machines. All rights reserved. www.ATOMICZOMBIE.com... - Page 31 Figure 29. The cap is simply welded along the seams using only enough heat to fill the joint with weld metal. All content copyright Atomic Zombie Extreme Machines. All rights reserved. www.ATOMICZOMBIE.com...
- Page 32 It feels much better to be asked "how much did that cool trike cost?" rather than "how long did it take to build that?" All content copyright Atomic Zombie Extreme Machines. All rights reserved. www.ATOMICZOMBIE.com...
- Page 33 The next few steps will make this clearer. All content copyright Atomic Zombie Extreme Machines. All rights reserved. www.ATOMICZOMBIE.com...
- Page 34 1.75 inches of total travel. When you find the magic place, just mark that position on the main boom so you can weld the seat tube in place. All content copyright Atomic Zombie Extreme Machines. All rights reserved. www.ATOMICZOMBIE.com...
- Page 35 View the two parts from all angles, and manipulate the seat tube if an alignment adjustment seems necessary. All content copyright Atomic Zombie Extreme Machines. All rights reserved. www.ATOMICZOMBIE.com...
- Page 36 The suspension spring mount will be installed after the front wheels have been attached, which is the next step. All content copyright Atomic Zombie Extreme Machines. All rights reserved. www.ATOMICZOMBIE.com...
-
Page 37: Front Wheel Arms
32 inch track, or may have radical plans to make the StreetFox into a lowracing speed machine, so a 27 inch track might be your goal. For every day riding and good stability, a track between 30 and 32 inches seems optimal, so I decided on a 30 inch track. - Page 38 As you will soon see, the side of the joint that All content copyright Atomic Zombie Extreme Machines. All rights reserved. www.ATOMICZOMBIE.com...
- Page 39 All content copyright Atomic Zombie Extreme Machines. All rights reserved. www.ATOMICZOMBIE.com...
- Page 40 38. Since the front arms are now joined to create one single piece, I will now refer to them simply as the "front arm boom". Figure 39 – Cleaning up a welded joint All content copyright Atomic Zombie Extreme Machines. All rights reserved. www.ATOMICZOMBIE.com...
- Page 41 All content copyright Atomic Zombie Extreme Machines. All rights reserved. www.ATOMICZOMBIE.com...
- Page 42 30 inch track. Therefore, the distance across my arm boom assembly needs to measure exactly 26 inches after trimming. All content copyright Atomic Zombie Extreme Machines. All rights reserved. www.ATOMICZOMBIE.com...
- Page 43 A small mark indicating the center of the tube is drawn, and this is where the measurement is taken at each end of the arm boom assembly. Figure 43 – Trimming the front arm boom at both ends All content copyright Atomic Zombie Extreme Machines. All rights reserved. www.ATOMICZOMBIE.com...
- Page 44 (or something of equal diameter) on the top of the front arm boom assembly as shown in Figure 44. The top of the arm boom is the side with the weld, opposite of the non welded side. All content copyright Atomic Zombie Extreme Machines. All rights reserved. www.ATOMICZOMBIE.com...
-
Page 45: Joining The Booms
At that point, you can place another tack weld on the front of the joint to lock down the angle. All content copyright Atomic Zombie Extreme Machines. All rights reserved. www.ATOMICZOMBIE.com... - Page 46 Also notice that the arm boom s welded on the top side of the main boom, which will help keep your chain line and steering system simple and clean. All content copyright Atomic Zombie Extreme Machines. All rights reserved. www.ATOMICZOMBIE.com...
- Page 47 Figure 47 shows the completed welds on the front and back side of the arm boom and main boom. All content copyright Atomic Zombie Extreme Machines. All rights reserved. www.ATOMICZOMBIE.com...
- Page 48 All content copyright Atomic Zombie Extreme Machines. All rights reserved. www.ATOMICZOMBIE.com...
-
Page 49: Head Tube Angles
Figure 49. All content copyright Atomic Zombie Extreme Machines. All rights reserved. www.ATOMICZOMBIE.com... - Page 50 75 degrees seems to be a good angle for a trike of this wheelbase, but feel free to alter this angle if you feel that you know what you are doing and how it will change the handling characteristics. All content copyright Atomic Zombie Extreme Machines. All rights reserved. www.ATOMICZOMBIE.com...
- Page 51 10 times the price of a manufactured trike imported from across the globe. Patience is the only way to win this battle. All content copyright Atomic Zombie Extreme Machines. All rights reserved. www.ATOMICZOMBIE.com...
- Page 52 11 inches, slightly ahead of the boom joint where my bucket is placed in Figure 51. All content copyright Atomic Zombie Extreme Machines. All rights reserved. www.ATOMICZOMBIE.com...
- Page 53 I am in Figure 52. No welding is done until both wheels pass visual alignment inspection from every possible angle. All content copyright Atomic Zombie Extreme Machines. All rights reserved. www.ATOMICZOMBIE.com...
- Page 54 I could force each head tube into alignment and continue welding. I was lucky with the left side, but the right side was visually out of alignment enough All content copyright Atomic Zombie Extreme Machines. All rights reserved. www.ATOMICZOMBIE.com...
- Page 55 90 degrees to the ground. When the All content copyright Atomic Zombie Extreme Machines. All rights reserved. www.ATOMICZOMBIE.com...
- Page 56 90 degrees to the ground. If one wheel seems to be "gimpy", then get busy and fix your work, as this will surely be seen by others and make your work look poor and your trike handling feel bizarre. All content copyright Atomic Zombie Extreme Machines. All rights reserved. www.ATOMICZOMBIE.com...
- Page 57 Figure 56 shows one of the head tubes fully welded around the joint. All content copyright Atomic Zombie Extreme Machines. All rights reserved. www.ATOMICZOMBIE.com...
- Page 58 Making the Head Tube Figure 57 – The main frame is now completed Figure 57 shows the almost completed StreetFox frame after an epic adventure with multiple and duplicate angle cutting and welding. If you enjoy bicycle building as a hobby, then every minute was pure fun, but you can sure learn appreciate the high price tag on a tadpole trike when you consider how much effort it takes to get here.
-
Page 59: Suspension
I did. As shown on Figure 58, the suspension mounting tabs can be cut from the donor frame, bypassing the need to drill the appropriate holes for the mounting bolt. All content copyright Atomic Zombie Extreme Machines. All rights reserved. www.ATOMICZOMBIE.com... - Page 60 All content copyright Atomic Zombie Extreme Machines. All rights reserved. www.ATOMICZOMBIE.com...
- Page 61 No part of the suspension spring body should rub on the frame as the spring compresses and expands. All content copyright Atomic Zombie Extreme Machines. All rights reserved. www.ATOMICZOMBIE.com...
-
Page 62: Brake Support Arms
3/4 inch square tubing with a 1/16 inch wall thickness (same thickness as the boom tubing). These tubes are shown in Figure 61, and have been cut as per the next drawing. All content copyright Atomic Zombie Extreme Machines. All rights reserved. www.ATOMICZOMBIE.com... - Page 63 2 inch wide 20 inch tire with minimal tread, which is a common choice of tire for this project. Much wider and taller tires are certainly available. Figure 62 – Brake support arms tack welded All content copyright Atomic Zombie Extreme Machines. All rights reserved. www.ATOMICZOMBIE.com...
- Page 64 I have. Figure 63 shows the brake support arms being capped and cleaned right before permanent installation onto the fork stems. All content copyright Atomic Zombie Extreme Machines. All rights reserved. www.ATOMICZOMBIE.com...
- Page 65 The brake support arms are only tack welded in one spot at this point, so they can be aligned properly with the wheel. All content copyright Atomic Zombie Extreme Machines. All rights reserved. www.ATOMICZOMBIE.com...
- Page 66 If you think of the brake support arm as a one sided chain stay, then the angle and tire clearance make sense. The brake will be bolted over the edge of the tire just as it would be done on a typical bicycle. All content copyright Atomic Zombie Extreme Machines. All rights reserved. www.ATOMICZOMBIE.com...
- Page 67 This is necessary as the brake also needs to be mounted at 90 degrees to the wheel so the brake pads hit the edge of the rim squarely. All content copyright Atomic Zombie Extreme Machines. All rights reserved. www.ATOMICZOMBIE.com...
- Page 68 Figure 67 once you have checked the alignment with the tire. Welding should be solid and gap free, as the brake arms will be put under considerable stress during a fast stop from high speeds. All content copyright Atomic Zombie Extreme Machines. All rights reserved. www.ATOMICZOMBIE.com...
- Page 69 The same process must be done to both brake arm support tubes, making sure alignment with the wheel and rim is correct for proper braking contact. Figure 68 shows the two completed parts ready for installation. All content copyright Atomic Zombie Extreme Machines. All rights reserved. www.ATOMICZOMBIE.com...
-
Page 70: Ackermann Steering
The name for this type of steering is "Ackermann Steering", and you can learn a lot about how it works by hitting your favorite search engine for more information. All content copyright Atomic Zombie Extreme Machines. All rights reserved. www.ATOMICZOMBIE.com... - Page 71 Ball joints with a 3/8 hole diameter are a good choice. All content copyright Atomic Zombie Extreme Machines. All rights reserved. www.ATOMICZOMBIE.com...
- Page 72 There are formulas and charts available on the Internet that can help determine this for you, but I found that "trial and error" is the best method. Old fashioned hard work is always the way to win any battle! All content copyright Atomic Zombie Extreme Machines. All rights reserved. www.ATOMICZOMBIE.com...
- Page 73 Figure 73 – Ball joints and control rod Ball joints are actually called "spherical rod ends", so remember that if you are asking for them at a bearing store, as they like to use the proper All content copyright Atomic Zombie Extreme Machines. All rights reserved. www.ATOMICZOMBIE.com...
- Page 74 4 foot distance. At this point, try not to disturb the All content copyright Atomic Zombie Extreme Machines. All rights reserved. www.ATOMICZOMBIE.com...
- Page 75 I did not even have to do any fine tuning of the steering alignment after this point, as the steering was tracking perfectly and friction free after assembling the trike for the very first time All content copyright Atomic Zombie Extreme Machines. All rights reserved. www.ATOMICZOMBIE.com...
- Page 76 Don't take chances with low quality parts on steering or braking components. All content copyright Atomic Zombie Extreme Machines. All rights reserved. www.ATOMICZOMBIE.com...
- Page 77 Figure 77, so they are easy to inspect every once in awhile. You could certainly place them on the other side of the control arm, but then they are always hidden from your view. All content copyright Atomic Zombie Extreme Machines. All rights reserved. www.ATOMICZOMBIE.com...
- Page 78 Remember, rolling the trike forward and allowing the two front wheels to self center is a good way to find the perfect alignment point. All content copyright Atomic Zombie Extreme Machines. All rights reserved. www.ATOMICZOMBIE.com...
-
Page 79: Bottom Bracket And Derailleur
(leg length) without making a small error. A fixed bottom bracket also means that you could never alter the seat, or adjust the StreetFox for anyone but yourself, so an adjustable bottom bracket is the only option. - Page 80 1/8 inch of material between the hole and edge of the plate. These two plates will form a "vice" that will clamp the bottom bracket to whatever position on the main boom you want. All content copyright Atomic Zombie Extreme Machines. All rights reserved. www.ATOMICZOMBIE.com...
- Page 81 If the bottom bracket becomes overly distorted, it will be a serious challenge trying to screw the hardware back into the bottom brackets without stripping the threads. All content copyright Atomic Zombie Extreme Machines. All rights reserved. www.ATOMICZOMBIE.com...
- Page 82 Without the small gap, it is easy to scratch the paint if you plan to move the bottom bracket around a few times. All content copyright Atomic Zombie Extreme Machines. All rights reserved. www.ATOMICZOMBIE.com...
- Page 83 In other words, the bottom bracket will be in the center of the main boom as viewed from above. All content copyright Atomic Zombie Extreme Machines. All rights reserved. www.ATOMICZOMBIE.com...
- Page 84 Because of the way the clamp system works, there would be no added benefit from welding the inside of the joint anyway. All content copyright Atomic Zombie Extreme Machines. All rights reserved. www.ATOMICZOMBIE.com...
- Page 85 If the holes are not below the line, you will not be able to pass the bolt through both plates because it will hit the frame tubing instead. All content copyright Atomic Zombie Extreme Machines. All rights reserved. www.ATOMICZOMBIE.com...
- Page 86 Figure 85, a washer is welded over the end of the tube and then completely filled in around the joint and the hole. To fill in the washer hole, several passes are made around the edge until completely covered in weld metal. All content copyright Atomic Zombie Extreme Machines. All rights reserved. www.ATOMICZOMBIE.com...
- Page 87 All content copyright Atomic Zombie Extreme Machines. All rights reserved. www.ATOMICZOMBIE.com...
- Page 88 Don't bother greasing up the bottom bracket bearings just yet, as you will want to do that after the priming and painting is completed. All content copyright Atomic Zombie Extreme Machines. All rights reserved. www.ATOMICZOMBIE.com...
-
Page 89: Pulleys And Chains
The StreetFox has only a single idler and it only bends the chain slightly, so the transmission is very efficient. Figure 88... - Page 90 When you are done, the pulley should be as close to the arm tube as possible without rubbing, and the pulley should stand off from the frame about 1 inch, which is why the lawn-mower wheel shoulder bolt worked All content copyright Atomic Zombie Extreme Machines. All rights reserved. www.ATOMICZOMBIE.com...
- Page 91 Bicycle chains are not expensive, so it might be best to work with new materials here. All content copyright Atomic Zombie Extreme Machines. All rights reserved. www.ATOMICZOMBIE.com...
-
Page 92: Seating
Seating Figure 91 – Seat mounting tabs Seating is a personal choice, and since the StreetFox has such a simple frame, you can install just about any type of seat you would like, from a simple board seat to a height tech adjustable mesh and frame style seat. I... - Page 93 You can now mount any type of plywood seat, or even a fishing boat seat to the frame. Later, I will show you how I made my minimal, yet comfortable wood and foam seat. All content copyright Atomic Zombie Extreme Machines. All rights reserved. www.ATOMICZOMBIE.com...
-
Page 94: Handlebars
Figure 93 shows the two standard steel bicycle goosenecks I have decided to cut up to make my handlebars. Do not worry about the condition of the gooseneck clamp, as this simple handlebar design only requires the stem. All content copyright Atomic Zombie Extreme Machines. All rights reserved. www.ATOMICZOMBIE.com... - Page 95 The handlebars need to be cut into two equal pieces to form a left and right handlebar for your trike. As shown in Figure 95, the handlebars are cut All content copyright Atomic Zombie Extreme Machines. All rights reserved. www.ATOMICZOMBIE.com...
- Page 96 Figure 96 seemed just right. Close your eyes and let your hands find the most natural position, as this is probably the position that best suits you. All content copyright Atomic Zombie Extreme Machines. All rights reserved. www.ATOMICZOMBIE.com...
-
Page 97: Adjustable Backrest
Figure 97 shows the two handlebar halves after completely welding around all the joints and checking the weld for errors. Adjustable Backrest Figure 98 – Adjustable back rest parts All content copyright Atomic Zombie Extreme Machines. All rights reserved. www.ATOMICZOMBIE.com... - Page 98 I had in my scrap pile. Figure 99 shows the resulting assembly, which looks like some type of long bizarre gooseneck. All content copyright Atomic Zombie Extreme Machines. All rights reserved. www.ATOMICZOMBIE.com...
- Page 99 (Figure 100). Figure 101 – Adjustable back rest installed All content copyright Atomic Zombie Extreme Machines. All rights reserved. www.ATOMICZOMBIE.com...
-
Page 100: Return Chain Idler
To keep the chain under control, all you need is a small idler wheel made from just about any lightweight pulley, skate board wheel, or even an old rear derailleur, like the All content copyright Atomic Zombie Extreme Machines. All rights reserved. www.ATOMICZOMBIE.com... - Page 101 The only goal here is to pick up the slack chain so it does not flop around or hit the ground when you are hitting the trails on our trike. All content copyright Atomic Zombie Extreme Machines. All rights reserved. www.ATOMICZOMBIE.com...
- Page 102 V-belt pulley would also do this job, so dig through your junk pile for ideas if you do not have an old derailleur to butcher. All content copyright Atomic Zombie Extreme Machines. All rights reserved. www.ATOMICZOMBIE.com...
-
Page 103: Front Brakes
This will not cause any problems, but being a symmetry freak, I wish I could avoid this. All content copyright Atomic Zombie Extreme Machines. All rights reserved. www.ATOMICZOMBIE.com... - Page 104 You might have to search the Internet for "dual brake lever", but there are several companies that make them. With a dual brake lever, you can go about your cabling as if you were cabling a standard bicycle. All content copyright Atomic Zombie Extreme Machines. All rights reserved. www.ATOMICZOMBIE.com...
-
Page 105: Basic Seat Design
The two parts shown in figure 107 are shown being cut from some 3/8 inch thick plywood. The rounded front and top were drawn by tracing a dinner plate and a bucket lid. All content copyright Atomic Zombie Extreme Machines. All rights reserved. www.ATOMICZOMBIE.com... - Page 106 1/16 inch thick angle iron, and then hammered them out to the angle of the seat. Figure 108 shows the two angle iron pieces with woodscrew holes drilled into them. All content copyright Atomic Zombie Extreme Machines. All rights reserved. www.ATOMICZOMBIE.com...
- Page 107 Also keep in mind that the thicker the base foam, the taller your backrest will need to be in order to support your back at the required height. All content copyright Atomic Zombie Extreme Machines. All rights reserved. www.ATOMICZOMBIE.com...
- Page 108 All content copyright Atomic Zombie Extreme Machines. All rights reserved. www.ATOMICZOMBIE.com...
- Page 109 I am not big on cutting corners, but if you ride a lot, the seat material will wear out after a year anyhow, so why get too fancy? Figure 111 shows the beginning of the staple intensive journey. All content copyright Atomic Zombie Extreme Machines. All rights reserved. www.ATOMICZOMBIE.com...
- Page 110 Figure 112 shows how many staples keep the material stretched around the corners to reduce the wrinkles. All content copyright Atomic Zombie Extreme Machines. All rights reserved. www.ATOMICZOMBIE.com...
- Page 111 Plastic or very thin sheet metal can also be used to hide the ugly staples and bare wood. All content copyright Atomic Zombie Extreme Machines. All rights reserved. www.ATOMICZOMBIE.com...
- Page 112 I stretched a length of seat belt material around the seam and stapled it to the wood. Figure 114 shows the completed seat, which is not perfect, but not all that bad either. All content copyright Atomic Zombie Extreme Machines. All rights reserved. www.ATOMICZOMBIE.com...
- Page 113 All content copyright Atomic Zombie Extreme Machines. All rights reserved. www.ATOMICZOMBIE.com...
-
Page 114: Trim Excess Main Boom And Paint
Of course, you have to cap off the open end of the boom tube just like you did with the seat tube, so it looks clean and solid as shown n Figure 116. All content copyright Atomic Zombie Extreme Machines. All rights reserved. www.ATOMICZOMBIE.com... - Page 115 I can avoid the urge to assemble a wet paint frame. Figure 117 shows the frame freshly primed with the smaller parts painted and curing. All content copyright Atomic Zombie Extreme Machines. All rights reserved. www.ATOMICZOMBIE.com...
-
Page 116: Final Adjustments And First Ride
Figure 118 – StreetFox read to ride! After two days of paint curing, I hit the garage and eagerly assembled the entire StreetFox in about two hours. All bearings were cleaned and greased, and new handle grips, tires, cables, and chain were installed. The... - Page 117 Figure 119 shows the plethora of cables running from the handlebars as well as the low budget “one into two” brake cable adapter. All content copyright Atomic Zombie Extreme Machines. All rights reserved. www.ATOMICZOMBIE.com...
- Page 118 Figure 120 shows the front derailleur being set up before the cables are installed. All content copyright Atomic Zombie Extreme Machines. All rights reserved. www.ATOMICZOMBIE.com...
- Page 119 A tiny bit of brake rubbing is OK as long as you can spin the wheel freely. Figure 121 shows the rear of the StreetFox, with the rear brake cable fully installed.
- Page 120 Figure 122 shows a close-up of the front brake and the adjustment screw. All content copyright Atomic Zombie Extreme Machines. All rights reserved. www.ATOMICZOMBIE.com...
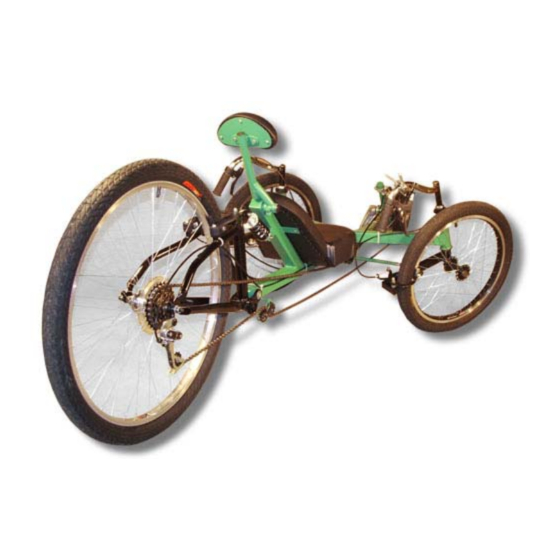
- Page 121 It's also a good idea to always check the front axle bolts before any ride, in case they have worked loose from excessive vibration. Figure 123 shows the completed StreetFox Trike, calling out for its pilot to jump into the driver's seat.
- Page 122 Hill climbing is not a problem due to the full range of gearing, and the suspension makes for a very smooth ride. Most people who encounter the StreetFox think it was store bought, and give a strange look when told it was made using hand tools from typical bicycle parts.
-
Page 123: Showing Off Your New Wheels
Showing Off Your New Wheels! Figure 125 – Kat’s new wheels! Kathy (Koolkat) hits the trails on her new StreetFox, taking on pavement, steep hills, gravel roads, and bush trails without any problems at all. Riding a comfortable recumbent trike is so much easier on your body than an upright bicycle, so the long journeys are truly enjoyable. - Page 124 Figure 126 is another shot of KoolKat enjoying the scenery at the Kakabeka Falls campground, with the Kam River in the background. All content copyright Atomic Zombie Extreme Machines. All rights reserved. www.ATOMICZOMBIE.com...
- Page 125 I hope to see your work or progress in the Atomic Zombie forum, and would certainly be happy to post a photo of your completed trike in our gallery for other builders to see.
Need help?
Do you have a question about the StreetFox and is the answer not in the manual?
Questions and answers