Table of Contents
Advertisement
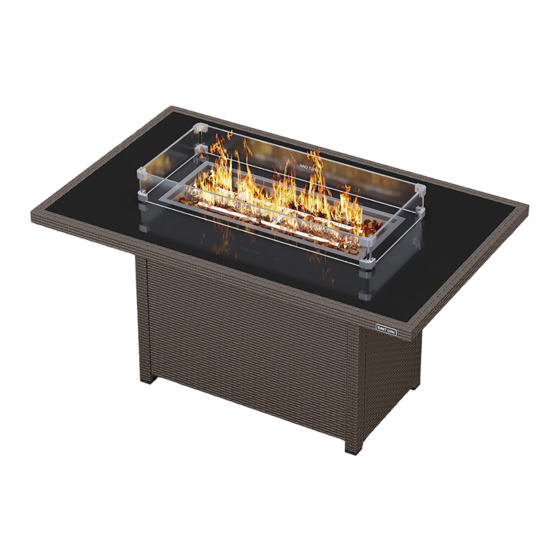
BRAZI Fire Pit Table
60000 BTU
Owner's Manual
MODEL:
GFT22001 | GFT22002 | GFT22003
GFT22004 | GFT22005 | GFT22006
GFT22007 | GFT22008 | GFT22009
This appliance can produce carbon monoxide which has no odor.Using it in an enclosed space can kill you.
Never use this appliance in an enclosed space such as a camper, tent, car, or home.
DANGER
FIRE OR EXPLOSION HAZARD
If you smell gas:
.Extinguish any open flame. If odor continues, leave the area immediately.
.After leaving the area, call your gas supplier or fire department.
Failure to follow these instructions could result in fire or explosion, which could cause property damage, personal iniurv.or death.
WARNING:
For Outdoor Use Only.
Installation and service must be performed by a qualified installer, service agency, or the gas supplier.
INSTALLER: Leave this manual with the appliance.
CONSUMER: Retain this manual for future reference.
Advertisement
Table of Contents

Related Manuals for EAST OAK GFT22001


Summary of Contents for EAST OAK GFT22001
- Page 1 BRAZI Fire Pit Table 60000 BTU Owner’s Manual MODEL: GFT22001 | GFT22002 | GFT22003 GFT22004 | GFT22005 | GFT22006 GFT22007 | GFT22008 | GFT22009 This appliance can produce carbon monoxide which has no odor.Using it in an enclosed space can kill you.
- Page 3 eastoak.com Questions? Comments? Reach out to us to for expert support! support@eastoak.com eastoak.com 1-833-EAST-OAK (USA) (1-833-327-8625) Follow eastoakliving on Claim your 3-year warranty at eastoak.com/warranty EASTOAK.COM FIRE PIT TABLE...
-
Page 4: Important Caution
IMPORTANT CAUTION CAUTION: PLEASE READ ENTIRETY OF MANUAL PRIOR TO ASSEMBLY AND OPERATION. Verify all parts and components are present. Check all pieces for any damage before assembly. If any parts are damaged or missing, contact customer service at support@eastoak.com. •... - Page 5 Do not store or use gasoline, or other flammable vapors and liquids, in the vicinity of this or any other appliance. An LP-cylinder not connected for use shall not be stored in the vicinity of this or any other appliance. CONSUMER Retain this manual for future reference.
- Page 6 1-833-327-8625 SUPPORT@EASTOAK.COM...
- Page 7 EASTOAK.COM FIRE PIT TABLE...
- Page 8 TABLE DIMENSIONS 1-833-327-8625 SUPPORT@EASTOAK.COM...
-
Page 9: Parts Diagram
PARTS DIAGRAM size 44in. 52in. 57in. EASTOAK.COM FIRE PIT TABLE... - Page 10 ASSEMBLY INSTRUCTIONS This product requires 2 people to assemble. Before assembly, please read the entirety of this manual to ensure safety and proper usage. Keep in mind there are a variety of steps. Place all parts and hardware on a at surface. Inspect each piece and ensure there is no damage or missing pieces.
- Page 11 Assemble the panels (E, F x2, G, H) as shown below and secure them together using 8 screws (BB). Place the burner unit on top of the unit. Fasten screws (BB x 4, I) tightly. EASTOAK.COM FIRE PIT TABLE...
- Page 12 Secure center piece using 4 screws (BB x4). Align two screws on the top side. Then, turn the unit upside down and fasten two screws on the bottom side. 1-833-327-8625 SUPPORT@EASTOAK.COM...
- Page 13 The direction of the front door faces the direction of the heat shield Do not lock all the screws at first, and lock them after all the mounting holes are aligned Place lava or glass rocks into the burner. ATTENTION: •...
-
Page 14: Assembly Instruction
ASSEMBLY INSTRUCTION (LPG cylinder) LIQUEFIED PETROLEUM GAS (LPG) SAFETY INFORMATION LPG cylinder used with the product must be: • Constructed and marked in accordance with the U.S.Department of Transportation (DOT) specication for LPG cylinder, CAN/CSAB339, Cylinders, Spheres, and Tubes for the Transportation of Dangerous Goods, as applicable;... - Page 15 ASSEMBLY INSTRUCTION (LPG cylinder) LPG cylinder connection Remember to tighten! • Inspect the entirety of the gasket for any sign of damage or erosion. Position the LPG cylinder in the repit and secure the unit using the retainer bolt. • ATTENTION: Ensure the valve on the re pit and LPG cylinder are set to the “OFF”...
-
Page 16: Lighting Instruction
LIGHTING INSTRUCTION • Ensure the re pit control knob is set to the “OFF” position. • Turn on the gas cylinder valve by pressing the knob and turning it counterclockwise to the “IGNITOR” position. This is indicated by a lighting symbol. - Page 17 ASSEMBLY INSTRUCTION (LPG cylinder) LPG cylinder disconnection • Allow unit to completely cool down after use. Then, ensure LPG cylinder valve is shut and cooled down. Control knob on unit must be in the “OFF” position. • Next, turn the coupling nut counterclockwise until the regulator detaches. •...
- Page 18 When an appliance is for connection to a fixed piping system, the installation must conform with local codes, or in the absence of local codes with the National Fuel Gas Code, ANSI Z223.1 • NFPA 54; National Fuel Gas Code; Natural Gas and Propane Installation Code, CSA B149.1;...
- Page 19 OPERATION INSTRUCTION (Leak Check) 2. If there is a leak, disconnect the connection and reconnect, then perform another leak test.If bubbles continue to appear after several attempts, you should replace the hose or cylinder valve. Contact a qualified service technician if attempts to stop the leak(s) are unsuccessful. Until leak problem is corrected, LPG supply must be shut o ffat the cylinder valve or the LPG cylinder must be disconnected and removed from the appliance.
-
Page 20: Warranty And Service
“OFF” position. WARRANTY AND SERVICE GUARANTEED 3-YEAR WARRANTY Thank you for choosing East Oak. This product is covered by our company warranty for up to 3 years from its original purchase date. CLAIM WARRANTY If you’d like to claim your product’s warranty, register your new product on our website at www.eastoak.com/warranty . -
Page 21: Troubleshooting
TROUBLESHOOTING Problem Possible Cause Solution Ensure the regulator is attached to the cylinder valve. Open the LPG cylinder valve is closed valve. Manually tighten the coupling Coupling nut not fully connected nut to the cylinder valve. Refill or replace the LPG Low or empty LPG cylinder cylinder Electrode and burner are wet... - Page 22 Problem Possible Cause Solution DO NOT use the appliance in Highwind/g using wind high winds Exchange, re flor replace LPG Low LPG level Flame goes out cylinder Carbon deposit accumulated Clean the burner and on the burner port or thermocouple thermocouple Wait until the LPG cylinder warms up and defrosts...
- Page 23 BRAZI Fire Pit Table Series EASTOAK.COM FIRE PIT TABLE...
- Page 25 support@eastoak.com eastoak.com 1-833-EAST-OAK (USA)
Need help?
Do you have a question about the GFT22001 and is the answer not in the manual?
Questions and answers