Table of Contents
Advertisement
Quick Links
Advertisement
Chapters
Table of Contents

Related Manuals for HP f790


Summary of Contents for HP f790
- Page 1 Car Camcorder 行車記錄器 User Manual 使用手冊...
- Page 2 Car Camcorder User Manual...
-
Page 3: Table Of Contents
Contents About this Guide ..................3 Notes on Installation ................3 Regulatory notices ................... 3 CE Regulatory Notice ................4 WEEE Notice ..................... 4 Caution ....................4 Introduction ................5 1.1 Features ..................... 5 1.2 Package Contents ................5 1.3 Product Overview ................6 2. - Page 4 3.5 Parking Mode ................... 18 3.6 Collision Detection ................19 4. Adjust the Settings ................20 5. Specifications ................22...
-
Page 5: About This Guide
About this Guide The content in this document is for information purpose and is subject to change without prior notice. We made every effort to ensure that this User Guide is accurate and complete. However, no liability is assumed for any errors and omissions that may have occurred. -
Page 6: Ce Regulatory Notice
They are for your reference only. HP Inc. Company is NOT responsible for the loss of any data/content during operation. Before you start using the Car Camcorder, it is assumed that you agree to the above statements. -
Page 7: Introduction
1 Introduction Thank you for purchasing this advanced camcorder. This camcorder is specifically designed for real time video and audio recording when driving. 1.1 Features • Built-in super capacity • Full HD 1920*1080 • 9.35” big touch displayer • F/2.4 aperture •... -
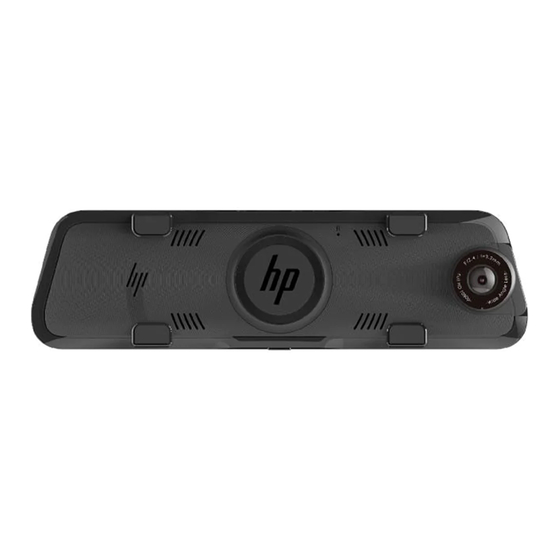
Page 8: Product Overview
1.3 Product Overview... - Page 9 Item Rearview mirror clip Touch LCD Screen Short press: LCD on/off Long press: Power on/off USB port: Car power adapter connection A/V port: Rear Camera connection (option) MicroSD memory card slot GPS port: External GPS connection (option) Speaker Reset Lens Microphone...
-
Page 10: Getting Start
2. Getting Start 2.1 Insert the Memory Card Insert the memory card with the gold contacts facing the back of the camcorder. Push the memory card until it clicks into place. (Use V30 or greater speed micro SD cards for this camcorder; It is recommended to format the micro SD cards before the initial use.) To remove the memory card Push the edge of the memory card inward until you hear/feel it click,... -
Page 11: Install In Vehicles
2.2 Install in Vehicles Clip on to your original car mirror. Circle the clip with the band. Adjust the camcorder lens. Note: Image shown here is for installation illustration. The outlook may differ from what you purchased. -
Page 12: Connecting To Power
2.3 Connecting to Power Use only the supplied car adapter to power up the camcorder. 1. Connect one end of the car adapter to the USB connector of the camcorder. USB port input: DC 5V / 2A. 2. Plug the other end of the car adapter to the cigarette lighter socket of your vehicle. -
Page 13: Powering The Camcorder On / Off And Reset
2.4 Powering the Camcorder On / Off and Reset 2.4.1 Auto Power On/Off Once the vehicle engine is started, the camcorder automatically powers on. And the recording will automatically start. Once the vehicle engine shuts down, the camcorder automatically saves the recording and turns off the power. -
Page 14: Initial Settings
2.5 Initial Settings 2.5.1 Set the Date and Time We recommend to set up date and time before initial use. To set the correct date and time, do the following: In the recording screen, tap button to stop recording. to enter [Setting] page. Use finger to slide the menu page and tap [Date/Time Setting] to set up. -
Page 15: Using The Camcorder
3. Using the Camcorder 3.1 Recording Videos 3.1.1 Auto Recording When the vehicle engine starts up, the camcorder automatically turns on and starts recording. Recording will automatically stop when the engine is switched off. Note: 1. On some cars, the recording will continue when the engine is switched off. If this happens, please manually turn off the cigarette lighter or remove the car adapter from the cigarette lighter. -
Page 16: Recording Screen
3.1.2 Recording Screen Icon Item Description Recording Current recording length 00:10 length Date/Time Current recording date/time Menu Setting Setting menu Playback Playback recorded files. Recording Start or stop recording Start/Stop Switch front camera and rear camera Switch preview image. (Rear camera is option camera and not in the box. -
Page 17: Emergency Recording
3.1.3 Emergency Recording This Car Camcorder is equipped with a G-Force sensor. If the G-sensor function is enabled, when collision is detected, the camcorder will automatically trigger the Emergency Recording feature. The displayer will pop up [Lock Current File] string and the flash red dot on left upper side on screen will become yellow dot. -
Page 18: Gps (Option)
3.2 GPS (Option) Plug the optional GPS accessory into GPS port on the camcorder. Once activate the GPS function, you can preview current car speed, speed cam ahead, and direction such information. Note: 1. GPS function is limited in certain areas. Please contact dealer for details. 2. -
Page 19: File Playback
Note: 1. Preview image can be set as Front cam, Rear cam or Dual cam. 2. Rear camera doesn’t support hot plug-n-play. Please power off the main camcorder before plug into rear camera. 3. Tap icon to switch main camcorder and rear camera preview image. 3.4 File Playback In the recording screen, tap to stop recording and tap... -
Page 20: Parking Mode
3.5 Parking Mode To monitor the vehicle when it is parked, you can activate Parking Mode. Before activate Parking Mode, please seek for professional shop to install ACC cable in advance. Follow the steps below to set up Parking Mode. In the recording screen, tap to stop recording and tap enter menu setting. -
Page 21: Collision Detection
3.6 Collision Detection If the Collision Detection function is enabled, this camcorder begins emergency recording once it detects any collision. Sensitivity of the Collision Detection function is set to Middle by default, if user wants to change the settings of Collision Detection, do the following: to stop recording and tap to enter menu setting. -
Page 22: Adjust The Settings
4. Adjust the Settings In recording preview screen, tap to stop recording and tap enter menu setting. Refer to the below table for details on menu items and available menu options. Menu Description Available option Resolution Setting of video resolution 1080p / 720p Set the recording duration Interval Time... - Page 23 Menu Description Available option be off after 1 or 3 minutes if you don’t operate the camcorder. (LCD off won’t affect the video recording.) Adjust LCD brightness Soft / Standard / Bright Brightness The camcorder will automatically trigger Collision emergency recording when Off / High / Middle / Low Sensitivity tremor of a collision is...
-
Page 24: Specifications
5. Specifications Item Description Image sensor 1/2.9” CMOS sensor Effective pixels 1920 (H) x 1080 (V) Supports Micro SD class V30 or higher, capacity 16GB or Storage media higher (max. 128GB). LCD display 9.35” touch panel Lens Wide Angle Fixed Focus lens Focus range 1.5m~Infinity Resolution: Full HD 1920 x 1080 @ 30fps... - Page 25 行車記錄器 使用手冊...
- Page 26 目錄 關於本手冊 ....................2 安裝須知 ....................2 Regulatory notices..................2 CE Regulatory Notice .................. 2 WEEE 通知 ....................2 安全注意事項 .................... 3 簡介 .................... 4 特色 ....................4 包裝內容 ..................4 產品概觀 ..................5 開始 .................... 7 插入記憶卡 ..................7 安裝車內...
-
Page 27: 關於本手冊
關於本手冊 本手冊內容僅供參考 , 且可隨時變更不事先通知。本公司已盡力確保此使用手冊內 容準確完整。然而 , 對於可能發生的任何錯誤或疏漏 , 本公司概不負責。 製造商保留變更技術規格與配件的權利不事先通知。 安裝須知 駕駛或車輛行進當中切勿設定行車記錄器。請先停靠在安全地點再調整或安裝。 行車記錄器請安裝在後視鏡位置以取得最開闊的視野。行車記錄器切勿安裝在阻 礙駕駛視線的地方。 確定鏡頭在擋風玻璃雨刷的擦拭範圍內 , 以確保下雨時視野清楚。 勿用手指觸碰鏡頭。手指上的油脂會留在鏡頭上導致影像或快照不清楚。請定期 清潔鏡頭。 本設備僅適用產品隨附之電源連接器 , 請勿使用其他廠牌以免設備燒毀。 Regulatory notices This document provides country- and region-specific non-wireless and wireless regulatory notices and compliance information for your product. Some of these notices may not apply to your product. -
Page 28: 安全注意事項
安全注意事項 千萬不要拆解或試圖修理本產品。此舉可能損壞行車記錄器 , 造成觸電並使 產品保固失效。 使用者須遵守當地法律並以行車安全為優先考量,請勿於行車中操作本設備。 使用設備前請先確認日期與時間已設定完成。 本設備內建的韌體功能僅供使用者參考, 道路駕駛請依實際路況作判斷。 本設備顯示之時速和方位等數值會因外在環境因素影響而有所誤差,僅供使用 者參考。 本產品僅供使用於非商業用途, 適用法律允許的最大限度內。本公司對於使 用本產品所造成的損失不承擔任何責任。 本產品在使用時會略微變熱, 純屬正常現象不代表故障。 不正確地使用本產品或操作不當導致設備或配件損壞, 您的保固將會無效。 HP Inc.對於操作中任何資料/內容的損失概不負責。 在您開始使用此行車記錄器時,表示您已同意上述聲明。... -
Page 29: 包裝內容
1 簡介 本公司在此先感謝您購買此行車記錄器。此行車記錄器經過特別設計,可于駕 駛時錄下即時的影像與聲音。 1.1 特色 • 內建超級電容 • 高清畫質 1920x1080 • 9.35 吋觸控屏 • F/2.4 超大光圈 • 碰撞檢測 • 緊急錄影 • 停車監控(支持縮時錄影) 1.2 包裝內容 包裝內包含下列項目。如有任何專案遺漏或毀損,請立刻聯絡經銷商。 行車記錄器 綁帶 車充 外掛式 GPS 後置鏡頭 說明書 ( 選配 ) ( 選配 ) -
Page 30: 產品概觀
1.3 產品概觀... - Page 31 號碼 項目 綁帶扣 觸控屏 短按 : 螢幕開關 長按 : 電源開關 USB 插口 , 連接車充 A/V 插口 , 連接後置鏡頭 ( 選配 ) MicroSD 記憶卡槽 GPS 插口 , 連接 GPS( 選配 ) 喇叭 復位 鏡頭 麥克風...
-
Page 32: 插入記憶卡
2 開始 2.1 插入記憶卡 記憶卡金色接觸面朝向行車記錄器背面插入。將記憶卡推到底直到扣住。 ( 此 記錄器請使用 V30 或速度更快的 micro SD 記憶卡;建議在初次使用前先將 micro SD 卡格式化。 ) 移除記憶卡 將記憶卡邊緣往內推到你聽到 / 感覺到喀噠聲,然後讓它從卡槽推出直到你可 以移除。 備註: 1. 設備在開機狀態時,不要取出或插入存儲卡,以免損壞存儲卡。 2. 限使用速度等級 V30 以上 , 且記憶體容量 16GB 以上的 micro SD 卡 。 最高支持 128GB 。 3. -
Page 33: 安裝車內
2.2 安裝車內 夾在原本的汽車後視鏡上。 用綁帶圈住綁帶扣子。 調整記錄器鏡頭。 備註: 以上圖示為安裝說明。實際外觀請以您購買機種為主。... -
Page 34: 連接電源
2.3 連接電源 限使用本產品包裝內附的車充供電給行車記錄器。 車充的一端連接到記錄器的 USB 埠。電源連接孔輸入直流電壓 5V/2A 。 將車充的另一端插到車內的點煙器插孔內。車輛的引擎一旦發動,記錄 器電源自動打開。車充輸入直流電壓 12/24V 。 備註: 本設備僅適用產品隨附之車充,請勿使用其他廠牌以免設備燒毀。... -
Page 35: 電源開/關及重置
2.4 電源開 / 關及重置 自動開 / 關 2.4.1 車輛引擎一旦發動,記錄器電源便自動打開,並且開始自動錄影。 車輛引擎一旦關閉,記錄器便自動儲存錄影並且在 10 秒內關掉電源。 備註: 前提是車充有連結到點煙器插孔內,則記錄器電源會自動打開及關閉。 手動開 / 關 2.4.2 短按 鍵以手動方式打開電源。記錄器電源便自動打開,並且開始自動錄 影。 長按 鍵可關閉電源。 重置 2.4.3 以大頭針或迴紋針插壓復位洞孔至少 3 秒重新設定。... -
Page 36: 初始設置
2.5 初始設置 設定日期及時間 2.5.1 在使用設備之前,我們建議先設置正確的日期與時間。 設置正確的日期與時間,其方式如下: 在錄影預覽畫面, 觸碰螢幕上的 圖示暫停錄影。 觸碰 圖示,進入功能表。 手指上下滑動菜單, 再點按[時間設置]進入設置。 觸碰[+][-]圖示修改數值, 再觸碰[OK]確認。 重複步驟 4,直到日期與時間完成設置。按[OK]返回上一頁。 按 圖示返回錄影畫面。 3 使用行車記錄器 3.1 錄影 自動錄影 3.1.1 車輛引擎發動時會啟動自動錄影功能,行車記錄器自動開啟並開始錄影 , 左上 螢幕的紅色圓點閃爍。引擎關閉時便自動停止錄影。 備註: 1. 某些車款因為點煙器 / 電源插座沒有連結點火系統,汽車熄火之後,依然持續錄影,此時 您需手動關閉行車記錄器的電源。 2. 循環錄影可設定 1 分鐘 , 2 分鐘 , 或 3 分鐘。 3. -
Page 37: 錄影畫面
錄影畫面 3.1.2 編號 圖示 項目 說明 錄影時長 顯示影片當前的錄影時長。 00:10 日期與時間 顯示當前拍攝的日期與時間。 菜單設定 設定功能選項。 播放 播放錄影檔及加鎖/緊急錄影檔。 錄影/暫停錄影 錄影或暫停錄影。 在錄影期間按此按鍵可切換前後鏡頭的影 鏡頭切換 像。(本機可支援後置高清鏡頭,包裝中並無 按鍵 附贈,欲瞭解更多資訊,請洽經銷商諮詢。) 聲音記錄 設定錄音或是不錄音。 在錄影期間按此按鍵可進入緊急錄影模式加 緊急錄影 鎖檔案。 若有選配GPS, GPS定位之後, 圖示會由白色 GPS狀態 變為藍色 。... -
Page 38: Gps (選配)
緊急錄影 3.1.3 啟用緊急錄影,其方式如下: 在錄影期間, 觸碰螢幕上的 圖示, 將會進入緊急錄影模式,螢幕出現 "鎖定目前檔案" 的提示, 左上螢幕的黃色圓點閃爍。在緊急錄影模式中 錄製的視頻會被保護起來, 不會被一般循環錄影的視頻所覆蓋。 緊急錄影的時長與循環錄影時長相同。當緊急錄影達設置的時間,系統 會恢復到一般的錄影模式。 備註: 1. 如果啟用 重力感應 功能並偵測到碰撞,設備會自動進入緊急錄影模式。此功能可於 [ 設 定 ] 選擇關閉,低敏度,中敏度或高敏度。 2. 緊急錄影的檔案會另外存儲成受保護的檔案,避免檔案被一般循環錄影的視頻所覆蓋。 3. 緊急錄影資料夾約 20% 的記憶卡可用容量。緊急錄影資料夾已滿時,當新的緊急錄影檔 案建立 , 最舊的緊急錄影檔案會被自動刪除。 3.2 GPS ( 選配 ) 將選配的GPS配件插入行車紀錄器的GPS插孔, 可以在預覽介面查看時速及方 向等資訊, 同時會有語音播報提醒。... -
Page 39: 後置鏡頭 (選配)
3.3 後置鏡頭 ( 選配 ) 先將行車記錄器關機, 再將選配的後置鏡頭配件插入行車記錄器的AV IN插孔, 安裝完成後, 重新開機, 便可以使用車前/後雙鏡頭錄影功能。 備註: 1. 開機默認鏡頭畫面可於菜單設置前錄 , 後錄 , 或是前後錄分屏顯示。 2. 後置鏡頭不支援熱插拔 , 請先關機再插拔後置鏡頭。 3. 鏡頭畫面預覽可觸碰螢幕上的 圖示切換。 3.4 檔案播放 在錄影預覽畫面, 觸碰圖示 暫停錄影, 再觸碰 圖示進入檔案播放功能 表。 觸碰左側 圖示選擇一般錄影檔, 或是 圖示選擇緊急錄影檔, 手指 滑動檔案清單, 選擇欲播放的檔案並點選該檔案確認播放。 若有安裝選配的後置鏡頭, 可觸碰汽車圖示顯示前鏡頭... -
Page 40: 停車模式
3.5 停車模式 若啟用停車模式的功能,可透過本記錄器監控車輛停置時的狀況。 啟用停車模式之前, 請您經由專門店安裝ACC常時電源線(或稱降壓線)。 打開停車監控的功能,其方式如下: 1. 在錄影預覽畫面, 觸碰圖示 暫停錄影, 再觸碰 圖示進入設置介面。 2. 手指滑動選擇[停車模式],點按確認進入設置。 3. 點按選擇12小時或是24小時。 4. 按 ,返回功能表頁面。 5. 汽車熄火後,設備自動進入停車監控模式,以一秒一幀的縮時錄影開始12小 時或是24小時錄影。錄影時間完成之後, 設備自動關機。 6. 停車監控的模式下, 當汽車受到外力撞擊時,設備會進入緊急錄影模式,檔 會加鎖, 不會被覆蓋。 備註: 1. 本包裝不包含 ACC 常時電源線 , 如欲購買 , 請洽經銷商。如需安裝 , 亦請透過專業的安裝 商店。 2. -
Page 41: 調整設定
4 調整設定 在錄影預覽畫面, 觸碰圖示 暫停錄影, 再觸碰 圖示進入設置介面,可 以對設備進行功能設置。功能選項的詳細說明,請參考下表。 設置 說明 可用選項 影像解析度 設置影片的解析度。 1080P / 720P 設備依循您所設置的影片時長將錄 1 分鐘 / 2 分鐘 / 3 錄影間隔 製的影片存儲為各個檔案 , 並且循 分鐘 環錄影。 聲音紀錄 設置錄影時是否錄製聲音。 關閉 / 開啟 後錄 / 前錄 / 分屏 開機默認顯示... - Page 42 設置 說明 可用選項 音量 設置提示音的音量。 1 ~ 10 系統重設 將系統恢復到出廠的設置。 是 / 否 將設備中的存儲卡格式化 , 所有的檔 格式化 SD 卡 是 / 否 案都將遺失。 韌體版本 顯示當前韌體版本。 備註: 1. GPS 功能須搭配選配的 GPS 配件 , 韌體自動偵測顯示這兩個選項。...
- Page 43 5 規格 項目 說明 影像感測器 1/2.9” CMOS 感測器 有效圖元 1920 (H) x 1080 (V) 支援速度等級V30以上,且記憶體容量 16GB 以上的 存儲媒體 micro SD 卡 (最高支持 128GB) 螢幕 9.35” 觸控螢幕 鏡頭 廣角固定焦距鏡頭 對焦範圍 1.5m ~ 無限 1920 x 1080P 30 fps 影片解析度 1280 x 720P 30 fps 影片格式...
-
Page 44: 限用物質含有情況說明書
6 限用物質含有情況說明書 設備名稱:行車記錄器 型號(型式):f790 Equipment name: Car Camcorder Type designation (Type): f790 限用物質及其化學符號 Restricted substances and its chemical symbols 單元Unit 六價鉻 多溴聯苯 多溴二苯醚 鉛 汞 鎘 Lead Mercury Cadmium Hexavalent Polybrominated Polybrominated (Pb) (Hg) (Cd) chromium biphenyls diphenyl ethers (PBB) (PBDE) 主機外殼...
Need help?
Do you have a question about the f790 and is the answer not in the manual?
Questions and answers