Table of Contents
Advertisement
Quick Links
iNS-300
User Manual
Ver. 1.0.0, Oct. 2021
W
ARRANTY
All products manufactured by ICP DAS are warranted against
defective materials for a period of one year from the date of
delivery to the original purchaser.
W
ARNING
ICP DAS assumes no liability for damages consequent to the
use of this product. ICP DAS reserves the right to change this
manual at any time without notice. The information
furnished by ICP DAS is believed to be accurate and reliable.
However, no responsibility is assumed by ICP DAS for its use,
nor for any infringements of patents or other rights of third
parties resulting from its use.
C
OPYRIGHT
Copyright © 2021 by ICP DAS. All rights are reserved.
T
RADEMARK
Names are used for identification only and may be registered
trademarks of their respective companies.
C
U
ONTACT
S
If you have any questions, please feel free to contact us via
email at:
service@icpdas.com
Series
S
UPPORT
iNS-306
Written by Albert Deng . Edited by Sunny
Advertisement
Table of Contents

Related Manuals for ICPDAS iNS-300 Series


Summary of Contents for ICPDAS iNS-300 Series
- Page 1 Names are used for identification only and may be registered trademarks of their respective companies. ONTACT If you have any questions, please feel free to contact us via email at: service@icpdas.com Written by Albert Deng . Edited by Sunny...
-
Page 2: Table Of Contents
Series User Manual ONTENTS INTRODUCTION ........................3 ..........................4 ACKING ..........................5 EATURES HARDWARE INFORMATION ....................8 ..........................8 PPEARANCE .......................... 11 PECIFICATION ..........................12 IMENSIONS GETTING STARTED ......................13 ....................13 ONFIGURING THE PC ................. 14 ONNECTING THE OWER AND THE .................. -
Page 3: Introduction
In compliance with the IEEE 802.3at standard, each PoE port ensures the PSE function and provides up to 30W for powered devices The iNS-300 web interface enables you to remotely log into the iNS-300 series module for configuration and maintenance. You can configure the iNS-300 series module, turn off/on or reset the power of the POE Ethernet port, and set power schedule from your browser. -
Page 4: Packing List
Series User Manual 1.1 Packing List The shipping package includes the following items: Note If any of these items are missing or damaged, please contact the local distributor for more information. Save the shipping materials and cartons in case you need to ship the module in the future. -
Page 5: Features
Series User Manual 1.2 Features 1. Built-in Web Server The iNS-300 series module has a built-in web server that allows users to easily configure, monitor and control the module from a remote location using a web browser. 2. Power On/Off Schedule An individual power on/off schedule is provided for each PoE port of the iNS-300 series module. - Page 6 The PoE powered devices may become slow or inoperable if they are left on for too long. A simple reset can help you to solve most problems most of the time. The iNS-300 series module offers an individual power reset schedule for each PoE port, you can configure the schedule through a web browser to reset your devices regularly and keep them working in good condition.
- Page 7 5. LAN Bypass LAN Bypass feature guarantees the Ethernet communication. It will automatically active to ensure the continued flow of important network traffic when the iNS-300 series module loses its power. 6. Highly Reliable Under Harsh Environment Wide Operating Temperature Range: -40 ~ +75°C ...
-
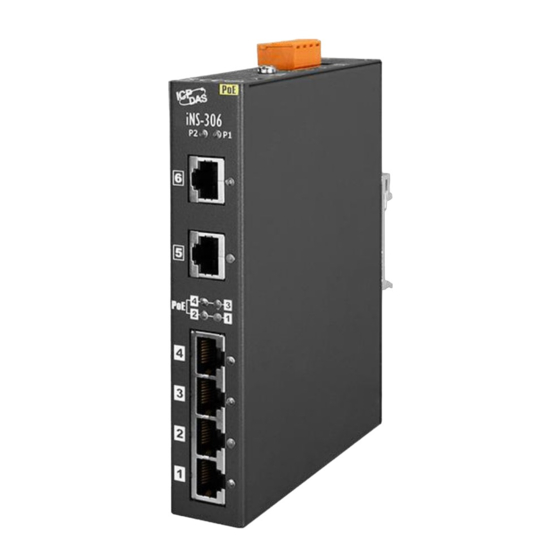
Page 8: Hardware Information
Series User Manual Hardware Information 2.1 Appearance Front Panel Top Panel Power LED Indicator Operating Mode Ethernet Port Switch Link/Act & Speed LED Indicator Power Input Connector (+12 ~ +57 VDC) PoE Status Indicator PoE and Link/Act & Speed... - Page 9 PoE and Ethernet Port and Link/Act & Speed LED Indicator The iNS-300 series module offers 4 x 10/100Mbps PoE ports. Each port can provide up to 30 W of power (compliant with IEEE 802.3at standard). They can be used to connect and supply power to any PoE-enabled devices such as wireless access points, network cameras, IP phones, as well as to connect Ethernet-enabled devices like computers and printers.
- Page 10 Once the power is supplied, the corresponding LED indicator lights up. Each PoE port can provide up to 30 W of power when the the iNS-300 series module is powered by +24 ~ +57V power supply.
-
Page 11: Specification
Series User Manual 2.2 Specification Model iNS-306 PoE Technology PoE Compliance 100% IEEE 802.3at compliant PoE Power Up to 30 watts per channel PoE Operation Automatic detection and power management PoE Pin Assignments V+ (pin 1, 2), V-(pin 3, 6) -
Page 12: Dimensions
Series User Manual 2.3 Dimensions Left Side View Front View Copyright © 2021 ICP DAS CO., Ltd. All Rights Reserved. - 12 -... -
Page 13: Getting Started
Series User Manual Getting Started This chapter provides a basic overview of how to configure and operate the iNS-300 series module. 3.1 Configuring the Boot Mode INIT Mode INIT mode is the initial mode used for troubleshooting only. -
Page 14: Connecting The Power And The Host Pc
3.2 Connecting the Power and the Host PC Step 1: Connect both the iNS-300 series module and the Host PC to the same sub network. Ensure that the network settings on the Host PC have been correctly configured and are functioning normally. -
Page 15: Configuring The Network Settings
Utility will be displayed on your desktop Step 3: Click “Search Servers” to search for the iNS-300 series module on the network Copyright © 2021 ICP DAS CO., Ltd. All Rights Reserved. - 15 -... - Page 16 Series User Manual Step 4: Double-click your module name to open the configuration dialog box Factory Default Settings 192.168.255.1 Gateway 192.168.0.1 Mask 255.255.0.0 Step 5: Assign new network settings and then click the “OK” button Enter the relevant values for the IP Address, Subnet Mask, Gateway, etc., and then click the “OK”...
- Page 17 Series User Manual Step 7: Click the “Web” button to connect to the web interface (Or entering the iNS-300's IP address into a web browser) Step 8: Change password upon first login The default password for logging in to the iNS-300 web page is Admin. You will be prompted to change your password upon first login or when the password is the same as the default.
-
Page 18: Web Configuration
Series User Manual Web Configuration The iNS-300 series module has a built-in Web Server, which provides an intuitive web interface, allowing users to login to the module for monitoring the physical status of an Ethernet or PoE port, configuring and managing module settings through a browser. - Page 19 Series User Manual The second section displays the connection status of each port and power consumption of the powered devices. You can manually power on or off the attached devices here. Item Description Displays the connection status of each port. A green light indicates that Link a device is connected to the port.
-
Page 20: Network
Series User Manual 4.2 Network The Network page contains the IP Address Configuration section allowing you to verify network settings, General Settings, Restore Factory Defaults and Firmware Update sections. Each of which will be described in more detail below. - Page 21 Series User Manual DHCP Configuration If a DHCP server is connected to you network, a network address can be dynamically assigned by enabling DHCP client mode. Step 1: Select “DHCP” from the Address Type drop-down menu. Step 2: Click the “Update Settings” button to complete the configuration.
- Page 22 Ethernet Speed, System Timeout, TCP Timeout, Web Auto-logout, etc. Item Description Set the system timeout period. If the iNS-300 series is abnormally or System Timeout connection failed due to unknown reason over the time set in this (Network Watchdog) field, the system will be automatically restarted.
- Page 23 Series User Manual You can restore the iNS-300 series module to factory default settings or reboot it in the Other Operations section. Restoring Factory Default Settings Step 1: Click the “Restore Defaults” button. Step 2: Click “OK” on the pop-up dialog box.
- Page 24 Series User Manual Rebooting the Module Step 1: Click the “Reboot” button in the right field of Force Reboot. Step 2: After the module restarts, reload the web interface and log into the module again. Copyright © 2021 ICP DAS CO., Ltd. All Rights Reserved.
- Page 25 “Reboot” button in the Firmware Update section via the network without manual adjustment. Note that the iNS-300 series module needs to be connected to the same network as your computer. If not, using remote desktop software like TeamViewer to access to a computer connected to the same network of the iNS-300 series module, you can remotely update firmware in the same way.
-
Page 26: Schedule
Series User Manual 4.3 Schedule On the Schedule page, you can set the system time (RTC), NTP server, and manage the power schedule for PoE powered device(s). Setting the system time Correct system time is essential to network communication and PoE power management. Configure the system time correctly before you run the module on the network. - Page 27 NTP section, you can enable or disable the NTP client function, specify an NTP server for clock synchronization and set the time zone. Note Once the NTP function is enabled, the iNS-300 series module will only synchronize its clock time every hour on the hour. Item...
- Page 28 Series User Manual Reset schedule for automatic reboot of PoE devices In order to keep the PoE powered devices functioning in good condition, restarting the devices regularly will help. You can configure a weekly schedule for each PoE port individually to reboot the attached devices.
- Page 29 Series User Manual Power schedule for turning on/off PoE devices The 4 PoE ports of the iNS-300 can be individually scheduled to automate shut down and restart PoE powered devices at specified times in a day or week. It is helpful for realizing remote management and saving manpower and power consumption.
-
Page 30: Filter
4.4 Filter The Filter page is used to query or edit the IP Filter list (Allow IP List) for the iNS-300 series module. The IP filter list restricts the access of incoming packets based on the IP address. If one or more IP addresses are saved into the Allow IP List, only clients that have an IP address within the filter list can access the iNS-300 series module. -
Page 31: Changing Password
Series User Manual 4.5 Changing Password You can change password on the Password page. Step 1: Enter your current password in the “Current password” field. Step 2: Enter your new password in the “New password” field. (1 ~ 12 alphanumeric characters are allowed) Step 3: Enter your new password in the “Confirm new password”... -
Page 32: Logout
Series User Manual 4.6 Logout Click “Logout” on the navigation bar to log out of your account. It redirects you to the login page Copyright © 2021 ICP DAS CO., Ltd. All Rights Reserved. - 32 -... -
Page 33: Revision History
Series User Manual Revision History Revision Date Description 1.0.0 Oct. 2021 Initial issue Copyright © 2021 ICP DAS CO., Ltd. All Rights Reserved. - 33 -...
Need help?
Do you have a question about the iNS-300 Series and is the answer not in the manual?
Questions and answers