Alpes Inox 2010 Series Instruction Manual
Multifunction electric oven with electronic temperature control and cool door
Hide thumbs
Also See for 2010 Series:
- Instruction manual (36 pages) ,
- Installation manual (8 pages) ,
- Instruction manual (16 pages)
Table of Contents
Advertisement
Quick Links
Advertisement
Table of Contents

Subscribe to Our Youtube Channel
Related Manuals for Alpes Inox 2010 Series


Summary of Contents for Alpes Inox 2010 Series
- Page 1 SERIE “2010” MULTIFUNCTION ELECTRIC OVEN WITH ELECTRONIC TEMPERATURE CONTROL AND COOL DOOR FOUR ELECTRIQUE MULTIFONCTIONS AVEC REGLAGE ELECTRONIQUE DE LA TEMPERATURE ET PORTE TEMPEREE GB Class 3 FR Classe 3 FI/9R - FS/9R INSTRUCTIONS MANUAL LIVRET D’INSTRUCTIONS...
-
Page 3: Table Of Contents
INDEX TABLES DES MATIERES IMPORTANT DIRECTIONS ..............pag. AVERTISSEMENTS IMPORTANTS ............. pag. DISPOSAL ....................pag. TRAITEMENT DES DÉCHETS .............. pag. TECHNICAL AND STRUCTURAL FEATURES ........pag. CARACTERISTIQUES TECHNIQUES ET DE CONSTRUCTION ... pag. STANDARD SUPPLY ACCESSORIES..........pag. ACCESSOIRES STANDARD ..............pag. ACCESSORIES UPON REQUEST ............pag. ACCESSOIRES SUR DEMANDE ............ -
Page 4: Important Directions
IMPORTANT DIRECTIONS AVERTISSEMENTS IMPORTANTS - Before using the appliance, carefully read this manual and keep it - Avant d’utiliser l’appareil, lisez attentivement ce manuel et in a safe place for further reference. conservez-le dans un endroit accessible pour toute consultation - When opening the package, check that the appliance is not ultérieure. -
Page 5: Disposal
DISPOSAL TRAITEMENT DES DÉCHETS Disposal of packaging: separate the various materials in Traitement des matériaux d’emballage: séparer les différents types observance of local disposal and recycling bylaws. de matériaux en se conformant aux normes locales relatives au traitement et au recyclage des déchets. Disposal of disused electrical appliances: The Community Traitement des appareils électroménagers mis eu rebut: la WEEE Directive concerning the disposal of Electrical and Electronic... -
Page 6: Technical And Structural Features
TECHNICAL CARACTERISTIQUES TECHNIQUES AND STRUCTURAL FEATURES ET DE CONSTRUCTION The oven and the components are made in 19/10 chrome- Le four et les pièces qui le composent sont construites en acier inox au nickel stainless steel. nickel-chrome 19/10. The external part of the door doesn’t exceed 50°C also at La partie externe de la porte du four, même aux températures les plus high temperature. -
Page 7: Standard Supply Accessories
STANDARD SUPPLY ACCESSORIES ACCESSOIRES STANDARD roast-meter thermosonde ACCESSORIES UPON REQUEST ACCESSOIRES SUR DEMANDE F9R/RS F/PCL F/PR spit flat cooking tray refractory plate for pizza/bread cooking plaque de cuisson lisse broche plaque réfractaire pour la pizza et le pain F/TB F/TM low-edged pan medium-edged pan pan lid... -
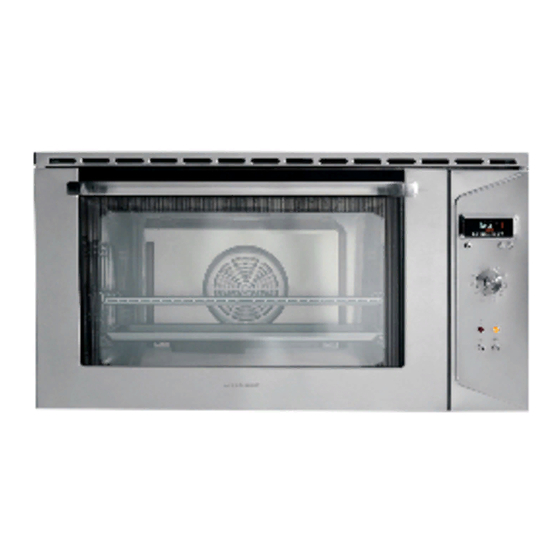
Page 8: Description Of Functions
DESCRIPTION OF FUNCTIONS DESCRIPTION DES FONCTIONS CONTROL PANEL PANNEAU DES COMMANDES A. Red warning light, comes on when the heating elements are A. Voyant lumineux rouge qui s’allume quand les résistances sont en working and goes off when the set temperature is reached. marche et s’éteint quand la température établie est atteinte. -
Page 9: Electronic Programmer
ELECTRONIC PROGRAMMER PROGRAMMATEUR DE CUISSON ÉLECTRONIQUE Child lockout safety device Bottom heating Sécurité enfant Chauffage par le bas Little bell Top heating Cloche (sonnerie) Chauffage par le haut Heating symbol Symbole chauffage Ventilateur Food probe Circular heating element Sonde à rôti Résistance circulaire Temperature Grill... -
Page 10: Using The Programmer
USING THE PROGRAMMER UTILISATION DU PROGRAMMATEUR SETTING THE LANGUAGE AND TIME RÉGLAGE DE LA LANGUE ET DE L’HEURE After connecting the appliance to the power supply, select the Après le branchement au réseau électrique, il faut sélectionner la langue desired language within 10 seconds using the F keys, then confirm désirée avec les touches F et dans les dix secondes, la confirmer avec la the selection by pressing the E key. -
Page 11: Demo" Function
“DEMO” FUNCTION FONCTIONS “DÉMO “ This function can be used for demonstrations in shops, showrooms Cette fonction peut être utilisée à des fins de démonstration dans les or trade fairs without using the oven heating elements. magasins, les salles exposition ou les foires, sans que les éléments Set the programmer for normal operation with the time displayed. - Page 12 To silence the buzzer operate one of the F keys; the message Arrêter la sonnerie en pressant l’une des deux touches. L’afficheur “PROLONG BAKING WITH +” or “OFF” will appear on the display. If indique l’option PROLONGER CUISSON AVEC +, ou ETEINDRE. Si l’on you decide to extend the baking time, you will need to reset the décide de prolonger la cuisson, reprogrammer la température de la thermometer temperature..
-
Page 13: Functions And Recommended Pre-Set Baking
FUNCTIONS AND RECOMMENDED PRE-SET BAKING TEMPERATURES FONCTIONS ET TEMPERATURES DE CUISSON CONSEILLEES ET PRESELECTIONNEES Defrost Super grill Decongélation Grand gril Hot air/Oven Grill Multicuisson Gril Fan grill Pizza Gril + ventilateur Multicuisson + inférieur Top heat Super hot air Supérieur Multicuisson + supérieur Bottom heat Top + bottom... - Page 14 SUPER HOT AIR The double fan forced baking function with upper heating element allows even baking of food with a brown crisp surface. MULTICUISSON + SUPERIEURE La double fonction cuisson ventilée et résistance supérieure permet une cuisson qui rend les aliments moelleux et parfumés dedans mais dorés et croquants dessus.
-
Page 15: Spit
GRILL Function used for spit roasting (sausages, ribs, game, etc.), to give that golden brown colour that is so appealing. GRIL Fonction employée pour la broche (saucisses, côtelettes, gibier, etc.) pour griller et pour créer, à la fin de la cuisson, ce doré si apprécié dans la cuisine traditionnelle. -
Page 16: Cooking Times
COOKING TIMES Preheat the oven. A beep will indicate that the set preheating temperature has been reached. SUPER TRAY CONVENTIONAL VENTILATED ROAST GRILL – TEMPERATURE COOKING WEIGHT G DISHES GRILL NOTES LEVEL COOKING COOKING METER C°|MINUTES – °C TIME C°|MINUTES Pasta dishes Lasagne 2.500... - Page 17 TABLEAU DES TEMPS DE CUISSON Préchauffer le four avant la cuisson. Un signal acoustique indiquera que la température de préchauffe programmée est atteinte. CUISSON TEMPÉ- NIVEAU CUISSON THERMO- GRIL GRAND GRIL DURÉE POIDS G PLATS TRADITION- RATURE NOTES LÈCHEFRITE VENTILÉE SONDE C°...
-
Page 18: Pull-Out Guides
PULL-OUT GUIDES The fully pull-out guides reduce the risk of getting burnt or upsetting trays when removing them. Place or remove the tray or grill with the guides fully out. Fit the two holes at the bottom into the two stops at the end of the guides (figs. 1 and 2). - Page 19 To position the sliding guide at a different level, release it from its track by pushing down on the two clips located at either end. Then push the guide towards the inside of the oven (fig. 4). To remount it, push the two clips onto the upper tubular element of the track, making sure that the shoe matches the right- or left-hand side of the oven (fig.
-
Page 20: Maintenance And Cleaning
MAINTENANCE AND CLEANING ENTRETIEN ET NETTOYAGE REPLACING THE OVEN LIGHT Before replacing the light, disconnect the plug from the outlet or simply turn off the main switch. Remove the light cover from its seat by prying it open with a screwdriver applied in the special slot (fig. - Page 21 NETTOYAGE DE LA VITRE DU FOUR Débloquer les charnières de la porte du four en soulevant la butée de blocage. Enlever ensuite la porte comme sur la figure 9 et la poser sur une surface plate. Dévisser les deux vis situées sur la partie supérieure de la porte et retirer le profil en acier (fig.
-
Page 22: Cleaning The Steel
CLEANING THE STEEL Before carrying out any operation, for obvious reasons of safety disconnect the power plug from the relevant socket or simply turn off the main switch. Use Cif with a soft. untreated cotton cloth on all outer surfaces; use the same type of clean cloth to rinse and dry. -
Page 23: Cleaning The Porcelain Enamel
lavent avec du Cif. Dans le cas où ils seraient noircis par la surchauffe, il faut les frotter en utilisant le tissu synthétique Scotch-Brite 3M avec le détergent Stahl Fix, rincer soigneusement et sécher avec un linge en coton. Il ne faut pour aucune raison employer des chiffons traités chimiquement, des chiffons abrasifs (à... -
Page 24: Instruction For Technician
INSTRUCTION FOR TECHNICIAN 89,5 INSTRUCTIONS POUR LE TECHNICIEN INSTALLATION Unpack the oven, removing all the wrapping and protecting material. The kitchen units or the wall unit that house the built-in oven must have cutouts corresponding to the dimensions and position indicated in the drawing shown above. -
Page 25: Connection To The Mains
CONNECTION TO THE MAINS This oven is equipped with a HAR H05VV-F type three-core (sec. 3x1.5mm ) power cable L=1.35 m arranged for operation with 230 V~ - 50/60 Hz A.C. power supply. The earth wire is yellow-green (fig. 16). In case the cord is damaged or needs to replaced make sure to replace it with one of the same type. -
Page 26: Schema Electrique
ELECTRICAL DIAGRAM SCHEMA ELECTRIQUE 1 2 1 2 KEY: LÉGENDE: Thermostat on front panel (50°C) Thermostat sur façade (50°C) Function selector 7LA Item 810600 Sélecteur fonctions 7LA - art. 810600 Electronic programmer – Item 701330 Programmateur électronique art. 701330 Orange pilot light (live line) Témoin lumineux orange (sélecteur programme en marche) Red pilot light (heating elements on) Témoin lumineux rouge (résistances en marche) -
Page 28: Etiquette Technique
TECHNICAL LABEL ETIQUETTE TECHNIQUE CP 11 The manufacturer declines all responsibility for possible imprecisions contained in this booklet, due to misprints or clerical errors, for damages to things or people, in case all the accident prevention regulations useful to the normal and regular operation of the electric system are not complied with. The same is true for any assembly, installation and use which is not carried out in conformity with the directions and instructions provided.
Need help?
Do you have a question about the 2010 Series and is the answer not in the manual?
Questions and answers