Table of Contents

Related Manuals for Growatt ShineMaster


Summary of Contents for Growatt ShineMaster
- Page 1 SHENZHEN GROWATT NEW ENERGY TECHNOLOGY CO.,LTD No.28 Guangming Road, Shiyan Street, Bao’an District, Shenzhen, P.R.China ShineMaster User Manual 86 755 2747 1942 + 86 755 2747 2131 service@ginverter.com www.ginverter.com...
-
Page 2: Table Of Contents
About the user manual 1.1 Introduction Copyright statement Authorized personnel Manual use Product description 2.1 Device Overview 2.2 Unpacking 2.3 ShineMaster Network Introduction Installation and Connection 3.1 ShineMaster installation environment requirements 3.2 ShineMaster installation 3.3 Connect to the photovoltaic device... -
Page 3: About The User Manual
No part of this document may be reproduced or transmitted in any form or by any means without prior written consent of Growatt New Energy Technology CO., LTD. 6.1 Reset ShineMaster The version of this manual is V2.0. Growatt owns the final interpretation right of this 6.2 Common faults and troubleshooting 6.3 Maintenance user manual. -
Page 4: Product Description
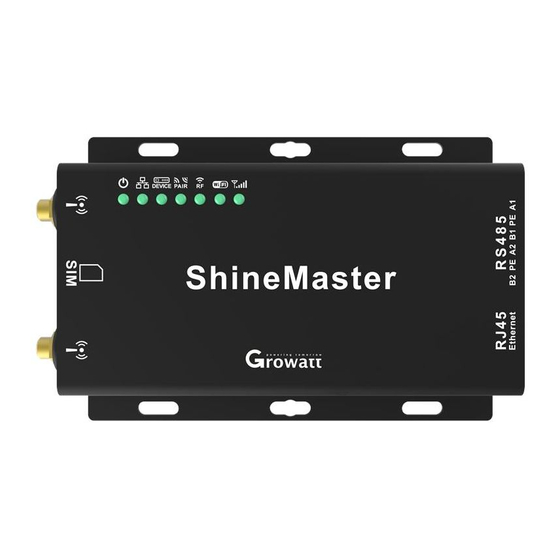
2.1.2 LED description 2.1.1 Port ShineMaster has seven LED indicators. The status of the ShineMaster can be displayed by The interface of ShineMaster, as shown in figure 2-1 above. the LED indicator. As shown in figure 2-1 and table 2-2 above. -
Page 5: Unpacking
If any damage is found or any component is missing, contact your supplier. Table 2-4 Note: 1:the above accessories ShineMaster 4 g version to configuration in 4 g antenna 2:4G sim card needs purchased from Local Telecommunication service provider . -
Page 6: Shinemaster Network Introduction
ShineMaster. When you want to upload the data of ShineMaster to the server, you will need both serial number and ‘check code’... -
Page 7: Shinemaster Installation
1.ShineMaster (leader) communicates with follower devices via RS485 wired connection. 3.2.1 Installation Procedure T+ on the RS485 port of the device corresponds to A1 or A2 on the ShineMaster 485 port, T- and ShineMaster 485 on the RS485 port of the follower device, corresponding to B1 or B2. -
Page 8: Access Methods
3) Find the same as the serial number of the collector SN the client name,This IP is the IP address of the router assigned to ShineMaster. Than if: ShineMaster serial number of SN is: AEA3745001, the query results as shown in the figure below: Note: the router must open the DHCP function. -
Page 9: Shinemaster Status
Fig 4-1 2.Enter the user name and password, the default login user name: admin password: admin, fill in and click on login to enter the Growatt ShineMaster system page. 4.3 ShineMaster Status Click the ShineMaster datalogger Status to view information such as the “System Status Information”, “Serial Number”, “Server Address”, “Number of Connected Devices”,... - Page 10 (4) Select "Add" and click Save. (5) After successfully saving, enter the "Device Status" page to check whether device is successfully added. Fig 4-6 Fig 4-4 4.4.2 Delete device (3) In the third drop-down list, fill in the communication address of monitored device (1) Select the monitoring method for monitoring PV devices in the first drop-down list of "Add or Remove Devices".
-
Page 11: Baud Rate Setting
4.4.3 Multiple add/delete devices (2) Both add and remove devices, select "DEL". Add and delete device: When you need delete a device, all the options should be the same with the momemet If the address of a kind of equipment continuously, can one-time added or delete. you add this device like: 485 channel, device type, address, if you are not sure about this As shown below: you can check the device status first. -
Page 12: Server Settings
In the configuration page click " Network setting" column, select the net way for LAN, can be saved. Fig 4-14 Note: ShineMaster 4 g version can also choose to LAN way to communicate with the server. Fig 4-11 4.6.2 Server Address Setting (2) ShineMaster’s Default setting of the DHCP function is “ON”... - Page 13 Shinemaster added to the server, if the subsequent need to modify some parameters of The datalogger or enable, disable a function can be done through the server.
- Page 14 (1) After the registration is completed, it will automatically skip to the ShineServer main Note: “ShineMaster serial number” and “datalogger check code” can be found on the interface. Click "plant" → "plant data" , and the displayed information is the total power package box.
- Page 15 (1) In the Server page click the “Device Management” and then click “Data Logger”. In this page click set the device updating icon. (2) Add one device, add one Growatt inverter set the 485 communication address is 1. Fig 5-3 (2) Click "plant"...
- Page 16 (4) Above adding or deleting devices if success following figure will pop out. (3) If success following figure will pop out. 5.3.2 Change ShineMaster Baud rate. Note: The second channel of Baud rate setting would be the same as the fist channel.
- Page 17 1. Avoid frequent turning on and off of the power supply, handle with care; 2. ShineMaster is a product for indoor use. Do not use ShineMaster in a humid If you press the “reset” button for five seconds, it will erase all the registered device environment or in direct sunlight.
- Page 18 RS485 communication distance cable) Contact us Growatt New Energy provides customers with a full range of technical support. Users can contact the nearest Growatt new energy office or customer service point, or they can contact the company's customer service center directly.
Need help?
Do you have a question about the ShineMaster and is the answer not in the manual?
Questions and answers