Table of Contents
Advertisement
Quick Links
Advertisement
Table of Contents

Related Manuals for Qu-Bit Electronix Data Bender


Summary of Contents for Qu-Bit Electronix Data Bender
- Page 1 v1.4.5 Digital Meets Analog.
-
Page 2: Table Of Contents
Table of Contents This manual covers Data Bender firmware v1.4.5 Foreword Description Module Installation What Is Circuit Bending? Recommend Reading Front Panel Diagram Functions • Time ∘ Internal Clock Mode ∘ External Clock Mode • Repeats • Mix • Mode •... -
Page 3: Foreword
What if we had digital “bend points”, that were attached to knobs and switches, affecting how DSP was rendered, all under voltage control? This was the inspiration for Data Bender. I hope you have as much fun breaking it as we did. Happy patching, Andrew Ikenberry Founder &... -
Page 4: Description
Description Data Bender is a circuit bent digital audio buffer. It is inspired by the ways in which audio equipment can fail. The sounds of skipping CDs, software bugs, and defective tape machine playback are all accessible. The 96kHz, 24-bit audio buffer can hold over a minute of stereo audio, providing a sonic canvas capable of infinite surprises and discovery. -
Page 5: What Is Circuit Bending
What Is Circuit Bending? Circuit bending is the manipulation of existing electronic circuits to achieve unpredictable and exciting results. The technique was pioneered by Reed Ghazala in the 1960s and has garnered a cult following in the world of electronic music. In practice, circuit bending usually involves finding two points on a circuit board which, when connected, will cause the device to operate in a different manner than originally intended. -
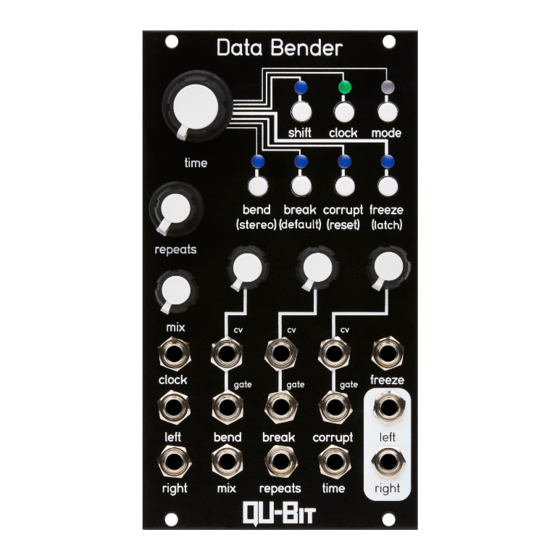
Page 6: Front Panel Diagram
Front Panel Tactile Controls CV Inputs Gate Inputs Audio IO... -
Page 7: Time
Functions - Persistent Between Modes 1. Time Time sets the sample period for incoming audio to be processed. This is the rate at which a new audio buffer is acquired for processing and manipulation. Switch between Internal and External Clock modes by pressing the Clock button. The buffer space located outside of the current section set by time is written to in the background so that some fairly recent audio is always in the buffer when time is changed. -
Page 8: Repeats
Plays subdivision twice Plays subdivision ten times Experiment: Repeats is the quickest way to create controlled stutter effects with Data Bender. While in external clock mode, send clocked CV to the Repeats CV input for instant stutters. Perfect for creating vocal glitches, or percussive beat repeats at the end of a bar for glitch transitions. -
Page 9: Mode
Macro mode is a set of 2 controls (Bend and Break) that have automated parameters based on the clock settings. Macro Mode is indicated by a Blue Mode LED. Set the knobs where you like them and let the Data Bender bend your data for you. 5. Bend Bend provides manipulations that are inspired by the tape medium and its associated playback machines. -
Page 10: Break
Functions - Different Between Modes 6. Break Break emulates the malfunctioning of digital audio devices such as CDs, wireless audio, and soft- ware bugs. With this control you can experience the following effects: • Glitches and stutters similar to a scratched CD •... -
Page 11: Micro Mode
Micro Mode is indicated by a Green Mode LED. Though Macro Mode provides immediacy for those data bending cravings, Micro Mode gives you complete control over any manipulation of the buffer, letting you break out of the “Data Bender” sound mold. -
Page 12: Break - Traverse/Silence
Functions - Different Between Modes 6. Break Pressing the button or using a Gate will toggle between Traverse and Silence. When either the knob, CV or the Repeats setting changes the currently selected subsection, the Break LED will blip gold. Traverse Silence break... -
Page 13: Corrupt
Functions - Persistent Between Modes 7. Corrupt Corrupt is an interchangeable end-of-chain effect within Data Bender, and includes 5 audio de- grading style effects. The knob controls a variable range for each control, and the button cycles between the 5 effects. -
Page 14: Freeze
Functions - Persistent Between Modes 8. Freeze When enabled, no new audio will be recorded into the audio buffer, and whatever is there will stay there until Freeze is deactivated. Extending the time control down below where it was when the signal was frozen will introduce ar- tifacts of old data from the last time the buffer was that size. -
Page 15: Shift
The Restore Settings action below will reset this to the default amount of windowing. Shift+Repeats: LED Dimmer Holding Shift and turning the Repeats knob will adjust the LED brightness level on Data Bender. This is useful for adjusting brightness depending on your ambient lighting situation, whether you are in a dark studio or the great outdoors! When the knob is fully CCW, the minimum LED brightness occurs. -
Page 16: Shift+Mix: Stereo Enhancement
Functions - Persistent Between Modes Shift+Mix: Stereo Enhancement Hold Shift and turning Mix to adjust Data Bender’s stereo imaging. When the knob is fully CCW, stereo enhancement for the buffer is at a minimum. When the knob is fully CW, The buffer’s left and right channels are pushed to the very edge, creating a wide stereo field. -
Page 17: Shift+Break Button: Restore Default Settings
Functions - Persistent Between Modes Shift+Break Button: Restore Default Settings While holding shift, pressing the Break button will restore all settings back to their defaults. The LED for this button will pulsate white to indicate that it is the restore default settings function. When pressed it will blink blue to indicate the settings have been restored to their defaults. -
Page 18: Shift+Clock Button: Gate Behaviors
Momentary Gates Shift+Mode Button: Corrupt Offerings Holding Shift and pressing Mode will swap between the current Data Bender Corrupt effect offer- ings and the original offerings. • When the Mode LED is blue, all 5 effects on Corrupt are available. -
Page 19: Audio Io
• Looking to recalibrate your Data Bender Then you can follow the steps below to calibrate your module. 1. Hold down Mode, and boot up Data Bender. Hold the button down until the Bend LED is red and the Break LED is white. -
Page 20: Updating Firmware/Firmware Version Check
If your Data Bender is on the most recent firmware (v1.4.5), then you do not need to reflash your module. See the firmware version check section below to determine your Data Bender’s firmware, and then follow these instructions to update: 1. -
Page 21: Patch Examples
Patch Examples Lo-Fi Tape Machine Turn your Data Bender into a lo-fi tape machine with control over pitch & tape speed, pops, noise and audio dropouts. Modules: Data Bender, Modulation Source (Qu-Bit Chance) Data Bender Settings: • Mode: Micro • Mix: 100% •... - Page 22 Patch Examples CD Skip Bring back the nostalgia of early 2000’s road trips using Data Bender’s discrete buffer control. Modules: Data Bender, Modulation Source (Chance), Clock Source (if desired) Data Bender Settings: • Mode: Micro • Mix: 100% • Time: 30% •...
- Page 23 This patch is all about chaos, for which Data Bender’s Macro Mode is perfect. CV is sent from Chance to Data Bender’s TIME and REPEATS CV inputs. Mix is brought up to introduce “unwanted glitches” and audio cuts using Corrupt’s Dropout Mode.
-
Page 24: Warranty
*Issues that are excluded from the warranty, but do not void it includes scratches, dents, and any other us- er-created cosmetic damage. Qu-Bit Electronix holds the right to void warranty at their own discretion and at any time. Module warranty may be voided if any user damage is present on the module. This includes, but is not limited to, heat damage, liquid damage, smoke damage, and any other user-created critical damage on the module. -
Page 25: Changelog
• Added DJ Filter Corrupt effect. • Added Vinyl Simulator Corrupt effect. • Added Corrupt offerings toggle via Shift+Mode. • Fixed dry signal bleed issue when Data Bender is fully wet. • Fixed Micro Bend knob range issue and LEDs, is now able to reach the 3rd octave via knob input.