
Subscribe to Our Youtube Channel
Related Manuals for AEQ FORUM LITE


Summary of Contents for AEQ FORUM LITE
- Page 1 FORUM LITE ULTRA-COMPACT DIGITAL AUDIO MIXER FOR BROADCAST APPLICATIONS USER’S MANUAL ED. 06/21 V. 1.5 - 10/05/2022 Software version 4.32, March 2022...
-
Page 2: Table Of Contents
CONTENTS 1. INTRODUCTION........................5 1.1. General description......................5 1.2. Specifications........................7 1.2.1. General morphology....................7 1.2.2. Functionality......................7 1.2.3. General features..................... 7 1.2.4. Standard Inputs and Outputs.................. 7 1.2.5. Optional Inputs and Outputs................... 8 1.2.6. - Page 3 4.1. "Administration" menu...................... 60 4.1.1. "Configurations" submenu..................60 4.1.2. "User Configuration" submenu................64 4.1.3. "About Forum Lite Setup" submenu..............66 4.2. "Hardware Configuration" menu..................66 4.2.1. "Board Configuration" submenu................67 4.2.1.1. "Internal Module/Virtual - Configuration" section........68 4.2.2.
- Page 4 4.4.3. "Log View" submenu................... 128 5. A.E.Q. GUARANTEE......................129 APPENDIX A. SIGNALLING CONNECTION................130 APPENDIX B. ADDITIONAL INFORMATION................135 FORUM LITE Ultra-compact digital audio mixer...
-
Page 5: Introduction
One of the main qualities of AEQ FORUM LITE is the extensive internal routing capacity which provides: 28 inputs and 30 outputs for analogue, digital or microphone audio signals, 16 or 32... - Page 6 All basic functions of activation, level adjustment and routing have their specific controls on each channel of the FORUM LITE surface, while less common adjustments are included in a set of contextual controls common to all channels and accessible with just one or two keystrokes: simplicity and clarity of use for dynamic control without handling error.
-
Page 7: Specifications
• VU-meters. 4 direct routing buttons on each channel. • Silent operation by convection cooling. AEQ FORUM LITE is ideally suited for self- • operated applications. Talk-back function assigned to microphone 4, with 4 PTT buttons for direct intercom. •... -
Page 8: Optional Inputs And Outputs
Analog stereo outputs for Control, Studio, CUE and Studio primary Headphone • monitoring. Analog stereo amplified output for Control Headphones, jack ¼". • 8 opto-coupled GPI’s, 8 opto-coupled GPO’s and 4 GPO’s with relays. • 1.2.5. Optional Inputs and Outputs. Dual line Digital Telephone Hybrid with two RJ-11 Line connectors and two RJ-11 •... -
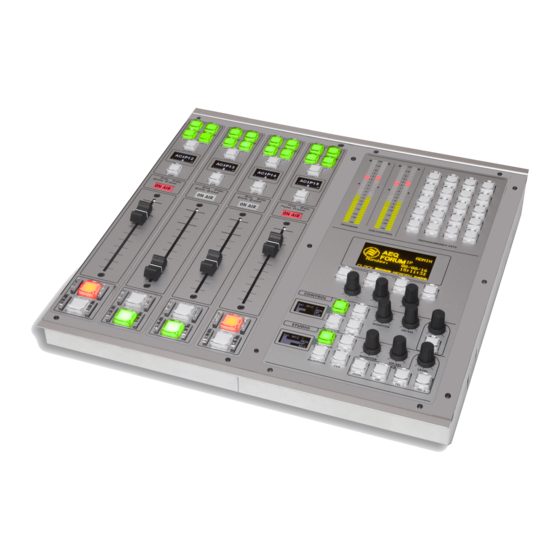
Page 9: Physical Description Of The Unit
2. PHYSICAL DESCRIPTION OF THE UNIT. AEQ FORUM LITE is an ultra-compact digital mixing console consisting in a control surface and associated audio engine. These two functional blocks, the control surface (where all the controls and status indicators are located) and the audio engine or core unit (where all the audio inputs/outputs, routing, sum and processing electronics is included), are connected together with a data and power supply proprietary link with RJ45 connectors. - Page 10 Located in the upper part of the channel are 4 routing keys ("PROGRAM","AUDITION","AUX1" and "AUX 2") and a "SELECT" button to assign the channel to advanced settings common control (gain, dynamics, EQ and balance). By means of a long press (more than 2 seconds), the "SELECT"...
-
Page 11: Routing Keys
CONFIGURATION SOFTWARE" of this manual. 2.1.1.2. SELECT. The control surface of AEQ FORUM LITE offers the usual controls for a mixing console on each channel, but AEQ FORUM LITE also offers a wide range of possibilities for routing and processing, beyond the physical options included in each channel. These possibilities have been distributed in a logical manner within internal menus accessible from the main screen of the Control and Monitoring section. -
Page 12: Active Processes Indicator
A dedicated stereo output for a set of external active speakers is provided in the "CUE" connector (a 1/8" or 3,5mm stereo minijack), at the back of the AEQ FORUM LITE audio core. It is compatible with most PC speakers. -
Page 13: Fader
There is a certain working mode in which this indicator may blink: see section 4.2.8 of this manual. 2.1.1.7. Fader. 100mm. fader. The fader travel is printed with 11 bands, the maximum output level +22dB corresponding to the last, and the third band from above to +0dB or nominal operating level. Both of these marks are differentiated in size from the rest. -
Page 14: Control And Monitoring Section
ON AIR INDICATOR CHANNEL ON CHANNEL OFF The upper key is associated with ON function and has a red light built in and the lower key is associated with OFF function and has a yellow light. The operation is exclusive, both keys can not be turned on simultaneously. -
Page 15: Control Vu Meters
This control and monitoring section is divided into four main areas: Control VU meters: allows you to monitor visually the level of the audio signals from • the master output and the CUE bus (or the control monitoring bus, when there are no channels sent to CUE). -
Page 16: Programmable Keys
IEC268-17: 300 ms (vu-meter & Flying PPM) superimposed. 2.1.2.2. Programmable keys. The Control and Monitoring area of the AEQ FORUM LITE includes 20 programmable keys in 5 rows of 4 columns. These programmable keys can be configured through software to perform specific functions such as salvos, GPI, GPO, external codecs control. -
Page 17: Main Display
2.1.2.4. Control room monitoring section. Located in the lower right corner of the AEQ FORUM LITE control surface are a two-coloured display, three rotary encoders and five keys (one of them, "SEL", a short-cut key). -
Page 18: Studio Room Monitoring And Talkback Sections
4.3.2.6 of this manual). 2.1.2.5. Studio room monitoring and Talkback sections. Located under control room monitoring section, in the lower left corner of the AEQ FORUM LITE control surface, are a two-coloured display, three rotary encoders and eight keys (one of them, "SEL", a short-cut key). - Page 19 Talkback section. This section allows the console operator to communicate directly with the studio and remote guests (lines). The default intercom channels for the AEQ FORUM LITE are established between the control room and the studio with separate channels for monitors and headphones. You can set additional channels of intercom to facilitate communications.
- Page 20 It is possible to establish a secondary group of headphone creating a salvo to be triggered from the programmable keys. "TEL 1": talk-back to the telephone hybrid line 1 (AEQ FORUM can work with an optional 2 lines digital hybrid module, but has 8 MPX internal buses hidden that can be used with dedicated lines, external audiocodecs or telephone hybrids.
-
Page 21: Audio Engine Description
The following chapters will describe AEQ FORUM LITE audio engine. The AEQ FORUM LITE audio engine or core unit consists in a 2RU chassis (89mm or 3 1/2" height), designed to be installed in standardized 19" (482mm) racks. As with the rest of AEQ FORUM LITE, the audio engine size has been minimized without leaving any feature out, its depth being only 330mm. -
Page 22: Power Supply
AEQ FORUM LITE has an optional bi-directional MADI interface that can carry up to 64 digital inputs and outputs (MADI functionality is not compatible with AoIP functionality, both options can’t be active at the same time); there is also an optional Dual line Digital Telephone Hybrid. -
Page 23: Auxiliary Connections
2.2.2. Auxiliary connections. This area of the AEQ FORUM LITE back panel includes a wide variety of inputs and outputs, required to integrate the unit with any professional audio installation, including several headphone and external speaker outputs, general purpose inputs and outputs, control and studio speakers. -
Page 24: Opto-Coupled Gpo
AEQ sales department or authorised distributors. 2.2.2.1.2. Opto-coupled GPO. As explained, AEQ FORUM LITE also includes 8 GPO output interfaces with opto-coupler. These are located at the back of the audio engine or core unit by means of a female DB15 connector labelled "GP OUTPUTS". -
Page 25: Physical Contact Gpo
For more information please refer to AEQ sales department or authorised distributors. 2.2.2.1.3. Physical contact GPO. As previously stated also, AEQ FORUM LITE includes 4 GPO with relay closing contacts on the DB15 female connector labelled "RELAYS" at the back of the engine. -
Page 26: Ethernet Port
2.2.2.2. Ethernet Port. Located in the lower left part of AEQ FORUM LITE back chassis you can find an Ethernet RJ45 10/100 Base T socket labelled "LAN" for connection to external devices using IP communications protocol. This socket permits connection of AEQ FORUM LITE console to one or more external computers where Setup software and, in future versions, Forum Lite Virtual and/or Forum Lite Screen applications are running. -
Page 27: Cue
AEQ sales department or authorised distributors. 2.2.2.4. CUE. AEQ FORUM LITE includes a professional stereo audio output for CUE or prelisten on TRS 3,5 mm ⅛" jack, unbalanced connection. This connector has been chosen to simplify the selection of this component among a wide range of cost-effective solutions. -
Page 28: Generic Audio Inputs And Outputs
In order to make installation process easier, AEQ offers specific pre-fabricated cable kits for AEQ FORUM LITE audio input/output, both analog and digital, as well as studio headphones: FR CAB INP, consisting in a male DB15 connector soldered to 4 balanced and shielded 6 meters long paired cables with no connectors at the other end, for 4 inputs or outputs. - Page 29 Opening the unit. It’s VERY IMPORTANT to turn first the equipment off and disconnect the power supply cable(s). Remove 10 screws located as depicted in the following photograph: 4 at the top cover, 3 at the top of the left side, 3 at the top of the right side. Pull up from the top cover and remove it.
-
Page 30: Digital Inputs
2.2.3.2. Digital inputs. AEQ FORUM LITE includes 4 stereo balanced digital inputs available through a female DB15 connector identified as "AES IN 1-4/SYNC" configurable one by one as AES/EBU (by default) or S/PDIF by configuring the corresponding jumpers. IMPORTANT NOTE: In the case of MCORE, there are no associated jumpers: to make this change to SPDIF, a hardware modification must be made (consult AEQ Technical Service). -
Page 31: Digital Outputs
2.2.3.3. Digital outputs. AEQ FORUM LITE includes 4 stereo balanced digital outputs available through a female DB15 connector identified as "AES OUT 1-4" configurable one by one as AES/EBU (by default) or S/PDIF by configuring the corresponding jumpers. IMPORTANT NOTE: In the case of MCORE, there are no associated jumpers: to make this change to SPDIF, a hardware modification must be made (consult AEQ Technical Service). - Page 32 In order to make installation process easier, AEQ offers specific pre-fabricated cable kits for AEQ FORUM LITE audio input/output, both analog and digital, as well as studio headphones: FR CAB INP, consisting in a male DB15 connector soldered to 4 balanced and shielded 6 meters long paired cables with no connectors at the other end, for 4 inputs or outputs.
-
Page 33: Analog Inputs
In order to make installation process easier, AEQ offers specific pre-fabricated cable kits for AEQ FORUM LITE audio input/output, both analog and digital, as well as studio headphones: FR CAB INP, consisting in a male DB15 connector soldered to 4 balanced and shielded 6 meters long paired cables with no connectors at the other end, for 4 inputs or outputs. -
Page 34: Mic/Line Inputs
In order to make installation process easier, AEQ offers specific pre-fabricated cable kits for AEQ FORUM LITE audio input/output, both analog and digital, as well as studio headphones: FR CAB INP, consisting in a male DB15 connector soldered to 4 balanced and shielded 6 meters long paired cables with no connectors at the other end, for 4 inputs or outputs. - Page 35 IMPORTANT NOTE: In the case of MCORE, there are no associated jumpers: it's possible to make this configuration as microphone/line or activate/deactivate the Phantom power from configuration software (see section 4.3.5.1 of this manual) or from the "CFG" menu in the main display of the control surface (see section 3.4.3.1.3.1 of this manual).
-
Page 36: Usb Inputs And Outputs
The modification or activation of any of these options can be monitored from the internal menu available at the Control and Monitoring section in the AEQ FORUM LITE control surface main display. For more information please check section "3.4.3.1.3 Enhanced information menu" of this manual. -
Page 37: Aoip Inputs And Outputs
50 m. If transmission is accomplished on a multi-mode fiber-optic interface (transceiver) with the specifications that the AEQ FORUM LITE is providing the distance is up to 2 km. The audio samples may have a maximum of 32 bit quantization. Additionally, by using this protocol, the bits of validity user status and parity of AES3 are maintained. -
Page 38: Telephone Hybrid Optional Module
If this option is not purchased and external compatible communication devices are used, you can control them using the programmable key section of AEQ FORUM LITE control surface. For more information, please refer to section "4.3.2.4. Configuration of Codec programmable keys"... - Page 39 Male DB15 connector, soldered to 6-meter long multiwire (interphone • type), not terminated, for GPI, GPO or relays for FORUM LITE console. Max 3 cables per console. AEQ can upon request provide fully finished cables and in special lengths. For more information please refer to AEQ sales department or authorised distributors.
-
Page 40: Description Of The Internal Menu
3. DESCRIPTION OF THE INTERNAL MENU. The AEQ FORUM LITE internal menu is displayed on the main display of the Control and Monitoring section of the control surface. Most of them allow you to modify the values shown (although some pages of the internal menu are merely informative), changing routing, gains or applying processes to the audio signals. - Page 41 Once date and time are configured, you can press the "SET" key in order to save the changes and return to the previous screen or the "BACK" key in order to return to that screen without changes saving. "CDOWN": lets you configure and activate the AEQ FORUM LITE Countdown option • through...
-
Page 42: Login/Logout" Menu
AEQ FORUM LITE enables up to 4 different user levels, each with its associated profiles and passwords: LEVEL 0: users with no associated password. - Page 43 (the main display shows then the initial AEQ FORUM LITE screen with the user level up on the right and the second contextual key identified as "LOGOU"). When you enter an incorrect combination of digits, a "WRONG PASSWORD"...
-
Page 44: Memory" Menu
3.3. "MEMORY" menu. This menu enables you to manage the configuration memories as snapshots. In two consecutive screens, the 10 memory positions available for user-defined configurations are shown. Each one of these memory positions stores all of the parameters in use at that time in each one of the console channel: gain, phase and balance configuration, "PROGRAM", "AUDITION", and/or "CUE"... -
Page 45: Info" Menu
"BACK": pressing this key allows you to return to the previous menu screen. • "INFO": essentially a maintenance menu displaying information about the IP address of • the "LAN" network port present in the rear panel of the unit and firmware versions installed in the several console operating modules, as well as the routing and process DSPs percentage of use. -
Page 46: Setup" Menu
(MASK) and gateway (GWAY). Only level 3 users are allowed to modify these parameters (the "SETUP" key is shown to other users but is not active). As in many other AEQ FORUM LITE console submenus, the icon in the upper left-hand corner indicates that browsing and configuration are performed by using the associated rotary encoders. -
Page 47: Select" Menu
3.4.3. "SELECT" menu. This menu enables you to perform advanced configuration operations on audio inputs/outputs, processes and internal routing of all of the signals present in the console. The options available through the contextual keys below the screen, from left to right, are: "BACK": pressing this key allows you to return to the previous menu screen. -
Page 48: Dynamics Menu: Compressor/Limiter And Noise Gate
• "DYNAM": allows you to access to the menus for configuration and activation of • dynamics effects included in AEQ FORUM LITE: Compressor/Limiter and Noise Gate. "EQUAL": allows you to access to the menu for configuration and activation of •... - Page 49 The "Compressor / Limiter" function acts as a "constant gain" compressor; that is, below the threshold, all input signals are amplified (or not amplified) equally, while above the threshold, the input levels are reduced to a greater or lesser degree according to the compression ratio. If the compression range selected is the maximum, the function will act as a limiter in such a way that the signals that exceed the selected threshold at input will not exceed a certain level at output.
- Page 50 The "COMP" contextual key enables you to activate the compressor whose parameters are shown at that time on the screen. The activation of the compressor is confirmed by the activation of the LED of the contextual key and the LED "PROCESS" of the selected mixer channel (see section "2.1.1.5.
-
Page 51: Equalizer And Filter Menu
In addition, the threshold must be adjusted to a level slightly higher than the level of the noise to be avoided. Thus, the threshold will be set at a very low level. Above the threshold, the noise gate does not act (unity gain), letting the rest of the signal through without processing it. The gate remains closed;... -
Page 52: Expanded Information Menu
"LPF": allows you to activate the configured low pass filter (the associated LED will • light). Pressing this contextual key for three seconds opens the cut-off frequency configuration menu: this configuration is accomplished by turning the first associated encoder and pressing the "BACK" contextual key to return to the previous screen once this parameter is configured (between 1000 and 20000Hz). -
Page 53: Cfg" Menu
In mic/line channels, indication of configuration as "MIC" or "LINE". See section • "2.2.3.6 MIC/LINE inputs". In mic/line channels configured as microphone, indication of Phantom power activated • ("PHANTON") or deactivated ("PHANTOFF"). See section "2.2.3.6. MIC/LINE inputs". The contextual keys under the display are associated with the four options shown in the bottom line of the screen: "BACK": pressing this key allows you to return to the previous menu screen. -
Page 54: Route" Menu
You can make your selection by turning any of the associated encoders and then pressing any of them or the "OK" contextual key to confirm the selection that is highlighted at that moment. The "BACK" contextual key allows you to return to the previous menu screen without changed the assigned signal. -
Page 55: Output" Menu
when the input is assigned to a fader and, in the previous list, you select "Program" bus (for instance), when you press the "ADD" key the routing key ("PROGRAM" in this case) of the channel is activated (the associated LED is lighted). In the display, the cross-point toward that bus appears for a moment and then disappear. - Page 56 Name of the channel, in alphanumeric format containing up to 6 characters. • Hardware corresponding to the audio output of this channel, in format HW: xx.yy, • where xx is the number of the virtual slot where this inputs/outputs module is installed, and yy is the audio channel of this inputs/outputs module.
-
Page 57: Configuration Software
4. CONFIGURATION SOFTWARE. The AEQ FORUM LITE console is ready for use once the mixer inputs and outputs have been properly connected. The console is shipped with the Audio inputs/outputs working. However, the name tags used for the channel audio inputs and outputs are generic (MIC 1, ANA 3, DIG 5 ...) and routing and effects programmed are AEQ standards that are used for functional testing of the console, whereas these settings may not be entirely to the preferences of the client. - Page 58 Once the "Forum Lite Setup" application is installed (by default, in C:\Program files\ ForumLiteSetup), you can start it up by double-clicking the icon displayed on the desktop: The configuration program will also be accessible from the Start menu. When the application starts up, the access screen will appear asking user to introduce name and password.
- Page 59 This initial screen shows information regarding the software version and the current user logged into the application. On the left side of the screen all the relevant menus and submenus are available. These are drop-down menus and are activated by clicking on the desired option. The list of available menus is: "Administration": manage from here the equipment operational levels, authorised •...
-
Page 60: Administration" Menu
There are two distinct areas in this submenu: "Offline Operations": allows you to execute actions where it is not necessary that the • "Forum Lite Setup" application is in direct communication with the AEQ FORUM LITE mixer. Two actions are available: FORUM... - Page 61 "Online Operations": allows you to execute actions where it is necessary that the • "Forum Lite Setup" application is in direct communication with the AEQ FORUM LITE mixer, which "LAN" port, located on the rear panel of the mixer, has the default IP address 172.31.34.1 displayed on the screen.
- Page 62 16 or 32 AoIP channels. "Licenses": allows you to activate the MADI link and/or the "Forum Lite Virtual" and "Forum Lite Screen" applications functionality, as well as the "Visual Radio"...
- Page 63 "Serial Number" by means of the associated button and send it to AEQ in order to generate the associated "Key" and send it back to you (you must paste it by means of the associated button).
-
Page 64: User Configuration" Submenu
6 digits could be used just to access the software, but couldn’t be used in the console). This password is used to access all the permitted actions in advanced menu, from the main screen of the Control and Monitoring section of AEQ FORUM LITE. For more information see section 3.2 of this manual. - Page 65 "ID": internal reference number for each user automatically and sequentially assigned. • The lower part of the "User Configuration submenu includes a set of standardized buttons to manage the list of registered users: Allows you to scroll to the top of the list. Allows you to move to the position immediately above in the list.
-
Page 66: About Forum Lite Setup" Submenu
4.1.3. "About Forum Lite Setup" submenu. "About Forum Lite Setup" submenu is accessed, from the drop-down menu "Administration", by clicking on the icon: "About Forum Lite Setup" submenu simply shows information regarding the software version and the current user logged into the application. -
Page 67: Board Configuration" Submenu
AEQ FORUM LITE console and read its configuration or load a configuration by means of "Import" option (see section 4.1.1 of this manual; you can find the "DemoConfiguration.LSC" file in C:\Program files\ForumLiteSetup\Demos). -
Page 68: Internal Module/Virtual - Configuration" Section
GPIO (both the physical contact relays and the opto-coupled) that are available on the rear panel of the AEQ FORUM LITE (please refer to section 2.2.2.1 of this manual), as well as the virtual GPIOs. - Page 69 "Disable/Enabled": deactivates or activates the module. "Sync": allows you to configure whether the console will use the synchronism extracted from MADI link ("Slave") or not ("Master"). "Used": allows you to configure how many of the 64 mono channels available are actually in use. AOIP: this module provides up to 16 (or 32, depending on hardware) mono •...
- Page 70 "Master" and/or there is no external synchronism input, then synchronism is local and the console internal oscillator is used. 2. GPI: General Purpose Inputs. AEQ FORUM LITE incorporates 8 opto-coupled GPI’s on open-collector transistors. The advanced configuration menu of GPIs is accessed by clicking "Click to [CONFIG]"...
- Page 71 3. GPO: General Purpose Outputs. AEQ FORUM LITE incorporates 8 opto-coupled GPO's on open collector transistors. The advanced configuration menu of GPOs is accessed by clicking "Click to [CONFIG]" and then clicking again on the "CONFIG" button that will appear. The configuration options are: Edit the "Label"...
- Page 72 5. VIRTUAL GPI: allows you to configure the Virtual GPIs, General Purpose Inputs that come into the unit through an IP connection. Up to 246 virtual GPIs can be configured. The advanced configuration menu of Virtual GPIs is accessed by clicking "Click to [CONFIG]"...
-
Page 73: Mixer Bus Configuration" Submenu
Configuration", by clicking on the icon: "Mixer Bus Configuration" submenu allows you to define the configuration of the internal summing buses of the mixer. AEQ FORUM LITE is supplied configured with the following factory default buses: "Program": stereo and with working mode defined as "Program". - Page 74 The mixer bus configuration table has the following fields: "Slot": indicates the internal position of this signal in the digital audio bus of the mixer. • The 32 available slots are numbered between 193 and 224 both inclusive. A warning message will appear when you try to define a bus above those 32 available slots: "Label": name of the bus.
-
Page 75: Configuration Of Mpx Buses Menu. "Clean Feed" Mode
Allows you to scroll to the top of the list. Allows you to move to the position immediately above in the list. Allows you to move to the position immediately below in the list. Allows you to scroll to the last position of the list. Allows you to insert a new entry in the list. - Page 76 When the "Clean Feed" option is selected, the window will change to: and allows you to configure a special group of multiplex named "Clean Feed", that allows to automatically establish a routing of the active signals in a certain moment toward that bus, with no need of explicitly routing.
- Page 77 In the example, the "ANA 1", "ANA 2" and "TEL 2" inputs have been excluded from the group associated with "MPX 2" bus. The order is very important in this kind of "Clean Feed" groups because the first selected input will established the operative priority in that group in each moment.
- Page 78 Once the group is defined ("MPX 2" in the example) the operation is as follows: Priority 5: Let's suppose that the starting point is that none of the routing keys • ("PROGRAM", "AUDITION", "AUX 1" and "AUX 2") of the inputs in control surface is activated.
- Page 79 In this case, the "ANA 1" signal defines an operative priority 1 because the "PROGRAM" routing key is activated (it doesn't matter that the "AUDITION" key is also activated and the channel is not active). "ANA 1", "ANA 2" and "TEL 2" signals will not be sent to "MPX 2" bus because they are excluded from the group.
-
Page 80: I/O Configuration" Submenu
"Label": alphanumeric name of the channel. Maximum number of characters • recommended is 6. This is the name that appears in all displays and menus of the AEQ FORUM LITE control surface. "Model": type of the physical inputs/outputs present in the rear panel of the unit. This •... -
Page 81: Advanced Configuration Of Input Channels Menu
"Label": alphanumeric name of the channel. Maximum number of characters • recommended is 6. This is the name that appears on all displays and menus of the AEQ FORUM LITE control surface. "Fader Start": allows you to select a physical or virtual GPO (from the list defined in •... - Page 82 "Remote ON/OFF": allows you to select a physical or virtual GPI (from the list defined • in section 4.2.1.1) to perform the remote start function for this channel ("CHANNEL ON/OFF" keys on control surface: see paragraph 2.1.1.8 of this manual). "None" indicates there is no Remote ON/OFF function associated with that channel.
- Page 83 (except the microphone inputs and the optional internal telephone hybrid ones) of AEQ FORUM LITE are defined as Stereo. If any channel is re-configured to Mono it will result in an incremented number of the listed available input channels: one Stereo Channel is converted into two Mono channels.
- Page 84 "Studio On Air": associates the activation of Channel ON/OFF key of this channel with • the triggering of a GPO for the "ON-AIR" lights of the Studio room (see section 4.2.4.1 of this manual). It also associates the studio monitors muting (or attenuation: see section 4.3.2.9 of this manual).
-
Page 85: Advanced Configuration Of Output Channels Menu
"Label": alphanumeric name of the channel. Maximum number of characters • recommended is 6. This is the name that appears on all displays and menus of the AEQ FORUM LITE control surface. "Default Routing": allows you to configure the signal routed by default to that output •... -
Page 86: Monitoring Configuration" Submenu
4.2.4. "Monitoring Configuration" submenu. "Monitoring Configuration" submenu is accessed, from the drop-down menu "Hardware Configuration", by clicking on the icon: "Monitoring Configuration" submenu allows you to define the operation of the Control and Monitoring sections associated with the control room and the studio room. Please refer to sections 2.1.2.4 and 2.1.2.5 of this manual. -
Page 87: Studio Room Section
4.2.4.1. "Studio Room Section". This section of "Monitoring Configuration" submenu lets you choose how the four keys under the display of the Studio Room Control and Monitoring section shall work, either in "Mixer" or "Exclusive". If the option "Mixer" is selected, the output bus associated with "Studio" monitor and headphones will act as a summing bus and therefore may be more than one of the four keys simultaneously activated, thus mixing the signals corresponding to each of the four keys on the studio monitor and headphones. -
Page 88: Visual Radio" Submenu
In this section you can also assign the GPO outputs associated with Control "OFF AIR" green light (indicates that there are no sources, typically microphones, activated in the control room) and "ON AIR" red light (indicates that there are sources, typically microphones, activated in the control room). - Page 89 When you press the button a list of the available logical inputs of the system will be displayed at the lower part of the screen: After selecting the desired input and pressing the "Add" button, this input will appear in the list of signals associated with the "Visual Radio"...
-
Page 90: Ntp Client Configuration" Submenu
Configuration", by clicking on the icon: "NTP Client Configuration" submenu allows you to enable synchronization of the date and time of the system using standard Ethernet NTP protocol, with the local AEQ FORUM LITE clock slaved to the remote (NTP) signal. -
Page 91: Vumeters" Submenu
4.2.7. "Vumeters" submenu. "Vumeters" submenu is accessed, from the drop-down menu "Hardware Configuration", by clicking on the icon: "Vumeters" submenu allows you to configure the vumeters transmission mode as "Broadcast" or "Multicast". The on-screen options are: "Broadcast": allows you to activate the Broadcast vumeters transmission. Vumeters •... -
Page 92: Options" Submenu
4.2.8. "Options" submenu. "Options" submenu is accessed, from the drop-down menu "Hardware Configuration", by clicking on the icon: "Options" submenu shows 2 options: "Pre-fader Sends" checkbox allows you to activate or not this option. By default, it's deactivated. This option allows you to configure the operation mode of the sends to the summing buses. -
Page 93: Programmable Configuration" Menu
AEQ FORUM LITE console and read its configuration or load a configuration by means of "Import" option (see section 4.1.1 of this manual; you can find the "DemoConfiguration.LSC" file in C:\Program files\ForumLiteSetup\Demos). - Page 94 The bottom of the workspace in this submenu contains two options: "Delete Routing": eliminates the selected cross-point. Confirmation is requested. • "Insert Routing": you can create a cross-point through a simple process that allows • you to select an input channel or an internal summing bus as the source, and an output channel or an internal summing bus as the destination.
-
Page 95: Programmable Keys" Submenu
"Programmable Keys" submenu lets you configure the actions associated with each of the 20 physical programmable keys found in the Control and Monitoring section of the AEQ FORUM LITE control surface (please refer to Section 2.1.2.2 of this manual) and each of the 100 virtual programmable keys. -
Page 96: Configuration Of "General" Programmable Keys
"None": no action associated. • "General": associated with activation of physical or virtual GPIs and/or GPOs. • "Salvo": allows you to configure activation/deactivation of a Salvo. • "Codec": associated with remote control of external communications equipment • through physical or virtual GPIs and GPOs. "Multiplex": allows you to make a quick management of signal routing toward a "MPX"... - Page 97 In order to be able to configure the programmable key (or edit a previously created configuration), you have to press the "Edit" button, to active and allows you to configure the following fields: "Group": allows you to assign the programmable key to a group. Assign a key to a •...
-
Page 98: Configuration Of "Salvo" Programmable Keys
"Off-On-Blinking-Off": initially the key is off, it turns on when the programmable key is pressed, starts blinking when the key is pressed again and turn off when it’s pressed again. From this point the cycle is re-initiated. When activation is through an associated GPI, the key turns on when the GPI is activated and starts blinking when it’s deactivated. - Page 99 The "General" tab gives you access to a screen identical to the one described in the previous section and allows you to configure the operational sequence of the programmable key and its relationship with the system GPI´s and GPO´s. This way it is possible to execute a Salvo by pressing the programmable key and activating at the same time a GPO or by the remote activation of the programmable key through GPI (for this purpose, you must activate the "Push"...
-
Page 100: Configuration Of "Codec" Programmable Keys
AEQ website. "Phoenix": IP/ISDN audiocodec AEQ PHOENIX Studio, Stratos, Venus, Venus V2 or Venus V3. For more information please consult the AEQ website. Depending on the particular equipment selected, the following options may vary. For CA33 module, the available configuration options are:... - Page 101 "Ring": the key starts to blink when there is an incoming call. This function can be • combined in the same key with any of the following three functions. "Extended": enables the option of frequency extender for the CA33 telephone hybrid. •...
- Page 102 "Ring", "Wait GPI" and "Wait GPO" functions and another one to share "On Air GPI" and "On Air GPO" functions. The following screens show an example of programmable keys configuration for remote control of an AEQ EAGLE audiocodec.
- Page 103 For Phoenix Studio, Stratos, Venus, Venus V2 or Venus V3 audiocodec, the available configuration options are: "Ring": allows you to select the physical or virtual GPI where the incoming call signal • provided by the codec is wired or addressed. The key starts to blink when there is an incoming call.
-
Page 104: Configuration Of "Multiplex" Programmable Keys
IMPORTANT NOTE: The functions "Call GPO" and "On Air GPO" are exclusive between them (a programmable key can have only one of the two functions associated). In addition, when a GPO already used is selected, a warning message will appear. 4.3.2.5. -
Page 105: Configuration Of "Orders" Programmable Keys
The lower part of the "Programmable Keys" submenu will show no options when this configuration mode is selected. The activation of this "Cue Reset" function will have the following result in AEQ FORUM LITE control surface: when the key is pressed, all the circuits or channels being sent to the CUE bus of the mixer will be disconnected and the LEDs of all the "CUE"... -
Page 106: Configuration Of "Studio Monitor Attenuation" Programmable Keys
IMPORTANT NOTE 1: When you press the key the configuration stored in the selected memory is directly loaded into the console. In this case no confirmation is requested (the system will ask for confirmation only when the memory is loaded from the "MEMORY" menu: see section 3.3 of this manual). -
Page 107: Configuration Of "Auto Cue" Programmable Key
When you press the key, it turns on and the studio monitors are attenuated when a microphone is activated according to the previous programming (-10dB, -15dB or -20dB). When you press the key again, it turns off and the studio monitors returns to initial operation. When there are several "Studio Monitor Attenuation"... -
Page 108: Mic Group Configuration" Submenu
4.3.3. "Mic Group Configuration" submenu. "Mic Group Configuration" submenu is accessed, from the drop-down menu "Programmable Configuration", by clicking on the icon: "Mic Group Configuration" submenu allows you to define groups of microphones. Within this submenu there are two distinct areas on the screen: The left side shows the list of groups of microphones set up. - Page 109 "Label": name or ID for the group of microphones. A maximum of 6 characters is recommended. adds ALL microphones or audio inputs from the "Inputs available" column to the "Inputs in the Group" column. adds ONLY the microphone or audio input selected from the "Inputs available"...
-
Page 110: Preset Configuration" Submenu
4.3.4. "Preset Configuration" submenu. "Preset Configuration" submenu is accessed, from the drop-down menu "Programmable Configuration", by clicking on the icon: "Preset Configuration" submenu allows you to create default settings associated with the different audio processes available FORUM LITE: equalizers, filters, compressors/limiters and noise gates. - Page 111 "Import Presets": allows you to import to "Forum Lite Setup" application all pre-sets • stored on an AEQ FORUM LITE mixing console that is connected through IP to the computer where the application is installed. "Export Presets": allows you to export from "Forum Lite Setup" application all stored •...
-
Page 112: Advanced Configuration Of Compressor/Limiter
4.3.4.1. Advanced configuration of Compressor/Limiter. From the initial screen of the pre-sets advanced information menu ("Digital Sound Processes") you can configure and activate/deactivate the Compressor/Limiter operation. When you select the "Active" checkbox, the "Configure" button gets active and gives you access to the graphic display where the Compressor/Limiter associated parameters can be modified. -
Page 113: Advanced Configuration Of Noise Gate
"ATTACK TIME": this is the time it takes the compressor to react to an increase in the • input signal. It ranges between 0.5 and 100 ms. "RELEASE TIME": this is the maintenance time during which the compressor keeps • acting, even when the level of the input signal has fallen below the threshold. -
Page 114: Advanced Configuration Of Equalizer
"HOLD TIME": the time that the gate should remain open when the signal falls below • the threshold. "RANGE": the limit of dynamic range where created configuration will have effect. • The threshold must be adjusted to a level slightly higher than the level of the noise to be avoided. -
Page 115: Advanced Configuration Of Low Pass Filter
4.3.4.4. Advanced configuration of Low Pass Filter. From the initial screen of the pre-sets advanced information menu ("Digital Sound Processes") you can configure and activate/deactivate the Low Pass Filter operation. When you select the "Active" checkbox, the "Configure" button gets active and gives you access to the graphic display where the Low Pass Filter associated parameters can be modified. -
Page 116: Snapshot Configuration" Submenu
"SnapShot Configuration" submenu allows you to manage the different configuration memories stored in AEQ FORUM LITE and available to operators through the internal menu of the main screen of the Control and Monitoring section of the unit (please refer to section 3.3 of this manual). - Page 117 (microphone 4) at the rear panel of the AEQ FORUM LITE. When "Self-Control" checkbox is not activated, that input is configured only as an orders microphone toward studio or return for any open communication lines (this is a typical configuration for AEQ FORUM LITE when installed in a Studio/Control configuration). When "Self-Control"...
- Page 118 "Normal": the upper red key is associated with ON function and the lower yellow key is associated with OFF function. The operation is exclusive, both keys can not be turned on simultaneously. "Orders": when you press and keep pressed the lower key you send to the output channel associated with the input present at the channel (Talkback functionality).
- Page 119 "GPO": when you press and keep pressed the lower key you activate the physical or virtual GPO output associated with the input present at the channel (the GPO is deactivated when you release the key). The upper key is associated with ON/OFF function (allows you to activate/deactivate the channel).
- Page 120 "Studio Monitoring Defaults": section where you can configure the initial activation of • one or several keys to send signal to monitor and headphones placed under the display of the studio monitoring section. The available options are "Program", "Audition", "Cue" and "Sel"...
-
Page 121: Advanced Configuration Of Inputs
"Configure Inputs & Outputs": this button • gives you a quick access to the advanced configuration section for audio inputs and outputs channels, presented in two consecutive columns. "OK": allows you to accept the created or edited configuration. • "Cancel": allows you to reject the created or edited configuration. No change you may •... - Page 122 "Routing": allows you to configure the initial activation (or not) of the quick routing keys • that are available above each fader channel of AEQ FORUM LITE control surface. "Balance/Panorama": allows you to manage the initial balance or panoramic control for •...
-
Page 123: Advanced Configuration Of Outputs
"Only for MCORE": this option, which, as its name indicates, is only available for the • audio core edition called MCORE, allows you to configure the selected input as a microphone or line input and, if configured as microphone, it allows you to activate or not the Phantom power. -
Page 124: Firmware Upgrade" Menu
4.4. "Firmware Upgrade" menu. This menu allows you to update the firmware versions for the AEQ FORUM LITE, allowing for the implementation of new features and developments in future versions. Clicking on the "Firmware Upgrade" section on the main screen, the left side of the screen will show you the list of submenus, which includes: "Tree View": provides a global view of the system, providing information regarding the... - Page 125 1. Place the pointer on the module to be upgraded, press the right mouse button and then the "Upgrade" option that appears. 2. In the new window that appears, press the button and select the "AFU" upgrading file (AEQ Firmware Upgrade) that contains the new version you want to load. FORUM LITE Ultra-compact digital audio mixer...
- Page 126 In case you select an AFU file that does not correspond to the selected module, an error message will be displayed: 3. Then press "Send" button to start the upgrading process. 4. From this point on, the application changes automatically to "Upgrade View" screen in order to show you the upgrading progress.
-
Page 127: Upgrade View" Submenu
"Write": progress bar concerning the AFU file copy process from the computer that is • running "Forum Lite Setup" application to the AEQ FORUM LITE internal memory. "Verify": progress bar for the AFU file check previously copied to the AEQ FORUM • LITE internal memory. -
Page 128: Log View" Submenu
"Device": electronic component part of the functional module that will be upgraded. "Old Version": information regarding the old firmware version installed on the component. "New Version": information about new firmware version installed on the component. "Next Slots": indicates the position of the following functional modules to be upgraded. -
Page 129: Guarantee
AEQ shall not be liable for loss of information in the disks or data support that have been altered or found to be inexact, neither for any accidental damage caused by the user or other persons manipulating the product. -
Page 130: Appendix A. Signalling Connection
The pinout of "RELAYS" DB15 connector is detailed in section 2.2.2.1.3 of this manual and the pinout of CP CAB GPIO cable in section 2.2.5. First of all, in the "Forum Lite Setup" application, it's necessary to configure in the "Monitoring Configuration" submenu of "Hardware Configuration" menu which relays will be used for ON AIR signalling of studio and control rooms. - Page 131 FORUM LITE Ultra-compact digital audio mixer...
- Page 132 There is another option (LAZSA) regarding the color code. It would be as follows: FORUM LITE Ultra-compact digital audio mixer...
- Page 133 In case you also want to take the signalling to a STUDIOBOX, the previous scheme could be as follows: FORUM LITE Ultra-compact digital audio mixer...
- Page 134 (RJ45-1). The corresponding cable will be connected to "GP INPUTS" DB15 connector of the console. This connection will also be associated with previous programming in the "Forum Lite Setup" application. In the example, the "TECH T. BACK" button of the STUDIOBOX is connected to GPI 1 of the console and that GPI would be associated with the "Remote PFL"...
-
Page 135: Appendix B. Additional Information
APPENDIX B. ADDITIONAL INFORMATION. NOTE: This equipment complies with the limits for a Class A digital device, pursuant to part 15 of the FCC Rules. These limits are designed to provide reasonable protection against harmful interference when the equipment is operated in a commercial environment.
Need help?
Do you have a question about the FORUM LITE and is the answer not in the manual?
Questions and answers