Table of Contents

Related Manuals for AMI AAA-RO200A


Summary of Contents for AMI AAA-RO200A
- Page 1 Manual for Installation, Operation and Maintenance of 5 Stage Point of Use Reverse Osmosis Drinking Water System AAA-RO200A Document ID #: AAARO200A www.appliedmembranes.com (760) 727-3711 sales@ appliedmembranes.com Revision: 05/13/20...
-
Page 2: About Your Ro Water Treatment System
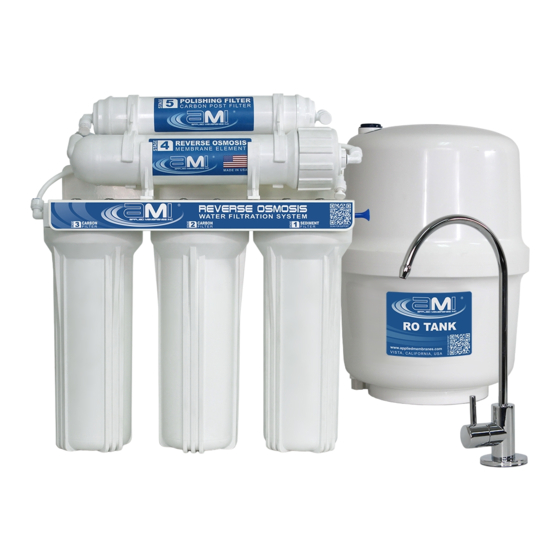
Installation and Service Manual – Under-the-Counter Point of Use 5 Stage Reverse Osmosis System About Your RO Water Treatment System Thank you for your purchase of the AMI home RO reverse osmosis water treatment system. This drinking water system has been designed for quick and simple installation and maintenance. By carefully reading this instruction manual and following the operational guidelines you will ensure a successful installation and reliable operation. -
Page 3: Table Of Contents
Installation and Service Manual – Under-the-Counter Point of Use 5 Stage Reverse Osmosis System Table of Contents About Your RO Water Treatment System ......................1 5 Stages of Water Treatment ..........................1 System On/Off Valves ............................1 Conditions for Operation ........................... 3 Warnings ................................ -
Page 4: Conditions For Operation
Installation and Service Manual – Under-the-Counter Point of Use 5 Stage Reverse Osmosis System Conditions for Operation Source Water Supply Community/Private Non-Chlorinated – or chlorinated as long as the carbon filter is in place and replaced every 6 months. Chlorine will damage membranes if not removed properly. -
Page 5: System Flow Diagram
Installation and Service Manual – Under-the-Counter Point of Use 5 Stage Reverse Osmosis System System Flow Diagram Water supply to the first housing Faucet Water supply to the second housing Clean Water Outlets Water supply to the third housing Pollutants Outlets Housing with RO Membrane (2) in parallel Water Supply to the 4-way valve from the elbow connector “OUT”... -
Page 6: Preparing For Installation
Installation and Service Manual – Under-the-Counter Point of Use 5 Stage Reverse Osmosis System Preparing For Installation Check the following list of components to ensure that all parts are packed with your system. RO System Filter Housing Filter Cartridges Manifold Assembly Sumps (Packed in Sumps) Storage Tank... -
Page 7: Prepare Tubing
Installation and Service Manual – Under-the-Counter Point of Use 5 Stage Reverse Osmosis System Prepare Tubing When cutting tube lengths, it is important to ensure the system is accessible for maintenance. During installation and measuring, it is recommended to complete all of the tubing connections to the system with the system in front of the cabinet (before mounting) to allow enough slack for easy removal of the system for easier maintenance. -
Page 8: Step 1 - Drill A Hole Into The Sink For The Faucet
Installation and Service Manual – Under-the-Counter Point of Use 5 Stage Reverse Osmosis System Step 1 - Drill a Hole into the Sink for the Faucet Notice: If your sink is equipped with a pre-drilled 1 ¼” or 1 ½” hole suitable for the faucet installation, you may skip to step 2. -
Page 9: Step 2 - Faucet Installation
Installation and Service Manual – Under-the-Counter Point of Use 5 Stage Reverse Osmosis System Step 2 - Faucet Installation For this step, you will need: Faucet assembly kit included with System Tubing, cut to the appropriate length Wrench Install the faucet onto the countertop/sink:... -
Page 10: Step 3 - Drain Saddle Installation
Installation and Service Manual – Under-the-Counter Point of Use 5 Stage Reverse Osmosis System Step 3 - Drain Saddle Installation Some states require the use of an air gap faucet. Check your local plumbing code to Notice: assure compliance. For this step you will need: o Masking tape or duct tape o Variable speed drill w/ ⅛”... -
Page 11: Step 4 - System Feed Line Installation
Installation and Service Manual – Under-the-Counter Point of Use 5 Stage Reverse Osmosis System Step 4 – System Feed Line Installation For this step you will need: ½” and ” open-end wrenches (or two adjustable wrenches) Teflon Tape ... -
Page 12: Step 5 - Installing The Ro Storage Tank
Installation and Service Manual – Under-the-Counter Point of Use 5 Stage Reverse Osmosis System Step 5 – Installing the RO Storage Tank For this step you will need: Storage Tank Tank Valve Tubing Notice: Do not tamper with the air valve on the low side of the storage tank. It has been factory charged to 8psi and covered with a black cap. -
Page 13: System Mounting
Installation and Service Manual – Under-the-Counter Point of Use 5 Stage Reverse Osmosis System System Mounting Wall mounting is recommended for this system. Dry wall anchors and screws may be necessary (not included with the system). Mark screw locations at the desired positions. Use the two holes on the back of the RO System mounting bracket for marker guides. -
Page 14: Replacement Parts
Installation and Service Manual – Under-the-Counter Point of Use 5 Stage Reverse Osmosis System Replacement Parts Sediment Pre-Filter, Carbon Pre-Filter, Replacement Filter Kits: 5 Micron. Extruded Carbon Stage 1 Stage 2 & 3 Model: H-F1005CF Model: H-F2510AC Qty. 1 Per System Qty. -
Page 15: System Maintenance
Installation and Service Manual – Under-the-Counter Point of Use 5 Stage Reverse Osmosis System System Maintenance Notice: If your RO system is connected to an icemaker or other equipment, you must turn off the connection to the equipment before performing any maintenance. Membrane Replacement Instructions The membranes should be replaced every 1-2 years, depending on the water quality. -
Page 16: Troubleshooting Chart
Installation and Service Manual – Under-the-Counter Point of Use 5 Stage Reverse Osmosis System Troubleshooting Chart Symptom Possible Cause Remedy No water in the storage Filter Cartridges have failed. Replace filter cartridges as indicated in tank maintenance section. Cartridges are out of Install cartridges in proper sequence as sequence. - Page 17 Installation and Service Manual – Under-the-Counter Point of Use 5 Stage Reverse Osmosis System Notes:_______________________________________________________ ____________________________________________________________ ____________________________________________________________ ____________________________________________________________ ____________________________________________________________ ____________________________________________________________ ____________________________________________________________ ____________________________________________________________ ____________________________________________________________ ____________________________________________________________ ____________________________________________________________ ____________________________________________________________ ____________________________________________________________ ____________________________________________________________ ____________________________________________________________ ____________________________________________________________ ____________________________________________________________ ____________________________________________________________ ____________________________________________________________ ____________________________________________________________ Copyright © 2019 Applied Membranes, Inc. Page 16 All Rights Reserved.
- Page 18 Installation and Service Manual – Under-the-Counter Point of Use 5 Stage Reverse Osmosis System Notes:_______________________________________________________ ____________________________________________________________ ____________________________________________________________ ____________________________________________________________ ____________________________________________________________ ____________________________________________________________ ____________________________________________________________ ____________________________________________________________ ____________________________________________________________ ____________________________________________________________ ____________________________________________________________ ____________________________________________________________ ____________________________________________________________ ____________________________________________________________ ____________________________________________________________ ____________________________________________________________ ____________________________________________________________ ____________________________________________________________ ____________________________________________________________ ____________________________________________________________ Copyright © 2019 Applied Membranes, Inc. Page 17 All Rights Reserved.
- Page 19 Product Warranty SELLER hereby warrants to CUSTOMER that the goods herein described will be free from any liens or encumbrances, that good title to said goods will be conveyed to CUSTOMER by sale of same. SELLER warrants materials of its own manufacture against defects in material and workmanship under normal conditions of usage and service as specified in this manual for one year from whichever of the following events occur first: ...
- Page 20 Replacement Schedule Our recommended replacement schedule is for average feed water quality. For cleaner city water, a lower frequency schedule may be sufficient. For applications where the feed water is dirtier or has specific issues, more frequent change-outs may be required. Generally speaking, filters should be changed when there is a loss of performance and after any extended periods of non-use.
Need help?
Do you have a question about the AAA-RO200A and is the answer not in the manual?
Questions and answers