Advertisement
Quick Links
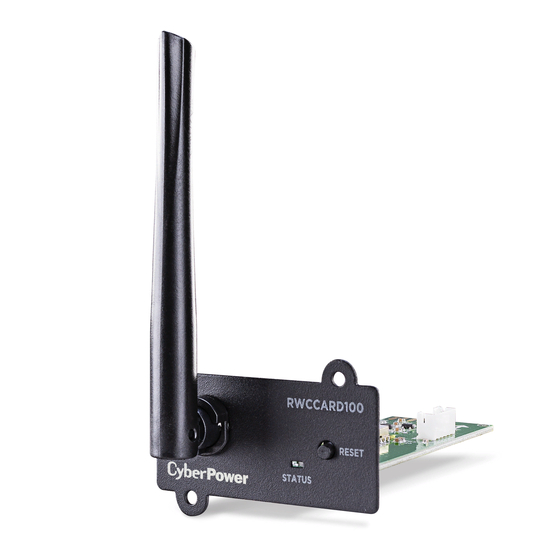
REMOTE WIRELESS CLOUD CARD
REMOTE WIRELESS CLOUD CARD
RWCCARD100
RWCCARD100
Quick Start Guide
INSTALLATION GUIDE
Step 1. Hardware Installation
1. Remove the two retaining
screws from the expansion
slot, and remove the cover.
2. Install the Remote Wireless
Cloud Card into the
expansion slot.
3. Insert and tighten the
retaining screws.
4. Please ensure the LED
Status is flashing blue.
NOTE: You can reset the Remote Wireless Cloud
Card back to its factory settings by pressing and
holding the Reset button. It will begin to flash blue
once it's reset.
NOTE: The Remote Wireless Cloud Card is hot-swappable,
so you do not need to turn o the device to install it.
Copyright © 2021 Cyber Power Systems, Inc. All rights reserved.
R W
C C
A R
P o
w e
D 10
C lo
0
r
ud
S T
R E
A T
U S
S E
T
1
Definitions for the LED Indicators
LED Status (Color)
Blue
The Remote Wireless Cloud Card is not
(Flashing)
connected to the Router.
Green
The Remote Wireless Cloud Card is being
(Flashing)
connected to the Network.
The Remote Wireless Cloud Card is
Green
connected to the Network.
Step 2. Application Installation
Install the "POWERPANEL" application available for download on
the Apple App Store or Google Play, then launch the application.
iOS
Step 3. Sign Up and Login, as shown in Figure 1
Step 4. Add a device in the POWERPANEL app
1. Click "+" in the upper right corner of the homepage, as shown in
Figure 2.
Reset Button
Network Indicator
Condition
Android
2
Figure 1
Figure 2
3
Advertisement

Subscribe to Our Youtube Channel
Related Manuals for CyberPower RWCCARD100


Summary of Contents for CyberPower RWCCARD100
- Page 1 REMOTE WIRELESS CLOUD CARD REMOTE WIRELESS CLOUD CARD RWCCARD100 RWCCARD100 Reset Button Network Indicator Definitions for the LED Indicators LED Status (Color) Condition Blue The Remote Wireless Cloud Card is not (Flashing) connected to the Router. Green The Remote Wireless Cloud Card is being (Flashing) connected to the Network.
- Page 2 FIRMWARE UPGRADE 2. Select “Add Device by WiFi” to add your Remote Wireless Cloud Card. Keep your RWCCARD100 up to date with the newest features and 3. Connect the Remote Wireless Cloud Card you are installing. improvements. Ensure your RWCCARD100 has the latest version of - Go to your phone's Settings >...
Need help?
Do you have a question about the RWCCARD100 and is the answer not in the manual?
Questions and answers