Table of Contents
Advertisement
Quick Links
LINEAR PCM RECORDER
LS-P5
Linear PCM Recorder
USER MANUAL
Thank you for your purchase of our company's voice recorder. Consult this
manual while operating the recorder to ensure that you are using the product
safely and correctly.
Be sure you have read and understood the contents of "8. Safety precautions",
before using this product. Keep these instructions available for future reference.
Read this manual thoroughly before using the product and record test audio to
confirm that it is functioning normally before making important recordings.
The screen and product illustrations shown in this manual were produced during
the development stages and may differ from the actual product.
If there are additions and/or modifications of functions due to firmware update for
the recorder, the contents will differ. For the latest information, please visit our
website.
Getting started
Recording
Playback
Menu
Bluetooth
function
®
Use with a computer
Other information
Safety precautions
1
2
3
4
5
6
7
8
EN
Advertisement
Table of Contents

Summary of Contents for OM SYSTEM LS-P5
- Page 1 Getting started Recording LINEAR PCM RECORDER Playback LS-P5 Menu Bluetooth function ® Use with a computer Other information Linear PCM Recorder USER MANUAL Safety precautions Thank you for your purchase of our company’s voice recorder. Consult this manual while operating the recorder to ensure that you are using the product safely and correctly.
-
Page 2: Table Of Contents
Table of contents Names of parts ............. 6 2 Recording Recorder ..............6 Recording ..............35 Display ............... 7 Basic recording procedure ........35 1 Getting started Adjusting Recording Levels Automatically Before Recording ([SMART] Mode) ........38 Setup ................11 Adjusting Recording Levels Manually Before Inserting batteries ............ - Page 3 Table of contents Recording menu [Rec Menu] ........84 3 Playback Selecting the recording level [Rec Level] ....84 Playback ..............58 Reducing clipping [Limiter]........85 Basic playback procedure........58 Setting the recording mode [Rec Mode] ....85 Fast-forwarding ............60 Selecting microphone directivity [Zoom Mic] ...
- Page 4 Table of contents Device menu [Device Menu] ........100 5 Bluetooth function ® Connecting a Bluetooth device [Bluetooth] ..100 ® Before using the Bluetooth function ....135 ® Selecting the recording media [Memory Select] ..100 Connecting/disconnecting a Bluetooth device ...
- Page 5 Table of contents Indications used in this manual NOTE Describes precautions and operations that should be absolutely avoided in using the voice recorder. Describes useful information and hints that will help you getting the most out of your voice recorder. ☞...
-
Page 6: Names Of Parts
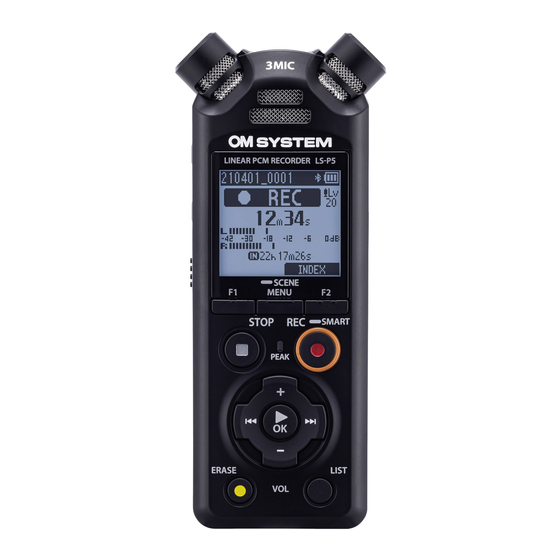
Names of parts Recorder & 1 Built-in center microphone % LIST button 2 Built-in stereo microphone (L) ^ `OK button 3 Microphone/Line jack ( ) & 0 button 4 Earphone jack ( * + button 5 POWER/HOLD switch ( 9 button ) −... -
Page 7: Display
Names of parts Display 4 [Home] screen 1 Recording media indicator ]: Internal memory ]: microSD card 2 Bluetooth indicator ® 3 Battery indicator 4 [Music] mode (☞ P.9) 5 [Recorder] mode (☞ P.8) 6 [Calender Search] mode (☞ P.7) 4 [Calender Search] mode 1 Recording media indicator ]: Internal memory... - Page 8 Names of parts 4 [Recorder] mode Folder list display File list display File display 1 Recording media indicator 9 Elapsed recording time (during recording mode), playback time ]: Internal memory (during playback mode) ]: microSD card 2 Bluetooth indicator 0 Speaker muting indicator ( ®...
- Page 9 Names of parts 4 [Music] mode List display 1 List display 2 File display When folder contains files When folder contains and folders only files 1 Recording media indicator ! Music title ]: Internal memory @ Artist name ]: microSD card # Album name 2 Bluetooth indicator...
- Page 10 Names of parts • To view [Time & Date] (☞ P.101) and [Remain] (remaining recording time available), press the STOP ( 4) button in the [Home] screen or list display or while recording and playback is paused. Additional information can be viewed by pressing the + or −...
-
Page 11: Getting Started
Getting started Setup After unpacking the voice recorder, follow the steps below to have it ready for use. Getting Inserting batteries started Getting Charging batteries started Getting Setting the time/date started Set the voice recorder’s clock for use with file management. -
Page 12: Inserting Batteries
Setup Inserting batteries Before using the voice recorder, insert supplied batteries (BR404) in the battery compartment of the voice recorder. Slide the battery cover to open. Slide the battery cover completely closed. Insert the batteries, making sure their positive and negative terminals are placed correctly. -
Page 13: Charging Batteries
Setup Charging batteries The supplied batteries can be charged by connecting the recorder to a computer via the supplied USB cable. The recorder can be used with the supplied Ni-MH (BR404) batteries or with third- party alkaline batteries. When using alkaline batteries, choose [Alkaline] for [Battery] (☞... - Page 14 Setup Press the `OK button to finalize the setting. • The recorder will display a [Charging] dialog and start charging the batteries. The LED indicator light will turn on. • Charging has finished when the battery indicator changes to [ Battery indicator Charging time: About 3 hours* * Approximate time needed to fully...
-
Page 15: Setting The Time/Date
Setup Setting the time/date Press the 9 or 0 button Press the `OK button to to select the item to set. finalize the setting. • You can press the `OK button during the setting procedure to set the items entered so far and start the clock. -
Page 16: Charging The Batteries
Charging the batteries The supplied rechargeable batteries can be charged either by connecting the recorder to a computer via the supplied USB cable or using an optional AC adapter that connects via USB. Charging the Batteries from a Computer via USB The supplied rechargeable batteries can be charged by connecting the recorder to a computer via USB. - Page 17 Charging the batteries NOTE • The computer to which the recorder is connected via USB must be on for the batteries to charge. You cannot charge the batteries when the power of the computer is OFF, or the computer is in standby, sleep or auto power OFF mode.
-
Page 18: Charging The Batteries By Connecting To An Ac Adapter With A Usb Connection (Model F-5Ac; Optional)
Charging the batteries Charging the batteries by connecting to an AC adapter with a USB connection (model F-5AC; optional) The supplied batteries can be charged by connecting the recorder to an optional F-5AC USB AC adapter using a USB cable. Be sure the batteries are correctly inserted in the recorder before proceeding (☞... - Page 19 Charging the batteries After confirming that the recorder is stopped or off, • Choosing [Optional] for [USB plug the AC adapter into an AC Connection] when [Composite] power outlet. is selected for [USB Class] gives you the option of enabling charging by choosing [AC Adapter] when To an AC connecting (☞...
-
Page 20: Batteries
Batteries Use of rechargeable batteries outside Battery indicator the temperature ranges above may result in drops in battery performance or life. As the batteries lose their remaining When not using the voice recorder for an charge, the battery indicator on the display extended period, remove the rechargeable changes as follows: batteries before storage to prevent fluid... - Page 21 Batteries For users in Germany Battery precautions Our company has an agreement with the • The voice recorder does not support GRS (Joint Battery Disposal Association) manganese batteries. in Germany to ensure environmentally- friendly battery disposal. • Always turn power OFF before replacing the batteries.
-
Page 22: Inserting/Removing A Microsd Card
Inserting/removing a microSD card The voice recorder has its own internal memory, and also supports standard microSD cards (microSD, microSDHC, microSDXC) sold separately. Inserting a microSD card While the voice recorder is in • Inserting a microSD card the wrong way or crookedly could damage its stop mode, open the microSD contact surface or cause it to jam in... - Page 23 Inserting/removing a microSD card • You can also select the internal memory as the recording media (☞ P.100). NOTE • The voice recorder may not be able to recognize a microSD card formatted (initialized) for a computer or other device. Before using a microSD card, always initialize it on the voice recorder (☞...
-
Page 24: Removing A Microsd Card
Inserting/removing a microSD card Removing a microSD card While the voice recorder is in NOTE stop mode, open the microSD • MicroSD cards may pop out card slot cover. forcefully on removal if you flick or release your finger too quickly after pressing the card in. - Page 25 Inserting/removing a microSD card • Processing speed may be low for some microSD card types. Processing performance may also be reduced by writing or deleting data repeatedly from a microSD card. In this case, reinitialize the card (☞ P.133).
-
Page 26: Turning The Power On/Off
Turning the power ON/OFF Turning the power ON Turning the power OFF To turn the recorder on, slide the POWER/ To turn the recorder off, keep the HOLD switch in the direction shown. POWER/HOLD switch in the position shown for at least 0.5 seconds. •... -
Page 27: Preventing Accidental Operation
Preventing accidental operation Setting the voice recorder to HOLD mode maintains the current operation and disables button operations. HOLD mode is a handy feature for preventing unintentional operation from accidental button presses when the voice recorder is carried in a bag or pocket. It is also useful for preventing the voice recorder being accidentally stopped during recording. -
Page 28: [Home] Screen Operations
[Home] screen operations Selecting the mode In addition to its recording function, the voice recorder also provides music player functions. Choose the application you want by selecting one of the voice recorder’s modes. When [Recorder] is selected: While the voice recorder is in stop mode, press the F1 The voice recorder enters [Recorder] mode. -
Page 29: Folders
Folders The recorder creates [Recorder] and [Music] folders both in internal memory and on microSD cards, the former for audio recordings and the latter as a handy location to store music files downloaded from computers. Folders for Audio Recordings Audio recordings are stored in sub-folders directly under the [Recorder] folder. Up to 99 such folders can be created (☞... - Page 30 Folders Press the + or − button to Creating Folders select the desired folder prefix. Create folders directly under the Folder prefixes [Recorder] folder. Folders can be named according to the type of audio recorded. Conference Podcast Meeting Recital Press the 9 or 0 button Interview Concert in the [Home] screen and...
- Page 31 Folders NOTE • The message [Recorder Folder Full] indicates that no additional folders can be created. Delete unwanted folders (☞ P.75). • Each of the folders directly under the [Recorder] folder can store up to 200 files. If you make additional recordings or divide files (☞...
-
Page 32: Music Folders
Folders Music Folders Music files downloaded from computers are stored in the [Music] folder. The [Music] folder can have up to two levels of sub-folders. HOME Level 1 Level 2 ARTIST ALBUM MUSIC ARTIST ALBUM You can create up ARTIST ALBUM to 400 folders in the [Music] folders,... -
Page 33: Selecting Folders And Files
Selecting folders and files You can select a different folder while the voice recorder is in stopped or playing a file. See “Folders” (☞ P.29) for a description of the voice recorder’s hierarchical folder structure. When [Recorder] mode is selected [Home] screen Folder list display* File list display... - Page 34 Selecting folders and files [Home] screen Used to select the voice recorder mode (☞ P.28). List display Displays the folders and files recorded in the voice recorder. Pressing the F2 (FOLDER) button changes the display to the list display of the next folder. File display Displays the information of the selected file.
-
Page 35: Recording
Recording Recording Audio recordings are stored in sub-folders directly under the [Recorder] folder (☞ P.29). Up to 99 such folders can be created (☞ P.30). Basic recording procedure To begin recording, simply select the destination folder and press the REC ( s ) button. Press the + or −... - Page 36 Recording Press the REC ( s ) button to Press the STOP ( 4 ) button start recording. when you want to stop recording. a Elapsed recording time b Remaining possible recording time c File length • The recording indicator light lights. •...
- Page 37 Recording NOTE Sound files recorded with the voice recorder are automatically given a file • To prevent the beginning of the name in the format below. You can add recording being cut off, start a prefix to the file name using [File recording after the recording Menu] >...
-
Page 38: Recording ([Smart] Mode)
Recording Adjusting Recording Levels Automatically Before Recording ([SMART] Mode) Start recording after automatically adjusting the recording level to suit the input volume. Press and hold the REC ( s ) Press the 9 or 0 button in the [Home] screen and button. - Page 39 Recording Point the built-in microphone in the direction of the sound to • If you press REC ( s ) without record. first pressing the STOP ( 4 ) button, automatic recording level adjustment will end and recording will begin at the selected level.
- Page 40 Recording Press the REC ( s ) button to start recording. b Elapsed recording time c Remaining possible recording time • The recording indicator light will turn on. • If you record simple recording content at the beginning, it will be convenient for searching later using the [Intro Play] function (☞...
-
Page 41: Adjusting Recording Levels Manually Before Recording
Recording Adjusting Recording Levels Manually Before Recording Start recording after manually adjusting the recording level to suit the input volume. Select [On] for [Rec Standby] Point the built-in microphone (☞ P.89). in the direction of the sound to record. Press the 9 or 0 button in the [Home] screen and select [Recorder] (☞... - Page 42 Recording Press the REC ( s ) button to Recording linear PCM format files of start recording. over 2 GB When recording a linear PCM format file, recording will continue even after the file size exceeds 2 GB. • The data is divided and saved in separate files of up to 2 GB.
-
Page 43: Pausing/Resuming Recording
Recording Pausing/resuming recording Quickly checking a recording Pressing the `OK button during recording Press the REC ( s ) button ends recording and starts playback. during recording. • Recording pauses, and the blinking message [75 PAUSE] appears in the display. •... - Page 44 Recording Recording menu Various recording settings are available, letting you tailor recording to different recording conditions. [Rec Level] (☞ P.84) Sets the recording level. Choose whether the recorder automatically limits distortion if the [Limiter] (☞ P.85) maximum input level is exceeded during recording. [Rec Mode] (☞...
-
Page 45: Monitoring While Recording
Monitoring while recording Sound can be monitored during recording using either earphones or other audio equipment connected via the earphone jack ( ) or Bluetooth devices connected via ® Bluetooth ® Using Earphones Connected to the Earphone Jack to Monitor Sound During Recording You can monitor the recording as you are making it by listening on the earphones ). -
Page 46: Monitoring Recording Using Earphones Connected Via Bluetooth
Monitoring while recording Monitoring Recording Using Earphones Connected via Bluetooth ® Recording can be monitored using earphones connected to the recorder via Bluetooth ® • The earphones are optional. • Other devices can also be connected via Bluetooth . For information on supported ®... -
Page 47: Selecting The Automatic Recording Setting [Rec Scene]
Selecting the automatic recording setting [Rec Scene] Changing the recording scene The voice recorder has preregistered templates of optimum settings tailored to various recording applications such as lectures and dictation. When selecting one of these templates you can enter several settings recommended for your recording application all in a single operation. - Page 48 Selecting the automatic recording setting [Rec Scene] Preregistered [Rec Scene] settings • Press the 9 button to display [Lecture] the settings of the selected [Rec Level] [Auto] template. Press the 0 button to return to the [Scene Select] [Rec Mode] [MP3 128 kbps] screen.
- Page 49 Selecting the automatic recording setting [Rec Scene] [Dictation] [DNS] [Rec Level] [Middle] [Rec Level] [Middle] [Rec Mode] [MP3 128 kbps] [Rec Mode] [MP3 128 kbps] [Zoom Mic] [Zoom Mic] [Low Cut Filter] [On] [Low Cut Filter] [Off] [External Input] [Microphone] [External Input] [Microphone] [NoisySituation]...
- Page 50 Selecting the automatic recording setting [Rec Scene] NOTE • For recording when [NoisySituation] is set, point the built-in microphone on the top left or top right of the voice recorder toward the speaker and place it in an upright position as close as approximately 3 cm from the speaker’s mouth.
-
Page 51: Creating Custom Recording Scenes
Selecting the automatic recording setting [Rec Scene] Creating Custom Recording Scenes Save [Rec Level] (☞ P.84), [Rec Mode] (☞ P.85), [Zoom Mic] (☞ P.86), [Low Cut Filter] (☞ P.87), and [External Input] (☞ P.53) settings to custom recording- scene banks. Press the `OK button to NOTE move the cursor into the list of •... - Page 52 Selecting the automatic recording setting [Rec Scene] Press the + or − button to select [User 1] or [User 2]. Press the `OK button to finalize the setting. • Current settings are saved to [User 1] or [User 2]. Press the STOP ( 4 ) button to exit the menu screen.
-
Page 53: Recording Using External Mics Or Other Input Devices Connected To The Recorder [External Input]
Recording Using External Mics or Other Input Devices Connected to the Recorder [External Input] Record sound from an external microphone or audio device connected via the voice recorder’s microphone/line jack ( ). Choosing an Input Device Select [Microphone] for input devices with microphone connectors, [Line In] for audio devices or other equipment with line-in connectors. - Page 54 Recording Using External Mics or Other Input Devices Connected to the Recorder [External Input] Press the `OK button to finalize the setting. Press the STOP ( 4 ) button to exit the menu screen. • To view an icon showing the option selected for external input, press the STOP ( ...
-
Page 55: Recording Using External Mics And Other Input Devices
Recording Using External Mics or Other Input Devices Connected to the Recorder [External Input] Recording Using External Mics and Other Input Devices The recorder can record audio input from external microphones and the like. See “Accessories (optional)” (☞ P.154) for the compatible external microphones. NOTE NOTE •... -
Page 56: Recording Audio From Another Device With This Recorder
Recording Using External Mics or Other Input Devices Connected to the Recorder [External Input] Recording audio from another device with this recorder The recorder can record audio playback from music players and other audio devices via line-in input. NOTE NOTE •... -
Page 57: Recording Audio From This Recorder With Another Device
Recording audio from this recorder with another device Record audio from music players or other audio devices connected via the recorder’s earphone jack ( Connect an other device to the voice recorder’s earphone jack • Audio from this recorder can be recorded to another device by connecting the audio input terminal (microphone/line jack) of the other... -
Page 58: Playback
Playback Playback In addition to files recorded by the voice recorder, you can also play WAV, FLAC or MP3 format files transferred from a computer. Basic playback procedure Select the file to play from the Press the + or − button to adjust folder containing it (☞... - Page 59 Playback Press the STOP ( 4 ) button to stop playback. • Playback ends automatically when the end of the file is reached. • The resume feature saves the current playback position when the recorder is turned off. The next time the power is turned on, playback can be resumed from the stop position stored in the memory.
-
Page 60: Fast-Forwarding
Playback Fast-forwarding Rewinding Fast-forwarding while the voice Rewinding while the voice recorder is in stop mode recorder is in stop mode With the voice recorder stopped, press With the voice recorder stopped, press and hold the 9 button. and hold the 0 button. •... -
Page 61: Skipping To The Beginning Of A File
Playback Skipping to the beginning of a file NOTE • If an index mark or temp mark is reached when skipping to the beginning of a file during playback, playback starts from the position of the mark. When skipping to the beginning of a file while the voice recorder is in stop mode, the mark is ignored (☞... - Page 62 Playback Playback menu You can select various file playback methods tailored to different applications and tastes. [Voice Playback]* (☞ P.94) Only plays voice portions of a recorded audio file. A setting that makes recorded voices more discernable when muffled [Noise Cancel]* (☞...
-
Page 63: Playback Using The Earphones Connected To The Earphone Jack
Playback Playback Using the Earphones Connected to the Earphone Jack You can connect the earphones to the voice recorder’s earphone jack ( ) and listen to playback through them. • The earphones are optional. • Speakers and other devices that can be connected via the earphone jack can be used instead of earphones. -
Page 64: Playback Using Earphones Connected Via Bluetooth
Playback Playback Using Earphones Connected via Bluetooth ® Audio can be played back over earphones connected via Bluetooth ® • The earphones are optional. • Other devices can also be connected via Bluetooth ® Connect the recorder and NOTE earphones via Bluetooth ®... - Page 65 Playback Music files Use the [Music] folder to store music files downloaded from computers (☞ P.32). If a music file transferred to the voice recorder is unplayable, check that its sampling rate, bit count and bit rate values are within the supported ranges. The sampling rate, bit count and bit rate combinations supported for music file playback by the voice recorder are shown below.
-
Page 66: Changing The Playback Speed
Changing the playback speed Changing the playback speed is handy for speeding up conference presentations, or for slowing down parts difficult to discern when learning a language. Press the `OK button during playback. • When changing the playback speed, playback operations such as stopping playback, skipping to the beginning of a file, and writing index marks/temp marks are the same as... -
Page 67: Abc Repeat Playback
ABC repeat playback The voice recorder has a function with which you can repeat the playback of a portion (segment) of the file being played. In addition to the A-B repeat function available from previous models, the segment to repeat can be changed during repeat playback. Select a file for ABC repeat ABC repeat playback playback, and start playback. - Page 68 ABC repeat playback Press the F1 (SET B) button • Segment A-B is canceled. [ becomes the new start position, and again when playback reaches playback continues. the desired end position for • You can change the playback speed ABC repeat playback. (☞...
- Page 69 ABC repeat playback NOTE Canceling ABC repeat playback • You cannot change the end position Press the F2 (CNCL ABC) button. of a repeat playback segment to a position before the start position. • You cannot write index marks or temp marks during ABC repeat playback (☞...
-
Page 70: Index Marks/Temp Marks
Index marks/temp marks Writing an index mark or temp mark in a file enables you to quickly access desired position in the file with the same operations used for fast-forwarding, rewinding or skipping to the start of a file. You can write index marks in files created with this recorder. For files created with devices other than this company’s voice recorders and files in which index marks cannot be written, you can write temp marks in a file being played, for temporarily remembering desired positions. -
Page 71: Erasing An Index Mark/Temp Mark
Index marks/temp marks Erasing an index mark/temp mark Deleting selected index/temp marks Erasing all index marks at once Delete selected index/temp marks. You can erase all index marks in a file at once. Select a file that contains index Select a file that contains mark/temp mark you want to index/temp marks you want to erase and start playback. - Page 72 Index marks/temp marks Press the `OK button. Press the + button to select [Start]. Press the `OK button. • [Erasing!] appears in the display, and the erasing process starts. [Erased] appears when the process has finished.
-
Page 73: Calendar Search Function
Calendar Search function You can search for voice files by specifying a recording date. If you have forgotten in which folder a file has been saved, with this feature you can access it quickly by entering its recording date. • You can only search for files saved in [Recorder] folder. •... -
Page 74: Erasing Files/Folders
Erasing files/folders This section describes how to erase a single unneeded file from a folder, erase all the files in the current folder at once, or erase a selected folder. Erasing files Select the file you want to Press the `OK button. erase (☞... -
Page 75: Erasing A Folder
Erasing files/folders Erasing a folder Select the folder you want to NOTE erase (☞ P.33). • Files cannot be restored after being erased, so please check carefully In the folder display screen, before erasing a file. press the ERASE button while •... - Page 76 Erasing files/folders • Before erasing a file or folder, charge or replace the batteries to ensure they will not run out before the process has finished. Erasing processes can take over 10 seconds to complete. To prevent the risk of damage to data, never attempt to perform any of the following processes before an erasing process has finished:...
-
Page 77: Menu
Menu Setting menu items Basic operation Menu items are arranged by tabs, with which you can quickly set desired items by selecting a tab and then moving to the desired item within the tab. Follow the steps below to set a menu item. During recording/playback or Press the `OK button to while the voice recorder is in... - Page 78 Setting menu items Press the STOP ( 4 ) button to Press the `OK button. exit the menu screen. • The setting of the selected item is displayed. • When the menu screen is displayed • You can also use the 9 button to during recording or playback, press perform this operation.
- Page 79 Setting menu items 4 Menu items that can be set during recording • Rec Level • Zoom Mic • Low Cut Filter • Bright Sound • Rec Monitor • External Input • Backlight • LED 4 Menu items that can be set during Playback •...
-
Page 80: File Menu [File Menu]
File menu [File Menu] Extracting the speaking Sorting files [Sort by] portions of files of spoken- You can change the playback order of the word content [Voice Detect] files in a folder. Press the + or − button The function extracts the speech portions to select [File name], of a voice file or a file being recorded by the voice recorder. -
Page 81: Moving/Copying Files [Move/Copy]
File menu [File Menu] Moving/copying files Increasing the overall volume [Move/Copy] level of a file [Normalize] Files saved in the internal memory or on Increase the overall volume level until the a microSD card can be moved or copied highest volume level of the recorded file within memory. -
Page 82: Fading In/Out Audio At The Beginning/End Of A File [Fade In/Out]
File menu [File Menu] Available Prefixes Fading in/out audio at the Important beginning/end of a file [Fade in/out] Keep You can apply fade in/out effect to the beginning/end of a file for approximately Press the `OK button. 1 second respectively and save the file as •... - Page 83 File menu [File Menu] Folder information Press the + or − button to switch the screen. • Information is displayed for the items [Name], [File] (the number of files) and [Folder] (the number of folders). • The [Folder] item is not displayed in [Recorder] mode.
-
Page 84: Recording Menu [Rec Menu]
Recording menu [Rec Menu] Selecting the recording level NOTE [Rec Level] • When [Rec Level] is set to other than [Manual], the recording level is You can change the recording level adjusted automatically but noise may (sensitivity) as needed for your recording be generated if an excessively loud application. -
Page 85: Reducing Clipping [Limiter]
Recording menu [Rec Menu] Reducing clipping [Limiter] Setting the recording mode [Rec Mode] Automatically reduce clipping caused by the input of excessively loud sounds You can prioritize sound quality or during recording. recording time. Select the recording [Music]: mode that best matches your recording Select this setting for clarity of sound application. -
Page 86: Selecting Microphone Directivity [Zoom Mic]
Recording menu [Rec Menu] Selecting microphone directivity [Zoom Mic] • Sound quality increases as the recording rate value increases. The voice recorder’s built-in stereo • Setting a higher recording rate microphone provides directivity ranging increases file size. Check that you from broad-coverage stereo recording to have enough remaining memory highly directional recording. -
Page 87: Reducing Noise During Recording [Low Cut Filter]
Recording menu [Rec Menu] Recording clear audio NOTE [Bright Sound] • The [Rec Scene] setting automatically changes to [Off] when [Zoom Mic] is set. [Zoom Mic] Create recordings with bright, clear sound. cannot be set during recording when [On]: [Rec Scene] is set. Create recordings with bright, clear sound. -
Page 88: Selecting The Automatic Recording Setting [Rec Scene]
Recording menu [Rec Menu] Selecting the automatic Recording Using External recording setting [Rec Scene] Mics or Other Input Devices Connected to the Recorder The voice recorder has preregistered [External Input] templates of optimum settings tailored to various recording applications such as Record sound from an external lectures and dictation. -
Page 89: Placing The Recorder On Standby Before Recording [Rec Standby]
Recording menu [Rec Menu] Placing the recorder on Choosing a recording method standby before recording [Fn Rec] [Rec Standby] A variety of recording options can be assigned to the F2 button for quick recall. The recorder can be configured so that See “Choosing a Recording Method [Fn pressing the REC ( ... - Page 90 Recording menu [Rec Menu] Press the REC ( s ) button. 4 Adjusting the voice sync level for voice sync recording • The blinking message [Standby] appears in the display, and the Press the F2 (SYNC) button to recording indicator light blinks. prepare for recording.
- Page 91 Recording menu [Rec Menu] Using overdubbing [Over Dubbing] Voice-activated recording function [VCVA] You can overdub a file while listening to its playback sound. The overdubbed file is The voice-activated recording function saved with a different name. This function (VCVA) automatically starts recording is useful for composing music or practicing when a sound louder than a preset musical instruments.
- Page 92 Recording menu [Rec Menu] Press the 9 or 0 button to adjust the voice activation • Increasing the setting number level. increases the VCVA activation sensitivity, enabling quieter sounds to activate the start of recording. • Adjust the VCVA voice activation level to suit the recording conditions (to cope with high levels of surrounding noise or the like).
-
Page 93: Choosing The Voice Sync Time [V-Sync. Time]
Recording menu [Rec Menu] Choosing the Voice Sync Time Recording a Reference Tone [V-Sync. Time] for Use When Synchronizing Audio and Video [Slate Tone] Choose how long the voice recorder continues to record after the input volume Reference tones, otherwise known as falls below the level selected for [V-Sync. -
Page 94: Playback Menu [Play Menu]
Playback menu [Play Menu] Skipping non-voice Reducing noise during portions during playback playback [Noise Cancel] [Voice Playback] Use the [Noise Cancel] function to reduce noise when a recorded voice is difficult to With the [Voice Playback] function you discern. can only play the speaking portions of a recorded file of spoken-word content. -
Page 95: Adjusting Low Volume Portions During Playback [Voice Balancer]
Playback menu [Play Menu] Adjusting low volume Selecting playback modes portions during playback [Play Mode] [Voice Balancer] Several playback modes are available for different listening styles. Cuts low- and high-frequency components and compensates low-volume portions Press the + or − button to during playback. -
Page 96: Changing Music Sound Quality [Equalizer]
Playback menu [Play Menu] Press the + or − button to Changing music sound quality select a setting. [Equalizer] When [Playback Range] was selected: The voice recorder’s equalizer settings can [File], [Folder], [All]: be changed to change music sound quality Specify the range of files for as desired. -
Page 97: Setting A Skip Space [Skip Space]
Playback menu [Play Menu] Setting a skip space NOTE [Skip Space] • Forward/reverse skip operations over a skip space that contains an The [Skip Space] function lets you skip index mark/temp mark or the starting a preset amount forward (forward skip) position of a file will stop at that mark or backward (reverse skip) in a file during or at the start position. -
Page 98: Lcd/Sound Menu [Lcd/Sound Menu]
LCD/Sound menu [LCD/Sound Menu] Setting the backlight Turning beeping sound on/off [Backlight] [Beep] The display backlights are switched on The voice recorder makes beeping sounds for a preset amount of time when a button when buttons are pressed, or to warn in operation is performed. -
Page 99: Playing The Beginning Of Files Automatically [Intro Play]
LCD/Sound menu [LCD/Sound Menu] Playing the beginning of files Selecting the speaker output automatically [Intro Play] [Speaker] Each time you select a file in the file You can set the built-in speaker to be list screen, the voice recorder can On or Off when the earphones are not automatically play a few seconds of the connected. -
Page 100: Device Menu [Device Menu]
Device menu [Device Menu] Connecting a Bluetooth Setting power save mode ® device [Bluetooth] [Power Save] This function is compatible with The voice recorder automatically enters Bluetooth and allows you to connect power save mode if the voice recorder is ®... -
Page 101: Setting The Time/Date [Time & Date]
Device menu [Device Menu] Setting the time/date [Time & Date] • When setting the hour or minute, each time you press the F2 button If you set the date and time, you will be the display changes between the able to check when a file was recorded in AM/PM and 24-hour clock formats. -
Page 102: Setting The Usb Connection [Usb Settings]
Device menu [Device Menu] Setting the USB connection Restoring the default settings [USB Settings] [Reset Settings] The [PC] setting lets you connect the voice The [Reset Settings] function restores all recorder to a computer to transfer files. the voice recorder’s functions to their initial The [AC Adapter] setting lets you connect (factory default) settings. -
Page 103: Formatting A Recording Media [Format]
Device menu [Device Menu] Formatting a recording media Play Menu: Voice Playback: Off [Format] Noise Cancel: Off Voice Balancer: Off Formatting a recording media erases Play Mode: all existing files saved on it. Be sure to transfer all important files to a computer Recorder: before formatting. -
Page 104: Viewing Certification Marks [Certification]
Device menu [Device Menu] Viewing Certification Marks [Certification] View the recorder’s product certifications. -
Page 105: Extracting The Speaking Portions Of Files Of Spoken-Word Content [Voice Detect]
Extracting the speaking portions of files of spoken-word content [Voice Detect] The function extracts the speech portions of a voice file or a file being recorded by the voice recorder. • The [Voice Detect] function can only be used in [Recorder] mode. Press the `OK button to move NOTE to the respective setting. - Page 106 Extracting the speaking portions of files of spoken-word content [Voice Detect] • The [Voice Playback] option • To resume normal recording and in [Play Menu] toggles to include non-voice audio, select [Off] [On] when voice detection is for [While recording]. complete.
- Page 107 Extracting the speaking portions of files of spoken-word content [Voice Detect] NOTE • The message [No file] appears if you select a folder that doesn’t contain a saved file. You must select a folder containing a file before you can perform the process.
-
Page 108: Moving/Copying Files [Move/Copy]
Moving/copying files [Move/Copy] Files saved in the internal memory or on a microSD card can be moved or copied within memory. Before performing the move/ [Copy to memory]: Copies one or more files saved in copy operation, first select the internal memory or inserted the folder containing the file microSD card to a different folder in you want to move or copy... - Page 109 Moving/copying files [Move/Copy] Press the `OK button to 2 Repeat Step 1 to select all the files you want to move or copy, continue to the next setting. then press the F2 button. When [One file] was selected When [All files] was selected 1 Press the + or −...
- Page 110 Moving/copying files [Move/Copy] Press the F2 button. • The progress of the operation is shown as a percentage in the display. • [File move completed] or [File copy completed] appears when the process has finished. • Locked files (☞ P.80) remain locked after being moved or copied.
-
Page 111: Dividing Files [File Divide]
Dividing files [File Divide] Large files or files with long recording times can be divided for easier management and editing. Press the F2 button at the NOTE desired division point. • Only PCM or MP3 format files recorded on the voice recorder can be divided. - Page 112 Dividing files [File Divide] • After dividing a file, the first half of the file is given the name “File name_1” and the second half “File name_2”. • If the current folder contains 200 files, a new folder will be created to hold the additional files.
-
Page 113: Partially Erasing Files [Partial Erase]
Partially erasing files [Partial Erase] You can erase unneeded parts of a file. Press the F2 button at the NOTE partial erase start position. • Only PCM-format file recorded on the voice recorder can be erased. Before performing the file erasing operation, first select the file you want to erase (☞... - Page 114 Partially erasing files [Partial Erase] Press the + button to select NOTE [Start]. • Files cannot be restored after being erased, so please check carefully before erasing a file. • Locked files and read-only files cannot be erased (☞ P.80). •...
-
Page 115: Trimming A File [Trimming]
Trimming a file [Trimming] A file can be trimmed down to just the required portion and then re-saved. Press the F2 button at the NOTE position where you want to • Only PCM-format file recorded on start trimming. the voice recorder can be trimmed. Before performing the file trimming operation, first select the file you want to trim... - Page 116 Trimming a file [Trimming] Press the + button to select NOTE [Start]. • If a file has an extremely short recording time, it may not be trimmed even if it is a PCM file. • Locked files and read-only files cannot be trimmed (☞...
-
Page 117: Fading In/Out Audio At The Beginning/End Of A File [Fade In/Out]
Fading in/out audio at the beginning/end of a file [Fade in/out] You can apply fade in/out effect to the beginning/end of a file for approximately 1 second respectively and save the file as another file. Press the `OK button. NOTE •... -
Page 118: Starting Recording At A Set Time [Timer Rec]
Starting Recording at a Set Time [Timer Rec] Start and end recording at specified times. NOTE Choosing Start and End Times • Before proceeding, check that the recorder’s clock is set to the Press the MENU/SCENE correct time and date. If it is not, button while the voice recorder set the clock using [Time &... - Page 119 Starting Recording at a Set Time [Timer Rec] Press the 9 or 0 button Starting Timed Recording to select the desired setting item. Press the MENU/SCENE button while the voice recorder is in stop mode. Press the + or − button to select the [Rec Menu] tab.
- Page 120 Starting Recording at a Set Time [Timer Rec] Press the STOP ( 4 ) button to exit the menu screen. NOTE • [Timer Rec] > [On/Off] reverts to [Off] when timed recording ends. • Timed recording will not start if the recorder is in use or recording is in progress at the starting time selected for [Timer Rec].
-
Page 121: Choosing A Recording Method [Fn Rec]
Choosing a Recording Method [Fn Rec] A variety of recording options can be assigned to the F2 button for quick recall. Press the + or − button to NOTE select the option you plan to • Before using [Pre-Recording], select assign to the F2 button. - Page 122 Choosing a Recording Method [Fn Rec] NOTE • Assigning a recording function to the F2 button using [Fn Rec] selects [Off] for [Slate Tone]. • Selecting [Pre-Recording], [V-Sync. Rec], or [VCVA] for [Fn Rec] selects [Off] for [Voice Detect] > [While Recording] (☞...
-
Page 123: Starting Recording Before You Press Record [Pre-Recording]
Choosing a Recording Method [Fn Rec] Starting Recording Before You Press Record [Pre-Recording] With pre-recording, recording starts approximately two seconds before you press the REC ( s ) button. If, for example, you were recording bird song and pressed the REC ( s ) button the moment you heard the first note, the recording would actually begin slightly before the bird started singing. - Page 124 Choosing a Recording Method [Fn Rec] Press the F2 (PRE REC) button NOTE to activate pre-recording. • The recording time shown after recording starts includes the time for the pre-recorded portion. • Recordings made while pre- recording is active will begin approximately two seconds before the REC ( ...
-
Page 125: Using Overdubbing [Over Dubbing]
Choosing a Recording Method [Fn Rec] Using Overdubbing [Over Dubbing] You can overdub a file while listening to its playback sound. The overdubbed file is saved with a different name. This function is useful for composing music or practicing musical instruments. -
Page 126: Recording A Reference Tone For Use When Synchronizing Audio And Video [Slate Tone]
Recording a Reference Tone for Use When Synchronizing Audio and Video [Slate Tone] Reference tones, otherwise known as “slate tones”, can be recorded for use during editing to help synchronize audio and video when audio from the voice recorder is substituted for sound recorded by the camera (☞ P.128). - Page 127 Recording a Reference Tone for Use When Synchronizing Audio and Video [Slate Tone] Press the 9 or 0 button Shooting Videos with a Slate Tone to adjust the recording level. Connect the camera audio input jack to the earphone jack ( ) on the voice recorder (☞...
- Page 128 Recording a Reference Tone for Use When Synchronizing Audio and Video [Slate Tone] Press the F1 (SLATE) button Press the STOP ( 4 ) button on the voice recorder. when you want to stop recording. • A beep (slate tone) will be recorded. End filming on the camera.
-
Page 129: Adjusting Sound Level For Output To The Camera [Test Tone]
Adjusting Sound Level for Output to the Camera [Test Tone] Using a test tone to match output volume to the optimal camera recording level before beginning recording helps prevent crackling and distortion. Connect the camera audio Press the `OK button to input jack to the earphone move the cursor into the list of jack (... - Page 130 Adjusting Sound Level for Output to the Camera [Test Tone] Adjust the volume using the + Press the STOP ( 4 ) button to or − button. exit the menu screen. • Press and hold the STOP ( 4 ) button when the voice recorder is stopped to check setting indicators meanings.
-
Page 131: Setting The Usb Connection [Usb Settings]
Setting the USB connection [USB Settings] Choose USB settings for tasks such as downloading files or charging the batteries. USB Connection Settings Choose whether the recorder uses a pre-selected download or charging option or instead prompts you to choose USB settings whenever a device is connected. Press the MENU/SCENE Press the `OK button. -
Page 132: Usb Class
Setting the USB connection [USB Settings] USB Class Before connecting the recorder to a computer, choose a USB class according to the task to be performed. Press the MENU/SCENE [Storage Class]: Select to have the voice recorder button while the voice recorder recognized as an external memory is in stop mode. -
Page 133: Formatting Recording Media [Format]
Formatting recording media [Format] Formatting a recording media erases all existing files saved on it. Be sure to transfer all important files to a computer before formatting. Press the MENU/SCENE Press the `OK button. button while the voice recorder is in stop mode. Press the + or −... - Page 134 Formatting recording media [Format] NOTE • Never format the voice recorder from a computer. • Formatting erases all the existing data, including locked files and read-only files. • If there is a microSD card in the voice recorder, make sure [Internal memory] or [microSD card] has been correctly selected as the recording media to erase (☞...
-
Page 135: Bluetooth ® Function
Bluetooth function ® Before using the Bluetooth function ® This function is compatible with Bluetooth and allows you to connect the voice recorder ® to a device that is compatible with the same standard. If you use Bluetooth compatible earphones, you can use the voice recorder freely within ®... - Page 136 Before using the Bluetooth function ® • Near a microwave, cordless telephone set, or device that uses the 2.4GHz frequency band, if the voice recorder is used at the same time with such a device, communication performance may be affected. When using the voice recorder, keep a sufficient distance away from such devices.
-
Page 137: Connecting/Disconnecting A Bluetooth ® Device
Connecting/disconnecting a Bluetooth device ® Connecting a Bluetooth device ® This function is compatible with Bluetooth and allows you to connect the voice recorder ® to a device that is compatible with the same standard. A wireless connection enables you to use earphones and other compatible devices freely within a certain range. - Page 138 Connecting/disconnecting a Bluetooth device ® Press the + or − button to • [Connecting!] appears in the display, and the connecting process select [Pairing]. starts. [Connection Completed] appears when the process has finished. Press the STOP ( 4 ) button to exit the menu screen.
- Page 139 Connecting/disconnecting a Bluetooth device ® Press the + or − button to Connecting using [Connection] select [Connection]. Performing operations such as turning the recorder off after it has been paired with a Bluetooth compatible device ® ends the Bluetooth connection. Select ®...
- Page 140 Connecting/disconnecting a Bluetooth device ® Press the `OK button. NOTE • Recording, playback, and other operations are not possible during the pairing process. • Only one Bluetooth device can ® be connected by performing pairing setting once. Multiple devices cannot be paired simultaneously.
-
Page 141: Device
Connecting/disconnecting a Bluetooth device ® Disconnecting the connection with a Bluetooth device ® Press the `OK button. Disconnecting the connection using [Disconnection] Press the MENU/SCENE button while the voice recorder is in stop mode. Press the + or − button to select [Device Menu] tab. -
Page 142: Connecting To Smartphones Via Bluetooth
Connecting to Smartphones via Bluetooth ® About DVR.Remote The DVR.Remote application for smartphones is required to use your smartphone to operate the voice recorder from a distance. What the application can do Connecting to Smartphones via [Pairing] With the application installed on your smartphone, you can remotely: The initial connection between two •... - Page 143 Connecting to Smartphones via Bluetooth ® Press the `OK button. 4 About pairing Paring will need to be performed again in the following cases. • When the information for pairing with the voice recorder has been deleted on the smartphone to be connected. •...
-
Page 144: Enabling Or Disabling Bluetooth
Enabling or Disabling Bluetooth ® Enabling Bluetooth and Connecting Automatically to Paired ® Devices Enabling Bluetooth Disabling Bluetooth ® ® To enable Bluetooth and allow the To prevent the recorder connecting to ® recorder to connect automatically to the Bluetooth devices automatically, select ®... -
Page 145: Use With A Computer
Use with a computer When connecting the voice recorder to a computer you can do the following: • You can enjoy MP3 or linear PCM (WAV) format files saved on your computer, or FLAC format music files downloaded from high-resolution distribution site. -
Page 146: Computer Connection/Disconnection
Computer connection/disconnection Connecting the voice recorder to a computer Start the computer. NOTE • Insert the USB connector securely After confirming that the all the way. Operation will not be recorder is stopped or off, normal if the connection is not made connect it to the computer properly. -
Page 147: Disconnecting The Voice Recorder From A Computer
Computer connection/disconnection Disconnecting the voice recorder from a computer After checking the recorder to confirm that the LED indicator light is not flashing, disconnect the USB cable from the recorder and computer. • You can disconnect the USB cable and use the voice recorder before the batteries are fully charged. -
Page 148: Other Information
Other information Alarm message list Message Meaning Action required Replace or charge the batteries Battery low The remaining battery power is low. (☞ P.12, P.16). An attempt was made to erase a You must unlock the file before you File locked locked file. - Page 149 Alarm message list Message Meaning Action required Same folder An attempt was made to move Select another folder. Can’t move (copy) (copy) a file to the same folder. A file with the same name as a file Some files can’t be being moved (copied) exists in the Select another file.
-
Page 150: Troubleshooting
Troubleshooting Problem Possible cause Solution Check that the positive and negative The batteries are not inserted terminals of the batteries are placed properly. correctly (☞ P.12). The display is blank. The remaining battery power Replace or charge the batteries is low. (☞... - Page 151 Troubleshooting Problem Possible cause Solution The recording level hasn’t been Redo recording after adjusting the adjusted. recording level (☞ P.84). Audio file sound is The voice recorder’s recording If the problem continues after adjusting distorted. level, or the output level of the the voice recorder’s recording level connected external device may (☞ P.84), adjust the output level of the...
- Page 152 Troubleshooting Problem Possible cause Solution No sound can be heard [Off] is selected for [Rec Select [On] for [Rec Monitor] from the earphones Monitor]. (☞ P.88). during recording. The folder contains a file that Connect the voice recorder to a Unable to erase a folder the voice recorder cannot computer to erase the folder (☞...
- Page 153 Troubleshooting Problem Possible cause Solution The computer is unable [AC Adapter] has been selected Select [PC] for [USB Connection] to recognize the voice for [USB Connection]. (☞ P.131). recorder. Playback speed function is set Playback speed is fast Set the playback speed function setting to anything other than [x1.0 (or slow).
-
Page 154: Accessories (Optional)
Accessories (optional) For more information on the accessories available for this product, visit our website. Availability of accessories differs depending on the country. Batteries BR404/BR404J nickel-metal hydride AAA rechargeable batteries (4 pcs) High efficiency, long-lasting rechargeable batteries. Microphone ME51SW stereo microphone A compact, high-quality stereo microphone that comes with a tie clip. - Page 155 Accessories (optional) AC adapter F-5AC USB-connection AC adapter A USB-connected AC adapter that provides 5-volt DC output. (100-240 VAC, 50/60 Hz) Other Accessories KA335 connecting cord A high-quality cable for connecting the camera to the recorder. SM2 Shock Mount An adapter that helps prevent noise being transmitted to the recorder from the camera to which it is attached.
-
Page 156: Recorder Care
Recorder care s Exterior • Wipe gently with a soft cloth when the recorder gets dirty. If the recorder is very dirty, soak the cloth in mild soapy water and wring well. Wipe the recorder with the damp cloth and then wipe it with a dry cloth. s Display •... -
Page 157: Copyright And Trademark Information
Copyright and trademark information • The information in this document is subject to change in future without prior notice. Contact Customer Support Center for the latest product names, model numbers and other information. • Voice recorder displays and product illustrations shown in this manual may differ from the actual product. - Page 158 Copyright and trademark information Notes f WARNING s Turn off the voice recorder in a hospital or near medical electric devices. Electric waves from the voice recorder could affect electric medical devices and could cause accidents due to malfunction. s Keep a distance of at least 15cm from persons who have a pacemaker. Electric waves from this voice recorder could affect the operation of a pacemaker.
-
Page 159: Specifications
Specifications 4 Bluetooth Specification ® General items Standard: Version 5.0 Support 4 Recording formats Transmit Power Level: Class 1 Communication Distance: Linear PCM format Line of sight approx. 10 m* (max.) FLAC format Operational Frequency Range: MP3 format 2.4 GHz to 2.4835 GHz 4 Input level 7 mW or less −63 dBv Modulation Method: FHSS/GFSK... - Page 160 Specifications 4 Power source Frequency response Batteries: Two AAA dry-cell batteries (model LR03), or two BR404 nickel- 4 When recording from microphone/ metal hydride rechargeable batteries line jack (always use BR404 batteries for Linear PCM/FLAC format charging with the recorder) 96.0 kHz/24 bits 20 Hz to 44 kHz External power supply: USB-connection...
- Page 161 Specifications Battery life The figures below are guideline values. 4 When recording with built-in stereo microphone (using internal memory) Nickel-metal hydride Recording mode Alkaline dry-cell batteries rechargeable batteries 96.0 kHz/24 bits 29 hours (approx.) 20 hours (approx.) 88.2 kHz/24 bits 31 hours (approx.) 21 hours (approx.) 48.0 kHz/24 bits 47 hours (approx.)
- Page 162 Specifications 4 During audio file playback During speaker playback Nickel-metal hydride Recording mode Alkaline dry-cell batteries rechargeable batteries 320 kbps 24 hours (approx.) 16 hours (approx.) MP3 format 128 kbps 24 hours (approx.) 16 hours (approx.) 64 kbps mono 24 hours (approx.) 17 hours (approx.) During earphone playback Nickel-metal hydride...
- Page 163 Specifications Recording times The figures below are guideline values. 4 Linear PCM format microSD card Recording Internal memory mode 64 GB 32 GB 29 hours, 30 minutes 14 hours, 30 minutes 96.0 kHz/24 bits 7 hours (approx.) (approx.) (approx.) 7 hours, 45 minutes 88.2 kHz/24 bits 32 hours (approx.) 16 hours (approx.)
- Page 164 Specifications 4 MP3 format microSD card Recording Internal memory mode 64 GB 32 GB 320 kbps 104 hours (approx.) 429 hours (approx.) 212 hours (approx.) 128 kbps 260 hours (approx.) 1070 hours (approx.) 530 hours (approx.) 64 kbps mono 520 hours (approx.) 2140 hours (approx.) 1060 hours (approx.) NOTE...
- Page 165 Specifications Maximum recording time per file • The maximum file size is limited to approximately 2 GB in linear PCM (WAV) format, and approximately 4 GB in FLAC/MP3 format. • Regardless of the amount of remaining memory, the maximum recording time per file is restricted to the following values: 4 Linear PCM format 4 FLAC format...
- Page 166 Specifications Number of music tracks (songs) that can be recorded The figures below are guideline values. 16 GB 3600 tracks (approx.) (At 128 kbps, 4 minutes per track) Note that voice recorder specifications and appearance are subject to change without prior notice for performance improvements or other upgrading.
-
Page 167: Safety Precautions
Safety precautions Before using the voice recorder, read Voice recorder safety precautions this manual to ensure correct and safe f WARNING operation. After reading this manual, s Do not use the voice recorder in be sure to keep it on hand for ready an atmosphere that might contain reference whenever needed. - Page 168 Safety precautions f CAUTION s Do not use the USB power supply via the car cigarette lighter socket or the s Do not raise the volume before self-modified power supply. performing an operation. It may cause overheating, fire, electric Hearing damage or loss may result. shock or malfunctions.
- Page 169 Safety precautions f WARNING s Keep batteries out of the reach of infants and children. s Do not touch or hold batteries with Batteries could be swallowed by infants wet hands. and children. Swallowing may lead to It may cause electric shock or burns, perforation of soft tissue, and malfunctions.
- Page 170 Safety precautions s Rechargeable batteries have a Operating precautions limited life. When the recorders • Do not leave the voice recorder in hot or operating time becomes shorter humid locations such as in direct sunlight after recharging under the specified inside a vehicle, or on a beach during condition, please consider that summer.
- Page 171 Safety precautions <Data loss precautions> <Voice recorder and microSD cards disposal precautions> • Recorded content in the internal memory and microSD card may be destroyed or • Even when formatting (☞ P.133) or lost due to reasons such as operating erasing (☞ P.74) are performed, only errors, device failure or repair.
- Page 172 date of issue 2022.01. https://om-digitalsolutions.com/ 2022 BS207100...
Need help?
Do you have a question about the LS-P5 and is the answer not in the manual?
Questions and answers