cycliq FLY12 SPORT CE123 User Manual
Hide thumbs
Also See for FLY12 SPORT CE123:
- User manual (16 pages) ,
- Quick start manual (16 pages) ,
- Quick start manual (19 pages)
Table of Contents
Advertisement
Quick Links
Advertisement
Table of Contents

Subscribe to Our Youtube Channel
Related Manuals for cycliq FLY12 SPORT CE123


Summary of Contents for cycliq FLY12 SPORT CE123
- Page 1 CYCLIQ.COM USER GUIDE MODEL: FLY12 SPORT CE123...
- Page 2 We’re doing so by creating a global network of Cycliq users on all major social media platforms, encouraging user engagement cycliq.com Subscribe to our newsletter at for all the latest product news.
-
Page 3: Table Of Contents
Audio settings Turning off your Fly12 Sport Volume levels Light modes Audio alerts Heat protection Display screen Cycliq Quick Release System Getting to know the display screen Idle mode Power on/off Video segment length Home screen Rotation Using your footage... -
Page 4: What's In The Box
What’s in the box 1 x Fly12 Sport 1 x Cycliq 64GB microSD Card (installed in Fly12 Sport) 1 x Handlebar Mount including bolts 1 x 22.2mm Rubber Handlebar Adapter 1 x Universal Adapter 1 x M5 screw for Universal Adapter... -
Page 5: Read This Before Using Your Fly12 Sport
Please note that Cycliq, its subsidiaries and affiliates, and its distributors are • The Fly12 Sport is not a toy: children should not play with the Fly12 Sport. not liable for any consequential damages arising from any malfunction of the •... -
Page 6: Your Fly12 Sport
Your Fly12 Sport Register your Fly12 Sport We strongly advise you register your Fly12 Sport with Cycliq, to ensure you receive notifications of firmware updates, feature upgrades and user tips. Registration will also allow us to deliver the fastest possible response should you require technical or warranty support. -
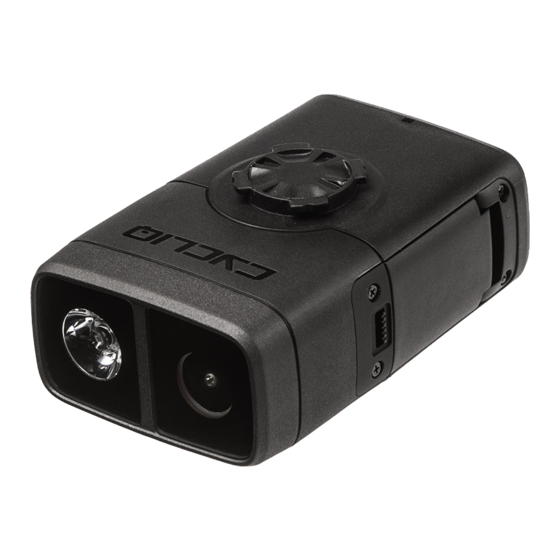
Page 7: Fly12 Sport Layout
Your Fly12 Sport Fly12 Sport layout Power button Main LED Camera Port door Speaker Q button Function button Front Side (port door closed) Button Display screen microSD card slot Microphone Status LED Charge port Reset button Side (port door open) Bottom side Front Fly12 Sport User Guide |... -
Page 8: Before Your First Ride
Your Fly12 Sport Before your first ride Light modes Please follow these steps before your first ride with your Fly12 Sport. You can cycle through the available light modes using the power button. • Camera Only (Main LED off) see page 16 1. -
Page 9: Display Screen
Powering on your Fly12 Sport Press and hold the power button until the power on chime is heard. The power level ‘beeps’ will sound indicating the battery status and the Cycliq Q logo will be displayed on the screen. Powering off your Fly12 Sport Press and hold the power button until the power off chime is heard. -
Page 10: Home Screen
Display Screen 2. Home screen The home screen is the default display on your Fly12 Sport. When turning on the Fly12 Sport the home screen will be displayed. The screen will also default back to the home screen 30 seconds after any activity. Bluetooth status The Bluetooth icon is shown when a Bluetooth conenction is established with the Fly12 Sport. -
Page 11: Rotation
Display Screen 3. Rotation The rotation screen shows the orientation your Fly12 Sport is set to record in. If the hold to rotate prompt is displaying upside down, rotate the screen so the text reads correctly. Changing rotation To rotate the orientation of your Fly12 Sport, press and hold the function button (for approximately 3 seconds). -
Page 12: Sd Card Formatting
Display Screen 4. SD card formatting Note Please note formatting your microSD card will permanently remove all previously recorded incidents - including any previously locked files. Formatting your microSD card To format your microSD card, press and hold the function button until a five second countdown appears. -
Page 13: Factory Reset
Display Screen 5. Factory reset 6. Information screen Allows you to easily view the firmware version installed on your Fly12 Sport To reset your Fly12 Sport and your serial number. To reset your Fly12 Sport back to factory settings press and hold the function button. -
Page 14: Image Capture
Display Screen 7. Image capture Incident protection Incident protection mode has been designed to automatically lock files containing incidents so that they are not recorded over. Incident protection mode is activated when the Fly12 Sport is tilted more than 60° from vertical for more than five seconds. -
Page 15: Other Functions
Display Screen 8. Other functions Charging Displayed when the Fly12 Sport is powered off and connected to a power source. Each bar represents 25% battery life. 4 bars = 75% to 100% charged 3 bars = 50% to <75% charged 2 bars = 25% to <50% charged 1 bar = 1% to <25% charged Mass Storage... -
Page 16: Setting Up Your Fly12 Sport
Setting up your Fly12 Sport Charging your Fly12 Sport battery Battery level indicator Your Fly12 Sport comes partially charged. Before using it When turning on your Fly12 Sport, an audible battery status will sound for the first time, please charge fully. alerting you to the current battery level. -
Page 17: Inserting And Removing The Microsd Card
Setting up your Fly12 Sport Inserting and removing the microSD card • Your Fly12 Sport comes with a 64GB microSD card pre-installed. • Your Fly12 Sport MUST have a microSD card installed to operate correctly. microSD card slot To install a microSD card into your Fly12 Sport, press the card gently into the card slot of your Fly12 Sport until locked in place. -
Page 18: Mounting Your Fly12 Sport
Setting up your Fly12 Sport Mounting your Fly12 Sport Your Fly12 Sport comes with a handlebar mount and a universal adapter that features the Cycliq 1/8th turn quick release system. To mount: 1. Place the handlebar mount above or below the handlebar, ensuring that nothing will obstruct the field of camera view. -
Page 19: Attaching The Safety Tether
Setting up your Fly12 Sport Attaching the safety tether to your Fly12 Sport 1. On the back and side of the Fly12 Sport there are two slots for the safety tether to be attached. 2. Thread the thinner part of the tether through the slots, then thread the other end through the loop to secure the tether. -
Page 20: Changing Your Fly12 Sport Settings
Setting up your Fly12 Sport Changing your Fly12 Sport settings Most primary functions of your Fly12 Sport can be controlled using the power, Q and function button on the side of the Fly12 Sport. Power button On the Fly12 Sport •... -
Page 21: Visual And Audio Alerts
Visual and audio alerts Mode Visual Alert Audible Alert Display: battery level shown on display screen Recording (Full charge) Power On/Off 4 beeps LED: Flashing red Display: battery level shown on display screen Recording (3/4 charge) Power On/Off 3 beeps LED: Flashing red Display: battery level shown on display screen Recording (1/2 charge) -
Page 22: Features
Features Video resolution The Fly12 Sport is equipped with a Ultra HD camera. The lens has a 135° viewing angle providing an ultra-wide view. There are multiple video resolutions to choose from. More storage space and power will be used, the higher the resolution settings. Video Frames per second Screen resolution... -
Page 23: Looping Function
If you want to keep your ride footage, simply transfer it onto another storage device like a phone, computer, or hard drive. microSD card full You can use a Cycliq microSD OTG Card Reader to transfer files from your microSD card. The maximum duration of video footage that you can record is dependent on the Fly12 Sport resolution, framerate settings and the storage size of your microSD card. -
Page 24: Incident Protection Mode
Features Incident protection mode Manual footage capture The Fly12 Sport has been designed to automatically save footage from If you witness an event that you want to capture and retain when riding, major incidents. simply press the Q button. This will lock the current and immediately preceding video files. -
Page 25: Audio Settings
This is useful when you can’t easily see the LED or display screen while riding. Note The recording alert notification and volume of the audio can be customised Cycliq recommend familiarising yourself with this function before using it, as via CycliqPlus. this mode can prevent your ride from being recorded. Idle mode should only... -
Page 26: Video Segment Length
Features Video segment length Footage is saved in chronological order in 3, 5 or 10-minute segments, with each segment creating a separate video file. Smaller segments create video files that are more convenient to move and edit, and use less memory. Larger segments will capture more time either side of an incident, but use more memory. -
Page 27: Using Your Footage
1. Connect the Fly12 Sport to any PC or Mac using the supplied USB cable. 2. Remove the microSD card and read data using your PC or Mac. 3. Using a Cycliq microSD OTG Card Reader. Editing footage You can edit your footage using CycliqPlus on desktop and mobile. From here you can also overlay Strava metrics ad share highlights from you ride. -
Page 28: Cycliqplus Mobile App
CycliqPlus mobile app All Fly12 Sport settings can be managed using CycliqPlus mobile app - Light mode settings available for iOS and Android. This function allows you to select which light options will be available on your Fly12 Sport - see page 8. -
Page 29: Updating Your Firmware
Making sure you have the most up to date firmware will give you the best Cycliq experience possible. Cycliq Plus firmware auto updater Download the macOS or Windows version of the firmware auto updater app from the links below, open on your desktop and follow the on screen instructions. -
Page 30: Trouble Shooting Your Fly12 Sport
Troubleshooting Reset If a reset is required, the reset button is located within the small cut out as illustrated. Carefully use a fine object to press the reset button to perform the reset. WARNING DO NOT complete a master rest when the Fly12 Sport is in the process of completing a firmware update, as this may damage your Fly12 Sport. -
Page 31: Technical Data
Technical data Name Fly12 Sport Model CE123 Product description 4K bike camera + front light Height 33mm Width 55mm Depth 81.2mm Weight 148g (5.22oz) Battery Rechargeable lithium ion battery Battery size 3000mAh (up to 7 hours in camera only mode) Watt hours 11.10Wh Voltage... -
Page 32: Compliance Statement
Compliance statements Federal Communications Commission (FCC) compliance statement This device complies with Part 15 of the FCC Rules. Operation is subject to the following two conditions: (1) this device may not cause harmful interference, and (2) this device must accept any interference received, including interference that may cause undesired operation. - Page 33 Industry Canada (IC) compliance statement This device complies with Industry Canada license-exempt RSS standard(s). Operation is subject to the following two conditions: this device may not cause interference; and this device must accept any interference, including interference that may cause undesired operation of the device. Le présent appareil est conforme aux CNR d'Industrie Canada applicables aux appareils radio exempts de licence.
-
Page 34: Regulatory Information
20cm from nearby persons. Cycliq customer support Warning Please go to support.cycliq.com for further information and support. Changes or modifications to this unit not expressly approved by the party responsible for compliance could void the user’s authority to operate the Caution equipment. - Page 35 CYCLIQ.COM PO Box 404 Subiaco WA 6904 Australia info@cycliq.com User Guide - Version 1.0.0 MODEL: FLY12 SPORT CE123 Fly12 Sport User Guide Cycliq reserves the right, at its discretion, to change and modify portions of this User Guide.
Need help?
Do you have a question about the FLY12 SPORT CE123 and is the answer not in the manual?
Questions and answers