Table of Contents
Advertisement
Quick Links
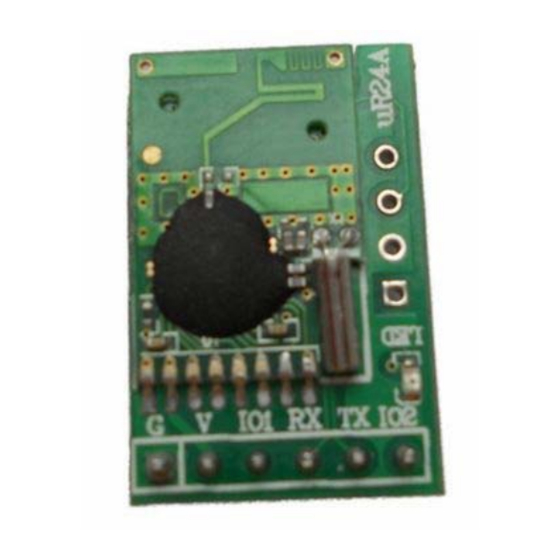
Description:
The UR24A is a low‐cost module. Integrated with High‐performance RF IC and High‐
speed MCU, users can easily use it to transfer data, without programming and complex
settings.
Applications:
‐ 2400‐2483.5MHz ISM/SRD band systems
‐ Consumer electronics
‐ Access control, Attendance, Logistics
‐ Smart Furniture
‐ Robert
‐ Wireless sensor
Features:
‐ DC Supply:2.95 to 3.6V
‐ Serial baud rate:2400 to 115200
‐ Max Power:+1dBm
‐ 256 byte buffer for receiver or transmitter
‐ Compatible with 5V TTL and CMOS
‐ Support the 2‐FSK, GFSK and MSK modulation
‐ High receiving sensitivity
‐ Standard 2.54mm Pitch Pin
Example:
In this test, Arduino will send string "Hi, I am Arduino!" every second. Those data will be
sent to PC wireless via those two modules.
Here is the code:
void setup()
{
// start serial port at 9600 bps:
Serial.begin(9600);
}
void loop()
{
delay(1000);
Serial.println("Hi, I am Arduino!");
}
UR24A TTL MODULE
w w w . e k t
. c o m
2
Advertisement
Table of Contents

Related Manuals for EKT UR24A


Summary of Contents for EKT UR24A
- Page 1 UR24A TTL MODULE Description: The UR24A is a low‐cost module. Integrated with High‐performance RF IC and High‐ speed MCU, users can easily use it to transfer data, without programming and complex settings. Applications: ‐ 2400‐2483.5MHz ISM/SRD band systems ‐ Consumer electronics ‐ Access control, Attendance, Logistics ‐ Smart Furniture ‐ Robert ‐ Wireless sensor Features: ‐ DC Supply:2.95 to 3.6V ‐ Serial baud rate:2400 to 115200 ‐ Max Power:+1dBm ‐ 256 byte buffer for receiver or transmitter ‐ Compatible with 5V TTL and CMOS ‐ Support the 2‐FSK, GFSK and MSK modulation ‐ High receiving sensitivity ‐ Standard 2.54mm Pitch Pin Example: In this test, Arduino will send string “Hi, I am Arduino!” every second. Those data will be sent to PC wireless via those two modules. Here is the code: void setup() { // start serial port at 9600 bps: Serial.begin(9600); } void loop() { delay(1000); Serial.println("Hi, I am Arduino!"); } w w w . e k t...
- Page 2 Upload the code to Arduino. Please note: keep TX and RX disconnected with mdules while uploading code because uploading will use UART. Connect the hardware as follows: Please note that this module should be powered 3.3V, not 5V. Connect the USB module to PC. Then power on. We took a picture shown below: To receive the string sent from Arduino to PC, we can also use Arduino IDE. Start a new page in Arduino IDE, and choose the serial port of USB UR24A. Here in my PC is COM7. w w w . e k t . c o m...
- Page 3 If you do not know which port, go to Device Manager: Then open Serial Monitor in Arduino IDE: Made in China w w w . e k t . c o m...
Need help?
Do you have a question about the UR24A and is the answer not in the manual?
Questions and answers