Samsung The Premiere LSP7T User Manual
Hide thumbs
Also See for The Premiere LSP7T:
- User manual ,
- User manual (20 pages) ,
- User manual (76 pages)

Related Manuals for Samsung The Premiere LSP7T


Summary of Contents for Samsung The Premiere LSP7T
- Page 1 USER MANUAL LSP7T / LSP9T Thank you for purchasing this Samsung product. To receive more complete service, please register your product at www.samsung.com Model Serial No.
-
Page 2: Before Reading This User Manual
• To open the e-Manual, > Settings > Support > Open e-Manual On the website (www.samsung.com), you can download the manuals and see its contents on your PC or mobile device. Learning the e-Manual's assistance functions • Some menu screens cannot be accessed from the e-Manual. -
Page 3: Warning! Important Safety Instructions
Warning! Important Safety Instructions Please read the Safety Instructions before using your Projector. Refer to the table below for an explanation of symbols which may be on your Samsung product. – Do not place this apparatus near or over CAUTION a radiator or heat register, or where it is exposed to direct sunlight. - Page 4 • Do not drop or strike the product. If the product is smells coming from it - unplug it immediately damaged, disconnect the power cord and contact and contact an authorised dealer or Samsung a Samsung service centre. service centre.
- Page 5 Laser Antenna • Do not block the light coming out of the projector • Bend down the part where the outdoor antenna lens when in operation. The light will heat the line goes into the inside so that rainwater cannot object and may melt, cause burns or start a fire.
-
Page 6: Table Of Contents
Connecting the antenna adapter ---------------------------------------------------------------------------- Product Overview About the Projector ---------------------------------------------------------------------------- The Samsung Smart Remote About the Buttons on the Samsung Smart Remote ---------------------------------------------------------------------------- Pairing the Projector to the Samsung Smart Remote ---------------------------------------------------------------------------- Installing batteries into the Samsung Smart Remote ----------------------------------------------------------------------------... -
Page 7: What's In The Box
01 What's in the Box? Make sure the following items are included with your Projector. If any items are missing, contact your dealer. • Samsung Smart Remote & Batteries (AA x 2) (Not • Warranty Card / Regulatory Guide (Not available in... -
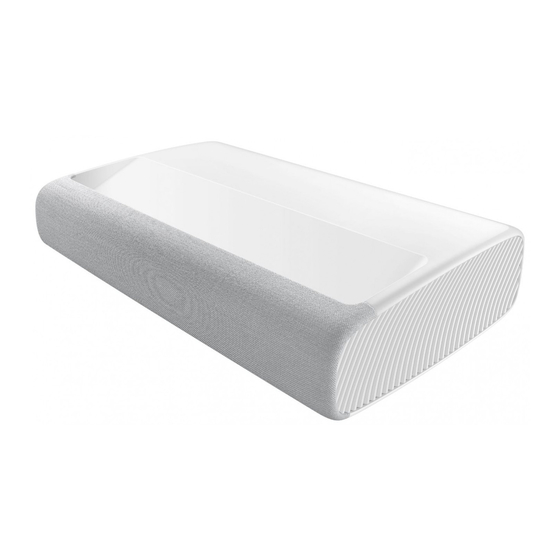
Page 8: Product Overview
02 Product Overview About the Projector <Front> SP-LSP7TUA SP-LSP9TUA <Rear> 1 Lens 4 Ventilation 2 Remote control sensor / LED Indicators 5 Power button 3 Speaker 6 Tilt-Adjustment Foot • The product colour and shape may vary depending on the model. •... -
Page 9: The Samsung Smart Remote
About the Buttons on the Samsung Smart Remote • The images, buttons, and functions of the Samsung Smart Remote may differ depending on the model. • The Universal Remote function operates normally only when you use the Samsung Smart Remote that comes with the Projector. -
Page 10: Pairing The Projector To The Samsung Smart Remote
Pairing the Projector to the Samsung Smart Remote When you turn on the Projector for the first time, the Samsung Smart Remote pairs to the Projector automatically. If the Samsung Smart Remote does not pair to the Projector automatically, point it at the remote control sensor of the... -
Page 11: Installing The Projector
04 Installing the Projector Install the projector horizontally on a flat surface to prevent it from being tilted. When the screen and the projector are not aligned horizontally and vertically, or the screen is curved, the display may get distorted. 1. -
Page 12: Image Size And Projection Distance
3. Move the projector forward or backward to adjust the projection distance for a desired screen size. – When the projected screen is unclear, adjust in Settings > General > Projector Settings > Focus. – When the projected screen is not a right angle, adjust in Projector Settings >... -
Page 13: Using The Power Button
Using the Power button You can turn on the Projector with the power button at the rear of the Projector, and then use the Control menu. The Control menu appears when the power button is pressed while the Projector is On. For more information about its usage, refer to the figure below. -
Page 14: Mounting The Projector On A Wall
Samsung is not liable for these kinds of accidents. • Samsung is not liable for product damage or personal injury when a non-specified wall mount is used or when the consumer fails to follow the product installation instructions. -
Page 15: Troubleshooting And Maintenance
• Make sure that the batteries are installed with their poles (+/–) in the correct direction. • Try pointing the remote directly at the Projector from 1.5-1.8 m away. • If your Projector came with a Samsung Smart Remote (Bluetooth Remote), make sure to pair the remote to the Projector. -
Page 16: Specifications And Other Information
06 Specifications and Other Information Specifications Model Name SP-LSP7TUA SP-LSP9TUA Display Resolution 3840 x 2160 Lens Fixed Lens Image Size (Diagonal) 90 - 120 inches 100 - 130 inches (228.6 - 304.8 cm) (254.0 - 330.2 cm) Sound (Output) 30 W 40 W Dimensions (W x H x D) Body... -
Page 17: Decreasing Power Consumption
HDMI Licensing LLC in the United States and other countries. Recommendation - Jordan Only Hereby, Samsung Electronics, declares that this TV is in compliance with the essential requirements and other relevant provisions of Directive 1999/5/EC. The official Declaration of Conformity may be found at http://www.samsung.com, go to Support > Search Product Support and enter the model name. - Page 18 This page is intentionally left blank.
- Page 19 Contact SAMSUNG WORLD WIDE If you have any questions or comments relating to Samsung products, please contact the Samsung service centre. Country Samsung Service Centre Web Site SINGAPORE 1800 7267864 | 1800-SAMSUNG www.samsung.com/sg/support AUSTRALIA 1300 362 603 www.samsung.com/au/support NEW ZEALAND 0800 726 786 www.samsung.com/nz/support...
- Page 20 ZAMBIA 3434 MOZAMBIQUE 84 726 7864 www.samsung.com/africa_pt/support ALGERIA 3004 www.samsung.com/n_africa/support TUNISIA 80 100 012 www.samsung.com/n_africa/support MAURITIUS 800 5050 www.samsung.com/africa_en/support REUNION 0262 50 88 80 www.samsung.com/africa_fr/support MOROCCO 080 100 22 55 www.samsung.com/n_africa/support © 2020 Samsung Electronics Co., Ltd. All rights reserved.
- Page 21 84 726 7864 MOZAMBIQUE www.samsung.com/n_africa/support 3004 ALGERIA www.samsung.com/n_africa/support 80 100 012 TUNISIA www.samsung.com/africa_en/support 800 5050 MAURITIUS www.samsung.com/africa_fr/support 0262 50 88 80 REUNION www.samsung.com/n_africa/support 080 100 22 55 MOROCCO .. جميع الحقوق محفوظةSamsung Electronics Co., Ltd حقوق النشر © عام 0202 لشركة...
- Page 22 اتصل بسامسونج في جميع انحاء العالم .Samsung ، في ُ رجى االتصال بمركز خدمةSamsung إذا كانت لديك أي أسئلة أو تعليقات خاصة بمنتجات موقع ويب Samsung مركز خدمة البلد www.samsung.com/sg/support 1800 7267864 | 1800-SAMSUNG SINGAPORE www.samsung.com/au/support 1300 362 603 AUSTRALIA www.samsung.com/nz/support...
- Page 23 تم ترك هذه الصفحة فارغة عن .قصد...
- Page 24 HDMI Licensing LLC in the United States and other countries. توصيات - األردن فقط أن هذا التلفزيون متوافق مع المتطلبات األساسية واألحكام األخرى ذاتSamsung Electronics بموجب هذه الوثيقة، تعلن شركة .EC/1999/5 الصلة بتوجيهات ، انتقل إىل الدعم > ابحث عن دعمhttp://www.samsung.com يمكن االطالع عىل إعالن المطابقة الرسمي عىل الموقع اإللكتروني...
- Page 25 المواصفات ومعلومات أخرى المواصفات اسم الطراز SP-LSP9TUA SP-LSP7TUA دقة العرض 3840 x 2160 العدسة عدسات ثابتة )حجم الصورة (قطري ً ا 001 - 031 بوصة 09 - 021 بوصة )(0.452 - 2.033 سم )(6.822 - 8.403 سم (مخرج) الصوت 04 واط 03 واط...
- Page 26 .حاول توجيه جهاز التحكم عن ب ُ عد مباشر ة ً ضمن مسافة تتراوح بين 8.1-5.1 م من جهاز العرض • )، تأكد منBluetooth (جهاز تحكم عن ب ُ عد بـSamsung Smart إذا كان جهاز العرض يأتي مزود ً ا بجهاز وحدة التحكم عن ب ُ عد لـ •...
- Page 27 • . أية مسؤولية تتعلق بمثل هذا النوع من الحوادثSamsung أي مسؤولية عن تلف المنتج أو عن أي إصابات جسدية عند استخدام رف تثبيت بالحائط غير محدد، أو عندSamsung ال تتحمل شركة • .عدم التزام العميل با ت ّباع إرشادات تركيب المنتج...
- Page 28 استخدام زر الطاقة يمكنك تشغيل جهاز العرض باستخدام زر الطاقة الموجود في الجزء الخلفي من جهاز العرض، ثم استخدم قائمة التحكم. تظهر قائمة .التحكم عند الضغط عىل زر الطاقة وجهاز العرض قيد التشغيل. لمزيد من المعلومات حول استخدامه، راجع الشكل أدناه .قم...
- Page 29 حر ّ ك جهاز العرض لألمام أو للخلف لضبط مسافة العرض لحجم الشاشة .المرغوب فيه اإلعدادات عندما تكون الشاشة المعروضة غير واضحة، اضبط في – . > التركيزProjector > عام > إعدادات عندما ال تكون زاوية الشاشة المعروضة زاوية قائمة، اضبط في –...
- Page 30 تثبيت جهاز العرض .تثبيت جهاز العرض أفقي ً ا عىل سطح مستو ٍ لمنعه إمالته .عندما ال تتم محاذاة الشاشة وجهاز العرض أفقي ً ا وعمودي ً ا، أو عندما تكون الشاشة مقوسة، قد يظهر تشويش عىل الشاشة قم بوضع جهاز العرض عىل مسافة مناسبة من الشاشة المراد عرضها .وقم...
- Page 31 باالقترانSamsung Smart عند تشغيل جهاز العرض ألول مرة، يقوم جهاز وحدة التحكم عن ب ُ عد لـ بجهاز العرضSamsung Smart تلقائي ً ا بجهاز العرض. إذا لم يقترن جهاز وحدة التحكم عن ب ُ عد لـ تلقائي ً ا، قم بتوجيهه نحو مستشعر جهاز التحكم عن ب ُ عد بجهاز العرض، ثم اضغط باستمرار عىل الزرين...
- Page 32 . وفق ً ا للطرازSamsung Smart قد تختلف الصور واألز ر ار والوظائف لجهاز وحدة التحكم عن ب ُ عد لـ • المتوفر معSamsung Smart ال تعمل وظيفة إعداد تحكم عن بعد عام بطريقة طبيعية إال ّ عند استخدام وحدة التحكم عن ب ُ عد لـ •...
- Page 33 نظرة عامة عىل المنتج معلومات حول جهاز العرض ><الجهة األمامية SP-LSP9TUA SP-LSP7TUA ><لجهة الخلفية التهوية العدسة زر الطاقة LED مستشعر جهاز التحكم عن ب ُ عد / مؤشرات قدم ضبط الميل السماعة .قد يختلف لون المنتج وشكله حسب الطراز • .ال...
- Page 34 .يرجى التأكد من وجود العناصر التالية مع جهاز العرض الخاص بك. في حالة عدم وجود أي عناص ر ، اتصل بالمو ز ِّع الذي تتعامل معه بطاقة الضمان / دليل اللوائح التنظيمية (ال يتوفران في بعض • & بطارياتSamsung Smart وحدة التحكم عن ب ُ عد لـ • )المواقع...
- Page 35 توصيل المهايئ الهوائي نظرة عامة عىل المنتج ---------------------------------------------------------------------- معلومات حول جهاز العرض Samsung Smart جهاز وحدة التحكم عن ب ُ عد لـ معلومات حول األزرار الموجودة عىل ---------------------------------------------------------------------- Samsung Smart وحدة التحكم عن ب ُ عد لـ إقران جهاز العرض بجهاز...
- Page 36 الهوائي الليزر قم بثني الجزء الذي يدخل فيه خط الهوائي الخارجي إىل الداخل ال تحجب الضوء المنبعث من عدسة جهاز العرض عندما تكون • • .حتى ال تتدفق مياه األمطار إليه قيد التشغيل. سيقوم الضوء بتسخين الجسم وقد يقوم بإذابته إذا...
- Page 37 تجنب سقوط المنتج أو تعرضه للطرق. وفي حالة تعرض الجهاز • .Samsung بالمو ز ّع المعتمد أو مركز خدمة للتلف، افصل سلك التيار الكهربائي، ثم اتصل بمركز خدمة تأكد من إخ ر اج قابس التيار الكهربائي من المأخذ في حالة ترك...
- Page 38 تحذير! إرشادات هامة للحفاظ عىل السالمة .ي ُ رجى قراءة إرشادات السالمة قبل استخدام جهاز العرض الخاص بك . لديكSamsung ارجع إىل الجدول أدناه لتوضيح الرموز التي قد توجد في جهاز ال تضع هذا الجهاز فوق جهاز مشع أو مقاو ِ م للحرارة...
- Page 39 اإلعدادات > الدعم > فتح > .) واالطالع عىل محتواها عىل جهاز الكمبيوتر أو عىل جهازك المحمولwww.samsung.com( يمكنك تنزيل األدلة من موقع الويب التعرف عىل وظائف المساعدة بالدليل اإللكتروني .ال يمكن الوصول إىل بعض شاشات القائمة من الدليل اإللكتروني...
- Page 40 دليل المستخدم LSP9T / LSP7T .Samsung شكر ً ا لش ر ائك هذا المنتج من www.samsung.com للحصول عىل خدمة أكثر تكام ال ً، ي ُ رجى تسجيل المنتج عىل الموقع الرقم التسلسلي الطراز...
Need help?
Do you have a question about the The Premiere LSP7T and is the answer not in the manual?
Questions and answers
The beamer gives sound but no image
The Samsung LSP7T projector may produce sound but no image due to a malfunction in the display system. One reported issue is that after pressing the power button a second time, colors appear on the right side and keep changing, which suggests a potential failure in the light engine, DMD chip, or internal video processing components. The projector not being used for a week is likely unrelated.
This answer is automatically generated