
Subscribe to Our Youtube Channel
Related Manuals for Phytec phyGATE Tauri-S L-1012e.A3


Summary of Contents for Phytec phyGATE Tauri-S L-1012e.A3
- Page 1 L-1012e.A3 phyGATE-Tauri-S i.MX 6UL/ULL Kit Hardware and BSP Manual A product of PHYTEC Technology Holding Company...
- Page 2 L-1012e.A3 phyGATE-Tauri-S i.MX 6UL/ULL Kit Hardware and BSP Manual Document Type BSP Reference Manual Yocto Page https://www.phytec.de/documents/l-813e-6-yocto-reference-manual/ Article Number L-1012e.A3 Release Date 02.08.2022 Is Branch of L-1012e.Ax phyGATE-Tauri-S i.MX 6UL/ULL Kit Hardware and BSP Manual Head © PHYTEC Messtecknik GmbH...
- Page 3 L-1012e.A3 phyGATE-Tauri-S i.MX 6UL/ULL Kit Hardware and BSP Manual © PHYTEC Messtecknik GmbH...
- Page 4 L-1012e.A3 phyGATE-Tauri-S i.MX 6UL/ULL Kit Hardware and BSP Manual © PHYTEC Messtecknik GmbH...
- Page 5 Usage The information in this manual is valid for all standard variants of the phyGATE Tauri-S industrial gateway from PHYTEC Messtechnik GmbH. An overview of all devices and variants to which the descriptions apply can be found in Product Information.
- Page 6 For data communication, the devices provide various typical industrial interfaces for connection to surrounding devices. This PHYTEC standard gateway is supplied exclusively as an OEM device by PHYTEC Messtechnik GmbH and requires an adaptation of the operating software for the intended application by the distributor of the device.
- Page 7 Improper use and connection of these devices, as well as subsequent processing of these devices (e.g. soldering work on the printed circuit board), lead to exclusion of liability on the part of the manufacturer. Please observe the corresponding information in the operating instructions for proper installation. © PHYTEC Messtecknik GmbH...
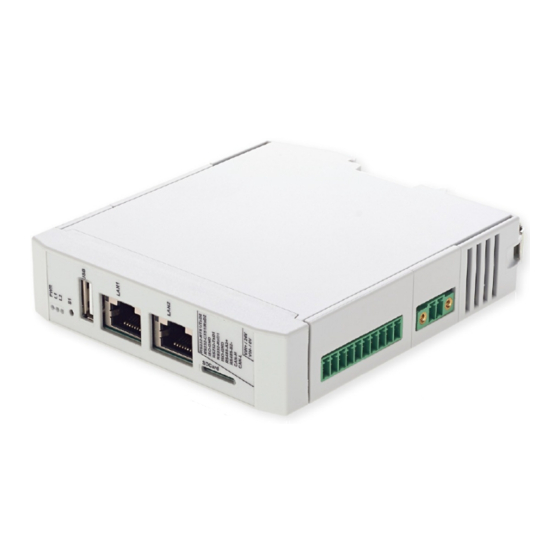
- Page 8 3.2 Product Overview 3.2.1 phyGATE-Tauri Gateway (25 mm housing) The phyGATE Tauri-S has several interfaces and controls/displays which are shown in the following figure. Picture of phyGATE Tauri-S with 50mm housing (reserved, will be added in next revision) © PHYTEC Messtecknik GmbH...
- Page 9 1. Power-LED green 2. User-LED red (freely configurable) 3. User-LED yellow (freely configurable) 4. Button (freely configurable) 5. USB interface (Typ A) 6. Ethernet interface (RJ45) 7. Micro-SD Slot 8. RS232, RS485, CAN interface (configurable) 9. Supply connection © PHYTEC Messtecknik GmbH...
- Page 10 Power supply voltage typ. 24 VDC max. 36 VDC (+10 %) Power consumption max. 200 mA @ 24 VDC Power adapter type SELV/PELV Hardware Specification CPU type NXP i.MX 6ULL Cortex-A7 512 MB eMMC 8 GB © PHYTEC Messtecknik GmbH...
- Page 11 1x power status LED Software Specification Operating system Linux (Yocto) Security Features Device-Management / Cloud-Update concept Mechanical Data Housing type Phoenix ICS Housing material Polyamide Mounting type Top-hat rail mounting according to DIN EN 60715 IP protection class max. IP20 © PHYTEC Messtecknik GmbH...
- Page 12 Weight (depending on variant) max. 250 g (depending on variant) Environmental Data Storage temperature -20 °C - +70 °C Operating temperature -20 °C - +60 °C Humidity 10% - 95% non condensing IP protection class control cabinet min. IP44 © PHYTEC Messtecknik GmbH...
- Page 13 L-1012e.A3 phyGATE-Tauri-S i.MX 6UL/ULL Kit Hardware and BSP Manual FIGURE 2: phyGATE Tauri-S Measurements 3.5 Package Contents / Accessories Accessories may be adapted for next version (reserved) © PHYTEC Messtecknik GmbH...
- Page 14 DIN EN 61000-6-2:2019-11 EMV Interference immunity for industrial areas • DIN EN 61000-6-3:2020-09 EMV Interference emissions for living area The CE declaration of conformity for the device can be found online on the product page at https://www.phytec.de/ p/oem/phygate-tauri/. © PHYTEC Messtecknik GmbH...
- Page 15 3.7 Technical Dokumentation und Support Technical documentation for the product can be found on our product page online at https://www.phytec.de/p/ oem/phygate-tauri/#downloads/. If you have any questions or suggestions regarding the product, we look forward to hearing from you: © PHYTEC Messtecknik GmbH...
- Page 16 FIGURE 3: phyGATE Tauri-S Mating Connectors TABLE 5: phyGATE Tauri-S Mating Connectors List phyGATE Tauri-S Interfaces Reference Connection Device Socket Mating Connector DC supply Phoenix MC 1,5/ 2-GF-3,81 Phoenix MC 1,5/ 2-STF-3,81 Phoenix FMC1.5/2-STF-3.81 Ethernet 1 RJ45 RJ45 © PHYTEC Messtecknik GmbH...
- Page 17 SMA (female) SMA (male) TABLE 6: Pinout of Non-standard Interfaces Pinout of Non-standard Interfaces Reference Connection Function +24 VDC DC supply Device GND RS232_0_TX RS232_0_RX GND_ISO RS232_1_TX RS232 / RS485 / CAN RS232_1_RX GND_ISO RS485_A RS485_B © PHYTEC Messtecknik GmbH...
- Page 18 For intended use, the device must be installed on a 35 mm top-hat rail according to DIN EN 60715. Pour l'utilisation à laquelle il est destiné, l’appareil doit être monté sur un rail profilé chapeau de 35 mm conformément à la norme DIN EN 60715. © PHYTEC Messtecknik GmbH...
- Page 19 Pour éviter tout dysfonctionnement ou destruction de l’appareil en cas de surchauffe, il est indispensable de s’assurer que les fentes d'aération ne sont pas couvertes par des composants environnants, des câbles et autres objets. L'air doit pouvoir circuler librement autour du boîtier pour dissiper la chaleur. © PHYTEC Messtecknik GmbH...
- Page 20 1x 24 VDC Mains-Adapter with a mating connector to device supply connector • 1x LAN cable TABLE 7: Needed Components The phyGATE Tauri-S kit upgrade contains all the necessary components to easily start installing the device. © PHYTEC Messtecknik GmbH...
- Page 21 If you are using your own SD Card, you'll have to download the prebuilt image file and burn it to the SD card first: Choose the right pre-built image from Phytec-ftp-Server. There is currently only one prebuild image available. The following links will take you to the download pages: •...
- Page 22 The phyGATE Tauri-S has a 2 pin Phoenix Contact MINI COMBICON power connector (counterpart Phoenix Contact FMC 1,5/ 2-STF-3,81). The permissible input voltage is 12 VDC to 36 VDC. A 24 VDC adapter with a minimum current rating of 1A is recommended to supply the board. © PHYTEC Messtecknik GmbH...
- Page 23 • IP address: 192.168.3.10 • Netmask: 255.255.255.0 Now you are able to log in via SSH. Therefore please use the following login data: • IP Address: 192.168.3.11 • Port: 22 © PHYTEC Messtecknik GmbH...
- Page 24 For the SSH connection under Windows, you can use an SSH client of your choice. The description below is based on PuTTY: FIGURE 7: PuTTY Interface Configure Host Name as "root@192.168.3.11" Press 'Open' to connect the device via SSH If you are using Linux: host$ ifconfig <eth-interface> 192.168.3.10 host$ ssh root@192.168.3.11 host$ host$ yes © PHYTEC Messtecknik GmbH...
- Page 25 L-1012e.A3 phyGATE-Tauri-S i.MX 6UL/ULL Kit Hardware and BSP Manual Yogurt Vendor (Phytec Vendor Distribution) 2.6.2 phyGATE-Tauri-imx6ul-2 ttymxc2 phyGATE-Tauri-imx6ul-2 login: 5.6 Set up Device Interfaces 5.6.1 Connecting to RS232 The phyGATE-Tauri-S provides up to two RS232 interfaces (RS232_0, RS232_1). From the command line prompt of Linux userspace, you can easily send and receive data over the RS232 interface.
- Page 26 123#ab.cd.ef target$ candump can0 5.6.4 Connecting to USB The driver will detect USB Devices automatically. To mount a USB Flash for example, use the following commands: target$ mount /dev/disk/by-id/usb_san_disk_0:-part1 /mnt/ target$ cd /mnt © PHYTEC Messtecknik GmbH...
- Page 27 ~/yocto Get the manifest that describes the location of the BSP sources: host$ mkdir ~/tauris host$ cd ~/tauris host$ git clone ssh://git@git.phytec.de/meta-pbacd20 host$ cd meta-pbacd20 host$ git checkout -b manifest remotes/origin/manifest host$ cp <manifest.xml> ~/yocto © PHYTEC Messtecknik GmbH...
- Page 28 Configuration. 6.3 Finding the Correct Software Platform To find the correct software and the corresponding machine name for your PHYTEC board, go to i.MX 6UL/ULL BSP Releases and click on the corresponding BSP release, or refer to the files in the source folder of the BSP: meta-pbacd20/conf/machine/*.conf...
- Page 29 As an example, the following list shows all files generated for the i.MX 6ULL SOC, phygate-tauri-imx6ul-1 machine: • Barebox: barebox.bin • Barebox configuration: barebox-defconfig • Kernel: zImage • Kernel device tree file: imx6ull-phygate-tauri-nand.dtb • Kernel configuration: zImage.config • Root filesystem: phytec-headless-image-phygate-tauri-imx6ul-1.tar.gz, phytec-headless-image-phygate- tauri-imx6ul-1.ubifs • SD card image: phytec-headless-image-phygate-tauri-imx6ul-1.sdcard © PHYTEC Messtecknik GmbH...
- Page 30 The easiest way to get started with your freshly created images is by writing them to an SD card and setting the boot configuration accordingly. For information on how to set the correct boot configuration, refer to the corresponding hardware manual for your PHYTEC board. 7.1 Booting from NAND Flash NAND is the default boot source.
- Page 31 1000. However, this is our reserved space! You must use the remaining portion of the card for this partition. • Write the new partition to the SD card and exit fdisk. Example: • Type: host$ sudo fdisk -l /dev/sdc You will receive: Disk /dev/sde: GiB, 4025483264 bytes, 7862272 sectors © PHYTEC Messtecknik GmbH...
- Page 32 In case you want to boot the whole Linux from the SD card, mount the ext4 partition. Then untar <IMAGENAME>- <MACHINE>.tar.gz rootfs image to it: host$ sudo mount /dev/sd<X>2 /media host$ sudo tar zxf <IMAGENAME>-<MACHINE>.tar.gz -C /media/ Do not forget to properly unmount the SD card: host$ sudo umount /media © PHYTEC Messtecknik GmbH...
- Page 33 Then copy your BSP image files to this directory. You also need to configure a static IP address for the appropriate interface. The default IP address of the PHYTEC evaluation boards is 192.168.3.11. So setting 192.168.3.10 with netmask 255.255.255.0 as a host address is a good choice.
- Page 34 For that, append /etc/exports: /home/<user>/<rootfspath> 192.168.3.11/255.255.255.0(rw,no_root_squash,sync,no_subtre e_check) and adapt it to your local needs, where <user> must be replaced with your home directory name and the <rootfspath> can be set to a folder that contains an extracted rootfs tar.gz image. © PHYTEC Messtecknik GmbH...
- Page 35 Otherwise, mount the SD card in the barebox with: bootloader$ detect mmc0 It is then also mounted under /mnt/mmc/ if it was partitioned as described above. In any other case, the partition needs to be mounted manually. © PHYTEC Messtecknik GmbH...
- Page 36 We also recommend erasing the environment of the old barebox. Otherwise, the new barebox will still use the old environment: target$ dd if=/dev/zero of=/dev/mmcblk0 bs=128k count=1 seek=7 After a reboot or power cycle, the new barebox will be used. © PHYTEC Messtecknik GmbH...
- Page 37 As an example, we configured the BSP to use an A-B setup with two redundant systems. FIGURE 8: Example BSP Setup The partition layout is defined in the /etc/rauc/system.conf file. Shown here is the system_nand.conf from meta- yogurt used for our example setup: [system] compatible=@MACHINE@ bootloader=barebox mountprefix=/mnt/rauc © PHYTEC Messtecknik GmbH...
- Page 38 To update your system with RAUC, a RAUC bundle (.raucb) needs to be created. It contains all required images and scripts for the update and a RAUC manifest.raucm that describes the content of the bundle for the RAUC update on the target. The BSP includes a Yocto target that lets you build a RAUC bundle from your Yocto build. © PHYTEC Messtecknik GmbH...
- Page 39 This results in the creation of a .raucb bundle file in the deploy/images/<machine-name>/phytec-qt5demo-bundle- <machine-name>.raucb file which can be used for an update described in the next chapter. There is no need to create a manifest.raucm manually as it is created automatically during the build of the bundle. But as a reference,...
- Page 40 2102512a05e37ba78e8dba06553be2f1c686e85acafbe5efd44e48c554b3f6db Size: 34242 Hooks: Files Certificate Chain: Subject: /O=PHYTEC Messtechnik GmbH/CN=PHYTEC Messtechnik GmbH Development-1 Issuer: /O=PHYTEC Messtechnik GmbH/CN=PHYTEC Messtechnik GmbH PHYTEC BSP CA Development SPKI sha256: E2:47:5F:32:05:37:04:D4:8C:48:8D:A6:74:A8:21:2E:97:41:EE:88:74:B5:F4:6 5:75:97:76:1D:FF:1D:7B:EE Not Before: Jan 1 00:00:00 1970 Not After: 31 23:59:59 9999...
- Page 41 To update the currently inactive system with the downloaded bundle, run: target$ rauc install phytec-headless-bundle-phygate-tauri-imx6u1-6.raucb and reboot afterward: target$ reboot When you update from a USB stick, make sure to remove the stick after a successful update before rebooting.
- Page 42 Type=oneshot Environment=DBUS_SESSION_BUS_ADDRESS=unix:path=/run/dbus/system_bus_socket ExecStartPre=/bin/mkdir -p /media/%I ExecStartPre=/bin/mount -t auto /dev/%I /media/%I ExecStart=/usr/bin/update_usb.sh %I ExecStop=/bin/umount -l /media/%I ExecStopPost=-/bin/rmdir /media/%I In our reference implementation, we simply use a bash script for the application logic. update_usb.sh update script: #!/bin/sh MOUNT=/media/$1 © PHYTEC Messtecknik GmbH...
- Page 43 # check from empty or unset variables [ -z "${VERSION}" ] && exit [ -z "${BUNDLE_VERSION}" ] && exit # developer mode, allow all updates if version is r0 [ ${VERSION} 0 ] && exit © PHYTEC Messtecknik GmbH...
- Page 44 8.5 How to setup RAUC for your Machine First, you need to add the state framework configuration to the barebox device tree. Check out the BSP Customization chapter in the Yocto reference manual. You have to include the imx6ul-phytec-state.dtsi file to your barebox device tree by adding #include imx6ul-phytec-state.dtsi to the includes. Afterward, rebuild the image ...
- Page 45 { reg = <0x18 0x4>; type = "uint32"; default = <0>; &eeprom { partitions { compatible = "fixed-partitions"; #size-cells = <1>; #address-cells = <1>; backend_update_eeprom: state@0 { reg = <0x0 0x100>; label = "update-eeprom"; © PHYTEC Messtecknik GmbH...
- Page 46 #!/bin/sh [ -e /env/config-expansions ] && /env/config-expansions [ ! -e /dev/nand0.root.ubi ] && ubiattach /dev/nand0.root global.bootm.image="/dev/nand0.root.ubi.kernel1" global.bootm.oftree="/dev/nand0.root.ubi.oftree1" global.linux.bootargs.dyn.root="root=ubi0:root1 ubi.mtd=root rootfstype=ubifs" Write the file by pressing CTRL-D and run: © PHYTEC Messtecknik GmbH...
- Page 47 To create it, use: bootloader$ edit /env/bin/rauc_flash_nand_from_tftp and insert the follwing to the file: echo "Initialize NAND flash for rauc from TFTP" [ ! -e /dev/nand0.root.ubi ] && ubiattach /dev/nand0.root © PHYTEC Messtecknik GmbH...
- Page 48 The NAND flash can be updated from different sources too. You can choose from one of the possibilities described in Updating the Software. Simply adapt the script and its name to the chosen source. © PHYTEC Messtecknik GmbH...
- Page 49 This resembles the physical properties of the hardware. For example, the same phyCORE-i.MX 6UL module can be used on the phyGATE-Tauri or the phyBOARD-Segin. In each layer, multiple device trees include files. An overview of the device tree hierarchy for the PHYTEC i.MX 6UL/6ULL platforms are shown below. © PHYTEC Messtecknik GmbH...
- Page 50 L-1012e.A3 phyGATE-Tauri-S i.MX 6UL/ULL Kit Hardware and BSP Manual FIGURE 9: PHYTEC i.MX 6UL/6ULL Device Tree Hierarchy © PHYTEC Messtecknik GmbH...
- Page 51 The following sections provide an overview of the supported hardware components and their corresponding operating system drivers. Further changes can be ported upon customer request. To find out which boards and modules are supported by the release of PHYTEC’s i.MX 6UL/6ULL BSP described herein, visit our web page at https://www.phytec.de/produkt/system-on-modules/phycore-imx-6ul-download/...
- Page 52 10.2 Serial TTYs The i.MX 6UL/6ULL SOCs provide up to 8 UART units. PHYTEC boards support different numbers of these UART units. The debug UART is configured as 115200 8N1 (115200 baud, 8 data bits, no parity bit, 1 stop bit). The other UARTs will have default settings, which normally will be 9600 baud.
- Page 53 &iomuxc { pinctrl_uart4: uart4grp { fsl,pins = < MX6UL_PAD_LCD_CLK__UART4_DCE_TX 0x1b0b1 MX6UL_PAD_LCD_ENABLE__UART4_DCE_RX 0x1b0b1 MX6UL_PAD_LCD_HSYNC__GPIO3_IO02 0x1b0b1 >; };}; /* UART4 * RS485 &uart4 { pinctrl-names = "default"; pinctrl-0 = <&pinctrl_uart4>; rts-gpios = <&gpio3 2 GPIO_ACTIVE_HIGH>; rs485-rts-active-high; © PHYTEC Messtecknik GmbH...
- Page 54 { #address-cells = <1>; #size-cells = <0>; ethphy1: ethernet-phy@1 { reg = <1>; interrupt-parent = <&gpio1>; interrupts = <2 IRQ_TYPE_LEVEL_LOW>; micrel,led-mode = <1>; clocks = <&clks IMX6UL_CLK_ENET_REF>; clock-names = "rmii-ref"; status = "disabled"; © PHYTEC Messtecknik GmbH...
- Page 55 In the next step, the network daemon has to be configured appropriately. For this, networkd needs to know about the interfaces and their role. Modify the already available eth0 and eth1 interface config files under /lib/systemd/ network/ . Comment all options under [Network] and add a Bridge option: © PHYTEC Messtecknik GmbH...
- Page 56 Unfortunately, CAN was not designed with the ISO/OSI layer model in mind, so most CAN APIs available throughout the industry does not support a clean separation between the different logical protocol layers, for example, known from Ethernet. © PHYTEC Messtecknik GmbH...
- Page 57 CAN. The following output parameters contain useful information: TABLE 8: Ethernet Interface Output Parameters Field Description can0 Interface Name NOARP CAN cannot use ARP protocol Maximum Transfer Unit RX packets Number of Received Packets TX packets Number of Transmitted Packets © PHYTEC Messtecknik GmbH...
- Page 58 To generate random CAN traffic for testing purpose, use cangen. target$ cangen See cansend --help and candump --help help messages for further information on options and usage. Here is a device tree excerpt for the can interface of the phyBOARD-Segin (arch/arm/boot/dts/imx6ul-phytec-segin.dtsi): reg_can1_en: regulator-can1-en { compatible = "regulator-fixed";...
- Page 59 <Y> counts as the partition number starting from 1 to the max. count of partitions on this device. The partitions can be formatted with any kind of file system and be handled in a standard manner, e.g the mount and umount command work as expected. © PHYTEC Messtecknik GmbH...
- Page 60 If it does not contain one, the whole device can be used as a file system (”floppy” like handling). In this case, /dev/mmcblk0 must be used for formatting and mounting. --------------------------------------- The cards are always mounted as being writable. Device tree configuration for the MMC interface in arch/arm/boot/dts/imx6qdl-phytec-segin.dtsi: &iomuxc { pinctrl_usdhc1: usdhc1grp { fsl,pins = <...
- Page 61 Value 0: The host does not support the manual trigger of BKOPS. Device write performance suffers. • Value 1: The host does support the manual trigger of BKOPS. It will issue BKOPS from time to time when it does not need the device. © PHYTEC Messtecknik GmbH...
- Page 62 BKOPS feature. It frees the host to trigger the background operations regularly because the device starts BKOPS itself when it is idle (see the description of bit AUTO_EN in register BKOPS_EN (Reg: 163)). eMMC chips deployed by PHYTEC currently do not support the new standard v5.1. The Linux kernel and userspace tool mmc do not support this feature.
- Page 63 Device power cycle needed settings to take effect. Confirm that PARTITION_SETTING_COMPLETED bit is set using 'extcsd read' after a power cycle To ensure that the new setting has taken over, shut down the system: target$ poweroff © PHYTEC Messtecknik GmbH...
- Page 64 2:31457280B:418647039B:387189760B:ext4::; Now use the size of the device minus one as the new end of the second partition (e.g. 3850371072B): target$ parted /dev/mmcblk1 resizepart 3850371071B After expanding the partition size, resize the ext4 file system in the partition: © PHYTEC Messtecknik GmbH...
- Page 65 1.25ms post 822µs diff 429µs align 67108864 pre 846µs on 1.29ms post 832µs diff 452µs align 33554432 pre 830µs on 1.24ms post 807µs diff 422µs align 16777216 pre 841µs on 1.26ms post 842µs diff 418µs © PHYTEC Messtecknik GmbH...
- Page 66 10.7 NAND Flash PHYTEC i.MX 6UL/6ULL modules are equipped with raw NAND memory, which is used as media for storing Linux, DTB, and root filesystem including applications and their data files. The NAND Flash is connected to the General Purpose Media Interface (GPMI) of the i.MX 6Ul/6ULL. The NAND Flash type and size is automatically detected via the Open NAND Flash Interface (ONFI) during boot.
- Page 67 10.8 GPIOs PHYTEC boards often have a set of pins especially dedicated to user I/Os. These pins are connected directly to i.MX 6UL/6ULL pins. The processor has organized its GPIOs into five chips (gpiochip0 – gpiochip4) of 32 GPIO lines each. By contrast, the Linux kernel uses a single integer to enumerate all available GPIOs in the system.
- Page 68 In this case, the new group will override the existing one. Fir example, to add pin 42 of the expansion connector of the phyBOARD-Segin as user GPIO, modify the arch/arm/ boot/dts/imx6ul-phytec-segin.dtsi file as shown below: &iomuxc { pinctrl-names = "default";...
- Page 69 A wake-up from this state can only be issued by another press of the Power Key button. This behavior can be prevented by disabling the power key handling of systemd. The Power Key handling of systemd can be disabled by setting the following configuration in /etc/systemd/ logind.conf: © PHYTEC Messtecknik GmbH...
- Page 70 The i.MX 6UL contains four Multimaster fast-mode I²C modules called I2C1, I2C2, I2C3, and I2C4. This chapter will describe the basic device usage of some of the I²C devices integrated on our phyBOARD-Segin. General i²C bus master device tree node (arch/arm/boot/dts/imx6ul-phytec-phycore-som.dtsi): &i2c1 { pinctrl-names = "default";...
- Page 71 10.9.2 RTC RTCs can be accessed via /dev/rtc*. Because PHYTEC boards often have more than one RTC, there might be more than one RTC device file. To find out the name of the RTC device, you can read its sysfs entry with:...
- Page 72 -w -u to store the new date into the RTC. For more information about this tool, refer to the manpage of hwclock. Device tree representation of I²C RTC (arch/arm/boot/dts/imx6ul-phytec-segin.dtsi): &i2c1 { i2c_rtc: rtc@68 { pinctrl-names = "default";...
- Page 73 10.11 USB OTG Most PHYTEC boards provide a USB OTG interface. USB OTG ports automatically act as a USB device or USB host. The mode depends on the USB hardware attached to the USB OTG port. If, for example, a USB mass storage device is attached to the USB OTG port, the device will show up as /dev/sda.
- Page 74 "CDC ACM+ECM+MS" > configs/c.1/strings/0x409/configuration target$ ln -s functions/acm.GS0 configs/c.1/ target$ ln -s functions/ecm.usb0 configs/c.1/ target$ ln -s functions/mass_storage.0 configs/c.1/ Finally, start the USB gadget with the following commands: © PHYTEC Messtecknik GmbH...
- Page 75 396000 > /sys/devices/system/cpu/cpu0/cpufreq/scaling_min_freq To check the current frequency, type: target$ cat /sys/devices/system/cpu/cpu0/cpufreq/scaling_cur_freq The frequency governors automatically select one of the available frequencies in accordance with their goals. List all governors available with the following command: © PHYTEC Messtecknik GmbH...
- Page 76 This section describes how the thermal management kernel API can be used to monitor the i.MX 6UL SOC temperature. The i.MX 6UL has an internal temperature sensor for the SOC ("Temperature Monitor (TEMPMON)" in the i.MX 6UL/6ULL Reference Manual). The current temperature can be read in millicelsius with: © PHYTEC Messtecknik GmbH...
- Page 77 10.14 Watchdog The PHYTEC i.MX 6UL/6ULL SOCs include a hardware watchdog that is able to reset the board when the system hangs. This chapter will explain how to handle the watchdog in the barebox to monitor a kernel boot and also how to handle the watchdog in Linux using systemd to check for system hangs and during reboot.
- Page 78 If the watchdog is enabled in the barebox it continues running in Linux so there is no need to also enable it with systemd © PHYTEC Messtecknik GmbH...
- Page 79 L-1012e.A3 phyGATE-Tauri-S i.MX 6UL/ULL Kit Hardware and BSP Manual 11 Revision History Date Version # Changes in this manual 14.04.2021 L-1012e.A0 New Release 28.09.2021 L-1012e.A1 Updated Power Information 29.10.2021 L-1012e.A2 Updated housing information 02.08.2022 L-1012e.A3 PDF Version © PHYTEC Messtecknik GmbH...
Need help?
Do you have a question about the phyGATE Tauri-S L-1012e.A3 and is the answer not in the manual?
Questions and answers