Table of Contents
Advertisement
Quick Links
Advertisement
Table of Contents

Subscribe to Our Youtube Channel
Related Manuals for Wisenet SPE-420


Summary of Contents for Wisenet SPE-420
- Page 1 4/16 CHANNEL NETWORK VIDEO ENCODER User Manual SPE-420 SPE-1630...
- Page 2 4/16 Channel Network Video Encoder User Manual Copyright ©2022 Co., Ltd. All rights reserved. Hanwha Techwin Trademark Each of trademarks herein is registered. The name of this product and other trademarks mentioned in this manual are the registered trademark of their respective company.
- Page 3 15. This product is intended to be supplied by a Listed Power Supply Unit marked “Class 2” or “LPS” and rated The exclamation point within an equilateral triangle is intended to alert the user to 12 Vdc, min. 0.8 A or PoE(37V ~57V), min. 0.28 A. (SPE-420) the presence of important operating and maintenance (servicing) instructions in 16.
- Page 4 overview Class construction Please read the following recommended safety precautions carefully. y Do not place this apparatus on an uneven surface. An apparatus with CLASS construction shall be connected to a MAINS socket outlet with a protective earthing connection. y Do not install on a surface where it is exposed to direct sunlight, near heating equipment or heavy cold area.
- Page 5 SPE-1630 :-10°C ~45°C (14°F ~ 113°F) (-10°C ~ 40°C (14°F ~ 104°F), When installing Rack) SPE-420 : -10°C ~ 50°C (14°F ~ 122°F). This product may not work properly if you run right after a long period of storage at a temperature below the guaranteed one.
-
Page 6: Table Of Contents
overview CONTENTS OVERVIEW WEB VIEWER Important Safety Instructions Connecting to the encoder Before Start Password setting Product Features Login Recommended PC Specifications Using the Live Screen Package Contents Part Names and Functions (Front) Part Names and Functions (Rear) SETUP SCREEN Setup Basic Setup INSTALLATION &... -
Page 7: Product Features
• Supports various resolutions via the network ※ Please see the appendix for detailed information on verified OS and browsers SPE-420 Some functions may be restricted even in supported browsers. - NTSC : 2560x1440, 1920x1080, 1280x720, 928x480, 704x480, 928x240, 704x240, 640x368, 352x240... -
Page 8: Package Contents
The appearance of the components may differ from the image shown. CH#1~#4 CH#5~#8 CH#9~#12 CH#13~#16 NETWORK POWER DV25 Accessory category and quantity may differ depending on sales region. NETWORK VIDEO ENCODER SRN-475S SPE-420 Network Video Encoder Power Adapter Power Cord CH3 CH4 AUDIO IN VIDEO IN... -
Page 9: Part Names And Functions (Front)
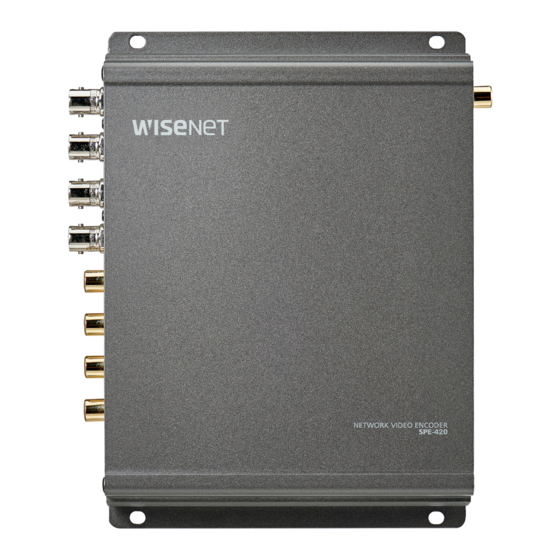
PART NAMES AND FUNCTIONS (FRONT) SPE-420 SPE-1630 CH#1~#4 CH#5~#8 CH#9~#12 CH#13~#16 NETWORK POWER DV25 NETWORK VIDEO ENCODER SRN-475S CH3 CH4 AUDIO IN VIDEO IN RESET VIDEO IN Part Names Functions Part Names Functions CH#1~#4 : Video input channels. Video input This is the video signal input terminal (BNC type). -
Page 10: Part Names And Functions (Rear)
PART NAMES AND FUNCTIONS (REAR) SPE-420 SPE-1630 a b c b c d e ALARM OUT � � RS��� ALARM IN POWER � � � � NO COM ALARM ALARM OUT 1 2 3 4 5 6 7 8... -
Page 11: Installation & Connection
installation & connection RACK INSTALLATION Please take note of the followings before using this product. • Do not use the product outdoor. Install the Bracket-Rack as shown in the figure, and then fasten the screws on both sides (2 screws on each side). •... - Page 12 & connection CONNECTING WITH OTHER DEVICE SPE-1630 Connecting the camera Monitor to install Connect the [VIDEO IN] port of the network video encoder to the video output port of the camera. SPE-420 CH3 CH4 AUDIO IN VIDEO IN VIDEO IN RESET...
- Page 13 Use the screwdriver to connect each line (+, –) of the power cable to the corresponding power port of the SPE-420 encoder. When connected to PoE and DC 12V power simultaneously, the device uses the external power (DC 12V). (SPE-420) Network You can also use a router featuring PoE to supply power to the encoder.
- Page 14 Connect the Alarm I/O signal to the corresponding port of the rear port box. Microphone We are preparing to provide the alarm input and output functions by connecting the encoder to the NVR. (You can check it on the homepage.) SPE-420 ALARM OUT � �...
- Page 15 Connecting to the Alarm Input SPE-1630 Connect one signal cable (out of 2) of applicable sensor to the [ALARM IN] port, and the other to the [G] port. Connecting the Alarm Output Connect one signal cable (out of 2) of applicable external device to the [ALARM OUT], and the other to the 1 2 3 4 5 6 7 8 9 10 11 12 13 14 15 16 ALARM OUT...
-
Page 16: Network Connection And
network connection and setup CONNECTING THE ENCODER DIRECTLY TO A DHCP BASED DSL/CABLE You can set up the network settings according to your network configurations. MODEM CONNECTING THE PRODUCT DIRECTLY TO LOCAL AREA NETWORKING Connecting to the product from a local PC in the LAN INTERNET DV25 CH#1~#4... -
Page 17: Using Device Manager
USING DEVICE MANAGER If using a Broadband Router • IP Address : Enter an address falling in the IP range provided by the Broadband Router. Device manager program can be downloaded from <Technical Support>-<Online Tool> menu at Hanwha Techwin website ex) 192.168.1.2~254, 192.168.0.2~254, (http://www.hanwha-security.com). -
Page 18: Manually Registering Product
network connection and setup AUTOMATICALLY CONFIGURING IP Configuring Dynamic IP Receive IP address from DHCP 1. Click the product from the list that you want to automatically • Example of the Dynamic IP environment configure the IP. SPE-1630 - If a Broadband Router, with products connected, is assigned an IP address by the DHCP server 2. -
Page 19: Port Range Forward (Port Mapping) Setup
PORT RANGE FORWARD (PORT MAPPING) SETUP Setting up Port Range Forward for several network products • You can set a rule of Port Forwarding on the Broadband Router device through its configuration web page. If you have installed a Broadband Router with a product connected, you must set the port range forwarding on •... -
Page 20: Connecting To The Encoder From A Shared Local Pc
network connection and setup CONNECTING TO THE ENCODER FROM A SHARED LOCAL PC 1. Run device manager. It will scan for connected encoders and display them as a list. 2. Double-click an encoder to access. The Internet browser starts and connects to the encoder. Access to the encoder can also be gained by typing the encoder’s IP address in the address bar of the Internet browser. -
Page 21: Connecting To The Encoder
If the HTTP port is other than 80 To register your device to the <DDNS> server, visit http://ddns.hanwha-security.com and register your device first, and then set the Web Viewer’s <Network> - <DDNS> to <Wisenet DDNS>, as well as providing 1. Launch the Internet browser. -
Page 22: Login
web viewer PASSWORD SETTING USING THE LIVE SCREEN When you access the product for the first time, you must register the login password. For a new password with 8 to 9 digits, you must use at least 3 of the following: uppercase/lowercase letters, numbers and special characters. - Page 23 Item Description Item Description Controls the PAN/TILT/ZOOM motion. Double click on the video screen, and the current video will be Full Screen ( played in the full screen of the monitor. Manual focus ( Adjusts the focus of the screen to near distance or far distance. A view mode in which the size of the camera video automatically fits Fit to screen ( Drag the bar on the right side of the UI up, or click the [...
- Page 24 web viewer To Use Audio To check the profile status You can check the profile information. 1. Click [Audio ( )] icon to activate audio communication. 2. Use [Audio control] bar to control the volume. 1. Click the [Status ( )] icon.
-
Page 25: Setup
setup screen SETUP Video profile 1. From the Setup menu, select the <Basic ( )> tab. You can configure the basic encoder information, PTZ, video and audio, network, event, analyze and system 2. Click <Video profile>. settings. 3. Select the channel to set. 1. - Page 26 setup screen To Add/Change the Video Profile • Multicast(RTSP) : Specify the use of the RTSP protocol. - IP address : Enter an IPv4 address with which you can connect to the IPv4 network. The profile setup can be added or modified to accommodate various profiles depending on the recording conditions.
- Page 27 User • Guest setup : If you select <Enable guest access>, the guest account can access the Web viewer screen but can only view the live Viewer screen. 1. From the Setup menu, select the <Basic ( )> tab. The ID/password for the guest account is <guest/guest>, which cannot be changed. 2.
- Page 28 setup screen Date & Time 5. Set the <IPv6 setup>. Set to <Use> to use IPv6 address. 1. From the Setup menu, select the <Basic ( )> tab. • Default : Use the default IPv6 address. 2. Click <Date & Time>. •...
-
Page 29: Ptz Setup
PTZ SETUP 7. Click the cursor [ ] on the screen moving pad to control movement of the screen. • Move screen: Scroll the cursor in the direction desired. • Control screen movement rate: The further away the cursor is from the center, the faster it moves on the External PTZ screen. -
Page 30: Video & Audio Setup
setup screen VIDEO & AUDIO SETUP Audio setup You can set the input/output value of the audio connected to the encoder. Video setup 1. From the Setup menu, select the <Video & Audio ( )> tab. 1. From the Setup menu, select the <Video & Audio ( )>... -
Page 31: Network Setup
4. Type in the DDNS items according to the selected type. 2. From the top menu bar, select <MY DDNS>. • Wisenet DDNS : Select this if you use the DDNS server provided by Hanwha Techwin. - Product ID : Enter the product ID that is registered with 3. - Page 32 1. From the DDNS setup page, set <DDNS> to <Wisenet The IP address of the computer used for the current setup cannot be added to <Deny registered IP>, it should be added to DDNS>.
- Page 33 802.1x SNMP When connecting network, you can choose whether using 802.1x protocol, and then install the certification. With the SNMP protocols, the system or network admin can monitor the network devices on a remote site, and configure the 1. From the Setup menu, select the <Network ( )>...
- Page 34 • Friendly name : Display the encoder name. - Name for the certificate: Enter the certificate name. Friendly name is displayed in the format of WISENET-<Model Name>-<MAC Address>. - Certificate file: Click the [Search ( )] button to select a certificate file.
-
Page 35: Event Setup
EVENT SETUP Handover Event detection can be used in conjunction with an additional camera with a PTZ preset function. When an event is detected, the interworking PTZ camera moves to the preset position and can perform monitoring. Event setup 1. From the Setup menu, select the <Event ( )>... - Page 36 setup screen FTP / E-mail Alarm output You can configure the FTP/E-mail server settings so that you can transfer the images taken with camera to 1. From the Setup menu, select the <Event ( )> tab. your PC if an event occurs. 2.
- Page 37 Alarm input Time schedule You can set the alarm input type, activation time, and operation mode. You can configure settings to transmit images at regular intervals at a scheduled operation time regardless of the occurrence of an event. 1. From the Setup menu, select the <Event ( )>...
-
Page 38: Configure Analysis Settings
setup screen CONFIGURE ANALYSIS SETTINGS Network disconnection When the network is physically disconnected, it is considered as an event to be saved. Motion detection 1. From the Setup menu, select the <Event ( )> tab. 2. Click <Network disconnection>. You can configure settings to generate an event signal when a motion is detected. 3. -
Page 39: System Setup
SYSTEM SETUP Tampering detection You can set to detect tampering attempts and trigger events, such as sudden change of camera’s framing direction, blocked lens and other overall change of scenes from the video. Product information 1. From the Setup menu, select the <Analytics ( )>... - Page 40 setup screen To perform the upgrade 1. Click [Browse ( )] and specify a file to upgrade. You can check the system log or event log. 2. Click [Upgrade]. 1. From the Setup menu, select the <System ( )> tab. 3.
-
Page 41: Device Type Setup Guide
appendix DEVICE TYPE SETUP GUIDE PROBLEM SOLUTION See the table below to connect your encoder to SSM. y Check whether two or more encoders are set to a single multicast address instead of Images overlap. different addresses. If a single address is used for multiple encoders, the images may For more details, see "Setting up the system"... - Page 42 Any changes or modifications in construction of this device which are not expressly approved by the party responsible for compliance could void the user's authority to operate the equipment. This device complies with part 15 of the FCC Rules. Operation is subject to the following two conditions: (1) This device may not cause harmful interference, and (2) this device must accept any interference received, including interference that may cause undesired operation.
Need help?
Do you have a question about the SPE-420 and is the answer not in the manual?
Questions and answers