Table of Contents
Advertisement
Quick Links
Advertisement
Table of Contents

Related Manuals for SRAM Quarq 0808


Summary of Contents for SRAM Quarq 0808
- Page 1 Power Meter User Manual...
- Page 2 The term “IC:” before the radio certification number only signifies that Industry Canada technical specifications were met. Statement of RoHS Compliance SRAM LLC. certifies that this product and its packaging are in compliance with European Union Directive 2002/95/EC on the Restriction of the Use of Certain Hazardous Substances in Electrical and Electronics Equipment, commonly known as RoHS.
- Page 3 This warranty only applies to the original owner and is not transferable. Claims under this warranty must be made through the retailer where the bicycle or the SRAM component was purchased. Original proof of purchase is required. Except as described herein, SRAM makes...
- Page 4 LIMITATIONS OF WARRANTY This warranty does not apply to products that have been incorrectly installed and/or adjusted according to the respective SRAM user manual. The SRAM user manuals can be found online at sram.com, rockshox.com, avidbike.com, truvativ.com, or zipp.com. This warranty does not apply to damage to the product caused by a crash, impact, abuse of the product, non-compliance with manufacturers specifications of usage or any other circumstances in which the product has been subjected to forces or loads beyond its design.
-
Page 5: Table Of Contents
TABLE OF CONTENTS POWER METER ANATOMY ���������������������������������������������������������������������������������������� 6 INSTALLATION ������������������������������������������������������������������������������������������������������������� 7 MAGNET INSTALLATION �����������������������������������������������������������������������������������������������������������������������7 BB CUP MOUNT INSTALLATION ��������������������������������������������������������������������������������������������������������8 CABLE GUIDE MOUNT INSTALLATION �������������������������������������������������������������������������������������������9 ADHESIVE PUTTY INSTALLATION ��������������������������������������������������������������������������������������������������10 CRANK INSTALLATION ��������������������������������������������������������������������������������������������� 11 SET UP �������������������������������������������������������������������������������������������������������������������������� 11 LED FUNCTIONALITY ���������������������������������������������������������������������������������������������������������������������������� 11 PAIRING �������������������������������������������������������������������������������������������������������������������������������������������������������... -
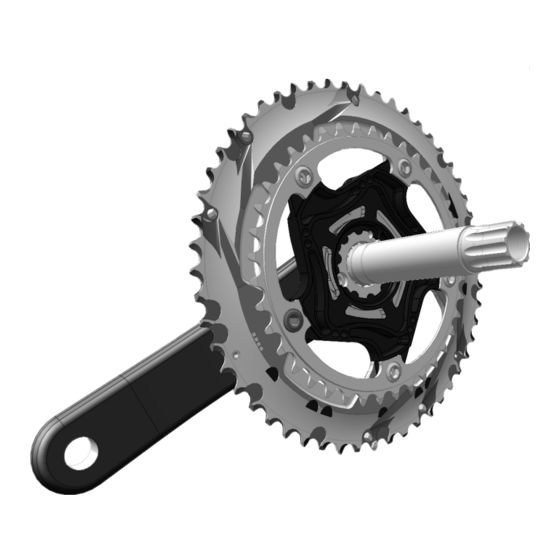
Page 6: Power Meter Anatomy
P O W E R M E T E R A N A T O M Y Crankarm Spider Serial Number/ANT+ ID Battery Compartment Cadence Sensor Ring Cadence Sensor Ring Label Power meter AnAtomy... -
Page 7: Installation
I N S T A L L A T I O N M A G N E T I N S T A L L A T I O N Quarq power meters measure cadence using a magnet, or if a magnet is not present, by using an accelerometer that is built into the power meter. -
Page 8: Bb Cup Mount Installation
The BB Cup Mount is only compatible with threaded bottom brackets. It does not work with frames that have bearings pressed into the bottom bracket (BB30, PF30, etc.). Frames using threaded bottom bracket adapters (ie. SRAM GXP30 BB Adapter) may use the BB Cup Mount if the mount is installed onto the threaded drive side bottom bracket cup. -
Page 9: Cable Guide Mount Installation
C A B L E G U I D E M O U N T I N S T A L L A T I O N The Cable Guide Mount should only be used when the cable guide is fastened with a screw. If the cable guide is fastened with a rivet, use the Bottom Bracket Cup Mount or Adhesive Putty instead. -
Page 10: Adhesive Putty Installation
A D H E S I V E P U T T Y I N S T A L L A T I O N The included adhesive putty will permanently attach the magnet to your frame. Other non-permanent attachment options include: hot glue, some epoxies, electrical tape, or similar adhesives. N O T I C E Do not allow the magnet to contact the power meter. -
Page 11: Crank Installation
C R A N K I N S T A L L A T I O N Install the crankset and bottom bracket assembly onto your bike according to the manufacturer’s instructions. Once the crankset has been installed, the power meter must not contact the frame or any other components. Please contact Quarq customer service with any frame compatibility questions. -
Page 12: Pairing
P A I R I N G Before pairing your power meter to a computer, make sure you are at least 10 meters (30 feet) from any other ANT+™ device. This will keep you from accidentally pairing to another person’s ANT+ device. To pair the power meter with an ANT+ computer, first spin the crank backwards 2-3 times to wake the power meter and begin broadcasting ANT+ messages. -
Page 13: Zeroing
Z E R O I N G The power meter must be zeroed to compensate for environmental changes. The power meter can be zeroed two ways: Auto Zero and Manual Zero. When to perform the Zero procedure For best results, you should perform the Manual Zero procedure before each ride. The Auto Zero procedure can be performed instead of a Manual Zero or if your computer cannot send a “Calibrate”... - Page 14 Z E R O I N G C O N T I N U E D Auto Zero Spin the crank backwards for 4-5 complete revolutions. The LED will flash one time when zeroing is complete. The computer will not display the Zero Offset value. The Auto Zero procedure may be performed while coasting with the rider on the bike, stopped using one or both feet, or by hand with the rider off of the bike.
- Page 15 C H A I N R I N G S C H A I N R I N G I N F O R M A T I O N On power meters with OmniCal™ you can swap chainrings without impacting accuracy� They do not need recalibration when you change chainrings or chainring sizes�...
-
Page 16: Chainring Installation
When installing chainrings you must align the chainring tabs and derailment pin so they are in line with the crank arm. Tighten the SRAM steel chainring bolts to 10 N·m (88.5 in-lb). Tighten other chainring bolts according to the manufacturer’s instruction. -
Page 17: Maintenance And Care
M A I N T E N A N C E A N D C A R E B A T T E R Y I N F O R M A T I O N • The power meter is powered by a CR2032 coin cell battery. •...
Need help?
Do you have a question about the Quarq 0808 and is the answer not in the manual?
Questions and answers