Table of Contents
Advertisement
Quick Links
Advertisement
Table of Contents

Related Manuals for tecnoswitch CR035BI


Summary of Contents for tecnoswitch CR035BI
- Page 1 WALL MOUNTED WEEKLY TOUCH PROGRAMMABLE THERMOSTAT...
- Page 3 WALL MOUNTED WEEKLY TOUCH PROGRAMMABLE THERMOSTAT Congratulations for purchasing the CR035BI. To get the maximum performance, please to read carefully all the instructions. The programmable thermostat guarantees the best comfort temperature, thanks to easy programming and intuitive graphics interface. It’s supplied with an in-cell touch display with back-lighting that it is the most advanced of the wall-mounted category.
- Page 4 18 17 g 8 . 8 % Ì AUTO � w/88:88 11 11 11 11 11 11 11 11 11 11 11 11 11 11 11 11 11 11 11 11 11 11 11 11 · · · ·...
-
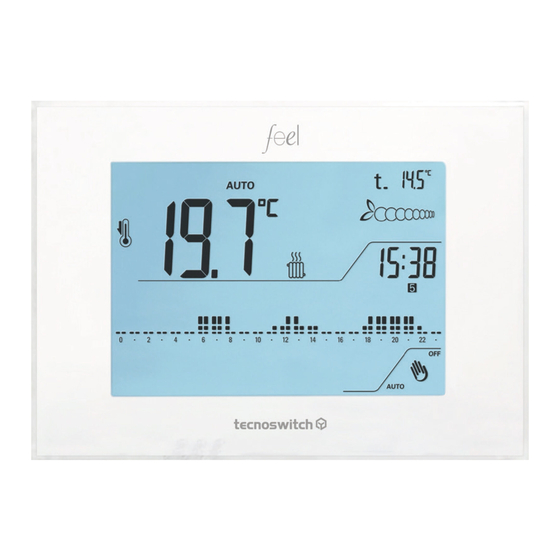
Page 5: Display Legend
KEYS LEGEND Menu Increase Decrease Confirm Scrool to the next icon ON/OFF - Manual/Automatic DISPLAY LEGEND Temperature levels T1, T2, T3 Day of week indicator (1 - 7) Current time (Clock) Energy consumption / savings indicator Set temperature Set temperature thresholds Cooling Heating Temperature... - Page 6 Frost protection Manual Mode :OFF Low batteries. When the icon appears batteries must be replaced within 15 days. Note: when the programmable thermostat is in Stand by, press to start the backlight. Now it can be set.
- Page 7 Installation Set day and time Set Heating / cooling Operating modes Daily programming of temperatures Set temperature levels T1 T2 T3 heating operation Set temperature levels T1 T2 T3 cooling operation Lock setting Temperature setting External probe setting Operation with telephone dialer...
- Page 8 The appliance must be installed on a wall at a height of 1,5m off the floor in a suitable position for correctly detecting the ambient temperature. It must not be installed in niches, behind doors and curtains or in areas affected by sources of heat or atmospheric factors. It must be installed on a wall or on 2 and 3 module back boxes, in dry places.
-
Page 9: Wiring Diagram
WIRING DIAGRAM RELAY RELAY... - Page 10 Fig.1A Fig.2A Fig.3A Fig.5A Fig.4A...
-
Page 11: Factory Setting
FACTORY SETTING For faster use, the programmable thermostat is supplied with the following setting: Heating program from Monday to Friday fig.5 and from Saturday and Sunday fig.6. Fig.5 Fig.6... - Page 12 Cooling Program from Monday to Friday and from Saturday and Sunday Temperature levels: Fig.7 Fig.8 Frost protection function: +5° C settable, active only in heating mode. Set temperature for MANUAL mode. + 22° C.
-
Page 13: Set Day And Time
SET DAY AND TIME 3.1 Starting from Stand-by, fig.2 , press Fig.9 Fig.9 Fig.10 3.2 Press the clock flashes. Fig.10... - Page 14 Fig.11 3.3 Press OK to confirm. The hours value flashes. 3.4 Press to set the current time. 3.5 Press OK to confirm. The minutes value flashes. 3.6 Press to set the minutes value. 3.7 Press OK to confirm. The day value (Monday) flashes.
- Page 15 3.8 Press and select the desired day that will start to flash. 3.9 Press OK to confirm the day.
- Page 16 SET HEATING / COOLING The programmable thermostat can regulate system of: 4.1 HEATING 4.2 COOLING 4.1 SET HEATING 4.1.1 Start the display by pressing 4.1.2 Press 4.1.3 Press up to position on that it will start to flash and OFF appears. Fig.13 Fig.13...
- Page 17 4.1.4 Press OK to confirm. The display shows ON and . If it’s not confirmed after 10 seconds it returns to Stand-by. 4.2 SET COOLING 4.2.1 Start display by pressing Fig.9 4.2.2 Press 4.2.3 Press up to position on that will start to flash and OFF appears. Fig.14 Fig.14...
- Page 18 4.2.4 Press OK to confirm. The display shows ON and fig.15 . If it’ not confirmed after 10 seconds it returns to Stand-by. Fig.15 SYSTEM ACTIVATION SIGNALING When the icon or is animated, the system is active.
-
Page 19: Operating Modes
OPERATING MODES The programmable thermostat CR035BI can operate in mode: 5.1 MANUAL 5.2 AUTOMATIC 5.3 COUNT-DOWN 5.4 OFF 5.1 OPERATION MANUAL MODE This function allows you to always have the same temperature. 5.1.1 To set it, start the display by pressing 5.1.2 Press again... - Page 20 5.1.3 Press to set the desired temperature within a range from +2 and +35°C with steps from 0,1°C. N.B. : To go back to the Automatic program, press again 5.2 OPERATION AUTOMATIC MODE The programable Thermostat regulates the system on / off (heating or cooling) based on the set temperature thresholds, for the sundry days of the week.
- Page 21 Fig.17 During automatic mode, temperature levels can be displyed by pressing This action will not change the set program. When the system is active, the icon is animated. To set the program you can see the chapter 6. 5.3 OPERATION COUNT-DOWN MODE If you need to leave home for a few hours or days and so to turn-off the system for a specified time, you can activate the count down mode timed switch-off.
- Page 22 The difference between timed switch-off and timed switch-on is determinated by the set temperature. (Ex.: +5°C to TIMED SWITCH-OFF and +25°C to TIMED SWITCH-ON). When this function is active, no setting can be made. The OPERATION COUNT-DOWN MODE has two settings: - TIMED SWITCH-OFF - TIMED SWITCH-ON TIMED SWITCH-OFF...
- Page 23 5.3.5 Press to set number of hours (e.g. if you want to switch off the thermostat for a week, you have, you have to set 7 x 24= 168 hours). 5.3.6 Press OK to confirm. Now the set temperature +5°C flashes. If the ambient temperature exceeds this value, the programmable thermostat will be off.
-
Page 24: Function Off
Fig.20A Fig.20B During the COUNT-DOWN, when less than 10 hours remain, the display shows both the remaining hours and the minutes (e.g. 12 hours: display shows h012. Fig.20A 9 hours and 59 minutes: display show h9:59) Fig.20B 5.3.12 To activate/deactivate the COUNT-DOWN, follow the steps 5.3.8 e 5.3.9 At this point the count-down program start. - Page 25 Fig.21 Fig.22 5.4.2 Press for 4 seconds to switch-on the programmable thermostat. The display shows On for 3 seconds. Fig.23...
- Page 26 The programmable thermostat is supplied with the following temperature level settings: E.g. Monday/Friday from 00.00 to 05.59: T1 from 06.00 to 07.59: T3 from 08.00 to 11.59: T1 from 12.00 to 14.59: T2 from 15.00 to 17.59: T1 from 18.00 to 21.59: T3 from 22.00 to 23.59: T1 Fig.24 It can customize the temperature levels of the Automatic operation, at 30 minute intervals.
- Page 27 Fig.24 Fig.25 6.5 Press OK to set the Monday program fig.25. the display shows: Fig.25 The icon fleshes. Fig.25. The clock shows the time 0:00 relative to the flashing segment The set temperature level (T1 14°) is displayed in reference to the half hour indicated by the flashing segment.
- Page 28 Fig.26 6.8 Press OK to confirm NOTE: If you are at 18:00 and touch OK, you confirm and the Monday setting ends.
- Page 29 The days 1 and 2 flash alternately. Now you can: a) - copy the program. Fig.27 b) - set the program. Fig.27 a) 6.9 Copy the program from Monday to Tuesday pressing OK. b) 6.10 set the Tuesday program pressing and then press OK to confirm.
- Page 30 6.11 Continue up to (Sunday) N.B.: Factory setting for Saturday and Sunday is differrent from the other days...
- Page 31 SET TEMPERATURE LEVELS T1 T2 T3 FOR HEATING OPERATION The programmable thermostat is supplied with these set temperature values: Make sure that the symbol for Heating is active, otherwise see chapter 4. 7.1 Press 7.2 Press 7.3 Press up to position on that it will start to flash Fig.28 7.4 Press OK to confirm.
- Page 32 Fig.28 Fig.29 7.5 Press to set the desired value. 7.6 Press OK to confirm the temperature. 7.7 Then the display shows the second level value: T2. The elative set temperature 18°C flashes. Fig.29 7.8 Press to set the desired value.
- Page 33 7.9 Press OK to confirm the temperature. 7.10 Then the display shows the third level value T3. The relative set temperature 22°C Fig.30 flashes. Fig.30 7.11 Press to set the desired value. 7.12 Press OK to confirm the temperature. Note. The temperature (T3) cannot be < (T2) or > + 35°C. The temperature (T2) cannot be <...
-
Page 34: Lock Setting
SET TEMPERATURE LEVELS T1 T2 T3 FOR COOLING OPERATION The programmable thermostat is supplied with the following set temperature values: Make sure that the symbol for cooling is active, otherwise see chapter 4.2. 8.1 To Set the desired temperature value in the 3 levels, repeat the chapter 7. LOCK SETTING The programmable thermostat is provided with a 3 diit Lock Code. - Page 35 9.2 Press and hold smltaneously for 4 seconds and PAS appears. 9.3 After 3 seconds, the first digit on the left will flash, so press to set it. Fig.31 9.4 Press to move to the other two digits. 9.5 Press to set the other two digits.
-
Page 36: Temperature Setting
10.0 TEMPERATURE SETTING Moving on icon , you can set these function: 10.1 - TEMPERATURE DIFFERENTIAL; 10.2 - TEMPERATURE IN A PROPORTIONAL WAY; 10.3 - CORRECTION OF MEASURED TEMPERATURE; 10.4 - FROST PROTECTION; 10.5 - ANTI-SEIZE PUMP. The programmable thermostat is supplied with ON-OFF Temperature Regulation with a Therminal Differential set at 0.3°... - Page 37 By choosing the different based on the type of system, continuous switching on and off is avoided. Therefore we recommend a low thermal differential for system with high thermal inertia (system with cast iron radiators or underfloor heating) and the high one for low inertia systems (eg ventilators, fan coils, etc.
- Page 38 10.1.5 Press OK 10.1.6 Press to set the desired differential value between 0.1 and 1° C. 10.1.7 Press OK to confirm. Fig.32 10.2 TEMPERATURE IN A PROPORTIONAL WAY It makes the temperature inside the building more stable. To set it, you have to: 10.2.1 Repeat the steps 10.1.1 - 10.1.4.
- Page 39 10.2.3 Press OK to confirm. appears and flashes (Breadth of adjustment range). This value can be adjusted from 0.5° C to 7° C with a resolution of 0.1° C. The factory setting is 1° C. 10.2.4 Press to set the desired Breadth value. Fig.35 10.2.5 Pres OK to confirm.
- Page 40 Example. Set the temperature 19.5° C with Breadth of adjustment range 1° C. If the ambient temperature is lower than 18.5° C the heating 100% on; as the ambient temperature approaches the set temperature, the system power decreases. Note: For location with good thermal insulation it is advisable to set small band values. Fig.36 10.2.6 Press to set the desired tc value.
- Page 41 10.3 CORRECTION OF MEASURED TEMPERATURE If the programmable thermostat is installed close to sources of heat (like heaters, radiators, air conditioners) the measured (current) temperture may not be correct the measured (current) temperature by screen from 0° C (factory setting) to +/- 3°C. To set it.
-
Page 42: Frost Protection Function
10.3.4 Press to set the desired correction value between -3 and + 3° C. 10.3.5 Press OK to confirm. 10.4 FROST PROTECTION FUNCTION I’ts important to avoid damage caused by too low temperatures. This function works only in the Heating mode. The default temperature is + 5° C. If the temperature drops below this value the system starts working. - Page 43 10.4.5 Press OK to confirm Note. below 2° C the frost protection is OFF. When the programmable thermostat is OFF, the icon is on the display, so the frost protection don’t work.
-
Page 44: Pump Anti-Seize Function
10.5 PUMP ANTI-SEIZE FUNCTION The device is provided of pump anti-seize function, this allow to start a count-down that switch on the relay per one minute every 24 hours. This function is only available on HEATING mode and is setting “OFF” by default Fig.39 to activate it: 10.5.1 Repeat the steps 10.1.1 -10.1.4. -
Page 45: External Probe Setting
11.0 EXTERNAL PROBE SETTING The programmable Thermostat has an input for 10k External probe (not supplied) that works in the range between - 10° C and 60 ° C. 11.1 - EXTERNAL PROBE ON/OFF 11.2 - ENVIRONMENT PROBE 11.3 - EXTERNAL PROBE 11.4 - UNDERFLOOR PROBE To set the External Temperature Probe, proceed as follows: 11.1 - EXTERNAL PROBE ON/OFF... - Page 46 . g i . g i 11.2 - ENVIRONMENT PROBE The plants is only regulated by external probe detected temperature. 11.2.1 Repeat the steps 11.1.1 and 11.1.2 11.2.2 Press up to position on that it will start to flash. The status is OFF. Fig.42...
- Page 47 11.2.3 Press OK to confirm. On appears. From now, the temperature measured by the external probe regulates the system. The display shows the temperature measured by the external probe. 11.3 EXTERNAL PROBE It only measures another temperature, of the external probe. The system settings do not change.
- Page 48 To display the external probe temperature, from standby press then press and Int, ambient temperature, appears. Press again and Est, temperature measured by the probe, appears. Fig.44a Fig.44b 11.4 UNDERFLOOR PROBE If the temperature value measured by the underfloor probe exceeds the set temperature, the system is switched off.
- Page 49 Fig.45 Fig.46 11.4.3 Press OK to confirm. On appears and the limit temperature flash. Fig.46 11.4.4 Press to set the value in the range between +2 and + 60°C. Factory setting 35° C. 11.4.5 Press OK to confirm. From this moment if the value detected by the floor probe exceeds the set limit temperature, the system is switched off.
- Page 51 By connecting a telephone programmer to the terminlas with the phone symbol fig.1B e 2B it is possible to remotely activate a special program called Timed Manual. The programmable thermostat has 2 different programs in memory, one for Heating and one for Cooling.
- Page 52 Cooling : 1 hour at 25° C; To set the temperature and the number oh hours, proceed as follows: 12.1 Select the operating mode: 12.2 Press 12.3 Press 12.4 Press up to position on that it will start to flash. OFF appears. 12.5 Press and hol OK for about 3 seconds.
- Page 53 12.6 Press to set the number of the hours. 12.7 Press OK to confirm. The set temperature 22° flashes. 12.8 Press to set the desired value. 12.9 Press OK to confirm. 13.0 STATISTICS The programmable thermostat shows statistical data on the operation of the system. 13.1 Press 13.2 Press 13.3 Press...
- Page 54 Fig.50 Fig.49 13.4 Press to move on page 3. PAGE 2 : this means that on the day before the system worked for 2 hours and 30 minutes. 13.5 Press to move on page 3. PAGE 3 : indicates how many hours the system is working (three hundred fifteen hours)
- Page 55 Note. You can reset the hour counter by pressing OK for 3 seconds. 13.6 Press to move on page 4.
- Page 56 13.8 Press to return on the main screen or wait for 15 seconds...
- Page 57 14.0 RESET Operating anomalies, interventions or other technical reasons may require the reset of the device and the restore of the factory settings. It restores the factory serttings, also deleting any password. 14.1 From stand by, press 14.2 Press and hold simultaneously for 4 seconds.
- Page 58 15.0 SUPPLY BATTERY REPLACEMENT When appears, batteries must be replaced within 15 days. We suggest the replacement of Alkaline AA batteries at the beginning of each season. Fitting the batteries with the wrong polarity may damage the programmable thermostat. The correct date and time settings are maintained if the batteries are replaced within 30 seconds thanks to the supercapacitor.
- Page 59 - Programmable Thermostat with differential and proportional temperature regulation and external probe. - Temperature Regulation from 2 to 35° C - Antifreeze temperature from 2 to 7° C - Correction Temperature from -3 to 3°C - Breadth of adjustment range from 0,5° C to 7° C of resolution - System Cycle Time 5, 10, 20, 30, 40 minutes - Thermal Differential from 0,1 to 1°...
-
Page 60: Safety Warnings
17.0 SAFETY WARNINGS During installation and operation of the appliance the following indications must be respected: - Do not feed the product if it is mechanically damaged. - Install and start up the appliance in compliance with the current regulations concerning electrical system. - Page 61 Tecno Switch reserves the right to make changes to its products in each moment and without further notice. Tecno Switch declines all responsibility for damage to things or persons derived from an incorrect or improper use of its products.
- Page 64 REV. 19-21...
Need help?
Do you have a question about the CR035BI and is the answer not in the manual?
Questions and answers