Advertisement
Quick Links
Advertisement

Related Manuals for tecnoswitch CR035WB


Summary of Contents for tecnoswitch CR035WB
- Page 1 Crono feel...
- Page 2 *Unit of measure: mm...
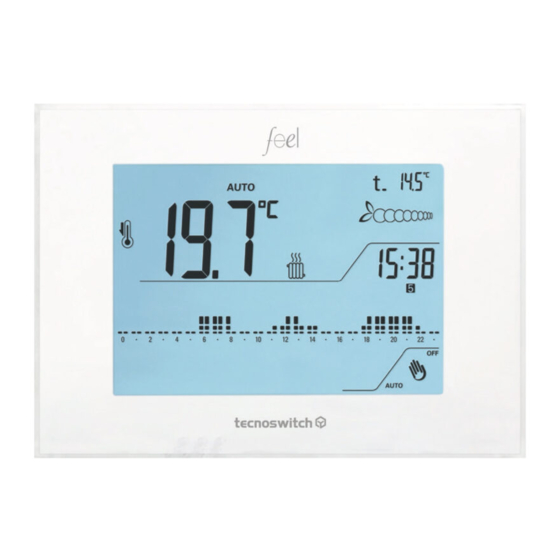
- Page 3 Congratulations for purchasing the Wi-Fi touch programmable thermostat CR035WB. WiFi connectivity...
- Page 5 setting...
- Page 7 INDEX OPERATING BY PROGRAMMABLE THERMOSTAT 1. Installation 2. Factory Settings 3. Setting day and time 4. Heating/Cooling Setting 5. Operation Modes 5.1 Manual Mode 5.2 Automatic Mode 5.3 Count-down mode 5.4 Function off 6. Daily programming of temperatures 7. Temperature levels Setting T1 T2 T3 for heating operation 8.Temperature levels Setting T1 T2 T3 for cooling operation 9.
- Page 8 11. External probe setting 11.1 External probe ON/OFF 11.2 Environment probe 11.3 External probe 11.4 Underfloor probe 12. Statistics 13. Reset 14. Tecnical features 15. Safety Warnings 16. Information to users...
-
Page 11: Temperature Levels
Temperature levels:... - Page 12 ; Saturday and Sunday...
- Page 13 The setting time is done automatically if the progrmmable thermostat is connected to a wifi network. Pressing...
- Page 15 up to position on the day that it will flash.
- Page 16 HEATING SETTING...
-
Page 17: Cooling Setting
COOLING SETTING... - Page 20 5.2.1 5.2.2...
- Page 24 Fig.20B...
- Page 29 programming programming...
- Page 32 flashes.
- Page 34 TEMPERATURE LEVELS SETTING...
-
Page 36: Temperature Setting
10.0 TEMPERATURE SETTING... - Page 40 The tc appears and flashes (System Cycle Time). It can choose between 5 values: 5, 10, 20, 30, 40 minutes. The factory setting is 20 minutes. Fig.36...
- Page 45 Fig.41...
- Page 46 flash.
- Page 47 it will flash.
- Page 48 To display the temperature of the external probe, from standby press Pressing , Int, ambient temperature, appears . Pressing again, Est, temperature measured by the probe, appears. Fig.44 11.4.1 Repeat the steps 11.1.1 - 11.1.2 flash.
- Page 50 it will flash Fig.47...
- Page 51 Fig.48 Fig.47 Fig.48 Fig.49...
- Page 52 Fig.50 Fig.49 Fig.50...
- Page 53 12.7 Fig.51 Fig.51...
- Page 54 appears Fig.52 Any passwords will be deleted. In the event of malfunctions even after the standard rest procedure, disconnect the programmable thermostat from the base and reconnect it after 1 minute. Fig.1A-4A...
-
Page 55: Frost Protection
Frost protection... - Page 57 CONFIGURATION AND OPERATION FROM APP...
- Page 58 COMMANDS AND INDICATIONS Time slots chart System status indicator Set Temperature Indicator Temporary Operation Menu ON / OFF Automatic/Manual Mode Place Installation and device Name Temperature Indicator and relative humidity Weather indicator of the installation site Temperature setting in Manual mode...
- Page 60 pagine 13. ON/OFF + Programmable thermostat 13.1 Switching ON/OFF all programmable thermostats paired in the same place 13.2 Switching ON/OFF a single programmable thermostat in the same place 14. Temporary operation 14.1 Temporary operation of all the programmable thermostats paired in the same place 14.2 Temporary operation of the single programmable thermostat 15.Daily/ weekly programming of + programmable thermostats 16.Settings of + programmable thermostats in + places...
- Page 61 Manual 1.1.1 1.2.1 1.2.2 Fig.1 1.2.3 Fig.2 1.2.4 Fig.3 from 3A to 3E Fig.2 Fig.1 Fig.3A Fig.3B Fig.3C...
- Page 62 After configuring the device, day and time will update automatically Fig.3F . g i Fig.3F You can watch the configuration on our TecnoSwitch IT channel.
- Page 63 Fig.4A by pressing Fig.4B Fig.5 Fig.4B Fig.4A Fig.5...
- Page 64 Fig.6 Fig.7 from 7A to 7C Fig.7A Fig.7B Fig.6 Fig.7C...
- Page 65 Fig.9 from 9A to 9B Fig.9B You can watch the configuration on our TecnoSwitch IT channel.
- Page 66 Fig.10 from 10A to 10H Fig.10B Fig.10C Fig.10D Fig.10A Fig.10E Fig.10F Fig.10G Fig.10H...
- Page 67 Fig.11 from 11A to 10C . g i . g i . g i 4.4 After programming, confirm by pressing Fig.13 otherwise press to go back to Fig.10E and press , select Fig.14A - Fig.14D PASTE...
- Page 68 Press to go back to the main screen. Fig.10A Follow the same procedure to copy / set the other days. Fig.14B Fig.14C Fig.14D Fig.15A, press PROGRAM Fig.15B, Fig.15C, Fig.16 You can watch the configuration on our TecnoSwitch IT channel.
- Page 69 Fig.17 from 17A to 17F Fig.17A . g i . g i Fig.17D Fig.17E Fig.17F...
- Page 70 Fig.18 from 18A to 18C it automatically go by next half hour. (Fig.19A and 19B) Fig.18A Fig.18B Fig.18C 5.4 After programming, confirm by pressing Fig.20, otherwise press to go back to Fig.17E Fig.19A Fig.19B Fig.20...
- Page 71 DELETE and SETTINGS 6.1 DELETE PROGRAMMING Enter the program (Monday, Tuesday, ecc), press Fig.21A, and confirm by pressing Fig.21B Fig.21B Fig.21A 6.2 TEMPERATURE LEVEL SETTING Press and set the value of the levels by scrolling the degrees. See chapter 9.5. Fig.22...
- Page 72 Fig.24 and Fig.25 Fig.26 7.4 Confirm by pressing Fig.27 , otherwise press to go back to Fig.23 Fig.27 . g i . g i . g i Fig.23...
- Page 73 Fig.28 from 28A to 28C . g i . g i Fig.28A...
- Page 74 VARIOUS 9.1 EDIT FIELDS 9.2 GEO-FENCE 9.3 HOLIDAY SETUP 9.4 HEATING / COOLING 9.5 TEMPERATURE LEVELS 9.6 ADVANCED SETTING 9.7 DELETE PROGRAMMING 9.1.1 Fig.29 from 29A to 29C 9.1.2 Fig.30 Fig.31 9.1.3 Confirm by pressing Fig.32 otherwise press to go back to Fig.29B Fig.29B Fig.29A...
- Page 75 9.2.1 the device; Fig.29 from 29A to 29C 9.2.2 Fig.33 9.2.3 Fig.34 9.2.4 Fig.35 9.2.5 Confirm by pressing Fig.36 “feel” Fig.36 Fig.34 Fig.35 Fig.33...
-
Page 76: Holiday Setup
9.3 HOLIDAY SETUP It allows you to switch Off the heating for a set period of time. 9.3.1 Follow to set holiday setup; Fig.29A - Fig.29C 9.3.2 Press Fig.37 9.3.3 Set: hours / minutes, date of Holiday On / Holiday Off and the desired temperature; Fig.38 9.3.4 Confirm by pressing Fig.39... - Page 77 Fig.44 Fig.43 Fig.42...
- Page 78 9.4.1 Fig.45 from 45A to 45D 9.4.2 Fig.46A 9.4.3 Press , Fig.46B, to go back to Fig.45A Fig.45B Fig.45C Fig.45D Fig.46A Fig.45A Fig.46B...
- Page 79 9.5.1 Fig.45A to 45D 9.5.2 Fig.47 9.5.3 Fig.48A or 48B 9.5.4 Confirm by pressing otherwise press to go back to Fig.47 Fig.47 Fig.48A Fig.48B...
- Page 80 9.6.1.1 Fig. 45A - 45D 9.6.1.2 Fig. 50 9.6.1.3 Fig.51A-51B Fig.50 Fig.45A-45D 9.6.2.1 9.6.2.2 9.6.2.3 9.6.2.4 Confirm by pressing otherwise press to go back to Fig.52 Fig.49 Fig.50 Fig.51A Fig.51B Fig.52 Fig.53...
- Page 81 9.7.1 Fig.45A - 45D 9.7.2 Fig.54 9.7.3 Fig.55 Fig.54 Fig.55...
- Page 82 Fig.56 10.1 10.2 Fig.57 10.3 Fig.58A - 58B Fig.56 Fig.57 Fig.58...
- Page 83 Fig.56 11.1 Fig.59 11.2 Fig.60 11.3 Now you can view the statistics. To reset them, press 11.4 Fig.61B Fig.60 Fig.61A Fig.61B Fig.59...
- Page 84 12.0 PAIR YOUR NEW PROGRAMMABLE THERMOSTAT This function allows you to add a new programmable thermostat to your App. It is possible to manage multiple devices simultaneously, maximum 4, in multiple different places, maximum 2. There are 2 procedures: 12.1 PAIR NEW PROGRAMMABLE THERMOSTAT IN THE SAME PLACE 12.2 PAIR NEW PROGRAMMABLE THERMOSTAT IN ANOTHER PLACE 12.1 PAIR NEW PROGRAMMABLE THERMOSTAT IN THE SAME PLACE 12.1.1 Configure the device, see chapter 1;...
- Page 85 12.2 PAIR NEW PROGRAMMABLE THERMOSTAT IN THE ANOTHER PLACE 12.2.1 Repeat steps from 12.1.1 to 12.1.3 12.2.2 Press to edit the location. Fig.67 12.2.3 Press and write the name of the new programmable thermostat . Fig.68 12.2.4 Confirm by pressing Fig.69A - 69B The icon , Fig.69B, means that there are 2 pages, that is, of 2 places...
- Page 86 13.0 ON/OFF + PROGRAMMABLE THERMOSTAS It is possible to manage On and Off in 2 ways: 13.1 SWITCHING ON / OFF OF ALL PROGRAMMABLE THERMOSTATS PAIRED IN THE SAME PLACE 13.2 SWITCHING ON / OFF A SINGLE PROGRAMMABLE THERMOSTAT IN THE SAME PLACE 13.1 SWITCHING ON / OFF OF ALL PROGRAMMABLE THERMOSTATS PAIRED IN THE SAME PLACE 13.1.1 From the main screen, press to turn Off all devices;...
- Page 87 Fig.76 Fig.77 Fig.73 Fig.74 Fig.75 13.2.4 To turn it On, press Fig.76 13.2.5 Confirm by pressing...
-
Page 88: Temporary Operation
14.0 TEMPORARY OPERATION There are 2 modes of use: 14.1 TEMPORARY OPERATION OF ALL THE PROGRAMMABLE THERMOSTATS PAIRED IN THE SAME PLACE 14.2 TEMPORARY OPERATION OF THE SINGLE PROGRAMMABLE THERMOSTAT 14.1 TEMPORARY OPERATION OF ALL THE PROGRAMMABLE THERMOSTATS PAIRED IN THE SAME PLACE 14.1.1 To start the operation, press , Fig.78A. - Page 89 14.2 TEMPORARY OPERATION OF THE SINGLE PROGRAMMABLE THERMOSTAT 14.2.1 To start the operation, from the main screen, press one of the programmable thermostats Fig.81 14.2.2 Press , Fig.82, and follow the settings as per chapter 7; 14.2.3 To disable it, press the programmable thermostat Fig.83 14.2.4 Press Fig.84...
- Page 90 15.0 DAILY/ WEEKLY PROGRAMMING OF + PROGRAMMABLE THERMOSTATS There are 2 procedures: Procedure 1 15.1.1 From the main screen, press one of the programmable thermostats Fig.86 15.1.2 To set the programming, see chapter 4 and 5; Procedure 2 15.2.1 From the main screen, press Fig.87 15.2.2 Follow to select the programmable thermostat to be set...
- Page 91 16.0 SETTINGS OF + PROGRAMMABLE THERMOSTATS IN + PLACES 16.1 From the main screen, Fig.87, press and follow to enter the settings; Fig.91 – Fig.93 16.2 Now you can manage, set up and edit any zone and place, as per chapter 9. Fig.93 Fig.92 Fig.91...
- Page 92 Tecno Switch reserves the right to make changes to its products in each moment and without further notice. Tecno Switch declines all responsibility for damage to things or persons derived from an incorrect or improper use of its products.
- Page 95 REV. 36-20...
Need help?
Do you have a question about the CR035WB and is the answer not in the manual?
Questions and answers