Advertisement
Available languages
Available languages
Quick Links
Use this guide to install the Router and establish a connection to the Internet. To set up the Router you must have
an Ethernet-enabled computer and a web browser with JavaScript enabled.
For instructions on setting up and using the wireless interface please read the instructions provided in the User's
Guide.
1
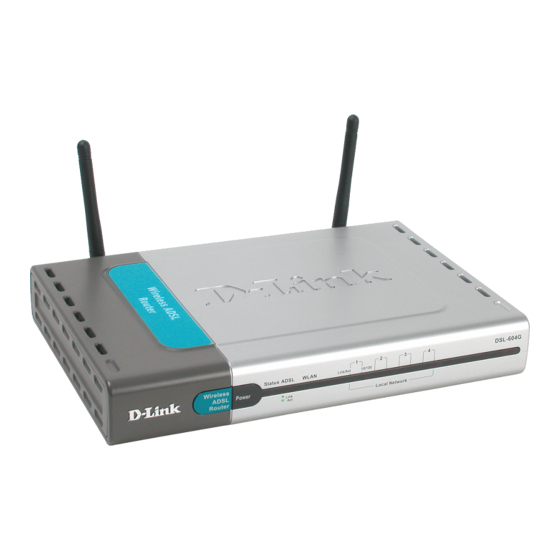
Connect the Cables and Power
A.
Use the power adapter included with the Router and connect it to a suitable power source. The green
power LED on the front of the device should light up immediately and remain lit. The Status LED will
light also light steady green during the power on self-test.
B.
With the unit powered on, insert one end of the included Ethernet cable into any Ethernet port and the
other end into the Ethernet port on your computer. The LED for that port should light green within a few
seconds. If the Ethernet indicator does not light, check the cable connections to make sure the connectors
are firmly in place.
C.
Now connect the telephone cable to the ADSL port on the back of the device. Connect the other end of
the cable to the telephone wall jack or low pass filter device (microfilter or splitter) as instructed by your
service provider.
A.
Plug in power adapter here. Plug the
other end into a power strip or wall
socket.
Quick Installation Guide
802.11b Wireless ADSL Router
Please refer to the User's Guide for more detailed information.
B.
Ethernet ports:
use any port to
connect to your
computer
C.
Plug in ADSL cable here
1
DSL-604+
ADSL port:
Advertisement

Related Manuals for D-Link DSL-604+


Summary of Contents for D-Link DSL-604+
- Page 1 Quick Installation Guide DSL-604+ 802.11b Wireless ADSL Router Please refer to the User’s Guide for more detailed information. Use this guide to install the Router and establish a connection to the Internet. To set up the Router you must have an Ethernet-enabled computer and a web browser with JavaScript enabled.
- Page 2 Change Computer IP Settings It may be necessary to change the IP settings on your computer. The computer connected to the Router should be configured to obtain its IP settings from the Router. This will enable you to configure the Router using a web browser.
- Page 3 Renew IP Settings in Windows for DHCP Client If your computer is already configured for DHCP (Obtain IP settings automatically), the IP settings can be renewed without restarting. Follow the procedures below for your Windows OS. Windows 95/98/Me For Windows 95/98/Me click on the Start button, go to the Run and click once to see the command dialog box. Type in winipcfg and click OK.
- Page 4 In the page that opens, click Login Click here to login A dialog box appears prompts for a user name and password to access the web-based manager. Use the default user name admin and password admin for first time set up. Once you have established the WAN connection, you should change the web-based manager access user name and password (read your User’s Guide for...
- Page 5 Configure the WAN (ADSL) Connection The first page that appears after you successfully login displays the menu you need to configure the Router so it can connect to the Internet. The Multiple PVC menu is used to configure the Router’s WAN connection and also used to add other virtual connections (PVCs).
- Page 6 default Encapsulation is PPPoA LLC. If you select an IPoA or Bridge Encapsulation, the user changeable variables displayed in the browser will change. These different variables are described in step 5.1 – 5.3. The remaining settings that must be configured are different for the different Encapsulations. If you have selected a PPPoE or PPPoA Encapsulation you must supply a User Name and Password used to verify the identity of your account.
- Page 7 Ausführliche Informationen finden Sie im Benutzerhandbuch. Dieses Handbuch hilft Ihnen bei der Installation des Routers und bei der Herstellung einer Verbindung zum Internet. Für die Inbetriebnahme des Routers benötigen Sie einen Computer mit Ethernet-Anschluss und Webbrowser mit aktiviertem JavaScript. Anleitungen zur Inbetriebnahme und Verwendung der drahtlosen Schnittstelle finden Sie im Benutzerhandbuch. Netz- und Netzwerkkabel anschließen Schließen Sie das mitgelieferte Netzteil an eine geeignete Stromquelle an.
- Page 8 IP-Einstellungen am Computer anpassen Unter Umständen ist es erforderlich, die IP-Einstellungen zu ändern. Der Computer muss so konfiguriert werden, dass er die IP-Einstellungen vom Router bezieht. Dann können Sie den Router mit Hilfe eines Webbrowsers konfigurieren. Wenn der Computer mehrere Ethernet-Anschlüsse hat, stellen Sie sicher, dass außer dem mit dem Router verbundenen Ethernet-Anschluss kein weiterer Anschluss aktiviert ist.
- Page 9 IP-Einstellungen des DHCP-Clients unter Windows aktualisieren Wenn der Computer bereits für DHCP konfiguriert ist, so dass er die IP-Einstellungen automatisch bezieht, können die IP-Einstellungen ohne Neustart aktualisiert werden. Folgen Sie den Anweisungen für das installierte Windows-Betriebssystem. Windows 95/98/Me Klicken Sie unter Windows 95/98/Me auf „Start“ und dann auf „Ausführen“. Geben Sie „winipcfg“...
- Page 10 Klicken Sie auf der aufgerufenen Seite auf „Login“. Zum Anmelden hier klicken. Ein Dialogfeld wird angezeigt, in dem Sie einen Benutzernamen und ein Kennwort für den Zugriff webbasierte Verwaltungsprogramm eingeben müssen. Verwenden Sie für die erstmalige Konfiguration Standard- Benutzernamen „admin“ und das Standard- Kennwort „admin“.
- Page 11 WAN-Verbindung (über ADSL) einrichten Nach der erfolgreichen Anmeldung wird das Menü zur Konfiguration des Routers für die Internet-Verbindung angezeigt. Im Menü „Multiple PVC“ wird die WAN-Verbindung des Routers konfiguriert. Außerdem können hier weitere permanente virtuelle Verbindungen (PVC, Permanent Virtual Connection) hinzugefügt werden. Alle Informationen zu Änderungen, die für eine funktionsfähige WAN-Verbindung erforderlich sind, erhalten Sie von Ihrem Internetdienstanbieter oder Netzwerkanbieter.
- Page 12 verwendet werden. Wenn Sie aufgefordert werden, sie zu ändern, geben Sie die vom Dienstanbieter angegebenen Werte ein. Wählen Sie unter „Encapsulation“ die Kapselungsmethode für Ihre Verbindung. Die verfügbaren Optionen sind: PPPoA VC mux, PPPoA LLC, PPPoE VC mux, PPPoE LLC, IPoA VC mux, IPoA LLC, Bridge VC mux und Bridge LLC.
-
Page 13: Guide D'installation Rapide
Guide d’installation rapide Routeur ADSL sans fil 802.11b DSL-604+ Pour des informations plus détaillées, reportez-vous au guide d’utilisation. Ce guide vous explique comment installer le routeur et établir une connexion à l’internet. Pour configurer le routeur, il vous faut un ordinateur doté d’une interface Ethernet et un navigateur internet avec JavaScript activé. Pour la configuration et l’utilisation de l’interface sans fil, reportez-vous au guide d’utilisation. - Page 14 Modification des paramètres IP de l’ordinateur Vous devrez peut-être modifier les paramètres IP de votre ordinateur. L’ordinateur relié au routeur doit être configuré pour obtenir ses paramètres IP du routeur. Cela vous permettra de configurer le routeur à l’aide d’un navigateur internet.
- Page 15 Modification des paramètres IP sous Windows pour un client DHCP Si votre ordinateur est déjà configuré pour DHCP (Obtenir automatiquement les paramètres IP), les paramètres IP peuvent être modifiés sans redémarrer. Procédez de la façon suivante selon votre système d’exploitation Windows OS. Windows 95/98/Me Sous Windows 95/98/Me, cliquez sur le bouton Démarrer et cliquez une fois sur Exécuter pour faire apparaître la boîte de dialogue Exécuter.
- Page 16 Pour accéder au logiciel de gestion web, tapez http:// suivi de l’adresse IP par défaut 192.168.0.1 dans la barre d’adresse du navigateur. Vous devez avoir dans la barre d’adresse l’URL suivante : http://192.168.0.1. Dans la page qui s’ouvre, cliquez sur Login Cliquez ici pour vous connecter...
- Page 17 Configuration de la connexion WAN (ADSL) Une fois que vous êtes connecté, la première page qui apparaît affiche le menu de configuration du routeur. Le menu Multiple PVC permet de configurer la connexion WAN du routeur et d’ajouter d’autres connexions virtuelles (PVC).
- Page 18 Ne modifiez pas les valeurs VPI ou VCI à moins que vous n’y soyez obligé. Si ces paramètres sont incorrects, la connexion ADSL ne fonctionnera pas. De nombreux utilisateurs peuvent utiliser les paramètres par défaut. Si vous devez les modifier, tapez les valeurs qui vous ont été communiquées par votre fournisseur de services.
-
Page 19: Guía De Instalación Rápida
Guía de instalación rápida DSL-604+ Enrutador inalámbrico ADSL 802.11b Consulte el manual del usuario para obtener más información. Utilice esta guía para instalar el enrutador y establecer una conexión a Internet. Para configurar el enrutador deberá tener un ordenador habilitado para Ethernet y un navegador de Web habilitado para JavaScript. Para obtener instrucciones sobre cómo configurar y utilizar la interfaz inalámbrica, lea las instrucciones que aparecen en la Guía del usuario. - Page 20 Cambio de la configuración IP del ordenador Podría ser necesario tener que cambiar la configuración IP del ordenador. El ordenador conectado al enrutador debería configurarse para obtener los valores IP del enrutador. Esto le permitirá configurar el enrutador mediante un navegador de Web. Si su ordenador tuviera más de una interfaz Ethernet, asegúrese de que el puerto Ethernet conectado al enrutador sea la única interfaz habilitada.
- Page 21 Actualización de la configuración IP en Windows para cliente DHCP Si su ordenador ya estuviera configurado para DHCP (Obtener la configuración IP automáticamente), la configuración IP podrá actualizarse sin necesidad de reiniciar el equipo. Siga las instrucciones que se describen a continuación para el sistema operativo Windows.
- Page 22 Haga clic en Login, en la ventana que aparece a continuación. Haga clic para conectarse Aparecerá un cuadro de diálogo que le solicitará un nombre de usuario y una contraseña para poder acceder al gestor de web. Utilice el nombre de usuario por defecto: admin y la contraseña admin la primera vez que se conecte.
- Page 23 Configuración de la conexión WAN (ADSL) La primera página que aparece después de conectarse muestra el menú con el que deberá configurar el enrutador para que pueda conectarse a Internet. El menú ”Multiple PVC” se utiliza para configurar la conexión WAN del enrutador, así...
- Page 24 Seleccione el método de encapsulado, Encapsulation, utilizado para su conexión. Las opciones disponibles son PPPoA VC mux, PPPoA LLC, PPPoE VC mux, PPPoE LLC, IPoA VC mux, IPoA LLC, Bridge VC mux o Bridge LLC. El Encapsulado por defecto es PPPoA LLC. Si selecciona un encapsulado IPoA o Bridge, las variables modificables por el usuario que se visualizan en el navegador cambiarán.
- Page 25 Manuale rapido d’installazione DSL-604+ Router Wireless ADSL 802.11b Informazioni più dettagliate sono contenute nel Manuale utente. Il presente manuale consente di installare il Router e instaurare una connessione a Internet. Per configurare il Router è necessario disporre di un computer basato sulla tecnologia Ethernet di un browser web abilitato per JavaScript.
- Page 26 Modifica delle impostazioni IP del computer Potrebbe essere necessario modificare le impostazioni IP del computer. Il computer connesso al Router può essere configurato in modo da ottenere automaticamente le impostazioni IP dal Router stesso. In questo modo è possibile configurare il Router, utilizzando un browser web. Se il computer dispone di più interfacce Ethernet, verificare che la porta Ethernet connessa al Router sia l’unica abilitata.
- Page 27 Rinnovo delle impostazioni IP per client DHCP in ambiente Windows Se il computer è già configurato come client DHCP (opzione Obtain un indirizzo IP automaticamente), le impostazioni IP possono essere rinnovate senza riavviare il sistema. In ambiente Windows la procedura è la seguente.
- Page 28 Nella finestra seguente, cliccare su Login Cliccare qui per eseguire il login Il sistema visualizza una finestra di dialogo richiedendo il nome utente e la password per l’accesso all’interfaccia di gestione basata sul Web. Per una prima configurazione, inserire admin in entrambi i campi. Una volta instaurata la connessione di WAN, il nome utente e la password possono essere modificati (maggiori informazioni sono contenute nel...
- Page 29 Configurazione della connessione di WAN (ADSL) La prima pagina visualizzata dopo la procedura di login, presenta il menu per configurare il Router in modo che possa connettersi a Internet. Il menu Multiple PVC è utilizzato per configurazione la connessione di WAN del Router e per aggiungere altre connessioni virtuali PVC (virtual connections).
- Page 30 Definire un metodo di incapsulamento nel campo Encapsulation. Le opzioni disponibili sono PPPoA VC mux, PPPoA LLC, PPPoE VC mux, PPPoE LLC, IPoA VC mux, IPoA LLC, Bridge VC mux o Bridge LLC. Il metodo di incapsulamento di default è PPPoA LLC. Selezionando il metodo di incapsulamento di tipo IPoA o Bridge, le variabili visualizzate dal browser e modificabili dall’utente vengono cambiate.
-
Page 31: Инструкция По Установке
Инструкция по установке DSL-604+ Беспроводной ADSLмаршрутизатор стандарта 802.11b За более детальной информацией обратитесь к руководству пользователя. Используйте данную инструкцию для установки маршрутизатора и установления соединения с Интернет. Для установки маршрутизатора у вас должен быть компьютер с адаптером Ethernet и web-браузер, поддерживающий... - Page 32 Изменение IP - настроек Вам может понадобиться изменить настройки IP на вашем компьютере для возможности использовать программу настройки маршрутизатора. Компьютер, подключенный к маршрутизатору должен получать все настройки IP от маршрутизатора. Это нужно для того, чтобы получить доступ к настройкам маршрутизатора через web-интерфейс. Если у вашего компьютера несколько интерфейсов Ethernet, убедитесь, что...
- Page 33 Обновление настроек IP для DHCP клиента в Windows Если ваш компьютер уже настроен как клиент DHCP (Получение IP-адреса автоматически), настройки IP могут быть обновлены без перезагрузки. Следуйте инструкциям, приведенным ниже: Windows 95/98/Me В Windows 95/98/Me щелкните на кнопку Пуск, выберите Run и щелкните, чтобы появилась командная строка. Наберите...
- Page 34 В открывшейся странице нажмите Login Нажмите здесь для вхо да в меню Появится диалоговое окно, предлагающее ввести имя пользователя и пароль. По умолчанию имя пользователя admin и пароль admin. После того, как вы установили соединение, Вы можете сменить имя пользователя и пароль для доступа к...
- Page 35 Настройка WAN (ADSL) Соединения Первая страница, появившаяся после успешной процедуры авторизации, отображает меня для настройки маршрутизатора для подключения к Интернет. Меню Multiple PVC используется для настройки WAN соединения маршрутизатора, а также для жобавления других виртуальных соединений (PVCs). Всю необходимую информацию для настройки WAN соединения вы должны получить у вашего провайдера.
- Page 36 Выберите тип инкапсуляции - Encapsulation для вашего соединения. Доступные варианты: PPPoA VC mux, PPPoA LLC, PPPoE VC mux, PPPoE LLC, IPoA VC mux, IPoA LLC, Bridge VC mux или Bridge LLC. Инкапсуляция по умолчанияю - PPPoA LLC. Если вы выбрали IPoA или Bridge Encapsulation, появятся...
Need help?
Do you have a question about the DSL-604+ and is the answer not in the manual?
Questions and answers