
Related Manuals for Venterior VT-FF005


Summary of Contents for Venterior VT-FF005
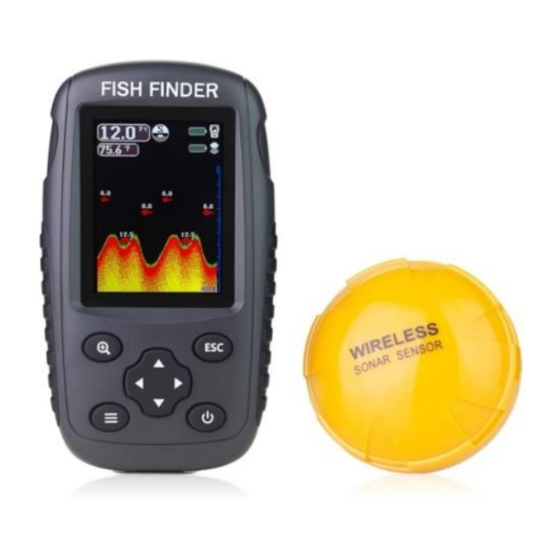
- Page 1 User Manual Venterior Wireless Fish Finder Model Number: VT-FF005 Brand Name: Venterior Country of origin: China...
-
Page 2: Table Of Contents
Contents Introduction to the Fish Finder ……......1 How to Use the Sonar Sensor …..……...………..….. 3 Setting of the Handheld Host ………...…...….…..6 Storage of the Fish Finder ……………..……..12 Product Specification ………………...….….….…. 12 Frequently Asked Questions ……..…………..…. 13 Warranty and After-sale Support ………..…...…..17 Compliance ………..…...…..……..…...……...…..17... -
Page 3: Introduction To The Fish Finder
Introduction to the Fish Finder 1. What’s in the Box Please check if the following product and accessories are in the box before using this product. Write to venterior@yahoo.com if anything is missing or broken. A sonar sensor A handheld host ... - Page 4 1) There are 2 charging cords in the package, the Micro USB for the host and the DC for the sonar sensor. 2) When the battery indicator icon on the screen flashes, please stop using the fish finder and charge the fish finder. 3) When the host is charging, the indicator light is red.
-
Page 5: How To Use The Sonar Sensor
4. Attentions 1) The host is not waterproof. If water splashes on the host, please dry it immediately. 2) The sensor is supposed to float on water when working. Please don’t drag it into water bottom, or submerge and hold the whole sensor under water. 3) Its reading might be interfered with other high power sonar device close to your sonar sensor. - Page 6 different intensity. The built-in computer then organizes all of this information and shows it on the display screen. 2) Sonar usually determines there is fish when it detects the air in fish swim bladders. That is also why the small bubbles in water might affect the fish finder's performance.
- Page 7 2) How to use the sensor There are 2 small holes on the sensor. Tether the sensor with fishing line (not included) and toss it into water. You can use a rod to guide the sensor to a fix spot or use a remote-controlled boat to send the sensor to the fishing spot.
-
Page 8: Setting Of The Handheld Host
Setting of the Handheld Host 1. Keys on the host/display unit Power Key --- Press and hold the power key for 2 seconds, the display unit will power on. The display unit starts working. Press and hold the power key for 3 seconds, the display unit will power off. - Page 9 2. Feature Setup (Preference Setting) There 3 setting/menu pages (Sonar, Setup, and Senior). Press Menu Key to enter and switch setting page. 1) Sensitivity There are 20 levels of sensitivity setting for user to choose from. It greatly depends on the clarity and depth of the water. Very clear water allows for a moderate sensitivity setting.
- Page 10 Press Menu Key to enter “Sonar” menu. Press up/down Direction Key to select the “Sensitivity”. When “Sensitivity” is selected, press left/right Direction Key to adjust the value (5% - 100%) of this feature. Press up/down direction key to select other feature setting or press “ECS”...
- Page 11 Fish depth will display above the fish icon when this feature is turned on. Otherwise it will only display the fish icon when fish is detected. 5) Fish Symbols When this feature is on, fish icon will display on the screen if fish is detected.
- Page 12 8) Backlight Setting the backlight to be highest will greatly reduce the battery life. It is suggested to adjust the backlight at a proper number. 9) Fish Alarm An alarm sounds when a group of fish is detected. The alarm feature can be turn off if you prefer quiet fishing. 10) Depth Alarm The depth alarm can be turned off or range from 7Ft/2M to 164Ft/50M.
- Page 13 Press Menu Key 3 times to enter “Senior” menu. Press up/down Direction Key to select the “Background”. 12) Volume There are 4 volume levels for users to choose from --- off, low, medium, high. Select the proper volume level according to the fishing environment.
-
Page 14: Storage Of The Fish Finder
Once “yes” is selected, the device will restore factory setting. Storage of the Fish Finder 1. Clean the sensor with fresh water and dry off. Do not submerge or spray the screen with water. 2. Keep the sensor and the display unit in dry condition after use. -
Page 15: Frequently Asked Questions
If the display unit does not turn on under properly operation, please send your order number and fish finder issue to venterior@yahoo.com for help. 2. Depth reading is “---” or incorrect 1) Ship motor or other high power sonar fish finder close to the fish finder will interfere with the fish finder’s sonar and... - Page 16 the surface of the sensor is clean. 3) Please make sure the water is within the depth range of 2.6Ft/0.8M to 164Ft/50M. 4) Suspended matter, muddy water, or extremely heavy vegetation may also confuse the sonar and cause misreading of depth. 5) Please make sure the sonar is not out of power and floats on water in peace.
- Page 17 The display is not waterproof. Do NOT submerge or spray the fish finder screen with water. 5. How long is the battery duration (fully charged)? It depends on the backlight level you set. It usually lasts about 4-6 hours in continuous use. Reduce the backlight level to extend battery life.
- Page 18 level may reduce these false readings, but if they do not go away, it is suggested that you discontinue use of the fish finder under these conditions. 8. Will it work for ice fishing? It can work for ice fishing. It is suggested to drill hole on ice and put the sensor into the water.
-
Page 19: Warranty And After-Sale Support
This fish finder is eligible for a 2-year warranty. To get a 2-year warranty for your fish finder, please register your product on our brand website www.venterior.com, or just send your order number to venterior@yahoo.com directly (we will register it in our system for you). - Page 20 device must accept any interference received, including interference that may cause undesired operation. CAUTION: Modification or changes to this equipment not expressly approved by Radio Systems Corporation may void the user's authority to operate the equipment. NOTE: This equipment has been tested and found to comply with the limits for a Class B digital device, pursuant to part 15 of the FCC Rules.
- Page 21 - Connect the equipment to an outlet on a circuit different from that to which the receiver is connected. - Consult customer care, the dealer, or an experienced radio/TV technician for help.
Need help?
Do you have a question about the VT-FF005 and is the answer not in the manual?
Questions and answers