Table of Contents
Advertisement
Quick Links
Advertisement
Table of Contents

Related Manuals for Datavideo BC-15P


Summary of Contents for Datavideo BC-15P
- Page 1 BC-15P...
-
Page 2: Table Of Contents
Table of Contents TABLE OF CONTENTS ................... 2 FCC COMPLIANCE STATEMENT ..............4 WARNINGS AND PRECAUTIONS ..............4 WARRANTY ....................5 .................. 5 TANDARD ARRANTY ................6 HREE ARRANTY DISPOSAL ....................7 PROUDCT OVERVIEW ................8 ....................8 EATURES SYSTEM DIAGRAM ................9 LOCATION AND FUNCTION OF PARTS .......... - Page 3 Disclaimer of Product and Services The information offered in this instruction manual is intended as a guide only. At all times, Datavideo Technologies will try to give correct, complete and suitable information. However, Datavideo Technologies cannot exclude that some information in this manual, from time to time, may not be correct or may be incomplete.
-
Page 4: Fcc Compliance Statement
7. This product should only be operated from the type of power source indicated on the marking label of the AC adapter. If you are not sure of the type of power available, consult your Datavideo dealer or your local power company. -
Page 5: Warranty
When the product has been dropped or the cabinet has been damaged; f. When the product exhibits a distinct change in performance, indicating a need for service. Warranty Standard Warranty Datavideo equipment are guaranteed against any manufacturing defects for one year from the date of purchase. -
Page 6: Three Year Warranty
DVD drives, Hard Drive, Solid State Drive, SD Card, USB Thumb Drive, Lighting, Camera module, PCIe Card are covered for 1 year. The three-year warranty must be registered on Datavideo's official website or with your local Datavideo office or one of its authorized distributors within 30 days of purchase. -
Page 7: Disposal
Disposal For EU Customers only - WEEE Marking This symbol on the product or on its packaging indicates that this product must not be disposed of with your other household waste. Instead, it is your responsibility to dispose of your waste equipment by handing it over to a designated collection point for the recycling of waste electrical and electronic equipment. -
Page 8: Proudct Overview
And the three 1/4” screw holes bring the flexibility of mounting it anywhere, anyway. BC-15P is one of the best choice for capturing eSport players with the wide angle lens that comes with the package. While changing back to the standard lens, it will fulfill the other wide range applications. -
Page 9: System Diagram
System Diagram... -
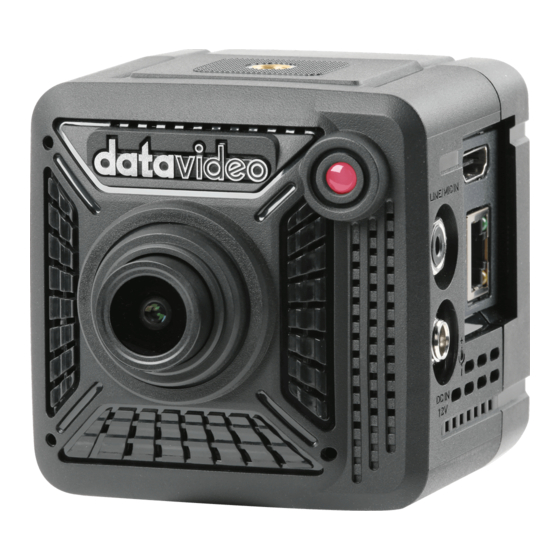
Page 10: Location And Function Of Parts
Twist the lens counter-clockwise: Focus Far Note: The lens you have should be the standard lens mounted on. There are two different camera lenses for the BC-15P including “Standard Lens” and “Wide-angle Lens”. Please refer to the following table for details. - Page 11 This tally LED will light up when it receives a tally signal from a controller which supports the DVIP control protocol. When powering on, the tally LED of the BC-15P will light up in the sequence of orange, green, and red. After that, the tally LED will be off.
- Page 12 “Camera Setting” and “Video Output” for your further configuration. UP-Arrow (Zoom In ) button When the OSD menu of the BC-15P is opened, this button is used as an Up-Arrow key for you to move up the arrow icon on the OSD menu.
- Page 13 Right-Arrow(GAIN+) button When the OSD menu of the BC-15P is opened, this button is used as a Right-Arrow key for you to move to the right side or move to the next page of the OSD menu. When the “Button Shortcut” option in the OSD menu is selected as “On”...
- Page 14 Please use an HDMI cable to connect from this HDMI interface to the HDMI interface of an external monitor or a switcher, and then the real- time screen which is shot by the BC-15P will be shown on the external monitor or the switcher.
- Page 15 This RJ-45 Ethernet interface allows you to transfer PoE(Power over Ethernet), LAN, and DVIP control signals with an RJ-45 Ethernet cable only. This interface allows for PoE, video streaming, and DVIP remote controlling for the BC-15P camera at the same time.
- Page 16 Left Panel of the Camera 1/4-20 UNC Screw Hole This 1/4 UNC screw hole allows you to install an external accessory such as a tripod. Top of the Camera 1/4-20 UNC Screw Hole This 1/4 UNC Screw hole allows you to install an external accessory such as a tripod.
- Page 17 1/4-20 UNC Screw Hole This 1/4 UNC screw hole allows you to install an external accessory such as a tripod.
-
Page 18: Basic Setup
2. Please use three HDMI cables to connect from the HDMI interfaces which are located on the right panel of the three BC-15P cameras to the “VIDEO IN HDMI 1”, “VIDEO IN HDMI 2” and “VIDEO IN HDMI 3” interfaces which are located on the rear panel of the Datavideo ShowCast 100 4K ShowCast Studio respectively. - Page 19 11. Please use an HDMI cable to connect from the “VIDEO OUT PGM 3” HDMI interface to the “HDMI IN” interface which is located on the rear panel of the Datavideo HDR-1 H.264 USB Recorder to do the backup video recording for the “PROGRAM” screen output.
-
Page 20: Osd Menu
The chapter 5 will introduce the OSD menu of the BC-15P camera. OSD menu On-Screen Menu allows the user to modify various camera settings. Please press the “MENU” button which is located on the rear panel of the BC-15P to enter the OSD menu which is shown as below. OSD Menu... - Page 21 R/B Gain Escape Escape Mirror Rotation Lock Escape Anti-Flicker Escape Video Output Escape Video Output Escape...
- Page 22 The table below summarizes the main option items and their sub-options. (the second page). Main Options Network Streaming Audio System Escape Info TS over Camera IP Audio Input Camera Name TCP/UDP RTSP DHCP Soundtrack Language RTMP/ Audio RTMPS Reset IP Standard Preset Escape...
- Page 23 Details of all options in the on-screen menu are listed in the table below. The first page Main Manu Sub Menu Options 1.0X 1.1X 1.2X Zoom 1.3X 1.4X 1.5X 1.6X 1.7X 1.8X 1.9X 2.0X 1.0dB 2.0dB 3.0dB 4.0dB 5.0dB 6.0dB 7.0dB 8.0dB...
- Page 24 1/180 1/210 1/600 1/1200 1/2400 1/4800 1/9000 Escape Auto Indoor Outdoor One-Push 2500K 2600K 2700K 2800K 2900K 3000K 3100K 3200K 3300K 3400K 3500K 3600K Color Temp. 3700K 3800K White Balance 3800K 3900K 4000K Color-Temp. 4100K 4200K 4300K 4400K 4500K 4600K 4700K 4800K 4900K...
- Page 25 5900K 6000K 6100K 6200K 6300K 6400K 6500K 6600K 6700K 6800K 6900K 7000K 7100K 7200K 7300K 7400K 7500K 7600K 7700K 7800K 7900K 8000K 8100K 8200K 8300K 8400K 8500K 8600K R/8700K 8800K 8900K 9000K R/B Gain RGain...
- Page 26 BGain Escape Lock...
- Page 27 Escape Global Center eSport Exposure Lock Manual Escape Contrast Contrast Escape Brightness Brightness Image Setting Escape Saturation Saturation Escape...
- Page 28 Escape Sharpness Sharpness Escape Escape Standard Lens Lens Select eSport Lens Escape Escape Standard Mode1 Gamma Mode Mode2 Mode3 Escape 3D NR Escape Camera Setting Escape Mirror Escape Rotation Escape Anti-Flicker 50HZ 60HZ Escape Escape Video Output 2160 60p Video Output...
- Page 29 2160 59.94p 2160 50p 2160 30p 2160 29.97p 2160 25p 1080 60p 1080 59.94p 1080 50p 1080 30p 1080 29.97p 1080 25p Escape Escape The second page Main Manu Sub Menu Options TS over TCP/UDP RTSP Streaming RTMP/RTMPS Escape Camera IP DHCP Network Info...
- Page 30 Escape Escape BC-15P Camera Name Escape English Traditional Chinese Language Simplified Chinese Escape Preset Default Load User1 Load User2 Preset Save User1 Save User2 Escape Red/Green System Tally Mode Green Escape Button Shortcut Escape Version Update Info Escape Firmware Update...
-
Page 31: Buttons And Rules For Operating The Osd Menu
You can use the up, down, left, right-arrow and the “MENU” buttons for opening the BC-15P OSD menu and for setting related parameters. The related buttons which are located on the rear panel of the BC-15P are shown in the following diagram. - Page 32 5. Left-Arrow button: When the OSD menu is opened, you can press this button to go to the previous page. When the sub-menu is opened and you want to adjust the value of each option, you can press this key to reduce the value (the adjusted value will be shown in blue.)
-
Page 33: Rules For Operating The Osd Menu
In the sub-menu of the OSD menu (for the list of setting items), when you press the “MENU” button which is located on the rear panel of the BC-15P, it means that the change will be saved and then it will go back to the previous page. - Page 34 “Manual” related settings for the last time will be removed. If the “MENU” button which is located on the rear panel of the BC-15P is pressed when the R/B Gain page is shown, the R Gain and B Gain values will be saved simultaneously.
-
Page 35: Selecting And Setting Ways For Options In The Osd Menu
At first, please press the “MENU” button which is located on the rear panel of the BC-15P and then the main screen of the OSD menu which is shown in the following diagram will be shown on the external monitor. There are several... - Page 36 2. After that, please press the MENU” button which is located on the rear panel of the BC-15P to enter the sub-menu which is shown in the following diagram. After that, you can use the “Left-Arrow button” or the “Right-Arrow button”...
- Page 37 This option allows you to adjust the “Gain Limit” of the camera lens for the BC-15P camera. There are several “Current Limit” values for you to select including 1.0dB, 2.0dB, 3.0dB, 4.0dB, 5.0dB, 6.0dB, 7.0dB, 8.0dB, 9.0dB, 10.0dB, 11.0dB, 12.0dB, 13.0dB, 14.0dB,...
- Page 38 2. After that, you can press the “MENU” button which is located on the rear panel of the BC-15P camera to enter the sub-menu which is shown in the following diagram. After that, you can adjust your desired Gain Limit value by the ”Left-Arrow button”...
- Page 39 3. After that, you can press the “MENU” button which is located on the rear panel of the BC-15P camera to enter the sub-menu which is shown in the following diagram. After that, you can adjust your desired Shutter value by the “Left-Arrow button”...
- Page 40 White Balance: This option allows you to adjust the “White Balance” mode of the BC-15P camera. You can use several built-in White Balance modes including Auto, Indoor, Outdoor, One-Push, Color Temp., R/B Gain, and Lock. Moreover, you can select the “Escape” option to go back...
- Page 41 2. After that, you can press the “MENU” button which is located on the rear panel of the BC-15P camera to enter the sub-menu which is shown in the following diagram. After that, you can adjust your desired White Balance mode (Auto, Indoor, Outdoor, and One-push) by the “Up-Arrow button”...
- Page 42 Balance color temperature manually. 3. After the adjustment is done, please press the “MENU” button which is located on the rear panel of the BC-15P to confirm your settings. Moreover, there are two operation reminders for the OSD menu including “Move” and “Set”...
- Page 43 6. Please press the “MENU” button which is located on the rear panel of the BC-15P to confirm and save the selected value and then go back to the main menu of the OSD Menu. Moreover, you can select the “Escape” option...
- Page 44 BC-15P to enter the sub-menu of the “White Balance” option. 3. Please use the “Up-Arrow button” or the “Down-Arrow button” which is located on the rear panel of the BC-15P to select the “R/B Gain” option. 4. Please press the “MENU” button to enter the “R/B Gain” sub-menu.
- Page 45 7. Please press the “MENU” button which is located on the rear panel of the BC-15P camera to confirm and save the selected value and to go back to the main menu of the OSD menu. Moreover, you can select the “Escape” option...
- Page 46 4. Please press the “MENU” button which is located on the rear panel of the BC-15P camera to confirm and save the selected value and to go back to the main menu of the OSD menu. 5. Please press the “MENU” button which is located on the rear panel of the BC-15P camera to enter the sub-menu of the “White Balance”...
- Page 47 7. Please press the “MENU” button which is located on the rear panel of the BC-15P camera to confirm and save the selected value and to go back to the main menu of the OSD menu. 8. Please press the “MENU” button which is located on the rear panel of the BC-15P camera to enter the sub-menu of the “White Balance”...
- Page 48 “Escape” option. After that, please press the “MENU” button which is located on the rear panel of the BC-15P camera to go back to the main menu of the OSD menu. Exposure: This option allows you to select your desired Exposure mode.
- Page 49 “Exposure” mode. 4. Please press the “MENU” button which is located on the rear panel of the BC-15P camera to confirm and save the selected value and to go back to the main menu of the OSD menu.
- Page 50 BC-15P to enter the sub-menu of that option. 5. Please use the “Left-Arrow button” or the “Right-Arrow button” which is located on the rear panel of the BC-15P camera to adjust your desired value.
- Page 51 6. Please press the “MENU” button which is located on the rear panel of the BC-15P to confirm and save the selected value and to go back to the “Image Setting” page. After that, please select the “Escape” option and then press the “MENU”...
- Page 52 6. Please press the “MENU” button which is located on the rear panel of the BC-15P camera to confirm and save the selected value and to go back to the “Camera Setting” page. If you don’t want to change the camera lens selection, you can select the...
- Page 54 OSD menu to enter the sub-menu of that option. 3. Please use the “Up-Arrow button” or the “Down-Arrow button” which is located on the rear panel of the BC-15P to select the “AGC” option. 4. Please press the “MENU” button which is located on the rear panel of the BC-15P to enter the sub-menu of that option.
- Page 55 “Mode2” and “Mode3” for you to select. 1. Please select the “Camera Setting” from the main menu of the OSD menu. 2. Please press the “MENU” button which is located on the rear panel of the BC-15P camera to enter the sub-menu of that option.
- Page 56 6. Please press the “MENU” button which is located on the rear panel of the BC-15P camera to confirm and save the selected value and to go back to the “Camera Setting” page. If you don’t want to change the setting, you can select the “Escape” option to...
- Page 57 BC-15P camera to enter the sub-menu of that option. 3. Please use the “Up-Arrow button” or the “Down-Arrow button” which is located on the rear panel of the BC-15P camera to select the “3DNR” option.
- Page 58 BC-15P camera to enter the sub-menu of that option. 5. Please use the “Up-Arrow button” or the “Down-Arrow button” which is located on the rear panel of the BC-15P camera to select the “On” or “Off” option. 6. Please press the “MENU” button...
- Page 59 BC-15P camera to enter the sub-menu of that option. 5. Please use the “Up-Arrow button” or the “Down-Arrow button” which is located on the rear panel of the BC-15P camera to select the “On” or “Off” option.
- Page 60 6. Please press the “MENU” button which is located on the rear panel of the BC-15P camera to confirm and save the selected value and to go back to the “Camera Setting” page. If you don’t want to change the setting, you can select the “Escape” option to...
- Page 61 BC-15P camera to enter the sub-menu of that option. 5. Please use the “Up-Arrow button” or the “Down-Arrow button” which is located on the rear panel of the BC-15P camera to select the “Off”, ”H”, ”V” or “H+V” option. 6. Please press the “MENU” button...
- Page 62 BC-15P camera to enter the sub-menu of that option. 3. Please use the “Up-Arrow button” or the “Down-Arrow button” which is located on the rear panel of the BC-15P camera to select the “Mirror” option.
- Page 63 BC-15P camera to enter the sub-menu of that option. 5. Please use the “Up-Arrow button” or the “Down-Arrow button” which is located on the rear panel of the BC-15P camera to select the “Off”, “H”, “V” or “H+V” option. 6. Please press the “MENU” button...
- Page 64 BC-15P camera to enter the sub-menu of that option. 5. Please use the “Up-Arrow button” or the “Down-Arrow button” which is located on the rear panel of the BC-15P camera to select the “Off”, “50Hz”, or “60Hz” option.
- Page 65 6. Please press the “MENU” button which is located on the rear panel of the BC-15P camera to confirm and save the selected value and to go back to the “Camera Setting” page. If you don’t want to change the setting, you can select the “Escape” option to...
- Page 66 When your desired resolution is selected, please press the “MENU” button which is located on the rear panel of the BC-15P to confirm and apply the selected output resolution and to go back to the main menu of the OSD menu.
- Page 67 Escape: Please use the “Up-Arrow button” or the “Down-Arrow button” to select the “Escape” option, and then please press the “MENU” button which is located on the rear panel of the BC-15P camera to exit the first page of the main menu for the OSD menu.
-
Page 68: The Second Page Of The Osd Menu
“Left-Arrow button” which is located on the rear panel of the BC-15P camera to jump back to the first page of the OSD menu. Please see the following section for the introduction of the related options for the second page of the OSD menu. - Page 69 7. Please use the “Up-Arrow button” or the “Down-Arrow button” which is located on the rear panel of the BC-15P camera to select the “Line In” or the “Mic In” option. 8. When your desired option is selected, please press the “MENU” button...
- Page 70 2. Please press the “Right-Arrow button” which is located on the rear panel of the BC-15P camera when the first page of the OSD menu is shown and then you can jump to the second page of the OSD menu.
- Page 71 If you don’t want to change the setting, you can select the “Escape” option, and then please press the “MENU” button which is located on the rear panel of the BC-15P camera to go back to the previous layer of the OSD menu.
- Page 72 Audio Standard: This option allows you to select the audio standard for the output audio signal to be “EBU” or “SMPTE”. 1. Please press the “MENU” button which is located on the rear panel of the BC-15P camera to open the main menu of the OSD menu.
- Page 73 7. Please use the “Up-Arrow button” or the “Down-Arrow button” which is located on the rear panel of the BC-15P camera to select the “Stereo” or the “Mono” option. 8. When your desired option is selected, please press the “MENU” button...
- Page 74 Escape: Please press the “MENU” button which is located on the rear panel of the BC-15P camera to go back to the main menu of the OSD menu. System: This option allows you to set several parameters including “Camera Name”, “Language”, “Preset”, “Tally Mode”, “Button Shortcut”,...
- Page 75 3. Please press the “Right-Arrow button” which is located on the rear panel of the BC-15P when the first page of the OSD menu is shown and then you can jump to the second page of the OSD menu. 4. Please use the “Up-Arrow button” or the “Down-Arrow button”...
- Page 76 9. Please press the “MENU” button which is located on the rear panel of the BC-15P camera for saving the preset for the “User1”.
- Page 77 BC-15P camera to enter the sub-menu of that option. 8. Please use the “Up-Arrow button” or the “Down-Arrow button” which is located on the rear panel of the BC-15P camera to select the “Load User1” option. 9. Please press the “MENU” button which is located on the rear panel of the BC-15P camera and then the “Yes/No”...
- Page 78 10. Please use the “Up-Arrow button” or the “Down-Arrow button” select the “Yes” option. After that, please press the “MENU” button which is located on the rear panel of the BC-15P and then the preset of “User1” will be loaded, and the BC-15P camera will be rebooted automatically.
- Page 79 “Button Shortcut” function. If this option is set as “On”, you can use the “Up & Down-Arrows/Left & Right Arrows buttons which are located on the rear panel of the BC-15P camera for Zooming In(T+), Zooming Out(W-), increasing Gain value(GAIN+) and decreasing...
- Page 80 7. Please use the “Up-Arrow button” or the “Down-Arrow button” which is located on the rear panel of the BC-15P camera to select the “On” option. 8. Please press the “MENU” button which is located on the rear panel of the BC-15P camera for confirmation, and then the “Button Shortcut”...
- Page 81 Arrow button” or the “Down-Arrow button” which is located on the rear panel of the BC-15P camera to select the “Off” option, and then please press the “MENU” button which is located on the rear panel of the BC-15P for...
- Page 82 2. Please press the “Right-Arrow button” which is located on the rear panel of the BC-15P when the first page of the OSD menu is shown and then you can jump to the second page of the OSD menu. 3. Please use the “Up-Arrow button” or the “Down-Arrow button”...
- Page 83 7. Please use the “Up-Arrow button” or the “Down-Arrow button” which is located on the rear panel of the BC-15P camera to select the “Yes” option. 8. Please press the “MENU” button which is located on the rear panel of the BC-15P camera and then the BC-15P will be reset to its factory default value and then the BC-15P camera will reboot automatically.
- Page 84 OSD menu. 1. Please use the “Up-Arrow button” or the “Down-Arrow button” which is located on the rear panel of the BC-15P camera to select the “Escape” option. 2. Please press the “MENU” button which is located on the rear panel of...
-
Page 85: Application Of The White Balance Modes And Special Function Introduction
Application of the White Balance Modes and Special Function Introduction 7.1 Introduction of the White Balance Modes Indoor: Use tungsten iodine or incandescent light as the main lighting source for indoor video shooting. When the sun is rising or the sun is about to set, the color temperature of the sun is close to 3200K. - Page 86 For using color matching fluorescent lights as the main lighting source to do the indoor video shooting. Auto:The “Auto” White Balance mode is a way that the camcorder will adjust the White Balance value automatically when the lighting source or the lighting condition is changed.
-
Page 87: Introduction For Special Functions
7.2 Introduction for special functions AGC: The brightness increase function (Gain) will be adjusted automatically to the selected upper limit. Please pay attention that if the Gain value is higher, it is suitable for using in the darker scenario. However, the noise will also be increased. If the Gain value is set in a lower value, the noise will be decreased, but the shutter speed will become slower to compensate the insufficient lighting. -
Page 88: Firmware Update
BC-15P camera. 4. Please connect an RJ-45 Ethernet cable from the RJ-45 Ethernet interface which is located on the right panel of the BC-15P camera to the RJ-45 Ethernet interface of your laptop or PC. - Page 89 7. Please press the right-arrow button which is located on the rear panel of the BC-15P to go to the next page of the OSD menu. After that, you can see the default IP address from the “Network Info” option, which is “192.168.100.115”.
- Page 90 8. Please set the IP address of your laptop or PC to be within the same LAN as the BC-15P. After that, please press the “OK” button. 9. Please use the down-arrow button which is located on the rear panel of the BC-15P to select the “System”...
- Page 91 11. Please use the down-arrow button which is located on the rear panel of the BC-15P to select the “Firmware” option. 12. Please press the “MENU” button which is located on the rear panel of the BC-15P to enter the sub-menu of the “Firmware” option.
- Page 92 BC-15P to enter the sub-menu of the “Update” option. After that. Please select the “Yes” option. 15. Please open the BC-15P Firmware Update tool and then please enter the IP address of your BC-15P. In this example, the IP address is “192.168.1.220...
- Page 93 16. Please press the “Select BC-15P Firmware” button to select the downloaded latest BC-15P firmware from the hard disk of your laptop or PC. 17. Please press the “Send” button. 18. After the latest firmware is sent, you can see the screen which is shown in the following diagram.
- Page 94 BC-15P camera. 4. Please connect an RJ-45 Ethernet cable from the RJ-45 Ethernet interface which is located on the right panel of the BC-15P camera to the first LAN interface of your router.
- Page 95 8. Please press the “MENU” button which is located on the rear panel of the BC-15P to open the OSD menu. 9. Please press the right-arrow button which is located on the rear panel of the BC-15P to go to the next page of the OSD menu.
- Page 96 BC-15P to select the “System” option. 11. Please press the “MENU” button which is located on the rear panel of the BC-15P to enter the sub-menu of the “System” option. 12. Please use the down-arrow button which is located on the rear panel of...
- Page 97 14. Please use the down-arrow button which is located on the rear panel of the BC-15P to select the “Update” option. 15. Please press the “MENU” button which is located on the rear panel of the BC-15P to enter the sub-menu of the “Update” option. After that. Please select the “Yes” option.
- Page 98 16. Please open the BC-15P Firmware Update tool and then please enter the IP address of your BC-15P. In this example, the IP address is “192.168.1.220 17. Please press the “Select BC-15P Firmware” button to select the downloaded latest BC-15P firmware from the hard disk of your laptop or PC.
- Page 99 18. Please press the “Send” button. 19. After the latest firmware is sent, you can see the screen which is shown in the following diagram. Please wait for a moment. After the firmware update is finished, the BC-15P will reboot automatically.
-
Page 100: Frequently-Asked Questions
Frequently-Asked Questions This section describes problems that you may encounter while using BC-15P. If you have any questions, please refer to related sections and follow all suggested solutions. If the problem still exists, please contact your distributor or the service center. - Page 101 10. Dimensions Unit:mm...
- Page 102 11. Specifications Camera Parameters Product Model BC-15P Product Name 4K POV Camera Video 2160p 60/59.94/50/30/29.97/25 Format/Resolution 1080p 60/59.94/50/30/29.97/25 Image Sensor 1/2.3" CMOS Effective 12.3Mega Pixels Pixels(approx.) S/N Ratio 50 dB Min. Illumination 0.5Lux (F1.0, AGC ON) 1/25(1/30), 1/50(1/60), 1/75(1/90), 1/100(1/120),...
- Page 103 HDMI 2.0 x1 Video Output RJ45 x1 Audio Input 3.5mm Line in/Mic in (Stereo) Tally LED Dual Color (Red, Green) Lens Filter IR cut built-in Control Protocol DVIP Remote Control RJ-45: for IP control (DVIP) Interface Video Compression H.264, H.265, Dual stream output Format Audio Compression Format...
- Page 104 F/W Update Ethernet Camera Control Unit RMC-300 series/PTZ View Assist APP Tripod Mount 1/4-20 UNC Color Black Dimension (LxWxH) 77mm (W) x 82mm (D) x 78mm (H) Weight 200g Operating Temp. 0~40 °C Range Power DC 7-15V 9W...
- Page 105 Note...
- Page 106 Note...
- Page 107 Note...
- Page 108 Datavideo Technologies Co., Ltd. All rights reserved 2020 Jun.-10 2022 Ver::E1...
Need help?
Do you have a question about the BC-15P and is the answer not in the manual?
Questions and answers