Table of Contents
Advertisement
Quick Links
Advertisement
Table of Contents

Related Manuals for Datavideo BC-15PN


Summary of Contents for Datavideo BC-15PN
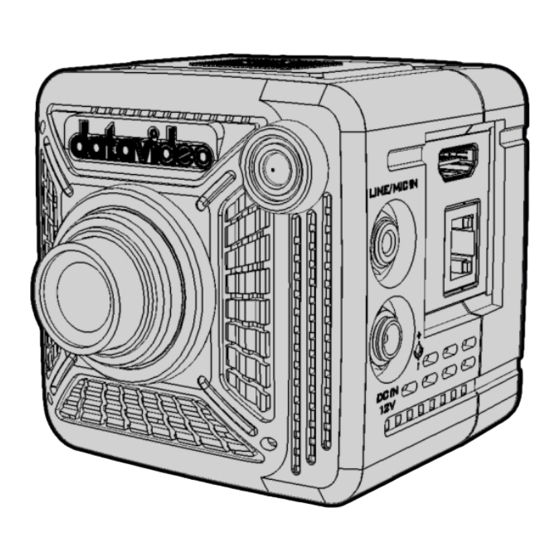
- Page 1 4K POV CAMERA/4K POV NDI CAMERA BC-15P/BC-15PN...
-
Page 2: Table Of Contents
Table of Contents TABLE OF CONTENTS ..................2 FCC COMPLIANCE STATEMENT ..............6 WARNINGS AND PRECAUTIONS ..............6 WARRANTY ....................8 ..................8 TANDARD ARRANTY ..................8 HREE ARRANTY DISPOSAL ...................... 9 PRODUCT OVERVIEW ................10 ......................10 EATURES SYSTEM DIAGRAM ................11 LOCATION AND FUNCTION OF PARTS .......... - Page 3 Audio Standard ..................48 ......................49 YSTEM Camera Name ..................49 Language ....................50 Preset ....................... 50 Tally Mode ....................51 Button Shortcut ..................52 Firmware ....................52 Factory Default ..................53 HOW TO CONTROL THE BC-15P/BC-15PN BY THE BC VIEW ASSIST APP...
- Page 4 BC V ..........74 SSIST AMERA NTRODUCTION HOW TO VIEW BC-15PN IMAGES WITH NDI STUDIO MONITOR ..77 HOW TO STREAM BC-15P/BC-15PN IMAGE TO THE STREAMING PLATFORMS (YOUTUBE AND FACEBOOK AS EXAMPLES) ......80 ................80 OW TO TREAM TO OUTUBE ................
- Page 5 Disclaimer of Product and Services The information offered in this instruction manual is intended as a guide only. At all times, Datavideo Technologies will try to give correct, complete and suitable information. However, Datavideo Technologies cannot exclude that some information in this manual, from time to time, may not be correct or may be incomplete.
-
Page 6: Fcc Compliance Statement
7. This product should only be operated from the type of power source indicated on the marking label of the AC adapter. If you are not sure of the type of power available, consult your Datavideo dealer or your local power company. - Page 7 9. If an extension cord must be used with this unit, make sure that the total of the ampere ratings on the products plugged into the extension cord do not exceed the extension cord’s rating. 10. Make sure that the total amperes of all the units that are plugged into a single wall outlet do not exceed 15 amperes.
-
Page 8: Warranty
Warranty Standard Warranty Datavideo equipment are guaranteed against any manufacturing defects for one year from the date of purchase. The original purchase invoice or other documentary evidence should be supplied at the time of any request for repair under warranty. -
Page 9: Disposal
The three-year warranty must be registered on Datavideo's official website or with your local Datavideo office or one of its authorized distributors within 30 days of purchase. Disposal For EU Customers only - WEEE Marking This symbol on the product or on its packaging indicates that this product must not be disposed of with your other household waste. -
Page 10: Product Overview
(PoE) are carried on a single Ethernet cable, so that system setup is easy and fast. The three 1/4-20 UNC screw holes add greater versatility to hardware installation. The only difference between the BC-15P and BC-15PN is that the BC-15PN supports the NDI protocol and other specifications of the BC-15PN are the same as the BC-15P. -
Page 11: System Diagram
2. System Diagram... -
Page 12: Location And Function Of Parts
The lens focus can only be adjusted manually by physically rotating the lens. Rotate the lens clockwise to focus near and counter-clockwise to focus far. The BC-15P/BC-15PN offers Standard Lens and Wide-Angle Lens. See the table below for differences between the two. Standard Lens... - Page 13 The tally LED will turn on upon receiving a tally signal from a DVIP controller. During initialization, you will see the tally LED colors in the sequence of orange, green and red. The tally LED should turn off after initialized. Rear of Camera (BC-15P) Rear of Camera (BC-15PN)
- Page 14 MENU button Press the MENU key to open the OSD menu on the connected monitor. Once the OSD menu is opened, use the MENU key to confirm a selection. UP-Arrow (Zoom In) button Press the up arrow key to move up the OSD menu. When the Button Shortcut is enabled and the OSD menu is shut down, press this key to zoom in.
- Page 15 Press the left arrow key to return to the previous page of the OSD menu or decrease the value of a parameter. When the Button Shortcut is enabled and the OSD menu is shut down, press this key to decrease the gain. Right Panel of the Camera (BC-15P) Right Panel of the Camera (BC-15PN)
- Page 16 Use an HDMI cable to connect an external monitor or switcher to display the camera image. POE/LAN/DVIP(BC-15P) DVIP/LAN/POE/ NDI®|HX (BC-15PN) Use an Ethernet cable to connect the camera to a network for video streaming or firmware update. You can also connect DVIP devices such as a camera controller.
- Page 17 1/4-20 UNC Screw Hole The 1/4-20 UNC screw hole allows you to secure the camera on mounting devices such as a tripod. Top of the Camera 1/4-20 UNC Screw Hole The 1/4-20 UNC screw hole allows you to secure the camera on mounting devices such as a tripod.
- Page 18 1/4-20 UNC Screw Hole The 1/4-20 UNC screw hole allows you to secure the camera on mounting devices such as a tripod.
-
Page 19: Basic Setup(Take Bc-15P As An Example)
4. Basic Setup(Take BC-15P as an example) Power-On Connect the DC 12V power adapter to the DC IN socket. Connect the DC 12 V power adapter Video Output Connect HDMI devices such as TLM series monitors, ShowCast 100, iCast 10NDI, and HDR-80/90. -
Page 20: Audio Output
Via an HDMI cable, the HDMI interface will then be able to deliver the camera image to an HDMI display such as an HDMI monitor (TLM series monitors), a switcher (ShowCast 100/iCast 10NDI) or a recorder (HDR-80/90). OSD MENU Video Output for setting the camera video resolution. -
Page 21: Ethernet Port
Ethernet Port Connect the POE/LAN/DVIP port to a router. Connect the Ethernet interface to a router. The IP address can be found in Network of the OSD menu. -
Page 22: Osd Menu
5. OSD menu Chapter 5 describes the OSD menu. Most of the OSD menus of BC-15P and BC- 15PN are the same, the only difference is that BC-15PN has "Stream/NDI" switching option, while BC-15P does not have "Stream/NDI" switching option. - Page 23 The table below summarizes the main options and their sub-options. Main Options Video Gain White Image Camera Zoom Shutter Exposure Streaming Network Audio System Escape Limit Balance Setting Setting Output Lens Video Audio Camera Zoom Gain Limit Shutter Auto Global Contrast DHCP Select...
- Page 24 Details of the OSD menu options are listed in the table below. Main Menu Sub Menu Options Descriptions 1.0X (no zoom) 1.1X 1.2X 1.3X New setting will be applied 1.4X Zoom without having to press the 1.5X Zoom menu key. 1.6X 1.7X 1.8X...
- Page 25 1/180 1/150 1/210 1/200 1/600 1/500 1/1200 1/1000 1/2400 1/2000 1/4800 1/4000 1/9000 1/8000 Escape Auto Indoor Outdoor One-Push 3000K 3100K 3200K 3300K 3400K 3500K 3600K 3700K 3800K 3900K 4000K 4100K 4200K 4300K 4400K 4500K 4600K White 4700K Manually configured color Balance 4800K temperature will be...
- Page 26 6900K 7000K 7100K 7200K 7300K 7400K 7500K Escape New setting can be previewed on the monitor and will be applied only after pressing the menu key. Please note that R Gain will RGain 0-255 be applied along with B Gain. Manually configured R Gain will be overridden when white balance mode is set to...
- Page 27 Escape New setting can be previewed on the monitor Brightness and will be applied only after Brightness pressing the menu key. Escape New setting can be previewed on the monitor Saturation and will be applied only after Saturation pressing the menu key. Escape New setting can be previewed on the monitor...
- Page 28 2160 29.97p 2160 25p Video Video Output 1080 60p Output 1080 59.94p 1080 50p 1080 30p 1080 29.97p 1080 25p Escape This "Streaming" mode is only applicable to BC-15PN, Streaming not BC-15P. If in Streaming mode, press "Switch to NDI",...
- Page 29 Escape Line IN Audio Input Mic IN Escape Stereo Soundtrack Mono Audio Escape SMPTE Audio Standard Escape Escape BC-15P/BC-15PN Camera Name Escape English Traditional Chinese Language Simplified Chinese Escape Preset Default System Load User1 Load User2 Preset Save User1 Save User2...
-
Page 30: Zoom
Red/Green Escape Button Shortcut Escape Version Firmware Update Escape Factory Default Escape Escape Zoom A digital zoom is when a camera recreates the effect of zooming in with a lens by capturing the image from an increasingly smaller area of the camera’s sensor, and then blowing up that image to the regular size. -
Page 31: Shutter
For example, 1/4 means a quarter of a second, while 1/250 means one-two-hundred-and-fiftieth of a second (or four milliseconds). BC-15P/BC-15PN offers NTSC and PAL speeds, sorted by the following NTSC: 1/30, 1/60, 1/90, 1/120, 1/150, 1/180, 1/210, 1/600, 1/1200, 1/2400, 1/4800 and 1/9000. -
Page 32: White Balance
Certain light conditions can cause discoloration of your image. White balance allows you to adjust the color balance in order to produce the best image quality. The BC-15P/BC-15PN offers auto and manual modes for white balance adjustment. Various modes will be described in this section. -
Page 33: Auto
Auto If Auto is selected, the most accurate colors will be selected automatically for the current scene. The white balance will be adjusted automatically when lighting conditions change. Auto is the most recommended mode for most situations or when you have to move frequently between different scenes. Note: Select “Lock”... -
Page 34: One-Push
One-push The one-push mode, when selected, adjusts the white balance once according to the ambient light. If the lighting condition changes, you will need to recalibrate the white balance setting by selecting the one-push mode again. Color Temperature Set the color temperature to manually adjust the white balance setting. See the table below for color temperatures of the corresponding light sources: Lighting Source Color Temperature Value... -
Page 35: Lock
Lock In Auto mode, you can select “Lock” to fix the white balance setting after the most accurate colors have been selected for the current scene. Follow the procedure below to lock the current white balance setting in Auto mode: Open OSD menu, then select White Balance ... -
Page 36: Exposure
The current white balance setting is locked when Auto mode appears as Auto Lock as shown below. To re-enable Auto mode, simply select Unlock. Exposure The Exposure basically controls the amount of light that reaches the camera sensor. You can allow the camera to adjust the exposure automatically or do it manually. -
Page 37: Image Setting
Image Setting BC-15P/BC-15PN allows you to adjust the following image parameters: - Contrast: 0/1/2/3/4/5/6/7/8/9/10 - Brightness: 0/1/2/3/4/5/6/7/8/9/10 - Saturation: 0/1/2/3/4/5/6/7/8/9/10 - Hue: 0/1/2/3/4/5/6/7/8/9/10 - Sharpness: 0/1/2/3/4/5/6/7/8/9/10 Note: New setting can be previewed on the monitor and will be applied only after pressing the menu key. -
Page 38: Lens Select
Lens Select Depending on the lens used, you can either select Standard or eSport (wide angle) lens. Automatic Gain Control or AGC, when turned on, allows the camera to automatically boost the image received so that objects can be seen more clearly. -
Page 39: Gamma Mode
Gamma Mode The gamma modes include Standard, Mode1, Mode2 and Mode3. 3DNR 3DNR stands for 3D Noise Reduction. Enable to remove image noise from the camera video. -
Page 40: Wdr
WDR, short for Wide Dynamic Range, refers to high dynamic range imaging. Enable WDR to improve your image quality. Mirror Use the mirror function to flip your video. With horizontal mirror, you create a mirror image of the original clip so what’s on the left will appear on the right. With vertical mirror, the video appears upside down. -
Page 41: Rotation
Rotation You can rotate your video by 90 or 270 degrees. 0 means no rotation. Anti-Flicker BC-15P/BC-15PN's anti-flicker mode has been designed to work with light flicker occurring at 50Hz and 60Hz frequencies. -
Page 42: Video Output
Streaming If your camera is a BC-15 PN, this "Streaming" option allows you to switch between normal streaming mode and NDI mode. If your BC-15PN camera is in Normal Streaming Mode, use "StreamingSwitch to NDI" to switch your camera to NDI Mode. If your BC-15PN camera is in NDI mode, utilize "StreamingSwitch Off NDI"... - Page 43 BC-15PN, not the BC-15P. If your camera is a BC-15P, use "StreamingOn" to start the push stream or "StreamingOff" to stop the push stream. BC-15P BC-15PN...
-
Page 44: Network
Network The Network option allows you to set several network related parameters. The factory default value for the BC-15P/BC-15PN is DHCP ON. If you set the DHCP to OFF, and then the BC-15P/BC-15PN’s static IP address will be 192.168.100.100. Moreover, you can set several parameters manually including NetMask, Gateway, DNS1 and DNS2. -
Page 45: Netmask
NetMask This option allows you to adjust the “NetMask” address. If the DHCP is turned “Off”, you can adjust the “NetMask” address manually. Gateway This option allows you to adjust the “Gateway” address. If the DHCP is turned “Off”, you can adjust the “Gateway” address manually. -
Page 46: Dns1
DNS1 This option allows you to adjust the DNS 1 address. If the DHCP is turned off, you can adjust this option manually. DNS2 This option allows you to adjust the DNS2 address. If the DHCP is turned off, and then you can adjust the DNS2 address manually. -
Page 47: Reset
Audio In the Audio menu, you can select the audio input, set the output audio format and audio standard, here is an example of the BC-15PN interface. * Note that the BC-15P/PN needs to be restarted after adjusting the sound settings, and do not change the sound settings while streaming (you must stop streaming first). -
Page 48: Audio Input
Audio Input You can either select “Mic In” or “Line In” as the audio input. Soundtrack Set the output audio format to either “Stereo” or “Mono”. Audio Standard The audio standard options are EBU or SMPTE. -
Page 49: System
System System parameters include Camera Name, Language, Preset, Tally Mode, Button Shortcut, Firmware and Factory Default. The following is an example of the BC-15P. Camera Name This option can show the camera name which is set by you. -
Page 50: Language
Currently not available. Preset BC-15P/BC-15PN provides two presets for saving camera settings. These presets can be loaded for later use. They allow you to quickly apply a set of camera settings, which is useful when switching between different setups or environments. -
Page 51: Tally Mode
Select Preset Default to restore the preset defaults. Please note that only default settings related to Streaming, Network, Audio and System will be restored. Tally Mode This option allows you to select different Tally modes including “Off”, “Red”, “Green” and “Red/Green”. -
Page 52: Button Shortcut
Button Shortcut You are allowed to enable the button shortcuts. Once the button shortcuts are enabled, you can press the left and right arrow keys to increase and decrease the gain respectively. Press the up arrow key to zoom in and down arrow key to zoom out. This chapter takes the BC-15P as an example. -
Page 53: Factory Default
Factory Default Select Factory Default to reset the camera to its default values except Video Output, Audio Standard and Language. The camera needs to be rebooted to complete the system reset. -
Page 54: How To Control The Bc-15P/Bc-15Pn By The Bc View Assist App
6. How to Control the BC-15P/BC-15PN by the BC View Assist App The BC View Assist app is developed by Datavideo for you to control the BC- 15P/BC-15PN by using mobile device such as handset or tablet. For the details of the BC View Assist app, please refer to the following section. - Page 55 4. Please turn on the Wi-Fi switch of your handset, and then please select the Wi-Fi signal which is sent by the router which is connected by your BC-15P/BC- 15PN camera. In this section, we will take “ASUS_D8_5G” as an example. - Please tap the “ASUS_D8_5G”...
- Page 56 7. After the following diagram is shown, it means that your BC-15P/BC-15PN camera is found successfully. Please check the checkbox next to the BC- 15P/BC-15PN and then press the “OK” button. 8. You can see that your BC-15P/BC-15PN is connected successfully which is shown in the following diagram.
-
Page 57: Introduction Of The Bc View Assist App Main Interface
First page of the main Second page of the main interface interface 1. Video Output This option can show the current resolution setting of yours BC-15P/BC-15PN. For details, please refer to Video Output section in Chapter 5. -
Page 58: Preview Screen
2. Preview Screen This preview screen can show the real-time screen which is shot by your BC- 15P/BC-15PN. Please refer to "9. How to Use BC View Assist to View Images from the BC-15P/PN". 3. Zoom This “Zoom” option allows you to adjust the “Zoom” ratio of the BC-15P/BC- 15PN. -
Page 59: Shutter
5. Shutter Please use this option to adjust the Shutter Speed. Please tap the “Shutter” icon, and then adjust your desired value by using the left and right button or the slider on the screen. For details, please refer to Shutter section in Chapter 6. -
Page 60: Exposure
7. Exposure Please tap this option and then choose your desired Exposure mode. For details, please refer to Exposure section in Chapter 5. 8. Contrast Please use this option to adjust the Contrast. Please tap the “Contrast” icon, and then adjust your desired value by using the left and right button or the slider on the screen. -
Page 61: Brightness
9. Brightness Please use this option to adjust the Brightness. Please tap the “Brightness” icon, and then adjust your desired value by using the left and right button or the slider on the screen. For details, please refer to Image Setting section in Chapter 5. -
Page 62: Camera Name
13. Camera Name This “Camera Name” shows the camera name that is set for the BC-15P/BC- 15PN in “Menu>Camera>Camera Name”. 14. Stream In this section, it will show the streaming situation which is set in “Menu>Stream>Main Stream”. 15. Menu Button After pressing this “Menu”... -
Page 63: Menu Introduction Of The Bc View Assist App
After the BC View Assist App is connected successfully, you can enter the Menu from “Camera List” After your BC View Assist app and the BC-15P/BC-15PN is connected successfully, you can see the screen below. Please press the pencil icon which is located at the top side and then please press the pencil icon which is located in the camera icon frame. - Page 64 After the BC View Assist App is connected successfully, you can press the “Menu” button from the main interface to enter the “Menu” interface After entering into the Menu, you can see the main interface of the “Menu” which is shown in the following diagram. There are several options including “Camera”, “Encoder”, “Stream”, “Audio”...
-
Page 65: Camera
Please press the “Camera” option and then you can see the camera menu which is shown in the following diagram. 1. Model: This column shows BC-15P/BC-15PN. 2. Camera Name: This column shows the camera that is set by yourself. If you want to modify the camera name, please tap this column once to enter the “Camera Name”... - Page 66 4. Preset: Please tap this column to enter the “Preset” interface which is shown in the following diagram. After the desired preset values for the BC- 15P/BC-15PN are set, please press “Save User 1/Save User 2” for saving the preset settings. Please tap “Load User 1/Load User 2” to load the pre-saved settings.
- Page 67 5. Lens Select: Please tap this option to select “Standard” or “eSport” camera lens. 6. 3D NR: This option allows you to turn on/turn off the 3D NR function. 7. WDR: This option allows you to turn on /turn off the WDR function. 8.
- Page 68 10. Tally Mode: Please tap this option to enter the “Tally Mode” interface to select different Tally Modes. 11. Anti Flicker: Please press this option to select “50Hz” or “60Hz” to eliminate the influence from different lighting flickering frequency. 12. Firmware version: This option allows you to see the current firmware version.
-
Page 69: Encoder
13. Factory Default: Please tap this option and then press the “Yes” button to resume your BC-15P/BC-15PN to its factory default. Encoder After entering the “Encoder” option from the “Menu” page, you can see the menu “Main Encoder” which is shown in the following diagram. -
Page 70: Stream
You can also select "OFF" to turn off "Main Stream". There are NDI/SRT/RTMP/RTMPS/PVW for you to choose. Please note that if you select NDI mode or PVW mode, the BC-15PN will reboot automatically when you press "Start Stream" or "Stop Stream", but it... - Page 71 In the "Stream Type" option, you can click "SRT", "RTMP(S)" and "NDI" options to set the parameters of different stream types. SRT: Allows you to set parameters such as "SRT Port", "SRT URL", "Stream ID" and "Latency". RTMP(S): Allows you to set the "RTMP URL" and "Stream Key" obtained from the streaming platform as well as your "Account"...
-
Page 72: Audio
NDI: This option does not need to be set. Audio Please tap “Menu>Audio” to enter the “Audio” interface which is shown in the following diagram. Please press “Audio Input” option to select your desired way for audio input. There are several ways including “Line In (Stereo)”, “Mic In (Stereo)”, “Line In (Mono)”... -
Page 73: Network
However, if the BC- 15P/BC-15PN is set as “DHCP OFF”, users need to fill in each network related parameter manually by themselves. The factory default static IP address for... -
Page 74: Bc View Assist App Camera List Introduction
BC View Assist App Camera List Introduction When the BC View Assist App is connected to the BC-15P/BC-15PN successfully, you can see the “Camera List” interface which is shown in the... - Page 75 1. Add Camera: Please tap this button to select “Scan In Network” to search the BC-15P/BC-15PN camera which is connected in the same IP range automatically. Moreover, you can tap “Add Manually” to add new camera by entering BC-15P/BC-15PN’s static IP address.
- Page 76 “ON”, it will scan all of the BC-15/BC-15P cameras which are connected within the same IP range once the app is opened. 4. Please tap the camera icon directly to enter the preview window of the screen which is shot by the BC-15P/BC-15PN.
-
Page 77: How To View Bc-15Pn Images With Ndi Studio Monitor
Studio Monitor You can also view the camera image on NDI Studio Monitor. Please follow the steps below to view the image of BC-15PN on NDI Studio Monitor. 1. The BC-15PN is defaulted to DHCP ON, please make sure your BC-15PN is connected to your router with an RJ-45 Ethernet cable. - Page 78 6. After the Studio Monitor is turned on, please click the button on the upper left corner and select the detected BC-15PN camera IP address to see the footage captured by the BC-15PN as NDI streaming on your laptop or...
- Page 79 Note: If you encounter problems installing or using NDI Studio Monitor, please visit NewTek's official NDI website(https://www.ndi.tv/) or contact NewTek's technical support team.
-
Page 80: How To Stream Bc-15P/Bc-15Pn Image To The Streaming Platforms (Youtube And Facebook As Examples)
15P/BC-15PN to the streaming platforms. How to Stream to Youtube 1. At first, please connect your BC-15P/BC-15PN to a router by an RJ-45 Ethernet cable, and then please confirm that another Ethernet cable which is connected to the public network is connected to the WAN interface of the router. -
Page 81: How To Stream To Facebook
Youtube into the “RTMP Setting>RTMP URL” and “RTMP Setting>Stream Key” respectively. 6. Finally, please go to “Menu>Stream” page and then click the “Start Stream” button, the image which is shot by the BC-15P/BC-15PN will be streamed to Youtube platform successfully. How to Stream to Facebook 1. - Page 82 “Server URL” and “Stream key” which are copied from Facebook into the “RTMP Setting>RTMP URL” and “RTMP Setting>Stream Key” respectively. 7. Finally, please go to “Menu>Stream”, and then click the “Start Stream” button for streaming the image which is shot by the BC-15P/BC-15PN to the Facebook platform.
-
Page 83: How To Use Bc View Assist To View Images From The Bc-15P/Pn
BC-15P/BC-15PN through the PVW (Preview) function. 1. The factory default IP mode of the BC-15P/BC-15PN is the DHCP mode. Please prepare a router and then use an RJ-45 Ethernet cable to connect from the “POE/LAN/DVIP”... - Page 84 5. You can see that the “ASUS_D8_5G” Wi-Fi signal is successfully connected. 6. At this time, please open the BC View Assist app, and then it will search the connected DVIP protocol supported device automatically which is shown in the following diagram.
- Page 85 7. After the following diagram is shown, it means that your BC-15P/BC-15PN camera is found successfully. Please check the checkbox next to the BC- 15P/BC-15PN and then press the “OK” button. 8. You can see that your BC-15P/BC-15PN is connected successfully which is shown in the following diagram.
-
Page 86: Firmware Update
Establish a point-to-point connection with a computer (fixed IP mode) Turn on the power of the BC-15P/BC-15PN and connect it to the computer with the firmware update utility installed through the Ethernet interface. - Page 87 After opening the OSD menu of BC-15P/BC-15PN, please go to "Network>DHCP ON" to change the setting to "DHCP OFF". The BC- 15P/BC-15PN will change to Fixed IP mode. The fixed IP address is 192.168.100.100. If your model is BC-15PN, there will be "Preview/NDI"...
- Page 88 Go back to the BC-15P/BC-15PN's OSD menu and go to System>Firmware, then select Update. After pressing Update, you will be prompted by the camera to continue with the firmware update, and if so, select " Yes ". Open the BC-15P/BC-15PN Firmware Update Utility on your computer...
- Page 89 6. Click "Select BC-15P/BC-15PN Firmware" to browse your computer's hard disk and search for the latest firmware file. Double-click on the file when it is found. 7. Click "Send" to start uploading files to BC-15P/BC-15PN. 8. The following screen indicates that the file has been successfully...
-
Page 90: Computer Connects To Multiple Cameras Via Router (Dhcp Mode)
"DHCP ON" in the "Network>HDCP" option of the BC-15P/BC-15PN OSD menu, which means DHCP mode is used. Open the BC-15P/BC-15PN OSD menu and get the IP address of the camera from Network in the main menu. To avoid IP conflict, please make sure that all connected devices have different IP addresses. - Page 91 4. Go back to the BC-15P/BC-15PN's OSD menu and go to System>Firmware, then select Update. After pressing Update, you will be prompted by the camera to continue with the firmware update. 5. Open the BC-15P/BC-15PN's firmware update utility on your computer...
- Page 92 6. Click "Select BC-15P/BC-15PN Firmware" to browse your computer's hard disk and search for the latest firmware file. Double-click on the file when it is found. 7. Click "Send" to start uploading files to BC-15P/BC-15PN. 8. The following screen indicates that the file has been successfully...
- Page 93 9. Repeat steps 5 through 8 to update the firmware on the other cameras.
-
Page 94: Frequently-Asked Questions
11. Frequently-Asked Questions This section describes problems that you may encounter while using BC- 15P/BC-15PN. If you have any questions, please refer to related sections and follow all suggested solutions. If the problem still exists, please contact your distributor or the service center. -
Page 95: Dimensions
12. Dimensions Unit:mm... -
Page 96: Specifications
13. Specifications Camera Parameters Product Model BC-15P/BC-15PN Product Name 4K POV Camera/4K NDI POV Camera Video 2160p 60/59.94/50/30/29.97/25 Format/Resolution 1080p 60/59.94/50/30/29.97/25 Image Sensor 1/2.3" CMOS Effective 12.3Mega Pixels Pixels(approx.) S/N Ratio 50 dB Min. Illumination 0.5Lux (F1.0, AGC ON) 1/25(1/30), 1/50(1/60), 1/75(1/90), 1/100(1/120),... - Page 97 Video Compression H.264, H.265 Format Audio Compression Format Audio Bitrate 128Kbps IP Interface 10/100/1000M BC-15P: RTMP(S), SRT Streaming Protocols BC-15PN: RTMP(S), SRT, NDI 1920x1080 1280x720 First Stream 1024x576 Supported Resolution 960x540 640x480 640x360 Video Bitrate 1Mbps ~ 7Mbps Video Bitrate Mode...
- Page 98 Notes...
- Page 99 Notes...
-
Page 100: Service And Support
Service and Support BC-15P: http://www.datavideo.com/product/BC-15P BC-15PN: http://www.datavideo.com/product/BC-15PN May.-07.2024 Ver. E3 Datavideo Technologies Co., Ltd. All rights reserved 2020...
Need help?
Do you have a question about the BC-15PN and is the answer not in the manual?
Questions and answers