Table of Contents
Advertisement
Quick Links
TM-8105005042
Solid State Kilowatt
Linear Power Amplifier
LPA-9600
Operation and Maintenance Manual (Rev. D)
WARNING
The LPA-9600 ships with internal packing material.
You MUST open the top cover and remove the
packing material BEFORE operating the unit.
nd
3131 SW 42
Street, Fort Lauderdale, Florida 33312 U.S.A.
www.sunairelectronics.com
Advertisement
Table of Contents

Related Manuals for sunair LPA-9600

Summary of Contents for sunair LPA-9600
- Page 1 Linear Power Amplifier LPA-9600 Operation and Maintenance Manual (Rev. D) WARNING The LPA-9600 ships with internal packing material. You MUST open the top cover and remove the packing material BEFORE operating the unit. 3131 SW 42 Street, Fort Lauderdale, Florida 33312 U.S.A.
- Page 2 Reproduction of this document or portions thereof without prior written approval of Sunair is prohibited. Return Material Authorization (RMA) Procedures In case of difficulty, please contact the Sunair Product Service Department between the hours of 8:00 a.m. and 5:00 p.m. EST. Telephone: (954) 400-5100 Fax: (954) 583-7337 Email: techsupport@sunairelectronics.com...
- Page 3 Sunair shall not be liable for consequential or other damage or expense whatsoever therefore or by any reason thereof. Sunair reserves the right to make changes in the design or additions to or improvements in its equipment without obligation to install such additions or improvements in equipment theretofore manufactured.
- Page 4 LPA-9600 Copyright © 2011, 2012 by Sunair Electronics All rights reserved. Printed in the United States of America Manual Unit Serial No. Addendum Revision Page(s) Revision Effectivity Covered Date A - First Edition - Production Changes 10/01/1990 B - Second Edition - Customer...
-
Page 5: Table Of Contents
2.9 Rack Mounting Kit Option ...................... 2-12 3.0 Operation ............................. 3-1 3.1 General ............................3-1 3.2 Function and Location of Controls and Indicators ..............3-1 3.3 Operating the LPA-9600 ......................3-3 3.3.1 Operation with a 9000 Series Exciter/Transceiver ............3-3 4.0 Theory of Operation ..........................4-1 4.1 General ............................ - Page 6 LPA-9600 Table of Contents 4.3.1 PC Assembly Computer Mother Board A3A1 ............. 4-2 4.3.2 Peripheral Board A3A2 ....................4-2 4.3.3 Microprocessor Board A3A3 ..................4-8 4.4 RF/PS Module A4 ........................4-13 4.4.1 RF Module Control Assembly A4A1 ................. 4-13 4.4.2 +48 VDC Switching Power Supply A4A2 ..............
- Page 7 LPA-9600 Table of Contents 5.5.5 Input Splitter A7 ......................5-11 5.5.6 Microprocessor Board A3A3 ..................5-11 5.6 Disassembly Instructions ......................5-11 5.7 Major Assembly Locations ...................... 5-12 5.8 Schematics and Parts Lists ...................... 5-23 Use or disclosure of information from this document is subject to the restrictions...
- Page 8 LPA-9600 Table of Contents THIS PAGE INTENTIONALLY LEFT BLANK viii Use or disclosure of information from this document is subject to the restrictions indicated on the proprietary/confidentiality page of this document...
- Page 9 Figure 1.5-2: LPA-9600 Front and Rear Panels ..................1-5 Figure 2.6-1: LPA-9600 with Broadband Antenna ..................2-4 Figure 2.6-2: LPA-9600 with CU-9150, 35-Foot Antenna (Roof Top Installation) ......... 2-5 Figure 2.6-3: LPA-9600 with CU-9150, Non-Resonant Antenna ............. 2-6 Figure 2.6-4: kW Long Wire Antenna Kit ....................2-7 Figure 2.7-1: Power Cable Assembly, P/N 8066002297 ................
- Page 10 LPA-9600 List of Figures Figure 5.8-21: Splitter Module, A7 ......................5-65 Figure 5.8-22: PC Assembly, Rear Panel Connector, A9 ................ 5-66 Figure 5.8-23: PC Assembly, Rear Panel Connector, A9 ................ 5-67 Figure 5.8-24: Auxiliary Power Supply, A10 ..................5-68 Use or disclosure of information from this document is subject to the restrictions...
- Page 11 Table 1.8-1: LPA-9600 Optional Equipment ..................... 1-7 Table 2.9-1: LPA-9600 Rack Mounting Kit Parts List ................2-13 Table 2.9-2: LPA-9600 Shockmount Kit Equipment Rack Parts List, P/N 6032090892 ......2-16 Table 3.2-1: Front Panel Controls and Indicators ..................3-2 Table 5.3-1: VRMS to Watts ........................5-4 Table 5.4-1: Fault Messages ........................
-
Page 12: Use Or Disclosure Of Information From This Document Is Subject To The Restrictions
LPA-9600 List of Tables THIS PAGE INTENTIONALLY LEFT BLANK Use or disclosure of information from this document is subject to the restrictions indicated on the proprietary/confidentiality page of this document... - Page 13 LPA-9600 General Glossary (Cont.) Term Meaning Term Meaning * (asterisk) Selected function Double Sideband Suppressed DSBSC Carrier A Ampere (unit) Display ac Alternating current ACC Automatic Carrier Control Digital Signal Processor ADDR Address DTMF Dual Tone Multi-Frequency AFSK Audio Frequency Shift Keying...
- Page 14 LPA-9600 General Glossary Term Meaning Term Meaning Local Oscillator RTTY Radio Teletype Local Receive Lowest Repairable Unit Rack Unit Lower Sideband Software Defined Radio Light Select Manual SINAD Signal to Noise and Distortion Level Slow M CH SLO BLO Time delayed fuse (slow blow)
- Page 15 LPA-9600 Electrical Safe Work Practices Accidents involving electricity can cause burns, explosions, shocks, and death. Only trained and qualified personnel should service, install, or repair electrical equipment. The general safety procedures for personnel servicing electronic and electrical equipment include: •...
- Page 16 LPA-9600 Electrostatic Discharge (ESD) Electrostatic Discharge (ESD) can severely damage sensitive components located on printed circuit cards. Electrostatic discharge measurements as high as 35,000 volts, can occur from walking across a carpet. To avoid potential damage to electronic equipment, follow correct electrostatic discharge preventive procedures when handling or working with the hardware.
- Page 17 LPA-9600 Lockout/Tagout Policy Lockout/Tagout refers to the complete isolation of equipment during maintenance or service work. It is good practice to require use of locks or tags as warning devices to prevent injuries to service personnel from accidental machine start-ups.
- Page 18 LPA-9600 Warnings, Cautions and Notes Warnings, cautions, and notes alert the user to special conditions regarding safety or correct performance of a particular step(s). WARNINGS - Used when a procedure, technique, or restriction could result in injury or death to personnel.
-
Page 19: General Information
1.2 Purpose of Equipment The purpose of the LPA-9600 is to amplify the low level RF output of a separate exciter to produce 1.0 kW peak envelope power (PEP) or average power. The LPA-9600 is microprocessor controlled and operates in the frequency range of 1.6 to 30 MHz. -
Page 20: Specifications
The LPA-9600 is designed with an EMP environment in mind. All control and power lines into and out of the LPA-9600 are filtered. This filtering on the standard unit is adequate for a mild EMP. But for full EMP hardening, the optional EMP filter, which replaces the existing filter, is required. This filter is designed per approved EMP techniques and decouples every input and output line (except the antenna). -
Page 21: Dimensions
Diagnostics: Microprocessor controlled with English Language Readout. 1.5 Dimensions Figure 1.5-1 shows the dimensions for the LPA-9600 Power Amplifier. Use or disclosure of information from this document is subject to the restrictions indicated on the proprietary/confidentiality page of this document. -
Page 22: Figure 1.5-1: Lpa-9600 Outline And Mounting Dimensions
LPA-9600 Figure 1.5-1: LPA-9600 Outline and Mounting Dimensions Use or disclosure of information from this document is subject to the restrictions indicated on the proprietary/confidentiality page of this document. -
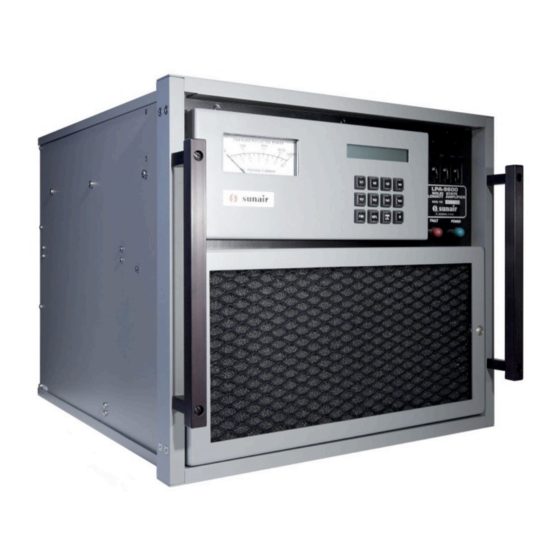
Page 23: Figure 1.5-2: Lpa-9600 Front And Rear Panels
LPA-9600 Figure 1.5-2: LPA-9600 Front and Rear Panels Use or disclosure of information from this document is subject to the restrictions indicated on the proprietary/confidentiality page of this document. -
Page 24: Equipment Supplied
• 1008390011 1 EA Connector, Power, 24 Pin Male 1.7 Equipment Required, Not Supplied Table 1.7-1 lists the equipment required, but not supplied, for the LPA-9600. Table 1.7-1: LPA-9600 Equipment Required, Not Supplied Equipment Sunair Part Number External AC Power Connector... -
Page 25: Optional Equipment
LPA-9600 1.8 Optional Equipment Table 1.8-1 lists the optional equipment for the LPA-9600. Table 1.8-1: LPA-9600 Optional Equipment Equipment Sunair Part Number Running Spares Kit 8066900198 Service Kit (Contains PC Assembly Card 8066000995 Extenders) Depot Spares Kit 8066900091 Field Module Kit... - Page 26 LPA-9600 THIS PAGE INTENTIONALLY LEFT BLANK Use or disclosure of information from this document is subject to the restrictions indicated on the proprietary/confidentiality page of this document.
-
Page 27: Installation
BEFORE operating the unit. The LPA-9600 1 kW Linear Solid State Power Amplifier is packed in a box using double wall construction. The packing material should be removed carefully and the contents inspected for physical damage. Any claims for shipping damage must be filed promptly with the transportation company. -
Page 28: Returning Equipment To Factory
Allow free circulation of air around the cabinet, and at least six inches air space between the back of the unit and any wall or partition. The companion transceiver may be placed on top of the LPA-9600 for voice or CW modes of communications. -
Page 29: Configurations
Another non-resonant antenna is the longwire. The two most popular length longwire antennas are 75 and 150 feet. Both of these antennas require an antenna coupler to match the antenna to the LPA-9600. Figure 2.6-4 is an illustration of a 75-foot longwire installation. Note that the feed line from the antenna to the coupler is part of the antenna’s length. -
Page 30: Figure 2.6-1: Lpa-9600 With Broadband Antenna
LPA-9600 Figure 2.6-1: LPA-9600 with Broadband Antenna Use or disclosure of information from this document is subject to the restrictions indicated on the proprietary/confidentiality page of this document. -
Page 31: Figure 2.6-2: Lpa-9600 With Cu-9150, 35-Foot Antenna (Roof Top Installation)
LPA-9600 Figure 2.6-2: LPA-9600 with CU-9150, 35-Foot Antenna (Roof Top Installation) Use or disclosure of information from this document is subject to the restrictions indicted on the proprietary/confidentiality page of this document. -
Page 32: Figure 2.6-3: Lpa-9600 With Cu-9150, Non-Resonant Antenna
LPA-9600 Figure 2.6-3: LPA-9600 with CU-9150, Non-Resonant Antenna Use or disclosure of information from this document is subject to the restrictions indicated on the proprietary/confidentiality page of this document. -
Page 33: Figure 2.6-4: Kw Long Wire Antenna Kit
LPA-9600 Figure 2.6-4: kW Long Wire Antenna Kit Use or disclosure of information from this document is subject to the restrictions indicted on the proprietary/confidentiality page of this document. -
Page 34: External Connections
2.7 External Connections 2.7.1 Primary Power Connections The LPA-9600 requires a primary power source that can provide up to 3.5 kVA (115 or 230 VAC). Whenever possible, the primary power source should be connected to the amplifier through a double-pole, 30 ampere capacity, manual disconnect switch (60 ampere if primary source is 115 VAC). -
Page 35: Figure 2.7-2: 9000 Series Exciter/Transceiver To Lpa-9600 Control Cable
LPA-9600 Figure 2.7-2: 9000 Series Exciter/Transceiver to LPA-9600 Control Cable Use or disclosure of information from this document is subject to the restrictions indicted on the proprietary/confidentiality page of this document. -
Page 36: Antenna Coupler Connections
Fan Voltage Switch, A10S1, is in the proper position. If the LPA-9600 is received as a system with its companion transceiver/exciter, no adjustments should be necessary. Otherwise, set the power levels as follows (see Figure 5.7-1 for component locations): •... -
Page 37: Figure 2.8-1: Voltage Customizing - Circuit Breaker/Auxiliary Power Supply
LPA-9600 Figure 2.8-1: Voltage Customizing - Circuit Breaker/Auxiliary Power Supply Use or disclosure of information from this document is subject to the restrictions 2-11 indicted on the proprietary/confidentiality page of this document. -
Page 38: Rack Mounting Kit Option
Figure 2.8-2: Voltage Customizing – RF/PS Module A4 (4 Each) 2.9 Rack Mounting Kit Option An optional slide rack mounting kit is available to facilitate installation of the LPA-9600 in standard E.I.A. equipment racks. See Figure 2.9-1, Figure 2.9-2, Table 2.9-1 and Table 2.9-2. -
Page 39: Figure 2.9-1: Rack Mount Slide Details
LPA-9600 Figure 2.9-1: Rack Mount Slide Details Table 2.9-1: LPA-9600 Rack Mounting Kit Parts List Sunair Part Number Description 80660042XX Rack Mounting Kit 50660043XX Bracket, Rack Mounting 6032041204 Chassis Slide 0538750006 Nut, Clip 10-32 0538870001 Screw, Ornamental 10-32 x 1/2 L... -
Page 40: Figure 2.9-2: Shockmount Equipment Rack With Outline Dimensions And Details
LPA-9600 Figure 2.9-2: Shockmount Equipment Rack with Outline Dimensions and Details (Page 1 of 2) 2-14 Use or disclosure of information from this document is subject to the restrictions indicated on the proprietary/confidentiality page of this document. - Page 41 LPA-9600 Figure 2.9-2: Shockmount Equipment Rack with Outline Dimensions and Details (Page 2 of 2) Use or disclosure of information from this document is subject to the restrictions 2-15 indicted on the proprietary/confidentiality page of this document.
-
Page 42: Table 2.9-2: Lpa-9600 Shockmount Kit Equipment Rack Parts List, P/N 6032090892
LPA-9600 Table 2.9-2: LPA-9600 Shockmount Kit Equipment Rack Parts List, P/N 6032090892 Sunair Part Number Description 0501650008 Washer, Split 3/8 0501700005 Nut, Hex 3/8-16 X 9/16 AF 0542880644 Rod, Thd 3/8-16 X 4 Lg 0841810001 Isolator, Shock/Vib. 50-80 Lbs 1001280016 Isolator, Shock/Vib. -
Page 43: Operation
Operation and Maintenance Manuals for detailed information regarding operation of these units. 3.2 Function and Location of Controls and Indicators Figure 3.2-1 shows the location of the LPA-9600 front panel controls and indicators. Their functions are listed in Table 3.2-1. -
Page 44: Table 3.2-1: Front Panel Controls And Indicators
Circuit Breaker, A8CB1 Applies primary power to the LPA-9600. FAULT Lamp, A8DS2 A red fault lamp which, when flashing, indicates a fault in the LPA-9600. A steady fault lamp indicates a fault external to the LPA-9600. POWER Lamp, A8DS1 A green lamp which indicates that primary power has been applied to the LPA-9600. -
Page 45: Operating The Lpa-9600
3.3.1 Operation with a 9000 Series Exciter/Transceiver Insure that the transceiver/exciter and the LPA-9600 are installed properly by referring to Section II of this manual and in the radio manual. If an antenna coupler is being used, insure its proper installation as well. - Page 46 LPA-9600 THIS PAGE INTENTIONALLY LEFT BLANK Use or disclosure of information from this document is subject to the restrictions indicated on the proprietary/confidentiality page of this document.
-
Page 47: Theory Of Operation
See Figure 5.8-2. The Control Panel Module is a plug-in panel arrangement on the front of the LPA-9600 which contains the meter, the LCD Assembly, and the 3 x 4 keyboard. The LCD Assembly A2A1 is used to display the power level selected, the diagnostic information, and the function selected to be displayed on the meter. -
Page 48: Computer Assembly A3
Connector A3A1J2 interfaces to the Filter Module A5. Connector A3A1J3 connects to the Control Panel Module A2. Connector A3A1J4 interfaces with the transceiver/exciter and the antenna coupler. Connector A3A1J5 interfaces with the front panel of the LPA-9600 by transferring control signals to the front panel lights, the bypass relay, and overtemperature fan. - Page 49 A3A3U1 thru U7. If this VSWR FAULT signal goes high, A3A3U1 will reduce the power produced by the LPA-9600 from 1000 watts to 500 watts. If is still high, A3A3U1 will place LPA-9600 in BYPASS, protecting it from the excessive VSWR FAULT VSWR.
- Page 50 Microprocessor A3A3U1 is alerted to the overcurrent condition by U15. Once the condition is verified, then A3A3U1 removes that amplifier from operation, reducing the output of the LPA-9600 from 1000 to 500 watts. Use or disclosure of information from this document is subject to the restrictions...
- Page 51 LPA-9600. A3A3U1 monitors the output of U9C and if it goes high for longer than 50 ms, then A3A3U1 causes the LPA-9600 to go to BYPASS by shutting down the power amplifier assemblies, preventing them from damaging the filter module.
- Page 52 The purpose of the Reflected Fault Detector is to warn Microprocessor A3A3U1 when a severe reflected fault condition is occurring in the LPA-9600. If the reflected power level reaches and exceeds 200 watts, U9D goes high. A3A3U1 checks the reflected fault condition indicated by the Reflected Fault Detector to insure that it actually exists, and if so, immediately places the LPA-9600 in BYPASS.
- Page 53 . When the LPA-9600 detects this signal, it immediately selects BYPASS operation so VOLT TUNE ENABLE that the power being sent through the LPA-9600 to the CU-9150 is the power from the transceiver. The LPA- 9600 monitors signals, , and from the CU-9150.
-
Page 54: Microprocessor Board A3A3
DETECT FAULT REMOTE FAULT OUT LOCAL controlled by Q6. U5G receives a high anytime Microprocessor A3A3U1 wishes to operate the LPA-9600 in BYPASS. This causes the Bypass relay K18 in the A5 Filter Module to energize. 4.3.2.25 BITE BITS The LPA-9600 is capable of self-checking certain elements of its circuit operation. - Page 55 LPA-9600 4.3.3.2 Microprocessor U1 The Microprocessor U1 controls the functions of Microprocessor Board A3A3. U1 contains three major busses. The first bus is AD0 thru AD7, a multiplexed address/data bus containing either data or address information. The second bus is A8 thru A15 and always contains address information. The third bus is the...
- Page 56 The Power Clear Circuit is necessary to initialize Microprocessor U1 when power is first applied to the LPA- 9600. The circuit provides a low on pin 36 of U1 for a time after the voltage is applied to the LPA-9600.
- Page 57 LPA-9600 4.3.3.11 Watchdog Circuit Q1, U2B, U3B The purpose of the watchdog circuit is to monitor the actions of Microprocessor U1 as it processes programming code. If U1 fails to function properly, then the watchdog circuit will time out and reinitialize U1.
- Page 58 The LPA-9600 will continue to operate at 500 watts if only one power amplifier module is affected, but will go to BYPASS if more than one fails.
-
Page 59: Rf/Ps Module A4
LPA-9600 4.3.3.21 Keyboard Input Buffers U16A-U16D, U18, U20A-D The purpose of the Keyboard Input Buffers is to provide Microprocessor U1 a means by which it can detect which key of the 3 x 4 keyboard is being pushed. U1 reads Column 1 thru 4 of the keyboard via U18 on the AD0 thru AD7 lines. - Page 60 LPA-9600 4.4.2.1 General The +48 VDC Switching Power Supply is of the pulse-width modulating type, employing high efficiency and small size. The AC input is converted to high voltage DC (Input Section). The DC drives a half-bridge inverter operating at 50 kHz (Inverter Section).
-
Page 61: Power Amplifier Assembly A4A3
See Figure 4.11-4 and Figure 5.8-8 The four Power Amplifier (PA) assemblies A4A3 contain the solid state power amplifiers which produce the approximate 13 dB power gain of the LPA-9600. See Figure 4.11-4 for the block diagram of one PA assembly. -
Page 62: Filter Module A5
LPA-9600 T2 combines the two 100 ohm amplifier outputs into a single 50 ohm module output which delivers a nominal output power of 300 watts. This output combiner has properties similar to the input splitter. Each amplifier output is presented a load impedance of 100 ohms, regardless of the condition of the other output. In the event that one amplifier is delivering more output power than the other, half of the power imbalance is dissipated in the combiner dump resistor R40, and the other half appears as additional module output power. -
Page 63: Mother Board Assembly A5A10
500 watts and continues to operate. The Output Power Combiner is located on the rear screen panel of the amplifier in the cooling airstream to transfer the dissipated power into the air and out of the LPA-9600. NOTE: You cannot physically leave an RF/PS module out of the LPA-9600 and have the LPA-9600 operate. -
Page 64: Block Diagrams
Microprocessor A3A3U1. 4.11 Block Diagrams The remainder of this section contains the following block diagrams: • LPA-9600 Overall Diagram • Peripheral Board • Microprocessor Board •... -
Page 65: Figure 4.11-1: Lpa-9600 Overall Block Diagram
LPA-9600 Figure 4.11-1: LPA-9600 Overall Block Diagram Use or disclosure of information from this document is subject to the restrictions 4-19 indicated on the proprietary/confidentiality page of this document. -
Page 66: Figure 4.11-2: Peripheral Board A3A2 Block Diagram
LPA-9600 Figure 4.11-2: Peripheral Board A3A2 Block Diagram 4-20 Use or disclosure of information from this document is subject to the restrictions indicated on the proprietary/confidentiality page of this document. -
Page 67: Figure 4.11-3: Microprocessor Board A3A3 Block Diagram
LPA-9600 Figure 4.11-3: Microprocessor Board A3A3 Block Diagram Use or disclosure of information from this document is subject to the restrictions 4-21 indicated on the proprietary/confidentiality page of this document. -
Page 68: Figure 4.11-4: Power Amplifier Assembly A4A3 Block Diagram
LPA-9600 Figure 4.11-4: Power Amplifier Assembly A4A3 Block Diagram 4-22 Use or disclosure of information from this document is subject to the restrictions indicated on the proprietary/confidentiality page of this document. -
Page 69: Fault Isolation, Maintenance, And Repair
5.1.1 Periodic Inspections The LPA-9600 design calls for periodic cleaning of the air filter on the front panel assembly. Remove the air filter and clean by vacuuming or forced air. The air filter should be periodically cleaned with soap and fresh water (air filter must be completely dry before reinstallation). -
Page 70: Connectors And Cables Required
Set up the LPA-9600 and required test equipment as shown in Figure 5.7-2. 5.3 Alignment Procedures The LPA-9600 is tested and aligned at the factory before shipment. The following alignment procedures should be used only by a competent technician after repair has been accomplished to the unit. If the LPA- 9600 is to be utilized with an exciter other than the one it was originally aligned to, it may be necessary to reset the power levels. -
Page 71: Keyboard
LPA-9600 3. The green lamp on the LPA-9600 front panel should illuminate. The three power supply POWER LEDs on Microprocessor Board A3A3 should illuminate. 4. On the Peripheral Board A3A2, adjust R164 until the LCD Assembly A2A2 has its best contrast. -
Page 72: Watt Adjustment
LPA-9600 Table 5.3-1: VRMS to Watts Watts Across VRMS VPEAK V P-P 50 Ohm 100.0 141.4 282.80 200.000 105.0 148.5 296.94 220.500 110.0 155.5 311.08 242.000 120.0 169.7 339.36 288.000 130.0 183.8 367.64 338.000 140.0 198.0 395.92 392.000 150.0 212.1 424.20... -
Page 73: Vswr Adjustment
This is the end of the alignment procedures. 5.4 Fault Messages Failures in the LPA-9600 cause fault messages to be displayed on the LCD Display A2A2. These messages direct attention to the areas in which failures have occurred. If more than one fault occurs, the message appears. -
Page 74: Table 5.4-1: Fault Messages
The output voltage from this +48V Power Supply A4A2 is low or missing. Solution: 1. Remove LPA-9600 bottom cover and disconnect +48 volts input from the indicated A4 Module. 2. Reset LPA-9600 controls and observe LCD display. 3. If fault message is not displayed, then the trouble lies in the A4 Module. Follow the RF/PS Module A4 fault isolation procedure in paragraph 5.5.1. - Page 75 The Power Supply current drain on this A4 Module has exceeded 17.5 amperes. Solution: 1. Remove LPA-9600 bottom cover and interchange output coax connections between the affected A4 Module and an operational module. 2. Reset LPA-9600 controls and attempt to transmit.
- Page 76 Solution: 1. Check control cable between transceiver/exciter and LPA-9600 for opens or shorts. 2. Refer to transceiver/exciter manual. Fault: 5 VOLT SUPPLY LO This message indicates that the +5 volt power supply output from the Auxiliary Power Supply A10 is too low.
-
Page 77: Table 5.4-2: Rf/Ps Module A4 Fault Isolation Procedures
LPA-9600 Table 5.4-2: RF/PS Module A4 Fault Isolation Procedures Normal Step Indication Failure Procedure 1. Remove +48VDC connection from 600 mA. If so, a. Remove +48VDC connection from P1 of A4A3. proceed to Step 8. P1 of A4A3. 2. Connect multimeter to read b. -
Page 78: Fault Isolation Procedures
+48VDC Power Supply A4A2, and the Power Amplifier Assembly A4A3. The RF/PS Module may be removed as a whole and bench tested, or tests may be performed in the LPA-9600 provided the faults do not activate the LPA-9600 protection circuits. If the RF/PS Module is... -
Page 79: Output Combiner A6
LPA-9600 8. If still no defect appears, the antenna system may be at fault. Refer to technical manuals for the antenna coupler and antenna system. 5.5.3.2 Fault, One Band 1. Remove connections from A5J3 and A5J2. Select 500W or 1 kW power level. -
Page 80: Major Assembly Locations
LPA-9600 Table 5.6-1: Disassembly Instructions Part To Remove Top Cover Loosen 2 zeus screws Bottom Cover Loosen 2 zeus screws Filter Module Cover Loosen 4 zeus screws, lift out and up. Filter Module A5 With unit upright, remove A3A2 and A3A3 assemblies by pulling straight up, one at a time. -
Page 81: Figure 5.7-1: Major Assembly Locations
LPA-9600 Front Panel with Control Panel Module A2 and Filter Module Removed. Figure 5.7-1: Major Assembly Locations (Page 1 of 8) Use or disclosure of information from this document is subject to the restrictions 4-13 indicated on the proprietary/confidentiality page of this document. - Page 82 LPA-9600 Top Covers Removed with Peripheral Board. Figure 5.7-1: Major Assembly Locations (Page 2 of 8) 4-14 Use or disclosure of information from this document is subject to the restrictions indicated on the proprietary/confidentiality page of this document.
- Page 83 LPA-9600 Top Covers Removed with Peripheral Board. Figure 5.7-1: Major Assembly Locations (Page 3 of 8) Use or disclosure of information from this document is subject to the restrictions 4-15 indicated on the proprietary/confidentiality page of this document.
- Page 84 LPA-9600 Figure 5.7-1: Major Assembly Locations (Page 4 of 8) 4-16 Use or disclosure of information from this document is subject to the restrictions indicated on the proprietary/confidentiality page of this document.
- Page 85 LPA-9600 Top View with A3A2, A3A3, A5 Removed and A4 #3 Pulled Out. Figure 5.7-1: Major Assembly Locations (Page 5 of 8) Use or disclosure of information from this document is subject to the restrictions 4-17 indicated on the proprietary/confidentiality page of this document.
- Page 86 LPA-9600 Top View with A3A2, A3A3, A5, A4 (4 each) removed. Figure 5.7-1: Major Assembly Locations (Page 6 of 8) 4-18 Use or disclosure of information from this document is subject to the restrictions indicated on the proprietary/confidentiality page of this document.
- Page 87 LPA-9600 Bottom cover removed. Figure 5.7-1: Major Assembly Locations (Page 7 of 8) Use or disclosure of information from this document is subject to the restrictions 4-19 indicated on the proprietary/confidentiality page of this document.
- Page 88 LPA-9600 RF/PS Module A4. Figure 5.7-1: Major Assembly Locations (Page 8 of 8) 4-20 Use or disclosure of information from this document is subject to the restrictions indicated on the proprietary/confidentiality page of this document.
-
Page 89: Table 5.7-1: Peripheral Board A3A2 Fault Isolation Procedures
LPA-9600 Table 5.7-1: Peripheral Board A3A2 Fault Isolation Procedures NOTE: The LPA-9600 has been designed to work with the CU- 9150 Digital Antenna Coupler. Symptom Procedure ALC and ACC Inoperative a. Check FWD Power input to A3A2R32 and A3A2R42. b. Check A3A2CR4. -
Page 90: Figure 5.7-2: Lpa-9600 Test Setup
LPA-9600 Figure 5.7-2: LPA-9600 Test Setup Figure 5.7-3: Audio Injection Test Cable (Used in Test Setup) 4-22 Use or disclosure of information from this document is subject to the restrictions indicated on the proprietary/confidentiality page of this document. -
Page 91: Schematics And Parts Lists
LPA-9600 5.8 Schematics and Parts Lists The following pages contain schematics and parts lists for the LPA-9600. Refer to Table 5.8-1 below for a list of assemblies. Table 5.8-1: LPA-9600 Table of Assemblies Reference Designator Sunair Description Part Number Assembly... - Page 92 LPA-9600 Table 5.8-1: LPA-9600 Table of Assemblies (Continued) Reference Designator Sunair Part Description Number Assembly Subassembly COMBINER MODULE 8066060092 SPLITTER MODULE 8066070098 FRONT PANEL ASSY 8066015097 8105041090 PC ASSY, REAR PANEL CONNECTOR A10A1 AUX POWER SUPPLY MODULE 8066050097 PC ASSY, AUX PWR SUPPLY...
-
Page 93: Table 5.8-2: Detailed Assemblies List
LPA-9600 Table 5.8-2: Detailed Assemblies List FINAL ASSY, TESTED CHASSIS ASSEMBLY (A1) HARNESS ASSY, W6A1 CHASSIS FRONT PANEL ASSY AB SUNAIR SUNAIR SUNAIR SUNAIR DESCRIPTION DESCRIPTION DESCRIPTION DESCRIPTION SYMBOL PART NO. SYMBOL PART NO. SYMBOL PART NO. SYMBOL PART NO. -
Page 94: Table 5.8-3: Detailed Assemblies List (Cont.)
LPA-9600 Table 5.8-3: Detailed Assemblies List (Cont.) FINAL ASSY, TESTED CHASSIS ASSEMBLY (A1) HARNESS ASSY, W6A1 CHASSIS FRONT PANEL ASSY AB SUNAIR SUNAIR SUNAIR SUNAIR DESCRIPTION DESCRIPTION DESCRIPTION DESCRIPTION SYMBOL PART NO. SYMBOL PART NO. SYMBOL PART NO. SYMBOL PART NO. -
Page 95: Figure 5.8-1: Chassis Wiring Diagram
LPA-9600 Figure 5.8-1: Chassis Wiring Diagram (Page 1 of 2) Use or disclosure of information from this document is subject to the restrictions 5-27 indicated on the proprietary/confidentiality page of this document. - Page 96 LPA-9600 Figure 5.8-1: Chassis Assembly Diagram (Page 2 of 2) 5-28 Use or disclosure of information from this document is subject to the restrictions indicated on the proprietary/confidentiality page of this document.
-
Page 97: Figure 5.8-2: Control Panel Module A2
LPA-9600 CONTROL PANEL MODULE (A2) SUNAIR DESCRIPTION SYMBOL PART NO. CONTROL PANEL MODULE (A2) 80660900XX PC ASSY, CONTROL PANEL 8066093098 LCD ASSY 8066092091 METER, ILLUMINATED 8066090803 W1A2P1 CONNECTOR, PC, 8 PIN HOUSING 1008050032 SPACER,.115 ID,.187 OD,.250L 0521420041 SPACER,.112 ID,.152 OD,.187L... -
Page 98: Figure 5.8-3: Computer Motherboard A3A1
LPA-9600 PC ASSY, COMPUTER MOTHER BOARD (A3A1) SUNAIR DESCRIPTION SYMBOL PART NO. COMPUTER MOTHER BOARD (A3A1) 8105081091 CONNECTOR, PC, 40 PIN, STR. 1008110019 CONNECTOR, PC, 20 PIN, STR. 1008120014 CONNECTOR, PC, 40 PIN, STR. 1008110019 CONNECTOR, PC, 40 PIN, STR. - Page 99 LPA-9600 Figure 5.8-3: Computer Motherboard A3A1 (Page 2 of 3) Use or disclosure of information from this document is subject to the restrictions 5-31 indicated on the proprietary/confidentiality page of this document.
- Page 100 LPA-9600 Figure 5.8-3: Computer Motherboard A3A1 (Page 3 of 3) 5-32 Use or disclosure of information from this document is subject to the restrictions indicated on the proprietary/confidentiality page of this document.
-
Page 101: Figure 5.8-4: Peripheral Board A3A2
LPA-9600 PC ASSY, PERIPHERAL BOARD (A3A2) SUNAIR DESCRIPTION SYMBOL PART NO. SUNAIR IDIODE, RECTIFIER 1N4004 0405180004 DESCRIPTION SYMBOL PART NO. DIODE, HOT CARRIER 1N6263 0405610009 DIODE, SIGNAL, SIL 1N3064 0405460007 PC ASSY, PERIPHERAL BOARD A3A2 8105085097 DIODE, SIGNAL, SIL 1N3064 0405460007 CAP. - Page 102 LPA-9600 SUNAIR SUNAIR SUNAIR SUNAIR DESCRIPTION DESCRIPTION DESCRIPTION DESCRIPTION SYMBOL PART NO. SYMBOL PART NO. SYMBOL PART NO. SYMBOL PART NO. FERRITE BEAD .0471D .138 0564510009 RESISTOR 4.7K 5%, 1/4W 0170770001 R120 RESISTOR 3.3K 10%, 1/4W 0170890007 R185 RESISTOR 5.6K, 10%, 1/4W 0183060008 INDUCTOR, MOLDED, 150µH, 5%...
- Page 103 LPA-9600 Figure 5.8-4: Peripheral Board A3A2 (Page 3 of 6) Use or disclosure of information from this document is subject to the restrictions 5-35 indicated on the proprietary/confidentiality page of this document.
- Page 104 LPA-9600 Figure 5.8-4: Peripheral Board A3A2 (Page 4 of 6) 5-36 Use or disclosure of information from this document is subject to the restrictions indicated on the proprietary/confidentiality page of this document.
- Page 105 LPA-9600 Figure 5.8-4: Peripheral Board A3A2 (Page 5 of 6) Use or disclosure of information from this document is subject to the restrictions 5-37 indicated on the proprietary/confidentiality page of this document.
- Page 106 LPA-9600 Figure 5.8-4: Peripheral Board A3A2 (Page 6 of 6) 5-38 Use or disclosure of information from this document is subject to the restrictions indicated on the proprietary/confidentiality page of this document.
-
Page 107: Figure 5.8-5: Microprocessor Board A3A3
LPA-9600 Figure 5.8-5: Microprocessor Board A3A3 (Page 1 of 6) Use or disclosure of information from this document is subject to the restrictions 5-39 indicated on the proprietary/confidentiality page of this document. - Page 108 LPA-9600 Figure 5.8-5: Microprocessor Board A3A3 (Page 2 of 6) 5-40 Use or disclosure of information from this document is subject to the restrictions indicated on the proprietary/confidentiality page of this document.
- Page 109 LPA-9600 Figure 5.8-5: Microprocessor Board A3A3 (Page 3 of 6) Use or disclosure of information from this document is subject to the restrictions 5-41 indicated on the proprietary/confidentiality page of this document.
- Page 110 LPA-9600 Figure 5.8-5: Microprocessor Board A3A3 (Page 4 of 6) 5-42 Use or disclosure of information from this document is subject to the restrictions indicated on the proprietary/confidentiality page of this document.
- Page 111 LPA-9600 Figure 5.8-5: Microprocessor Board A3A3 (Page 5 of 6) Use or disclosure of information from this document is subject to the restrictions 5-43 indicated on the proprietary/confidentiality page of this document.
- Page 112 LPA-9600 Figure 5.8-5: Microprocessor Board A3A3 (Page 6 of 6) 5-44 Use or disclosure of information from this document is subject to the restrictions indicated on the proprietary/confidentiality page of this document.
-
Page 113: Figure 5.8-6: Module Control Board A4A1
LPA-9600 PC ASSY, MODULE CONTROL (A4A1) SUNAIR DESCRIPTION SYMBOL PART NO. PC ASSY, MODULE CONTROL A4A1 8066037091 A4A1J1 CONNECTOR, PC, 2 PIN 1008040029 A4A1J2 CONNECTOR, PC, 10 PIN HEADER 1008070009 A4A1J3 CONNECTOR, PC, 10 PIN HEADER 1008070009 A4A1J4 CONNECTOR, PC, 3 PIN... -
Page 114: Figure 5.8-7: 48Vdc Switching Power Supply A4A2
LPA-9600 Figure 5.8-7: 48VDC Switching Power Supply A4A2 (Page 1 of 3) 5-46 Use or disclosure of information from this document is subject to the restrictions indicated on the proprietary/confidentiality page of this document. - Page 115 LPA-9600 Figure 5.8-7: 48VDC Switching Power Supply A4A2 (Page 2 of 3) Use or disclosure of information from this document is subject to the restrictions 5-47 indicated on the proprietary/confidentiality page of this document.
- Page 116 LPA-9600 Figure 5.8-7: 48VDC Switching Power Supply A4A2 (Page 3 of 3) 5-48 Use or disclosure of information from this document is subject to the restrictions indicated on the proprietary/confidentiality page of this document.
-
Page 117: Figure 5.8-8: Power Amplifier A4A3
LPA-9600 SUNAIR DESCRIPTION SYMBOL PART NO. L22 P/O FERRITE BEAD .047ID .138 OD 0564510009 TERMINAL, PC MOUNT, 1/4" MALE 1008330035 TERMINAL, PC MOUNT, 1/4" MALE 1008330035 RESISTOR 2.7K, 5%, 2W 0195940008 RESISTOR 680, 10%, 1/2W 0167500007 RESISTOR 150, 10%, 2W... - Page 118 LPA-9600 (Page 1 of 2) Figure 5.8-8: Power Amplifier A4A3 5-50 Use or disclosure of information from this document is subject to the restrictions indicated on the proprietary/confidentiality page of this document.
- Page 119 LPA-9600 (Page 2 of 2) FILTER MODULE (A5) SUNAIR DESCRIPTION SYMBOL PART NO. A5A1 FILTER MODULE (A5) 8066020091 A5A2 PC ASSY, BAND FILTER 1 8066021097 A5A3 PC ASSY, BAND FILTER 2 8066022093 A5A4 PC ASSY, BAND FILTER 3 8066023090 A5A5...
-
Page 120: Figure 5.8-9: Filter Module A5
LPA-9600 Figure 5.8-9: Filter Module A5 (Page 2 of 2) 5-52 Use or disclosure of information from this document is subject to the restrictions indicated on the proprietary/confidentiality page of this document. -
Page 121: Figure 5.8-10: Pc Assembly, Band Filter 1, A5A1
LPA-9600 PC ASSY, BAND FILTER 1 (A5A1) SUNAIR DESCRIPTION SYMBOL PART NO. PC ASSY, BAND FILTER 1, A5Al 8066021097 CAP. 330PF 2KV..N750 1008280038 CAP. 330PF 2KV..N750 1008280038 CAP. 330PF 2KV..N750 1008280038 CAP. 300PF 2KV..N750 1008470015 CAP. 110PF 2KV..N750 1008260002 CAP. 240PF 2KV..N750 1008280011 CAP. -
Page 122: Figure 5.8-11: Pc Assembly, Band Filter 2, A5A2
LPA-9600 PC ASSY, BAND FILTER 2 (A5A2) DESCRIPTION SUNAIR SYMBOL PART NO. PC ASSY, BAND FILTER 2, 8066022093 A5A2 C12A CAP. 220PF 2KV..N750 1008280003 C12B CAP. 220PF 2KV..N750 1008280003 C12C CAP. 220PF 2KV..N750 1008280003 C12D CAP. 240PF 2KV..N750 1008280011 CAP. 82 PF 2KV..N750... -
Page 123: Figure 5.8-12: Pc Assembly, Band Filter 3, A5A3
LPA-9600 PC ASSY, BAND FILTER 3 (A5A3) SUNAIR DESCRIPTION SYMBOL PART NO. PC ASSY, BAND FILTER 3, A5A3 8066023090 C54A CAP. 150PF 2KV..N750 1008260037 C54B CAP. 150PF 2KV..N750 1008260037 C54C CAP. 150PF 2KV..N750 1008260037 C54D CAP. 150PF 2KV..N750 1008260037 CAP. 50 PF, 2KV..N750... -
Page 124: Figure 5.8-13: Pc Assembly, Band Filter 4, A5A4
LPA-9600 PC ASSY, BAND FILTER 4 (A5A4) SUNAIR DESCRIPTION SYMBOL PART NO. PC ASSY, BAND FILTER 4, A5A4 8066024096 C47A CAP. 120PF 2KV..N750 1008260011 C47B CAP. 110PF 2KV..N750 1008260002 C47C CAP. 110PF 2KV..N750 1008260002 C47D CAP. 110PF 2KV..N750 1008260002 CAP. 39 PF, 2KV,..N750... -
Page 125: Figure 5.8-14: Pc Assembly, Band Filter 5, A5A5
LPA-9600 PC ASSY, BAND FILTER 5 (A5A5) SUNAIR DESCRIPTION SYMBOL PART NO. PC ASSY, BAND FILTER 5, A5A5 8066025092 C19A CAP. 68 PF, 2KV..N750 1008250007 C19B CAP. 68 PF, 2KV..N750 1008250007 C19C CAP. 68 PF, 2KV..N750 1008250007 C19D CAP. 68 PF, 2KV..N750 1008250007 CAP. -
Page 126: Figure 5.8-15: Pc Assembly, Band Filter 6, A5A6
LPA-9600 PC ASSY, BAND FILTER 6 (A5A6) SUNAIR DESCRIPTION SYMBOL PART NO. PC ASSY, BAND FILTER 6, A5A6 8066026099 C40A CAP. 43PF 2KV..N750 1008470023 C40B CAP. 39 PF, 2KV,..N750 1008240001 C40C CAP. 39 PF, 2KV,..N750 1008240001 C40D CAP. 39 PF, 2KV,..N750 1008240001 CAP. -
Page 127: Figure 5.8-16: Pc Assembly, Band Filter 7, A5A7
LPA-9600 PC ASSY, BAND FILTER 7 (A5A7) SUNAIR DESCRIPTION SYMBOL PART NO. PC ASSY, BAND FILTER 7, AW 8066027095 C26A CAP. 24PF 2KV..N750 1008470031 C26B CAP. 22 PF, 2KV,..N750 1008220035 C26C CAP. 22 PF, 2KV,..N750 1008220035 C26D CAP. 22 PF, 2KV,..N750 1008220035 CAP. -
Page 128: Figure 5.8-17: Pc Assembly, Band Filter 8, A5A8
LPA-9600 PC ASSY, BAND FILTER 8 (A5A8) SUNAIR DESCRIPTION SYMBOL PART NO. PC ASSY, BAND FILTER 8, A5A8 8066028091 C33A CAP. 15 PF, 2KV,..N750 1008220001 C33B CAP. 15 PF, 2KV,..N750 1008220001 C33C CAP. 15 PF, 2KV,..N750 1008220001 C33D CAP. 15 PF, 2KV,..N750 1008220001 CAP. -
Page 129: Figure 5.8-18: Pc Assembly, Watt Meter 9, A5A9
LPA-9600 PC ASSY, WATT METER (A5A9) SUNAIR DESCRIPTION SYMBOL PART NO. PC ASSY, WATT METER A5A9 8066029098 CAP. DISC, 4.7 PF, 3KV NPO 1007150025 CAP. 15/60 PF NPO 1007160004 CAP. 390PF, 500V, DM15, 2% 0281040001 CAP. .01µF, 50V, X7R 20% 0281730008 CAP. -
Page 130: Figure 5.8-19: Pc Assembly, Mother Board, A5A10
LPA-9600 Figure 5.8-19: PC Assembly, Mother Board, A5A10 (Page 1 of 2) 5-62 Use or disclosure of information from this document is subject to the restrictions indicated on the proprietary/confidentiality page of this document. - Page 131 LPA-9600 PC ASSY, MOTHER BOARD (A5A10) SUNAIR SUNAIR DESCRIPTION DESCRIPTION SYMBOL PART NO. SYMBOL PART NO. PC ASSY, MOTHER BOARD 8066020899 RELAY, SPDT, 24VDC, 10 AMP 1008290009 A5A10 RELAY, SPDT, 24VDC, 10 AMP 1008290009 CAP. DISC, 4.7 PF. 3KV NPO...
-
Page 132: Figure 5.8-20: Combiner Module, A6
LPA-9600 COMBINER MODULE (A6) SUNAIR DESCRIPTION SYMBOL PART NO. COMBINER MODULE A6 8066060092 CONNECTOR, RF, BNC UG- 0744030005 88/U CONNECTOR, RF, BNC UG- 0744030005 88/U CONNECTOR, RF, BNC UG- 0744030005 88/U CONNECTOR, RF, BNC UG- 0744030005 88/U CONNECTOR, RF, UHF, RT,... -
Page 133: Figure 5.8-21: Splitter Module, A7
LPA-9600 COMBINER MODULE (A7) SUNAIR DESCRIPTION SYMBOL PART NO. SPLITTER MODULE A7 8066070098 CAP. 180PF, 500V, DM15,5% 0258280000 CAP. 18PF, 500V, DM15 0281330000 CONNECTOR, RF, SUBMINIATURE 0753700000 CONNECTOR, RF, SUBMINIATURE 0753700000 CONNECTOR, RF, SUBMINIATURE 0753700000 CONNECTOR, RF, SUBMINIATURE 0753700000 CONNECTOR, RF, BNC UG-913... -
Page 134: Figure 5.8-22: Pc Assembly, Rear Panel Connector, A9
LPA-9600 PC ASSY, REAR PANEL CONNECTOR (A9) SUNAIR SUNAIR SUNAIR DESCRIPTION DESCRIPTION DESCRIPTION SYMBOL PART NO. SYMBOL PART NO. SYMBOL PART NO. PC ASSY, REAR PANEL CONN. A9 8105041090 INDUCTOR, MOLDED, 15µH, 5% 0659070006 INDUCTOR, MOLDED, 15µH, 5% 0659070006 CAP. 0.01µF, 1000V, Z5U, 20% 0243550006 INDUCTOR, MOLDED, 15µH, 5%... -
Page 135: Figure 5.8-23: Pc Assembly, Rear Panel Connector, A9
LPA-9600 Figure 5.8-23: PC Assembly, Rear Panel Connector, A9 (Page 2 of 2) Use or disclosure of information from this document is subject to the restrictions 5-67 indicated on the proprietary/confidentiality page of this document. -
Page 136: Figure 5.8-24: Auxiliary Power Supply, A10
LPA-9600 AUX POWER SUPPLY MODULE (A10) PC ASSY, AUX POWER SUPPLY (A10A1) SUNAIR SUNAIR DESCRIPTION DESCRIPTION SYMBOL PART NO. SYMBOL PART NO. PC ASSY, AUX. POWER SUPPLY A10A1 8066051093 AUX. POWER SUPPLY MODULE A10 8066050097 CAP. 0.1µF, 50V, X7R,20% 0281610002... - Page 137 LPA-9600 Figure 5.8-24: Auxiliary Power Supply, A10 (Page 2 of 2) Use or disclosure of information from this document is subject to the restrictions 5-69 indicated on the proprietary/confidentiality page of this document.
- Page 138 LPA-9600 THIS PAGE INTENTIONALLY LEFT BLANK 5-70 Use or disclosure of information from this document is subject to the restrictions indicated on the proprietary/confidentiality page of this document.
Need help?
Do you have a question about the LPA-9600 and is the answer not in the manual?
Questions and answers