
Subscribe to Our Youtube Channel
Related Manuals for Radioddity DB25-D


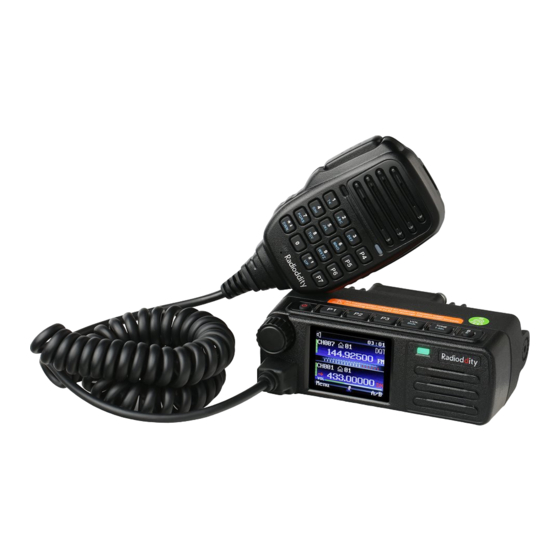
Summary of Contents for Radioddity DB25-D
- Page 1 Extended Manual for DB25-D & GD-88 V2.0, July 2022 © Radioddity 2022 page 1 of 209...
-
Page 2: Table Of Contents
Mount GD-88 Antenna ..................25 Charge the battery pack ..................25 Install Radioddity GD-88 battery pack ............. 26 Install Radioddity GD-88 hand strap and belt clip .......... 26 Accessories connection ..................26 External speaker/headset and microphone ............. 26 Radioddity DB25-D Speaker-Microphone .......... - Page 3 Radioddity Extended manual for Radioddity DB25-D & GD-88 v2.0 Basic Operation ..................... 43 Turning the radio On/Off..................43 Adjust Volume ......................43 Adjust Squelch ....................43 Switch VFOs ......................44 Busy Channel Lockout ..................44 Wide/ Narrow Band ..................44 CTCSS / DCS .......................
- Page 4 Radioddity Extended manual for Radioddity DB25-D & GD-88 v2.0 CreateMsg ....................62 Common Messages CommMsg ............... 63 Inbox ......................63 Outbox ......................64 Draftbox ..................... 65 10.3 Call Log ......................66 Dialed Calls (DialedNumbs) ..............66 Received Calls .................... 66 Missed Calls ....................
- Page 5 Radioddity Extended manual for Radioddity DB25-D & GD-88 v2.0 ........................86 FM Radio ......................87 Time ......................... 88 DTMF ......................89 Headset+Speaker ................... 89 APRS ........................ 90 10.10 Record ....................... 91 10.11 Device Info ..................... 92 10.12 Channel Edit ....................93 11 Prepare for using the CPS ................
- Page 6 Radioddity Extended manual for Radioddity DB25-D & GD-88 v2.0 Backlight ON/OFF ....................111 Keylock .......................111 Roaming ......................112 Roaming Mode ....................113 RSSI Set .......................113 Connect Check Timer ..................114 Connect Repeater Check Timer ...............114 Connect Time .....................114 Record Set .....................115 12.3 Common Menus ....................115 12.4...
- Page 7 Radioddity Extended manual for Radioddity DB25-D & GD-88 v2.0 Import Delay ....................131 DTMF Duration (On-time) ................132 DTMF Interval (Off-time) ................132 DTMF Volume ....................132 DTMF code ....................132 GPS ........................133 GPS interval......................134 GPS channel .......................134 Mandown ......................134 Mandown Interval ...................134 Mandown Angle ....................134 Mandown Alarm Duration ................134...
- Page 8 Radioddity Extended manual for Radioddity DB25-D & GD-88 v2.0 12.12 Contacts ...................... 145 Contact list ....................145 Ham contacts ....................147 Ham groups ....................149 12.13 Digital Alarm List ..................151 12.14 Scan List ......................152 Scan List ......................152 Talkback ......................153 Scan TX Mode ....................153 Appointed Channel ...................153...
- Page 9 Receiver of the GD-88 ..................195 18.6 Transmitter of the GD-88 ................... 196 19 Certification ....................197 19.1 FCC part 90 approval for DB25-D ..............197 19.2 FCC part 90 approval for GD-88 ................ 198 19.3 CE certificate for DB25-D ..................200 19.4...
- Page 10 Radioddity Extended manual for Radioddity DB25-D & GD-88 v2.0 20 Common problems and how to solve them ..........205 21 Where to find support material ..............208 © Radioddity 2022 page 10 of 209...
-
Page 11: About Radioddity
About Radioddity ‘You, our friend, and customer, are our focus’ At Radioddity, customers are important to us. As a customer, your time and money are important to you. When you buy radios online, you face a dilemma: buy from a reputable website at a high price, or try to save money by choosing a dealer who may or may not offer quality goods, service, and advice. -
Page 12: Disclaimer
It does describe all those details, that are required to know in order to get the most out of your Radioddity DB25-D or GD-88. If you find anything that needs correction or should be added, please let us know at: support@radioddity.com. -
Page 13: Revision History Of This Document
We will try our best to make the next version of this document of even more added value for you. -
Page 14: Product Safety And Rf Exposure For Portable Radios
Radioddity Extended manual for Radioddity DB25-D & GD-88 v2.0 3 Product safety and RF exposure for portable radios Before using the radio, please read this manual carefully. It contains important instructions for the safe and proper use of the radio and operating instructions for compliance with the limits of RF energy exposure in accordance with applicable national and international standards. -
Page 15: Maintenance And Cleaning
Radioddity Extended manual for Radioddity DB25-D & GD-88 v2.0 Maintenance and Cleaning To ensure the best performance and prolong working life, please acquaint yourself with the following for maintenance and cleaning. Maintenance Please do not scratch or puncture the device with hard or sharp object. -
Page 16: What Is In The Box
4 What is in the box? Thank you for choosing a Radioddity DB25-D or Radioddity GD-88 radio. We recommend that you first check the delivery contents listed in the following tables and keep the packaging for later storage. If something is missing or damaged, please contact your dealer immediately. - Page 17 Radioddity Extended manual for Radioddity DB25-D & GD-88 v2.0 Item Picture Mounting Bracket Rack mounting Screws (2) Programming Cable Box manual © Radioddity 2022 page 17 of 209...
-
Page 18: Bill Of Materials For Radioddity Gd-88
Radioddity Extended manual for Radioddity DB25-D & GD-88 v2.0 Bill of materials for Radioddity GD-88 Item Picture Radioddity GD-88 Handheld Radio Dual-Band Antenna Li-Po Battery, 3000 mAh Charging Base Power Supply (Type depending on country of sales) © Radioddity 2022... - Page 19 Radioddity Extended manual for Radioddity DB25-D & GD-88 v2.0 Item Picture Belt Clip Hand strap Programming Cable Box Manual Notes: Further accessories for your radio are available at: https://www.radioddity.com/ © Radioddity 2022 page 19 of 209...
-
Page 20: Prepare Radio For Operation
Radioddity Extended manual for Radioddity DB25-D & GD-88 v2.0 5 Prepare radio for operation Radioddity DB25-D preparation and mounting For sake of your own and passenger’s safety, please find a safe and convenient position in order to prevent any damage caused by moving car. Check about suitable and allowed positions with the manufacturer of your car. -
Page 21: Radioddity Db25-D Antenna Connection
Notes: If transmitting without an antenna or other matched load line, it could damage the Radioddity DB25-D. The antenna must be connected to the radio before transmitting. All base stations should be equipped with lightning arrester to reduce the risk of fire, electric shock, or radio damage. -
Page 22: Radioddity Db25-D Power Supply Options
The vehicle battery must have a nominal rating of 12 V. Never connect the Radioddity DB25-D to a 24V battery. Be sure to use a 12 V vehicle battery that has sufficient current capacity. If the current to the DB 25-D is insufficient the display may darken during transmission or transmitting output power may drop excessively. -
Page 23: Base Station Operation
Extended manual for Radioddity DB25-D & GD-88 v2.0 Notes: If you use the Radioddity DB25-D for a long period and the vehicle battery is not fully charged or when the car engine is OFF, the car battery may become discharged and will not have sufficient power left to start the vehicle. Avoid using the Radioddity DB25-D in these conditions. -
Page 24: Replace Fuse
Radioddity Extended manual for Radioddity DB25-D & GD-88 v2.0 4. Connect a properly matched dual-band (2m/70cm) antenna to the radio’s antenna port. Replace fuse If the fuse is blown, please find out the cause and then solve the problem. After the problem is fixed then replace the fuse. -
Page 25: Radioddity Gd-88 Preparation
Radioddity GD-88 Preparation Before using the Radioddity GD-88 for the very first time, please make sure that the supplied antenna has been mounted to the radio and that the supplied battery has been fully charged and mounted to the radio. -
Page 26: Install Radioddity Gd-88 Battery Pack
Radioddity Extended manual for Radioddity DB25-D & GD-88 v2.0 Install Radioddity GD-88 battery pack Slide in the battery with its two noses sliding into the notches underneath the blank metal piece on the backside of the radio. Firmly push it down on its lower end. -
Page 27: Radioddity Db25-D Speaker-Microphone
On the Radioddity GD-88 those ports are on the right side and covered by a rubber cover. Notes: More details on this K1 style connector are to be found in Chapter 17.5 K1 connector on page 191. -
Page 28: Parts Description & Function Applications
Radioddity Extended manual for Radioddity DB25-D & GD-88 v2.0 Parts description & function applications Part Name Function description and applications [ ] Power Press and hold it for more than 3 sec to turn the radio Switch on or off. - Page 29 Radioddity Extended manual for Radioddity DB25-D & GD-88 v2.0 Part Name Function description and applications 1) For external accessories connection, such as earpiece, speaker. SP/MIC jacket 2) Connect the programming cable here to get connection with the PC for data programming.
- Page 30 Radioddity Extended manual for Radioddity DB25-D & GD-88 v2.0 Part Name Function description and applications Install the external antenna to this port. In TX testing, please install a dummy load to replace the antenna. Antenna port The antenna or dummy load should be with 50 Ω...
- Page 31 Radioddity Extended manual for Radioddity DB25-D & GD-88 v2.0 Part Name Function description and applications The Speaker- Used to receive audio from others (Audio output Microphone options can be set from the menu option) Press and then speak in to the microphone to [PTT]-key transmit;...
-
Page 32: Radioddity Gd-88 Radio Controls
Radioddity Extended manual for Radioddity DB25-D & GD-88 v2.0 Radioddity GD-88 radio controls Part Name Function description and applications [P1] Programmable function key 1 Press and then speak in to the microphone to [PTT] transmit; Release it to receive. [P2]... - Page 33 Radioddity Extended manual for Radioddity DB25-D & GD-88 v2.0 Part Name Function description and applications Power switch / 1) Turn the radio On/Off Volume control 2) Choose the proper volume level for your needs 1) For external accessories connection, such as Speaker / Mic earpiece, speaker.
-
Page 34: Radioddity Db25-D Display
Radioddity Extended manual for Radioddity DB25-D & GD-88 v2.0 Radioddity DB25-D display Radioddity GD-88 display © Radioddity 2022 page 34 of 209... -
Page 35: Status Icons
Radioddity Extended manual for Radioddity DB25-D & GD-88 v2.0 5.10 Status Icons Icon Icon description Functional description 6 red bars indicate high power High Power Low Power 3 red bars indicate low power White bars indicate the radio being in... - Page 36 Radioddity Extended manual for Radioddity DB25-D & GD-88 v2.0 Icon Icon description Functional description Offset Frequency Appears when RX frequency is higher Negative direction than TX frequency Offset Frequency Appears when TX frequency is higher Positive direction than RX frequency...
-
Page 37: Transmit / Receiving Icons
Rotate the [ENC] knob Select set options Use [▲/▼]-keys on GD-88 Press and hold the power switch for more Press and hold power switch than 3s to turn the DB25-D On or Off © Radioddity 2022 page 37 of 209... -
Page 38: Keys And Enc (Channel Selector) Operation
Radioddity Extended manual for Radioddity DB25-D & GD-88 v2.0 Keys and ENC (channel Selector) operation The following keys can be used to quickly achieve the desired function. Status Operation Description Long Press Standby Power On /Off (3 sec) Short Press... -
Page 39: Main Functions Description
Radioddity Extended manual for Radioddity DB25-D & GD-88 v2.0 5.12 Main functions description Common functions Function Description A zone Is a group of channels. Support end users to build and Zone expand zones by themselves. In VFO mode, the user can directly input the required... -
Page 40: Analog Functions
Radioddity Extended manual for Radioddity DB25-D & GD-88 v2.0 Analog Functions Function Description Analog channel An analog call is a call on an analog channel. call Narrow / Wide Working bandwidth for the radio Band (Narrow band: 12.5 kHz, Wide band: 25 kHz) It is the signal strength required to adjust the received signal. -
Page 41: Using The Numeric Keypad
Radioddity Extended manual for Radioddity DB25-D & GD-88 v2.0 5.13 Using the numeric keypad The numeric keypad of the Speaker-Microphone / the radio can be used to input frequency/channel numbers, user alias or ID or SMS. Most characters require pressing a key for several times. - Page 42 Radioddity Extended manual for Radioddity DB25-D & GD-88 v2.0 Preset Keys on page 121. © Radioddity 2022 page 42 of 209...
-
Page 43: Basic Operation
‘click’ to power on the radio till a ‘Beep sound’ is heard (if turned on). After power on, the Radioddity logo and ‘Powering On’ text is shown on the display. The radio is now in standby-mode. -
Page 44: Switch Vfos
Radioddity Extended manual for Radioddity DB25-D & GD-88 v2.0 Switch VFOs In Standby Mode, press the [B/E]-key to switch between VFOs A and B for operation and settings. The current operable and settable VFO shows the ‘ ’ icon left to the channel name. -
Page 45: Channel Selection
3. In standby, press the [TONE/T.SEL]-key, and then choose the required signaling. This is only possible with the Radioddity DB25-D (1) Choose the signaling type: single click the [TONE/T.SEL]-key to choose from QT , DQT, DQI or none. The signaling icon will display at the upper right of the current VFOs channel. -
Page 46: Vfo Frequency Set
Radioddity Extended manual for Radioddity DB25-D & GD-88 v2.0 6.10 VFO Frequency Set In Standby Mode, when the ‘ ’ icon or ‘CTRL’ is shown left to the VFO A or B and the current VFO is in VFO mode, the desired frequency can be entered through the numeric keypad. -
Page 47: Repeater / Talk Around
Radioddity Extended manual for Radioddity DB25-D & GD-88 v2.0 6.14 Repeater / Talk Around When the repeater fails to work, or the radio exceeds the coverage of the repeater but within the call range of other radio users, press the preset [Repeater / Talk Around]-key or actively set ‘Menu →... -
Page 48: Roaming On / Off
VFOs, those will be heard. Only one VFO can be heard at the very same time. Notes: If you are unable to assign ‘Promiscuous’ to your Radioddity GD-88, then you are not using our latest CPS. The old CPS is not capable of assigning it. -
Page 49: Using The Radio Menu
7 Using the radio menu Set various functions and parameters by accessing the main menu and submenu of the radio. The menu function options supported by the Radioddity DB25-D and GD-88 are shown in the table below. The user-defined [P]-key programming keys are function shortcut keys, for specific functions and may be pre-programed using the Radioddity CPS. -
Page 50: Accessing The Menus And Operations
Radioddity Extended manual for Radioddity DB25-D & GD-88 v2.0 Accessing the menus and operations Access the main menu and submenu options to set or browse various parameters (like message checking, editing, and sending, etc.) through the following operations and steps. Some of the menus may be enabled or disabled using the Radioddity CPS. -
Page 51: Placing A Ptt Call
Private calls, Group calls, and All calls can be made to the preset contacts on the current digital channel (All call rights need to be allowed by the Radioddity CPS), and the methods for initiating and receiving all types of calls are the same. Each digital channel can be preset using the Radioddity CPS with a ‘transmission... - Page 52 Radioddity Extended manual for Radioddity DB25-D & GD-88 v2.0 Operation method Call Type Make a call Receive a Call In Standby Mode, press the When Private Call [PTT]-key to initiate the call. received, the screen displays: When Private Call initiated, the screen displays:...
-
Page 53: Initiate A Digital Radio Call
Radioddity Extended manual for Radioddity DB25-D & GD-88 v2.0 Initiate a digital radio call If necessary, a call can be initiated by any of the following ways. 1. Rotate the [ENC] knob or use the [▲/▼]-keys to select any of the preset channels, and then press the [PTT]-key of the Speaker-Microphone to initiate the call. -
Page 54: Special Dmr Functions
9 Special DMR functions Use our Radioddity CPS software to enable/disable and preset any of the Preset Buttons with one of the following functions. Notes: For more details on how to program the Preset Keys, please check chapter 0 ©... -
Page 55: Remote Monitor
Radioddity Extended manual for Radioddity DB25-D & GD-88 v2.0 Preset Keys on page 121. Remote monitor Preset to prohibit the radio from being remotely monitored by others or allow other users to remote monitor for the set time for continuing to keep the MIC and transmitter on (Time range is from 10s - 120s). -
Page 56: Gps
Radioddity Extended manual for Radioddity DB25-D & GD-88 v2.0 Turn on/off GPS and position report feature to report the position information to the preset designated channel and TalkGroup at the preset intervals. Record Preset to prohibit or allow the recording for any of receive, transmit, receive + transmit voice. -
Page 57: 10 The Radio Menu Functions In Detail
Extended manual for Radioddity DB25-D & GD-88 v2.0 10 The radio Menu functions in detail The various functions, applications and parameter configurations of the radio can be checked and set by menus, if those have been enabled using the Radioddity CPS. 10.1 Contacts The contacts provide the ‘address book’... -
Page 58: New Contact
Radioddity Extended manual for Radioddity DB25-D & GD-88 v2.0 Contact of call type Private Call (1) Application → press the [Select]-key → Rotate the [ENC] knob or use the [▲/▼]-keys to choose either Radio Check, Call Alert, Remote Mon.(Monitor), Radio Disable or Radio Enable → press the [Select]-key to send→ ‘OK’ or ‘Fail’... -
Page 59: Manual Dial
[Select]-key to confirm the selected option → return to the previous level. Ham Contacts The Radioddity DB25-D and GD-88 can permanently store up to 300.000 HAM contacts within its internal memory. 1. Access the menu, press the [Menu]-key and rotate the [ENC] knob or use the [▲/▼]-keys to select Contacts... -
Page 60: Ham Group Contacts
Radioddity Extended manual for Radioddity DB25-D & GD-88 v2.0 3. Choose the desired private contact by rotating the [ENC] knob, the selected contact ID number will display at the top left of the screen and the serial No of the contact displays at the upper right. -
Page 61: Message
As an example, the currently largest DMR network, Brandmeister network, requires the brand of radio associated with the DMR ID to be assigned. For your Radioddity DB25-D or GD-88 set it to ‘Chinese Radio’. -
Page 62: Createmsg
Radioddity Extended manual for Radioddity DB25-D & GD-88 v2.0 CreateMsg 1. Press the preset [SMS]-key to access the menu. 1. Access the menu, press the [Menu]-key and rotate the [ENC] knob or use the [▲/▼]-keys to select Message and press the [Select]-key to enter. -
Page 63: Common Messages Commmsg
→ return to the previous level. Notes: If there are no Common Messages, you should pre-program those using the Radioddity CPS software first or add them into ‘CommMsg’. Inbox 1. Access the menu, press the [Menu]-key and rotate the [ENC] knob or use the [▲/▼]-keys to select Message... -
Page 64: Outbox
Radioddity Extended manual for Radioddity DB25-D & GD-88 v2.0 • Reply → press the [Select]-key → edit SMS → rotate the [ENC] knob or use the [▲/▼]-keys to choose an option of either SendMsg, lnsertComMsg or ExitEditor → press the [Select]-key to confirm the selected option. -
Page 65: Draftbox
Radioddity Extended manual for Radioddity DB25-D & GD-88 v2.0 • Save → press the [Select]-key to save the message → return to the previous level. • Delete → ‘Are you sure?’ pops up on the screen → press the [OK]-key to confirm deletion or press the [Back]-key to cancel the deletion →... -
Page 66: Call Log
Radioddity Extended manual for Radioddity DB25-D & GD-88 v2.0 10.3 Call Log Information for recent dialed calls, received calls and missed calls can be checked by users thru Call Log menu. Call logs help to manage the recent call activities. -
Page 67: Missed Calls
Radioddity Extended manual for Radioddity DB25-D & GD-88 v2.0 • View → Press the [Select]-key to check the dialed number → Press the [Back]-key to return to the previous level. • TimeOfCall → press the [Select]-key to display the call time and duration information →... -
Page 68: Scan
Scan 1. Press the preset [Scan On/Off]-key to turn the scan On or Off 2. Hold and long press the Radioddity GD-88 [▲/▼]-key to turn on scan, and press any key to turn if off 1. Access the menu, press the [Menu]-key and rotate the [ENC] knob or use the [▲/▼]-keys in order to select Scan... -
Page 69: Scan Mode
Radioddity Extended manual for Radioddity DB25-D & GD-88 v2.0 • Set Prior → press the [Select]-key to set the channel to be priority → ‘Prior is Set’ pops up on the screen → return to the channel list, where the current channel is additionally marked with a P. -
Page 70: Roam Setting
Radioddity Extended manual for Radioddity DB25-D & GD-88 v2.0 Roam Setting Roaming and Roam Mode can be enabled or disabled by the following two ways: 1. Press the preset [Roam On/Off]-key to turn the roaming On/Off. 1. Access the menu, press the [Menu]-key and rotate the [ENC] knob or use the [▲/▼]-keys in order to select Scan... - Page 71 Radioddity Extended manual for Radioddity DB25-D & GD-88 v2.0 (2) RSSI Set → press the [Select]-key to display the current RSSI threshold value → rotate the [ENC] knob or use the [▲/▼]-keys to adjust the desired value → press the [OK]-key to confirm the modification → ‘Set Ok!’ pops up on the screen and return to the previous level.
-
Page 72: Precautions For Roaming
Radioddity Extended manual for Radioddity DB25-D & GD-88 v2.0 (5) ConnectTime → press the [Select]-key to display the current connect time → rotate the [ENC] knob or use the [▲/▼]-keys to adjust the desired connect times → press the [OK]-key to confirm the modification → ‘Set Ok!’ pops up on the screen and return to the previous level. -
Page 73: Local Set
Radioddity Extended manual for Radioddity DB25-D & GD-88 v2.0 1. Access the menu, press the [Menu]-key and rotate the [ENC] knob or use the [▲/▼]-keys to select Zone & Channel and then press the [Select]-key to enter. 2. Rotate the [ENC] knob or use the [▲/▼]-keys for the desired zone and press the [Select]-key to enter. -
Page 74: Backlight
Radioddity Extended manual for Radioddity DB25-D & GD-88 v2.0 Backlight 1. Press the preset [BackLight Auto/On/Off]-key. 1. Access the menu, press the [Menu]-key and rotate the [ENC] knob or use the [▲/▼]-keys to choose Local Set and then press the [Select]-key to enter. -
Page 75: Vox
Radioddity Extended manual for Radioddity DB25-D & GD-88 v2.0 3. Rotate the [ENC] knob or use the [▲/▼]-keys to choose from the following options: (1) CHN+Name → press the [Select]-key for the display to show the channel number and the name associated to it → ‘DispMode is Set’ pops up on the screen →... -
Page 76: Channel Sw
Radioddity Extended manual for Radioddity DB25-D & GD-88 v2.0 1. Access the menu, press the [Menu]-key and rotate the [ENC] knob or use the [▲/▼]-keys to choose Local Set and then press the [Select]-key to enter. 2. Rotate the [ENC] knob or use the [▲/▼]-keys to choose VOX and press the [Select]-key to choose from the following options: (1) Vox Switch →... -
Page 77: Abrepeat
Notes: If you restore the factory settings, the radio will be restored with those settings that have previously been saved using the Radioddity CPS as your radios factory settings. All data will be overwritten by those as saved for the factory reset procedure. -
Page 78: Parameters
Radioddity Extended manual for Radioddity DB25-D & GD-88 v2.0 TranRxTx The currently selected channel is supposed to be part of a repeater-setup and RX and TX are both enabled if the channel is in repeater-mode. (4) B RepeatMode → Press the [Select]-key to choose for VFO-B from The currently selected channel is not in repeater-mode. -
Page 79: Power
Radioddity Extended manual for Radioddity DB25-D & GD-88 v2.0 Power 1. Press the preset [High/Low Power option]-key to switch the power between high and low. 1. Access the menu, press the [Menu]-key and rotate the [ENC] knob or use the [▲/▼]-keys to choose Parameters... -
Page 80: Sleep Mode
Slot and Tx Time Slot for those. Sleep Mode As the Radioddity GD-88 is powered by a battery with limited capacity, it is advisable to make best use of the battery´s capacity. Therefore, the radio has special functionalities for saving power and lengthen the battery life. -
Page 81: Encryption (Enc Level)
Radioddity Extended manual for Radioddity DB25-D & GD-88 v2.0 (2) Delay Time → press the [Select]-key → rotate the [ENC] knob or use the [▲/▼]-keys to choose the delay time between 10 and 60 seconds → press the [OK]-key to confirm → ‘Set OK!’ pops up on the screen and returns to the previous level. -
Page 82: Busy Channel Lockout (Bclo)
Radioddity Extended manual for Radioddity DB25-D & GD-88 v2.0 3. Rotate the [ENC] knob or use the [▲/▼]-keys to select the desired Narrow bandwidth or Wide bandwidth and press the [Select]-key to confirm. 4. ‘Set Ok’ pops up on the screen and the radio returns to the previous level. -
Page 83: Ctcss Phase Reverse (Ctcss Tail)
4. ‘Set OK!’ pops up on the screen and returns to the previous level. 10.8 Tone Set If It is allowed by the Radioddity CPS software, set and check the prompt tones by accessing the Tone Set menu. Profiles 1. Access the menu, press the [Menu]-key and rotate the [ENC] knob or use the [▲/▼]-keys to choose Tone Set... -
Page 84: Key Tone (Keytone)
Radioddity Extended manual for Radioddity DB25-D & GD-88 v2.0 Key Tone (KeyTone) 1. Access the menu, press the [Menu]-key and rotate the [ENC] knob or use the [▲/▼]-keys to choose Tone Set and then press the [Select]-key to enter. 2. Rotate the [ENC] knob or use the [▲/▼]-keys to choose KeyTone and press the [Select]-key to choose from the following options and procedures: (1) KeyRingSW →... -
Page 85: Group Call Ring Tone (G Call Tone)
Radioddity Extended manual for Radioddity DB25-D & GD-88 v2.0 2. Rotate the [ENC] knob or use the [▲/▼]-keys to choose PCallTone and press the [Select]-key to choose from the following options and procedures: (1) PCallSW → press the [Select]-key → rotate the [ENC] knob or use the [▲/▼]- keys to choose from one of the options of Rx Begin Tone, Rx End Tone, Tx Begin Tone or Tx End Tone →... -
Page 86: Fm Call Tone / Power On Tone
• GPS Map → press the [Select]-key to display the rough distance between the Radioddity DB25-D or GD-88 and other stations → rotate the [ENC] knob or use the [▲/▼]-keys to choose between GroupMap and Location → press the [Back]-key to return to the previous level. -
Page 87: Fm Radio
• GPS Location → press the [Select]-key to display the location information (date, time, longitude, latitude, altitude, speed) of the Radioddity DB25-D or GD-88 → rotate the [ENC] knob or use the [▲/▼]-keys to check GPS / GL received satellites information and signal strength (white: empty signal, red: weak signal, light blue: available signal) →... -
Page 88: Time
Radioddity Extended manual for Radioddity DB25-D & GD-88 v2.0 desired frequency → press the [Select]-key to select one of the following options: • Delete → press the [Select]-key to delete the current FM radio frequency or press the [Back]-key to cancel. -
Page 89: Dtmf
If Spk+HeadSet (factory default) mode is selected, there is audio from the Radioddity GD-88 speaker and the plugged in headset accessory. If Headset mode is selected, there is no audio output from the Radioddity GD-88 speaker, but audio output from the inserted headset. -
Page 90: Aprs
Radioddity Extended manual for Radioddity DB25-D & GD-88 v2.0 APRS 1. Access the menu, press the [Menu]-key and rotate the [ENC] knob or use the [▲/▼]-keys to choose Appendix and then press the [Select]-key to enter. 2. Rotate the [ENC] knob or use the [▲/▼]-keys to choose APRS and press the [Select]-key to choose from the following options: (1) APRS Type →... -
Page 91: Record
Radioddity Extended manual for Radioddity DB25-D & GD-88 v2.0 • APRS Message → press the [Select]-key to display the list of received APRS messages → rotate the [ENC] knob or use the [▲/▼]-keys to choose the received message → press the [Select]-key to display the full APRS data (date, time, longitude, latitude, altitude, speed) that had been received →... -
Page 92: Device Info
Name, Call Type) of the contact associated with the currently selected channel → press the [Back]-key to return to the previous level. (4) Version → press the [Select]-key to display the Model Number (DB25-D), Firmware Version, Frequency Range (F136-174,F400-480) and Version Date and time →... - Page 93 Radioddity Extended manual for Radioddity DB25-D & GD-88 v2.0 10.12 Channel Edit It is supported to check and modify the parameters of Channel or VFO mode by accessing the Channel Edit mode. 1. In Standby Mode, press and hold the [B/E]-key for 3 seconds to enter the Channel Edit mode.
- Page 94 Radioddity Extended manual for Radioddity DB25-D & GD-88 v2.0 Parameter Possible Values Channel Attribution Digital/Analog/RX:D/A-TX:A/TX:D/A-RX:D RX Frequency In the available range of the radio TX Frequency In the available range of the radio FreqStep 5kHz/6.25kHz/10kHz/12.50kHz/25kHz/50kHz/100kHz Power High/Low RXOnly On/Off Rx TimeSlot...
-
Page 95: 11 Prepare For Using The Cps
11.1 Install device driver Quite likely, your Radioddity DB25-D or GD-88 came with a programming cable. This programming cable adds an additional virtual COM-port to your system. It does include a small chip that converts signals to and from the USB-side into serial signals to/from the K1 style connector. -
Page 96: Install Cps
11.2 Install CPS Download the current Radioddity CPS version for your radio from our Support area. After downloading, unpack the archive into a temporary directory of your choice. Navigate to the subfolder named ‘Software’. In there, you find the CPS-installer. Execute the installer with admin rights by invoking ‘Run as administrator’... - Page 97 Radioddity Extended manual for Radioddity DB25-D & GD-88 v2.0 Click on the underlined ‘More info’ and continue by clicking on ‘Run anyway’. An additional confirmation dialog will follow, asking ‘Do you want to allow this app from an unknown publisher to make changes to your device?’. Confirm this dialog by clicking ‘Yes’.
- Page 98 Radioddity Extended manual for Radioddity DB25-D & GD-88 v2.0 After a while, the installation process finishes with Click ‘Finish’ to confirm the completion of the installation process. © Radioddity 2022 page 98 of 209...
-
Page 99: Start Cps
Radioddity Extended manual for Radioddity DB25-D & GD-88 v2.0 11.3 Start CPS During installation of the CPS, a shortcut had been placed on your desktop. Double click on that shortcut to start the CPS. As the e CPS has never been used before, it will be preloaded with certain default data. -
Page 100: Special Functions
Radioddity Extended manual for Radioddity DB25-D & GD-88 v2.0 Special functions Some of the computers keyboard function keys have been assigned special functionality within the CPS. Function Turn Toolbar On/Off Turn Navigation bar On/Off Turn Status bar On/Off Font Background Color... -
Page 101: Read Codeplug From Db25-D Or Gd-88
To read the current codeplug as stored on the radio, click on ‘Read’ within the toolbar to start the transfer of data from the Radioddity DB25-D or GD-88 to the The radio will display ‘Flash Read’ whilst data is been transferred from the radio to the CPS. -
Page 102: Safe Codeplug To File
The Radioddity DB25-D or GD-88 will display ‘Flash Write’ whilst data is been transferred from the CPS to the radio. As soon as all data has been transferred from the CPS to the Radioddity DB25-D or GD-88, the text ‘Flash Write’ will disappear. -
Page 103: Open Existing Codeplug
The radio will display ‘Write Factory’ whilst data is been transferred from the CPS to the Radioddity DB25-D or GD-88. As soon as all data has been transferred from the CPS to the Radioddity DB25-D or GD-88, the text ‘Write Factory’ will disappear. - Page 104 Confirm by pushing the MENU-knob. Now the settings previously stored as factory-defaults will be restored. You will see a couple of screens on your Radioddity DB25-D and Radioddity GD-88. The complete process takes about 15 seconds, depending on the size of the factory-defaults codeplug you previously saved to the radio.
-
Page 105: 12 Using The Cps To Make Changes To Your Settings
Some of those menus are needed just once whilst others are needed more often. Our CPS (although it is the very same as for the Radioddity DB25-D) will present additional parameters as soon as a Radioddity GD-88 configuration has been read. -
Page 106: Model Number
A number to indicate the radio type that cannot be amended or edited. Notes: You may find other radios looking similar to the Radioddity DB25-D and even sharing the very same ‘Model Number’. Be careful as to not use any firmware or CPS not downloaded from our website with your Radioddity DB25-D as this may void any warranty. -
Page 107: Basic Parameters
12.2 Basic Parameters Before starting your first QSO with your new Radioddity DB25-D or GD-88, do not forget to setup your Radio ID (DMR ID) and your Radio Name (Call Sign). You find those parameters at the very top of the ‘Basic Parameters’. -
Page 108: Busy Channel Lockout
Power-saving As the radio is operated by a battery with limited capacity, it is advisable to make best use of its capacity. Therefore, the Radioddity GD-88 has 3 additional parameters: ‘Power-saving’, ‘Power Saving Ratio’ and ‘Save power startup time’. In order to activate the power-saving function, also called ‘Sleep Mode’, it needs to... -
Page 109: Power Saving Ratio
Radioddity Extended manual for Radioddity DB25-D & GD-88 v2.0 Power Saving Ratio Users can set the duty cycle (waketime : sleep time) of the power-saving mode. The smaller the ratio, the lower the power consumption. A higher ratio may result in a receiving delay or missed calls. -
Page 110: End-Tone Types
Radioddity Extended manual for Radioddity DB25-D & GD-88 v2.0 End-tone types Users can enable this function according to the working environment and actual needs to set the end-tone type after [PTT] has been released, so as to facilitate the receiver to turn off its speaker in advance. -
Page 111: Radio Id
Never ever use a DMR ID that is not assigned to you. Rolling Code This feature is for companies using larger quantities of the Radioddity DB25-D or GD-88. If the checkbox is ticked the specified ‘Radio ID.’ will get increased by one on each ‘write’... -
Page 112: Roaming
Radioddity Extended manual for Radioddity DB25-D & GD-88 v2.0 Roaming Users can enable this function according to the working environment and their actual needs to specify if the radio should directly start roaming after booting up. Options: Off Do not start roaming after booting up. -
Page 113: Roaming Mode
Radioddity Extended manual for Radioddity DB25-D & GD-88 v2.0 Roaming Mode Users can enable this function according to the working environment and their actual needs. options: Auto Once searching an available repeater from the scan list, the radio will lock to the current available repeater and pause auto roaming. -
Page 114: Connect Check Timer
Radioddity Extended manual for Radioddity DB25-D & GD-88 v2.0 Notes: The received signal strength (RSSI threshold value) is settable. If the RSSI mode is enabled and the searched repeater RSSI value is more than the preset threshold, the repeater's transmitting signal coverage will be automatically recognized as good, and then the radio will suspend RSSI roaming. -
Page 115: Record Set
Radioddity Extended manual for Radioddity DB25-D & GD-88 v2.0 Record Set Users can enable this function according to the working environment and their actual needs to set recording functions. Options: Off Close the recording. Record the received voice whenever radio is receiving... -
Page 116: Prompt Tone
Radioddity Extended manual for Radioddity DB25-D & GD-88 v2.0 12.4 Prompt Tone You can turn on or off all sounds and prompt tones thru this parameter, or just set partial prompt tones of specific radio parameters. Profiles Select a predefined audio profile. -
Page 117: Group Call Tone
Radioddity Extended manual for Radioddity DB25-D & GD-88 v2.0 Group Call Tone Once receiving a group call, the Group Call Tone will be heard if this option is selected. Mode Options: off, 1~5 Default: Roaming restart prompt Users can select the ‘Roaming restart prompt’ option to play a prompt whenever the radio restarts roaming. -
Page 118: Low Battery Alert Tone
Radioddity Extended manual for Radioddity DB25-D & GD-88 v2.0 Low Battery Alert tone After setting it to ‘On’, a low battery alert will be heard when the battery voltage is less than a factory preset battery power level, which reminds you to charge or change the battery pack. -
Page 119: Indicator
Radioddity Extended manual for Radioddity DB25-D & GD-88 v2.0 12.5 Indicator You can enable or disable some status indicators thru this menu. All Indicators You can activate or disable all working status indicators of the radio thru this parameter. Options: On... -
Page 120: Rx Indicator
Radioddity Extended manual for Radioddity DB25-D & GD-88 v2.0 RX Indicator You can activate or disable the working status of the LED indicator for receiving a signal thru this parameter. Options: On LED indicator is on when the radio is receiving... -
Page 121: Preset Keys
12.6 Preset Keys Users can define the keys within this menu. Depending on the radio either P1…P4 (Radioddity GD-88) or P1…P7 (Radioddity DB25-D) are available to be assigned with special functions. Long Press Duration You can trigger different functions depending on Long Press or Short Press of a P- key. - Page 122 Radioddity Extended manual for Radioddity DB25-D & GD-88 v2.0 Type Features Description Scan On/Off Enable or disable radio scanning feature Select the desired scan mode´(switch between SE, TO and Scan Mode CO mode) Repeater / Switch between Repeater and Talk Around Mode...
-
Page 123: Mic Gain
MIC Gain 1 refers to a microphone attached to the K1-socket of the radio and requires also MIC Gain 2 to be in its ‘On‘-position. MIC Gain 2 refers to the Speaker- Microphone that comes with the DB25-D and is connected via the front RJ45- Socket or the bult-in microphone of the GD-88. -
Page 124: Mic Gain 1
You can turn on or off the MIC Gain 2 feature of the microphone attached to the RJ45-socket at the front of the Radioddity DB25-D or the built-in microphone of the GD-88 and with the parameter turned ‘On’, the transmitted radio microphone audio level will be amplified in accordance with the setup gain ratio of ‘... -
Page 125: Quick Msg
Radioddity Extended manual for Radioddity DB25-D & GD-88 v2.0 12.8 Quick Msg The users can pre-program up to 100 messages, each message content up to 40 characters. Valid characters include alphanumeric characters, spaces, and special characters. Users can access the function through the Message menu function. -
Page 126: Remote Monitor Duration
Radioddity Extended manual for Radioddity DB25-D & GD-88 v2.0 Remote monitor duration By programming, users can program how long the radio will keep the microphone and transmitter on after it receives the remote monitor command from another radio. No visual or audio indication will be shown to your radio. -
Page 127: Remote Kill Decode
Radioddity Extended manual for Radioddity DB25-D & GD-88 v2.0 Preset Keys on page 121. Remote Kill Decode It allows the radio to receive and deal with the ‘Remote Kill’ command. The radio will be forbidden to be used, which would be useful to protect a stolen or missing radio from being used by others. - Page 128 Radioddity Extended manual for Radioddity DB25-D & GD-88 v2.0 Preset Keys on page 121. © Radioddity 2022 page 128 of 209...
-
Page 129: Radio Detection
Radioddity Extended manual for Radioddity DB25-D & GD-88 v2.0 Radio Detection Users or base station operators can send a ‘Radio Detection’ command to a target radio to see whether it is active in the system, and without showing any indications. -
Page 130: Radio Revive
Radioddity Extended manual for Radioddity DB25-D & GD-88 v2.0 Preset Keys on page 121. Radio Revive It allows the radio to receive and deal with the ‘Radio Revive’ command, and activate itself to be used again. Options: On Allow and accept to be revived by other radios... -
Page 131: Call Alert
Radioddity Extended manual for Radioddity DB25-D & GD-88 v2.0 Preset Keys on page 121. Call Alert It allows the radio to receive and deal with the ‘Call Alert’ command, and will reply to it at its convenience. Options: On Allow the radio to receive the call alert command... -
Page 132: Dtmf Duration (On-Time)
Radioddity Extended manual for Radioddity DB25-D & GD-88 v2.0 DTMF Duration (On-time) To change the duration of each DTMF code send by setting this parameter. Options: Maximum: 500 ms Minimum: 50 ms Increment: 10 ms Recommendation: 100 ms Default: 60 ms... -
Page 133: Gps
Radioddity Extended manual for Radioddity DB25-D & GD-88 v2.0 Preset Keys on page 121. By setting this parameter, users can turn on the GPS module. Options: Off Close the GPS Open the GPS Default: Notes: The function may be assigned to one of the function keys. For more details, please check chapter 0 ©... -
Page 134: Gps Interval
Extended manual for Radioddity DB25-D & GD-88 v2.0 Preset Keys on page 121. GPS interval Once the GPS feature is activated, the Radioddity DB25-D or GD-88 will send the GPS data whenever the ‘GPS interval’ has elapsed. Options: Max: 250 min Min:... -
Page 135: Inactive Time
Notes: The alarm duration of the digital channel is configured by the parameters of the digital alarm list corresponding to the channel. Inactive Time This option and its value are not applicable for the Radioddity DB25-D or the GD- 88. Please ignore it. Pre-alarm Time This option and its value are not applicable for the Radioddity DB25-D or the GD- 88. -
Page 136: Analog Aprs
Radioddity Extended manual for Radioddity DB25-D & GD-88 v2.0 Analog APRS For Analog APRS data, check which frequency and further parameters are to be used for your region. Within the CPS, those settings required for analog APRS are specified within the following block: Notes: Analog APRS may be assigned to a channel as ‘APRS(A)’. -
Page 137: Aprs Auto Tx Intervals[S]
Recommended: Beacon If the Radioddity DB25-D is mainly used as a radio station at home, we advise to not use GPS but set the GPS-data within the APRS protocol to the fixed location as specified with the parameters ‘Latitude’ and ‘Longitude’. -
Page 138: Tx Freq [Mhz]
Radioddity Extended manual for Radioddity DB25-D & GD-88 v2.0 Default: Notes: This parameter is mandatory if using APRS with a ‘Fixed Location’. TX Freq [MHz] The frequency specified with this parameter for analog APRS is totally independent of the selected channels frequency. The APRS beacon is transmitted using 1200 Baud AFSK. -
Page 139: Transmit Delay
Radioddity Extended manual for Radioddity DB25-D & GD-88 v2.0 Transmit Delay The two parameters ‘Transmit Delay’ and ‘Prewave Time’ are responsible for the delay between automatic [PTT] activation (for analog APRS) and the actual transmission of the APRS beacon. Delay period:... -
Page 140: Destn Ssid
Radioddity Extended manual for Radioddity DB25-D & GD-88 v2.0 Destn SSID The specified digit will be appended to the destination call sign Value: Maximum: Minimum: Increment: Default: Destn Call Sign This parameter is required to specify the destination call sign and may not be left empty for analog APRS. -
Page 141: Your Call Sign
Radioddity Extended manual for Radioddity DB25-D & GD-88 v2.0 Your Call Sign This parameter is also mandatory for analog APRS as it does specify your own call sign Default: <empty> APRS Symbol Table Initially APRS supported just 192 different symbols. This has recently been enhanced to several thousands. - Page 142 APRS service pages such as https://aprs.fi. The following table list the most used icons and their corresponding ‘APRS Symbol Table’, ‘APRS Map Icon’ and ‘SSID’ that are applicable for your DB25-D. Notes: We advise not to take any other combinations besides those listed.
-
Page 143: Aprs Signal Path
Radioddity Extended manual for Radioddity DB25-D & GD-88 v2.0 APRS Signal Path This parameter defines the path your APRS beacon packets should take. Recommended: WIDE1-1WIDE2-1 Notes: There is no space or ‘,’ between ‘WIDE1-1’ and ‘WIDE2-1’. This parameter is only... -
Page 144: Aprs Tg
Radioddity Extended manual for Radioddity DB25-D & GD-88 v2.0 APRS TG In digital APRS the APRS data will be transmitted to the TalkGroup, specified by this parameter. The TalkGroup is depending on the network that is used by the defined APRS channel. The following table lists some of those TalkGroups as found on the DMR Brandmeister network. -
Page 145: Encryption
Radioddity Extended manual for Radioddity DB25-D & GD-88 v2.0 12.11 Encryption Users are allowed to program a maximum of 10 encryption key names and their 2 Byte encryption key values. The encryption level (low, middle and high) should be programmed to be the same. Otherwise, the encryption value can't be used. If the encryption level is programmed to be ‘off’, this function can't be used. - Page 146 Radioddity Extended manual for Radioddity DB25-D & GD-88 v2.0 If you press the button ‘Import’, you will be directed to the default file path of the system, and you can directly import a CSV file of digital contacts. For your convenience we have included a sample file ‘contacts 2000.csv ‘.
-
Page 147: Ham Contacts
Radioddity Extended manual for Radioddity DB25-D & GD-88 v2.0 To manually add one or more records (‘Serial No’s) to the ‘Contact list’, first specify the total number of records you want to add within the field labeled ‘ADD QTY’ before you push the button ‘+ Add’. Be careful as to not exceed the maximum number of allowed records. - Page 148 CSV file of digital contacts. For your convenience we have included a sample file ‘Ham contacts_ALL_20200505193301 max 200000.csv ‘ within the installation directory of the Radioddity CPS. This sample file has more than 160000 records with their ‘DMR ID’, ‘Call sign’, ‘Full name’, ‘City’, ‘State/Province’...
-
Page 149: Ham Groups
Radioddity Extended manual for Radioddity DB25-D & GD-88 v2.0 When you have imported the digital contacts CSV file, you can press the ‘Write’ button to write the list to the radio. Only The ‘Ham contacts’ will be written to the radio. - Page 150 Radioddity Extended manual for Radioddity DB25-D & GD-88 v2.0 If you press the ‘import’ button, you will be directed to the default file path of the system in order to directly import a CSV file of Ham groups. If you need to update the imported ‘Ham group’...
-
Page 151: Digital Alarm List
Radioddity Extended manual for Radioddity DB25-D & GD-88 v2.0 When you have imported the ham groups CSV file, you can select your desired groups from it, and then tick ‘’ in the ‘’ box next to serial number. After all the required groups have been selected, press the ‘Copy’... -
Page 152: Scan List
Radioddity Extended manual for Radioddity DB25-D & GD-88 v2.0 12.14 Scan List A Scan/Roaming list can be associated with each channel. Once scan is ‘On’, this Scan/Roaming list will be monitored for activity on the current channel. If Roaming is turned ‘On’ within the ‘Basic Parameters’ menu, the radio will scan the repeater channels on the roaming list to search for an available repeater station. -
Page 153: Talkback
Radioddity Extended manual for Radioddity DB25-D & GD-88 v2.0 Mark one of the existing scan lists. Its name will be displayed in the input field ‘Scan List’. Now press the button ‘- Del’ to delete than scan list from the existing scan lists. -
Page 154: Optional Channel
Radioddity Extended manual for Radioddity DB25-D & GD-88 v2.0 Optional Channel Displays all available channel members that can be added to the scan/roaming list. Notes: When you add a member shown in the ‘Optional Channels’ window to the scan/roaming list, the selected channel member information will no longer appear in the ‘Optional Channels’... -
Page 155: Rx Group
Radioddity Extended manual for Radioddity DB25-D & GD-88 v2.0 12.15 RX Group An RX Group needs to be setup for the user to listen to group calls to members with the same configuration. You can set or select any group from the available lists (1-250) as a ‘RX Group List’... -
Page 156: 13 Setup Of Channels
Users can set the channels receive frequency (in MHz). The possible frequency depends on the available frequency ranges of the DB25-D. In ‘Digital’ mode, the Radioddity DB25-D and GD-88 do not support simplex DMR Tier 1 operation with different TX and RX frequency. Whenever the RX and TX frequencies are different, the channel will be defined as a repeater channel (using DMR Tier 2), using Time Slots to communicate with the repeater. -
Page 157: Tx Freq
Users can set the channels transmit frequency (in MHz). The possible frequency depends on the available frequency ranges of the Radioddity DB25-D or GD-88. In ‘Digital’ mode, the Radioddity DB25-D and GD-88 do not support simplex DMR Tier 1 operation with different TX and RX frequency. Whenever the RX and TX frequencies are different, the channel will be defined as a repeater channel (using DMR Tier 2), using Time Slots to communicate with the repeater. -
Page 158: Pct (Private Call Type)
Notes: This parameter is only available in digital mode. 13.11 RX TS The Radioddity DB25-D and GD-88 are based on TDMA technology and can divide a 12.5kHz channel into two alternate Time Slots. When operating a digital repeater or duplex-hotspot with the Radioddity DB25-D or GD-88, normally the digital repeater does have a TX-frequency different to its RX-frequency and uses DMR Tier 2 for transmission. -
Page 159: Dmr Use With Simplex Hotspot
Most Ham operators nowadays do have their own personal hotspot. Some of those hotspots do support ‘full duplex’, others only support ‘simplex’ operation. In order to successfully use a simplex hotspot with your Radioddity DB25-D or Radioddity GD-88, the digital channel definition needs to be different than for duplex repeaters or duplex hotspots. -
Page 160: Tx Cc
Radioddity Extended manual for Radioddity DB25-D & GD-88 v2.0 13.14 TX CC Users can assign a color code for a TX channel. The channel Color Code can be same or different, but a repeater can have only one Color Code. -
Page 161: Rx Group
Radioddity Extended manual for Radioddity DB25-D & GD-88 v2.0 13.17 RX Group In order to be able to receive a group call within the channel, a ‘RX Group’ should be defined and assigned to the channel. Only those groups, that are listed with their Digital Contact (TalkGroup ID) within the assigned ‘RX Group’... -
Page 162: Contacts
Radioddity Extended manual for Radioddity DB25-D & GD-88 v2.0 13.20 Contacts Each digital channel may be assigned a specific Contact. Whenever the [PTT]-key is pressed, the radio will start to transmit a call on the selected channel and targeted to the specified contact our group. If a group call is initiated and another Contact ID (group ID) is already active within that channel, the call will be terminated to signal that a call may currently not be initiated. -
Page 163: Crossband Analog To Analog
Sample settings (only relevant parts shown): The Radioddity GD-88 will receive on VFO-A (144.100 MHz) and transmit the received signal on VFO-B (433.100 MHz), acting as an analog crossband-repeater. Notes: If a channel is set for CH mode of ‘Analog’, Relay mode will not be available for that channel. -
Page 164: Crossband Digital To Analog
Sample settings (only relevant parts shown): The Radioddity GD-88 will digitally receive on VFO-A (144.100 MHz), TS 1, CC1 and analog transmit the received signal on VFO-B (433.100 MHz), acting as a digital to analog crossband-repeater. -
Page 165: Crossband Analog To Digital
Sample settings (only relevant parts shown): The Radioddity GD-88 will analo receive on VFO-A (144.100 MHz) and digitally transmit the received signal on VFO-B (433.100 MHz), TS 1, CC1 acting as an analog to digital crossband-repeater. -
Page 166: Crossband Digital/Analog To Analog
Sample settings (only relevant parts shown): The Radioddity GD-88 will receive analog/digital on VFO-A (144.100 MHz) and analog transmit the received signal on VFO-B (433.100 MHz) acting as an analog/digital to analog crossband-repeater. -
Page 167: Crossband Analog/Digital To Digital
Sample settings (only relevant parts shown): The Radioddity GD-88 will receive analog/digital on VFO-A (144.100 MHz), CC 1, TS 1 and digital transmit the received signal on VFO-B (433.100 MHz) with the CC, TS and Contact as speciified acting as an analog/digital to digital crossband-repeater. -
Page 168: Crossband Digital To Digital
Sample settings (only relevant parts shown): The Radioddity GD-88 will receive digital on VFO-A (144.100 MHz), CC 1, TS 1 and digital transmit the received signal on VFO-B (433.100 MHz) with the CC, TS and Contact as speciified acting as a digital to digital crossband-repeater. -
Page 169: Digital Same Frequency Repeater
So, RX TS1 → TX TS2 and RX TS2 → TX TS1. As the Radioddity GD-88 has two fully independent VFOs (A and B) it is best to setup two SFR-channels with one of them using TX TS1 and RX TS1 and the second one using TX TS2 and RX TS2. -
Page 170: Bandwidth
(only those parameters are shown that are of relevance). Keep in mind that the Radioddity DB25-D is not capable of acting as a repeater using SFR, but of course it can be a station within a Radioddity GD-88 based SFR mesh-network. -
Page 171: Supported Dcs Codes
Radioddity Extended manual for Radioddity DB25-D & GD-88 v2.0 Supported DCS codes D017N D114N D205N D306N D411N D503N D606N D703N D023N D115N D212N D311N D412N D506N D612N D712N D025N D116N D223N D315N D413N D516N D624N D723N D026N D122N D225N D325N... -
Page 172: Rx Sq
GD-88 is consistent with the CTCSS frequency of the transmitting radio, squelch will be opened. Only if the DCS decoding value of the DB25-D or GD- 88 is consistent with the DCS encoding of the transmitting radio, squelch will be opened on the DB25-D. -
Page 173: Tx Qd/Dqt (Tx Ctcss/Dcs)
Radioddity Extended manual for Radioddity DB25-D & GD-88 v2.0 13.29 TX QD/DQT (TX CTCSS/DCS) Depending on the option selected as ‘TX SQ’, this is the place to specify the CTCSS frequency or DCS/DCS-I code. Default: 13.30 APRS Specify the APRS channel to be used when transmitting the APRS beacon. Either one of the 8 digital APRS channels or the analog APRS definition may be assigned for APRS of this channel. -
Page 174: Firmware Update
Connect your Radioddity DB25-D or GD-88 via the supplied programming cable to your Windows PC Press the [P1]-key on top of the Radioddity DB25-D and keep it depressed, For the Radioddity GD-88 it is the upper sidekey [P2] that needs to be kept depressed. - Page 175 10. Choose the virtual COM-port that does represent your programming cable 11. Click on ‘Open’ 12. If the updater can connect to your Radioddity DB25-D or GD-88, it will output ‘IAP Successfully’. If it isn´t able to connect to the radio, it will stay on ‘CommPort:COMx’...
- Page 176 Do not use update files intended for other radios, even if those radios may be looking like the Radioddity DB25-D or Radioddity GD-88. Using files not intended to be put on a Radioddity DB25-D or a Radioddity GD-88 may result in a loss of any guarantee.
- Page 177 ‘Current Page’. 18. As soon as the update has finished on the Radioddity DB25-D, the radio will automatically shut down, whereas the Radioddity GD-88 will state the following on its screen ‘Status: Rec Done!’.
- Page 178 Radioddity Extended manual for Radioddity DB25-D & GD-88 v2.0 20. To check which firmware version currently is installed, click: MENU → Device Info → Version 21. The output will look similar to: © Radioddity 2022 page 178 of 209...
-
Page 179: 15 Release Notes
Radioddity Extended manual for Radioddity DB25-D & GD-88 v2.0 15 Release notes The following table lists the details that had been changed with new versions of the firmware. Attention: Never update your radio unless it is really required or with other words ‘Don´t fix it, if it isn´t... - Page 180 Radioddity Extended manual for Radioddity DB25-D & GD-88 v2.0 15.3 CPS Release notes The following table lists the details that had been changed with new versions of the CPS. revision Changes released CPS 3.3 Functionality for full support of •...
-
Page 181: 16 Quickstart For Common Use Cases
DMR, we suggest to take a closer look at the document we did prepare some time ago (not specific for the DB25-D or GD88 but most topics applicable for the Radioddity DB25-D and GD-88as well. You find the document via our Blog entry at: https://www.radioddity.com/blogs/all/radioddity-getting-on-air-with-your-dmr-radio... -
Page 182: Duplex Analog Fm Operation With A Local Analog Fm-Repeater
9. Set APRS to ‘Off’ for now Write your settings to the radio. Do not forget to switch to Zone ‘simplex FM’ and select Channel ‘FM simplex’ at your Radioddity DB25-D or GD-88. Now you are ready for your very first simplex analog FM QSO. -
Page 183: Analog Fm Operation Including Analog Aprs
Using analog APRS does require a bunch of settings to be made within the APRS menu of the Radioddity DB25-D / GD-88 CPS. For initial testing, we advise to use a beacon with a fixed location (1) representing the latitude and longitude (2) of your current QTH. -
Page 184: Simplex Digital Dmr Operation With Other Station
Radioddity Extended manual for Radioddity DB25-D & GD-88 v2.0 Of course, also define your call sign (4) to be used for APRS-reporting. The defined SSID will automatically be added to your call sign. For details on the other parameters, please refer to the chapter on APRS within this addendum. -
Page 185: Simplex Digital Dmr Operation With Single-Hat Hotspot
Write your settings to the radio. Do not forget to switch to Zone ‘simplexDMR’ and select channel ‘DMRsimplex’ at your Radioddity DB25-D or GD-88. Now you are ready for your very first simplex digital DMR QSO with the selected station. -
Page 186: Duplex Digital Dmr Operation With Dual-Hat Hotspot
Write your settings to the radio. Do not forget to switch to Zone ‘simplex HS’ and select channel ‘HS TG 99’ at your Radioddity DB25-D or GD-88. Now you are ready for your very first simplex digital DMR QSO using your hotspot. - Page 187 Write your settings to the radio. Do not forget to switch to Zone ‘My Hotspot’ and select channel ‘HS WW’ at your Radioddity DB25-D or GD-88. Now you are ready for your very first digital DMR QSO via your duplex hotspot.
-
Page 188: Digital Dmr Operation With Digital Repeater
Radioddity Extended manual for Radioddity DB25-D & GD-88 v2.0 16.7 Digital DMR operation with digital repeater In order to setup the radio for duplex digital DMR operation, follow these steps: 1. Within the ‘Contacts’ menu, define a ‘Contact Name’ with the corresponding ‘Contact ID’... - Page 189 Write your settings to the radio. Do not forget to switch to Zone ‘My Hotspot’ and select channel ‘HS WW’ at your Radioddity DB25-D or GD-88. Now you are ready for your very first digital DMR QSO via your duplex hotspot.
-
Page 190: 17 Connectivity
GPS antenna that comes with the Radioddity DB25-D is a passive one and absolutely sufficient for use with the Radioddity DB25-D. If you plan to add an external antenna to the Radioddity DB25-D you need to make sure that sufficient signal input level gets to the Radioddity DB25-D. This will more or less require the use of an active GPS antenna. -
Page 191: Rj45 Speaker-Microphone Connector Of Db25-D
Radioddity Extended manual for Radioddity DB25-D & GD-88 v2.0 17.4 RJ45 Speaker-Microphone connector of DB25-D The Speaker-Microphone is connected via its RJ45-plug to the RJ45-socket of the Radioddity DB25-D. The RJ45 socket may also be used for programming the radio. It is based on 3.3 V signals. -
Page 192: Hf Antenna Connector Of Gd-88
Radioddity Extended manual for Radioddity DB25-D & GD-88 v2.0 17.6 HF Antenna connector of GD-88 Socket of type SMA-f, requiring a plug of type SMA-m. 17.7 Battery connector of GD-88 The battery is connected to the radio via a 2-pin spring-type connector that seals with the battery. -
Page 193: 18 Technical Specifications
Radioddity Extended manual for Radioddity DB25-D & GD-88 v2.0 18 Technical specifications All of the following technical specifications are subject to change without further notice. 18.1 General specifications of the DB25-D Parameter Frequency 136…174 MHz 400…480 MHz Frequency Stability ±2.5 ppm... -
Page 194: Receiver Of The Db25-D
Radioddity Extended manual for Radioddity DB25-D & GD-88 v2.0 18.2 Receiver of the DB25-D Parameter Frequency Range 136…174 MHz 400…480 MHz Channel Spacing 12.5 kHz / 25 kHz Operating Bandwidth ≤±5 kHz @ 12.5 kHz / ≤±7 kHz @ 25 kHz Frequency stability (-20 °C …... -
Page 195: General Specifications Of The Gd-88
Radioddity Extended manual for Radioddity DB25-D & GD-88 v2.0 18.4 General specifications of the GD-88 Parameter Frequency 136…174 MHz 400…470 MHz Dual band, Dual standby, Dual mode, Type Dual VFO TDMA 2-Time Slot technology Digital mode (Tier 1 and Tier 2) Digital vocoder AMBE+2™... - Page 196 Radioddity Extended manual for Radioddity DB25-D & GD-88 v2.0 18.6 Transmitter of the GD-88 Parameter Frequency Range 136…174 MHz 400…480 MHz Frequency stability (-30°C, +25°C) ± 1.5 ppm Low Power 2.5 W 2.5 W High Power 7.0 W 7.0 W FM modulation Type 12.5 kHz: 11KOF3E / 25 kHz: 16KOF3E...
-
Page 197: 19 Certification
European regulations. This is attested by the following certificates. 19.1 FCC part 90 approval for DB25-D Below you find a copy of the FCC part 90 approval for our Radioddity DB25-D mobile radio. © Radioddity 2022 page 197 of 209... -
Page 198: Fcc Part 90 Approval For Gd-88
Radioddity Extended manual for Radioddity DB25-D & GD-88 v2.0 19.2 FCC part 90 approval for GD-88 Below you find a copy of the FCC part 90 approval for our Radioddity GD-88 handheld radio. © Radioddity 2022 page 198 of 209... - Page 199 Radioddity Extended manual for Radioddity DB25-D & GD-88 v2.0 © Radioddity 2022 page 199 of 209...
-
Page 200: Ce Certificate For Db25-D
Radioddity Extended manual for Radioddity DB25-D & GD-88 v2.0 19.3 CE certificate for DB25-D Below you find a copy of the CE certificate for our Radioddity DB25-D mobile radio. © Radioddity 2022 page 200 of 209... -
Page 201: Ce Certificate For Gd-88
Radioddity Extended manual for Radioddity DB25-D & GD-88 v2.0 19.4 CE certificate for GD-88 Below you find a copy of the CE certificate for our Radioddity GD-88 handheld radio. © Radioddity 2022 page 201 of 209... - Page 202 Radioddity Extended manual for Radioddity DB25-D & GD-88 v2.0 © Radioddity 2022 page 202 of 209...
- Page 203 Radioddity Extended manual for Radioddity DB25-D & GD-88 v2.0 © Radioddity 2022 page 203 of 209...
- Page 204 Radioddity Extended manual for Radioddity DB25-D & GD-88 v2.0 © Radioddity 2022 page 204 of 209...
- Page 205 Radioddity Extended manual for Radioddity DB25-D & GD-88 v2.0 20 Common problems and how to solve them Problem Solution Radio fails to power on Channel selector knob does Turn on Channel Switch: no longer allow to switch MENU (press knob) → Local Set → Channel Sw between the channels →...
- Page 206 Radioddity Extended manual for Radioddity DB25-D & GD-88 v2.0 Problem Solution Sometimes a ‘Run time Make sure you did install the CPS as error 6’ is been thrown administrator in order to avoid such. Analog APRS does not work Analog APRS currently only works if an analog...
- Page 207 Radioddity Extended manual for Radioddity DB25-D & GD-88 v2.0 Problem Solution Cannot hear the local DMR- For each TalkGroup that you do want to repeater operate, you will need a separate channel. Each digital channel should have a reference to a...
- Page 208 → Support → Radioddity → click on ‘DB25-D’ or ‘GD- 88’ As for the Radioddity DB25-D the resulting support page will look similar to the following: As soon as any new file becomes available (such as firmware updates, updated manuals or others), it will be published within our support area.
- Page 209 In general, the software- and firmware-updates for your Radioddity DB25-D and Radioddity GD-88 are free of charge. Using a CPS or a firmware not originating from Radioddity may void your warranty.
Need help?
Do you have a question about the DB25-D and is the answer not in the manual?
Questions and answers