Advertisement
Quick Links
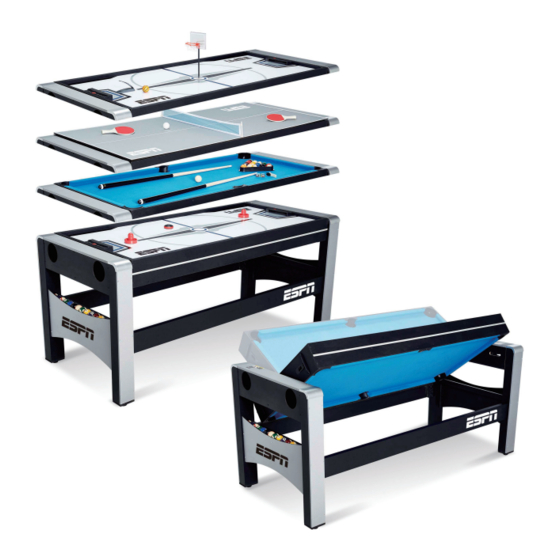
MODEL/MODELO: CBF072_018E
WM.COM
ASSEMBLY INSTRUCTIONS
INSTRUCCIONES DE ARMADO
ATTENTION
ATENCIÓN
DO NOT RETURN
NO DEVOLVERLO
TO THE STORE
A LA TIENDA
Contact
Contacto
MD Sports
MD Sports
Customer Service
Servicio al Cliente
Toll Free: 877-268-2555
Llamados gratuitos: 877-268-2555
* For additional resources and Frequently
* Por mayor información y Preguntas
Asked Questions, please visit us at
Frecuentes, favor visitarnos en
themdsports.com
themdsports.com
Advertisement

Related Manuals for MD SPORTS CBF072 018E


Summary of Contents for MD SPORTS CBF072 018E
- Page 1 ATENCIÓN DO NOT RETURN NO DEVOLVERLO TO THE STORE A LA TIENDA Contact Contacto MD Sports MD Sports Customer Service Servicio al Cliente Toll Free: 877-268-2555 Llamados gratuitos: 877-268-2555 * For additional resources and Frequently * Por mayor información y Preguntas...
- Page 2 English Español LIMITED 90 DAYS WARRANTY GARANTÍA LIMITA DE 90 DIAS This product is covered by a limited warranty that is effective for Este producto está cubierto por una garantía efectiva de 90 días a 90 days from the date of purchase. If, during the limited partir de la fecha de su compra.
-
Page 3: Herramientas Necesarias
English Español TOOLS REQUIRED HERRAMIENTAS NECESARIAS Destornillador Phillips - No incluido Phillips Screwdriver - Not Included Power Tools Herramientas eléctricas - Set Low Torque - Ajuste en par bajo Destornillador de cabeza plana - No incluido Standard (Flat Head Screwdriver) - Not Included Llave Inglesa - Incluido Wrench - Included... - Page 4 Español English CBF072_018E PARTS LIST / LISTA DE PARTES FOR FIG. 1 FOR FIG. 3 FOR FIG. 6 FOR FIG. 6 Campo de Unidad Principal Under Leg Bajo Pierna Panele Hockey Mainframe Billiards Playfield End Panel - A Juego de Billar de Hockey Pedestal Pedestal...
- Page 5 Español English CBF072_018E PARTS LIST / LISTA DE PARTES FOR FIG. 2 Tira Plástica Plastic Strip Brush Cepillo 42'' Cues Taco 42'' Chalk Tiza FOR FIG. 18 FOR FIG. 7 Juego de 4x45mm Tornillo de Cabeza Baloncesto de Allen key Llave Allen Basketball Set Wrench...
-
Page 6: Instrucciones De Ensamblaje
Español English ASSEMBLY INSTRUCTIONS: INSTRUCCIONES DE ENSAMBLAJE: 1. Find a clean, level place to begin the assembly of your 1. Encuentre un lugar limpio y nivelado para comenzar el product. ensamblaje de su producto. 2. Remove all the parts from the box and verify that you 2. - Page 7 Español English FIG. 3 X 18 FIG. 4 X 12 Note: Plug part (#26) into part (#14) before locking the screws (#41), and remove part (#26) before playing pool table. / Nota: Enchfa la parte (#26) a la parte (14) antes de cerrar los tornillos (#41), y quite la parte (#26) antes de jugar la billar.
- Page 8 Español English FIG. 5 & FIG. 6 Pin / Pin Locking Pin / Clavija de Chapa IMPORTANT: Make sure that the Pin from the Locking Pin is in the direction that is shown. / IMPORTANTE: Asegure que la clavija de la clavija de chapa venga en la dirección indicada.
- Page 9 Español English FIG. 7 FIG. 8 X 10 CBF072_018E (Continued on the next page.) www.themdsports.com (Continúe en la siguiente página.)
- Page 10 Español English FIG. 9 FIG. 10 CBF072_018E (Continued on the next page.) www.themdsports.com (Continúe en la siguiente página.)
- Page 11 Español English FIG. 11 X 10 FIG. 12 CBF072_018E (Continued on the next page.) www.themdsports.com (Continúe en la siguiente página.)
- Page 12 Español English FIG. 13 X 24 FIG. 14 CBF072_018E (Continued on the next page.) www.themdsports.com (Continúe en la siguiente página.)
- Page 13 Español English FIG. 15 FIG. 15A Note: Keep the Locking Pins (#18) open. / Nota: Mantenga las clavijas de chapa (#18) abiertas. FIG. 15B Table Top View of proper Swivel Bolt and Washer placement. / Vista Superior del perno enroscado y Colocación de Arandela.
- Page 14 Español English FIG. 16 Note: Make sure that the Locking Pins are closed to secure the mainframe. / Nota: Asegure que las clavijas de chapa estén cerradas para asegurar el Unidad principal. FIG. 17 Note: Tear off the backside papers of the Felt Pads (#21) and stick them onto the bottom of the Pushers (#22).
- Page 15 Español English FIG. 18 GAME 2: BASKETBALL Attach the Basketball system and use the Basketball and the Launcher (#55). JUEGO 2: BALONCESTO Asegure el sistea del Baloncesto y use el Baloncesto y el Lanzador (#55). CBF072_018E (Continued on the next page.) www.themdsports.com (Continúe en la siguiente página.)
- Page 16 Español English FIG. 19 Note: Open the Locking Pins. / Nota: Open the Clavija de chapas. Note: To complete this step, the billiards side must be facing upwards. If not, disengage all 4 Locking Pins (#32), swivel the table and then re-engage the Locking Pins. / Nota: Para completer este paso, el lado de billar debe quedar cara arriba.
- Page 17 Español English FIG. 20 Note: Make sure that the Locking Pins are closed to secure the mainframe. / Nota: Asegure que las clavijas de chapa estén cerradas para asegurar el Unidad principal. GAME 4: Table Tennis Use the Table Tennis Paddle (#30) and Table Tennis Balls (#29). JUEGO 4: Tenis de Mesa Use las paletas de Tenis de Mesa (#30) y la pelota de Tenis de Mesa (#29).
- Page 18 Español English FIG. 21 MADE IN CHINA CHARGER IN Charging in / Entrada de carga USB Power / Potencia de USB Note: Plug the USB Power Cord (#24) into the back of the Hover Puck (#23) . Allow Note: Insert USB Power Cord (#24) the Hover Puck to charge for 60 minutes.
- Page 19 Español English WARNING: ADVERTENCIA: Changes or modifications not expressly approved by Los cambios o modificaciones no the party responsible for compliance could void the user’s authority expresamente aprobado por la parte responsable del cumplimiento to operate the equipment. podrían anular la autoridad del usuario para operar el equipo. NOTE: NOTA: This equipment has been tested and found to comply with...
Need help?
Do you have a question about the CBF072 018E and is the answer not in the manual?
Questions and answers