
Related Manuals for General Components WALRUS 5000C


Summary of Contents for General Components WALRUS 5000C
- Page 1 WALRUS 5000C DIESEL COOLANT HEATER INSTRUCTION MANUAL CONTACT INFO Ph: +1.800.517.7740 Ph: +1.604.677.6210 info@generalcomponents.ca...
-
Page 2: Table Of Contents
Check the heater for WALRUS 5000C. For correct use of the heater, any damage when unpacking and contact the dealer please read this instruction book carefully immediately if any damage is found. -
Page 3: Introduction
The WALRUS 5000C and demisting. For both vehicle and marine markets, WALRUS 5000C is a great way to is fully automatic in operation featuring low... -
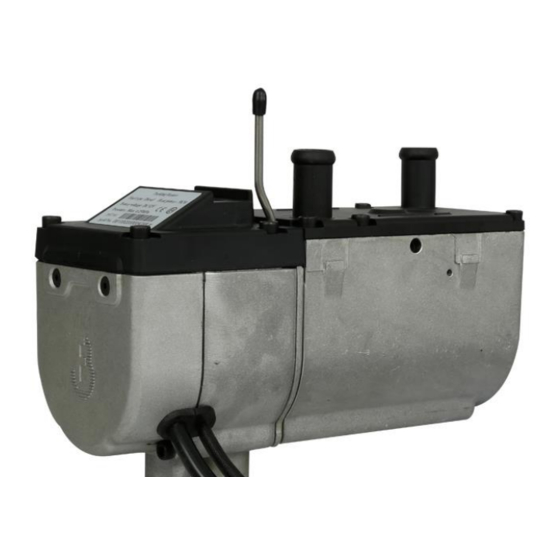
Page 4: Exploded Parts Diagram
Coolant Pipe Clamps Coolant Pipe Clamps Fuel Pump Power Loom Fuse Holder Matrix Heater Relay Main Wiring Harness Heater body Loom and Plug *Combined 2.3m stainless steel exhaust and silencer for marine applications **Only supplied in vehicle applications WALRUS 5000C... -
Page 5: Dimensions, Mm
Once it is in place the unit can be removal and servicing of the unit. mounted to the bracket with the M6X10 bolt The main heater body is mounted onto a supplied in the kit. suitable surface with a bracket. Ensure it is ALLOWABLE MOUNTING ANGLE WALRUS 5000C... - Page 6 Any excess air should immediately circulate out then re-filled with new coolant. Ensure you use of the system and the hose can be re-tightened. the right coolant specified for your vehicle. WALRUS 5000C...
- Page 7 (*) Not necessary when the silencer is mounting bracket supplied installation kit, along with a 100mm M6 hex bolt, used to secure the heater in place to the bracket using one of the two M6 taps, located near the center of the bracket. WALRUS 5000C...
-
Page 8: Fuel Pump Angle & Suction Height
Fuel Pump 3000mm 500mm 2000m Not acceptable Acceptable (between 15- 19°) Not acceptable mount the fuel pump. Figure shows the ideal way to The fuel pump’s outlet tilt upward at an angle between 15˚-35˚ (as shown above). should WALRUS 5000C... -
Page 9: Fuel Line Connections
When the fuel is being sucked from the about 30-40mm from the bottom of the fuel tank, vehicle tank, or an independent tank, a fuel to avoid sucking impurities or sediment from the standpipe is required. Make sure all the openings bottom. WALRUS 5000C... -
Page 10: Fuel Standpipe
Drill a hole in the top of the vehicle’s fuel tank Φ22 ± 0.2mm in size. Ensure it is smooth burrs and clean of • Remove the top nut and washers and bend the standpipe straight • Straighten the standpipe and cut it down to size if necessary WALRUS 5000C... - Page 11 P a g e | 11 • Fit the standpipe by tilting it into position into the newly drilled hole WALRUS 5000C...
- Page 12 The bottom of the fuel standpipe should be 30-40mm from the bottom of the fuel tank to allow enough suction of fuel and at the same time not allow impurities and sediment to be drawn up the standpipe. WALRUS 5000C...
-
Page 13: Wiring Diagram
P a g e | 13 WIRING DIAGRAM WALRUS 5000C... -
Page 14: Connections
TIMER CONNECTIONS All connections should be prepared for you following diagrams to ensure the timer plugs are in your kit. However, if changes need to be made, wired correctly. or terminals have become disconnected, use the WALRUS 5000C... -
Page 15: Operating Instructions
Keep pressing ok slowly until ‘02:oF’ appears. Press any of the arrow keys until the screen reads ‘02:on’ Keep pressing ok until back to the P1 menu screen Press power button to return. The language will now be set to English. WALRUS 5000C... -
Page 16: Pre-Setting Heating Times
Clean the externals of the heater • Check for corrosion or loose connections of the • circuits • Check the combustion air inlet and exhaust pipe for • damage and clogs • Check the fuel line for leaks WALRUS 5000C... -
Page 17: Additional Precautions
The manufacturer will not be held responsible The heater will go into a self-check mode, for any damage to the heater caused by will only start when internal anything That violates these instructions. temperature has cooled to appropriate levels. WALRUS 5000C... -
Page 18: Troubleshooting
70°C. • Check the fuses • Ensure that there is sufficient coolant in the system before starting-up, and never start the heater if the coolant has frozen. WALRUS 5000C... - Page 19 P a g e | 19 WALRUS 5000C...
- Page 20 P a g e | 20 WALRUS 5000C...
Need help?
Do you have a question about the WALRUS 5000C and is the answer not in the manual?
Questions and answers