Table of Contents
Advertisement
Quick Links
Advertisement
Table of Contents

Subscribe to Our Youtube Channel
Related Manuals for Kuzma 4Point11


Summary of Contents for Kuzma 4Point11
- Page 1 KUZMA 4POINT TONEARM Instruction manual Serial Number: ….. 2020-04...
-
Page 2: Table Of Contents
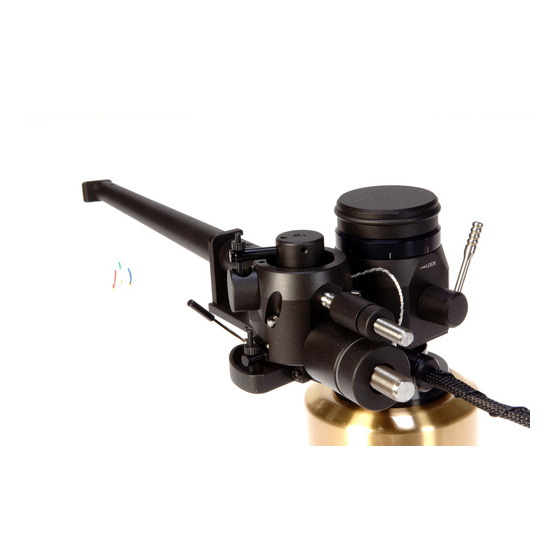
KUZMA LTD INSTRUCTION MANUAL FOR 4POINT tonearm The 4POINT tonearm is a very precisely engineered piece of equipement, however, the construction is robust and requires minimal maintenance for optimal performance. headshell lock vertical paddle vert. paddle lock horizontal bearing assembly... -
Page 3: General Description
RCA plugs. Product registration and warranty extension Kuzma products have a non transferable 2 year limited warranty on parts and labour, which may vary in each country. To obtain the 5 years* limited warranty from us, you need to register the product on our web site within 30 days of purchase. -
Page 4: Technical Data
Distance from spindle to horizontal bearing: 264 mm Effective mass: 18 g VTA adjustment: Azimuth adjustment: Bias adjustment: Vertical damping: Horizontal damping: Detachable headshell: yes ( one extra supplied) Cables: silver Arm mount: Kuzma 212 mm Optional: biwiring wiring, extra headshells... -
Page 5: Unpacking And Basic Setup
1. Unpacking Open the box carefully and remove top covers. The tube with vertical bearing points is packed separately (tube assembly) on the top of the box. Please do handle with care and when put aside, ensure that nothing is touching the bearing points. - Page 6 With 1.5 mm Allen key, release the height ring which is on the fixing pillar below the VTA arm tower. ( Fig. 2A) Now it will drop down and touch the armbase. Fix the ring again and release the VTA arm tower. You now have the correct height but you can freely rotate the VTA arm tower horizontally.
-
Page 7: Setting Up The Tonearm
3. Setting up the tonearm Connecting tonearm: Check the horizontal movement of the tube to ensure that the headshell will reach the inner grooves (approximately to the edge of record label), but will not travel to the centre of the record. - Page 8 Fig.5 Locked Fig.6 Unlocked Note: Do not over-tighten the screw which locks the headshell. Fig.7 Removing headshell Fig. 7A Headshell’s fingerlift Balancing of the tonearm: Fix cartridge pins. Add counterweights to the lower threaded carrier, starting with the longest counterweight, then a plastic ring and another counterweight, until the tonearm is roughly balanced.
-
Page 9: Adjustment Of Tracking Force
Counterweight configuration: Cartridge weight: counterweights configuration (gr) 0-4 g (3.5 mm) (5 mm) (7 mm) (8.5 mm) +40+20 +40+30 +50+30 +50+40 +50+30+20 +50+40+20 +50+40+30 +50+40+20+20 +50+40+30+20 30-32g +50+40+30+20+20 Move the small upper counterweight for more precise balance, by rotating. The tonearm's centre of gravity is chosen to be around the height of vertical rotation. -
Page 10: Adjustment Of Vta
6. Adjustment of VTA It is extremely easy to set up VTA on this tonearm. Just unlock the lever at the back and rotate the VTA knob. VTA knob rotation CW- VTA down (Fig.1) VTA adjustment between any two lines is 0.1 mm (the whole rotation is then 0.8 mm) which allows for very fine repeatable adjustment. -
Page 11: Adjustment Of Bias
8. Bias The bias should be adjusted roughly according to the tracking force. Using Allen key 1.5 mm, unlock the screw on the bias weight and position it to the equivalent of gap X to your chosen tracking force. Lock the screw back, when in position. 1.00 Cue device lock 1.50... - Page 12 The paddles long screws (1.5 mm Allen key) are fixed with fingers by a small black plastic nut. Start with both at zero damping. The more the paddle is inserted into the liquid, the stronger the damping. First start with horizontal, then add vertical, but feel free to experiment.
-
Page 13: Adjustment Of Cueing Device
10. Cueing device adjustment Should you find that in the ‘up’ position the cartridge is too high or too low above the record then the cueing device can be raised or lowered. This can be done simply by using Allen key 1.5 mm: Insert key into screw on side of arm rest. -
Page 14: Troubleshooting
2B: Cartridge is not reaching inner grooves: check that position of the tonearm is correct with protractor for distance and spindle to armbase distance is 212 mm. 3. Headshell cannot be removed- check that the screw is released enough with Allen key. Kuzma Ltd Hotemaze 17A SI-4205 PREDDVOR... -
Page 15: Technical Appendixes-Set Up Cartridge
APPENDIX 1 Tangential Cartridge geometry adjustment Once the cartridge has been mounted, it is necessary to ensure that the cartridge is tangential to the record grooves in order to minimize tracking distortion during playing. As the cartridge moves in an arc across the record, tracking distortion occurs and is minimized by the tonearm geometry and the angle of the cartridge in the headshell. - Page 16 To rotate or readjust cartridge: 4. Slightly loosen the screws which attach the cartridge to the headshell. 5. Holding headshell in one hand slightly rotate the body of the cartridge. 6. Recheck alignment at position A and continue adjustment until line described in point 3 is achieved.
- Page 17 Fig.17 Rotation at A 11. Recheck alignment of the cantilever at zero point B. If cantilever is not aligned here, rotate protractor to find where on line “x- y” the cantilever is aligned again. (Fig.18&15) Fig. 18 Alongside line “X-Y” alignment at B If the stylus is still in front of zero point B on the line “x-y”...
- Page 18 Appendix 2 Fine Azimuth Adjustment This can be done using an oscilloscope and a test record or by using good records in a good system and listening to the sound. Cartridges with fine profiles (VDH, Microline etc.) are more sensitive to this adjustment. On the other hand cheaper cartridges are not made so well, making fine adjustment more useful.
- Page 19 Appendix 3 Fine bias adjustment 1. Set bias and tracking force as previously described and listen to mistracking on highly Modulated tracking bands on test record. On higher modulated bands mistracking can be heard as impure tones and there will be more overtones. (See instructions on test record) 2.
-
Page 20: Protractors
Cartridge Protractor ( Not in correct scale) Tonearm mounting protractor...
Need help?
Do you have a question about the 4Point11 and is the answer not in the manual?
Questions and answers