Table of Contents
Advertisement
Quick Links
EN
FP04WIFI
HD Hunting camera with WIFI
connection
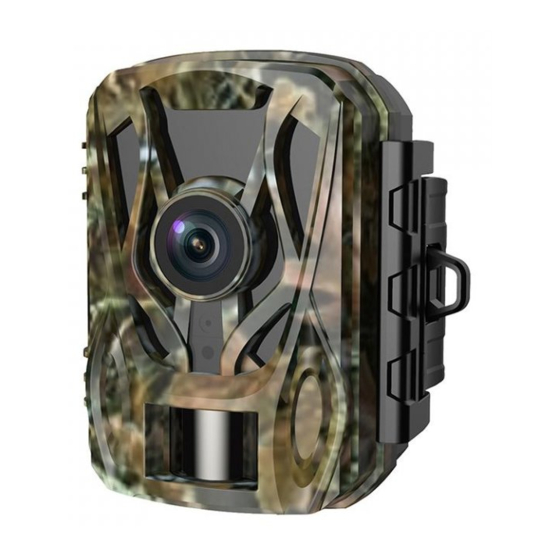
DESCRIPTION
1. MENU button
2. Left arrow
3. PLAY button
4. OK button
5. Arrow to the right
6. SHOT button
7. Switch position ON
8. SETUP switch position
9. Switch position OFF
10. USB connector
11. Speaker
12. AV connector
13. DC connector
14. SD slot
15. AA batteries
14
1 EN
15
1
2
3
7 8 9
10 11 12 13
4
5
6
Advertisement
Table of Contents

Related Manuals for Solight FP04WIFI


Summary of Contents for Solight FP04WIFI
- Page 1 FP04WIFI HD Hunting camera with WIFI connection DESCRIPTION 1. MENU button 2. Left arrow 3. PLAY button 4. OK button 5. Arrow to the right 6. SHOT button 7. Switch position ON 8. SETUP switch position 9. Switch position OFF 10.
-
Page 2: Insertion Of Batteries
INSERTION OF BATTERIES Remove the battery compartment cover and insert four 1.5V AA batteries into the battery compartment. When inserting, make sure to observe the correct polarity, which is marked on the bottom of the battery compartment. Replace the cover. When replacing, first remove the dead batteries and then insert the new ones. - Page 3 Do not insert or remove the SD card while the hunting camera is in operation. The hunting camera supports high-speed SD cards class 10 and higher. Format the SD card before use. Regular use, as well as improper use, will shorten the life of the SD card and may cause data corruption.
- Page 4 Settings item Option Description Select the hunting camera Photo Camera mode Video mode. (Hunting camera Mode) Photo + video The higher the resolution, Photo resolution 20 MP (6144 x 3456) the better the quality of the 16 MP (5376 x 3024) (Photo resolution) photo, but the larger the file 12 MP (4608 x 2592)
- Page 5 Settings item Option Description From 5 seconds to 3 minutes We recommend setting the Video length video length to 10 seconds. (Video length) The longer the recording time, the more power is consumed and the file takes up more space in the SD card memory.
- Page 6 Settings item Option Description Low (low) Medium The sensitivity of the PIR sensor sensitivity (medium) High PIR sensor depends on (PIR sensor sensitivity) (high) the ambient temperature. The "HIGH" setting is more suitable at higher temperatures. The "ME- DIUM/LOW" setting is suitable for lower temperatures.
- Page 7 Settings item Option Description ON - on Select "ON" and the Time Lapse OFF - off hunting camera will (Time-lapse mode) automatically take photos/videos according to the set interval. This setting is particularly suitable for recording cold-blooded animals (e.g. snakes) or for recording plant growth.
- Page 8 Settings item Option Description 1. Set the clock and 1. Setting the clock: use the Time & Date date. left/right arrow keys to (Hours and date) set the clock and date. 2. Set the clock format. 2. Clock format: select 24- 3.
- Page 9 Settings item Option Description ON - password must be You can set a 4-digit input Password password of the digits 0-9 (Password) OFF - settings will be and the letters A-Z to prevent unwanted access to without password the hunting camera settings.
- Page 10 Settings item Option Description Format memory card Yes - yes, the memory card Formatting will delete all files will be formatted. No - no on the tab. Note: Before using the SD card for the first time, format it. ON - on OFF - Set the 4-digit photocell Camera ID identification code from the...
-
Page 11: Download And Install The App
Settings item Option Description Hunting cam WIFI SSID The name of the WIFI SSID can be changed. 12345678 You can change your WIFI Password Wi-Fi password. (Wi-Fi password) Current version of the Current version of the Version hunting camera hunting camera. (Version) DOWNLOAD AND INSTALL THE APP 1. - Page 12 CONNECTION TO THE PHONE - ANDROID • Make sure Bluetooth is turned on before you start pairing. • Click on the "Hunting Camera" app icon. A message will be displayed to enable the Bluetooth function in the hunting camera. • Click "Turn on camera Bluetooth" in the hunting camera and the Bluetooth list will appear.
- Page 13 trap) and the Bluetooth list will be displayed. • Select the corresponding Bluetooth name of the hunting camera "Hunting XXXXXX" and click on "Bluetooth to turn on WiFi". • When you turn on your phone's Wi-Fi via Bluetooth, a countdown starts. At the same time, the Wi-Fi in the hunting camera is activated.
-
Page 14: Night Mode
This testing will help you determine the best place to install the hunting camera. The height from the ground depends on the size of the game you want to record. The recommended height from the ground is between 90 and 180 cm (but it is up to you which height you choose). - Page 15 VIDEO AND DATA TRANSMISSION Connecting to TV Play the video footage on a connected TV. Switch on the TV and connect the hunting camera to the TV via AV cable. Once connected, the hunting camera display will switch to power saving mode and the files can be played on the TV display.
-
Page 16: Technical Parameters
TECHNICAL PARAMETERS 2" Display size 2 MP Camera FOV=90 Lentils Photo resolution 20 MP, MP16, MP12, MP, MP85, MP3, 1 MP 2.7K, 1080P, 720P, 480P, VGA Video resolution Video format JPEG Photo format Language menu English (English), German (German), French (French), Italian (Italian), Spanish (Spanish), Czech (Czech) SD card up to 32 GB SD card... - Page 17 Batteries 4x 1.5 V type AA Microphone Built-in microphone Built-in speaker Speaker -20 °C to +60 °C Operating temperature -30 °C to +65 °C Storage temperature About 192 g Weight 110 x 90 x 61 mm Dimensions 17 EN...
-
Page 18: Problem Solving
PROBLEM SOLVING The Problem Possible cause Solution The hunting camera is You have not removed the Check that you have not capturing the protective film. removed the protective film. photos correctly. The hunting camera is not Check the installation site installed in the right place. - Page 19 The Problem Possible cause Solution It is not possible to connect The app is not compatible Check your app version to the app. with your phone. and update your phone. Your phone does not Make sure Bluetoo th is display the Blue- tooth. switched on.
- Page 20 EU Directives that apply to it. The product has been issued with a CE declaration of conformity in accordance with the applicable regulations. On request from the manufacturer: info@solight.cz, or downloadable from www.solight.cz. Solight Holding, s.r.o., Na Brně Hradec1972,...
Need help?
Do you have a question about the FP04WIFI and is the answer not in the manual?
Questions and answers