Table of Contents
Advertisement
Available languages
Available languages
Quick Links
Advertisement
Chapters
Table of Contents

Related Manuals for Polaroid TVSAND32HDPR02


Summary of Contents for Polaroid TVSAND32HDPR02
- Page 1 TVSAND32HDPR02 TV LED HD 32PO/ACCESS 32 SÉRIE 8000 Mode d'emploi...
- Page 2 TVSAND32HDPR02 Importé par Market Maker Brand Licensing – 79/81 Ancienne Route Nationale 7-69570 Dardilly, France...
- Page 3 Vous pouvez aussi vous rendre à l’adresse www.polaroid.com et consulter la déclaration de responsabilité sociale http://www. polaroid.com/social-responsibility pour en apprendre plus sur les lois spécifiques en vigueur dans votre...
-
Page 4: Consignes De Sécurité Importantes
CONSIGNES DE SÉCURITÉ IMPORTANTES PRÉCAUTIONS DE SÉCURITÉ ATTENTION RISQUE D’ÉLECTROCUTION NE PAS OUVRIR Le symbole ATTENTION : POUR ÉVITER TOUT Le symbole d’avertissement RISQUE D’ÉLECTROCUTION, NE d’avertissement montrant un éclair dans RETIREZ PAS LE COUVERCLE (NI LE montrant un point un triangle indique que PANNEAU ARRIÈRE). - Page 5 Pour éviter tout risque d’incendie, ne placez pas de sources de flammes nues, telles que des bougies allumées, ou de sources de chaleur, telles que des radiateurs, au-dessus ou à proximité de l’appareil. ● L’appareil est destiné à être utilisé uniquement sous un climat tempéré. ●...
- Page 6 L’utilisation exclusive de meubles pouvant supporter le poids du téléviseur en toute sécurité. S’assurer que le téléviseur ne dépasse pas le bord du meuble sur lequel il est placé. Ne jamais placer le téléviseur sur un meuble haut (tel qu’armoire ou bibliothèque) sans avoir fixé...
-
Page 7: Accessoires
ACCESSOIRES Guide d’utilisation ........................Télécommande ..........................Socle ..............................Toutes les images dans ce manuel sont données uniquement à titre de référence, l’apparence et l’écran doivent être conformes au produit final. -
Page 8: Table Of Contents
TABLE DES MATIÈRES POUR COMMENCER CONSIGNES DE SÉCURITÉ IMPORTANTES ............. 1 ACCESSOIRES ......................4 CARACTÉRISTIQUES ....................6 PIÈCES GÉNÉRALES ....................7 TÉLÉCOMMANDE ......................9 PRÉPARATION DE LA TÉLÉCOMMANDE ..............11 CONNEXIONS DE BASE .................... 12 OPERATIONS FONCTIONNEMENT DE BASE ................. 15-35 POUR RÉFÉRENCE ENTRETIEN ........................ -
Page 9: Caractéristiques
CARACTÉRISTIQUES Écran LED32" Ce téléviseur comprend un écran LED pour fournir une vision claire et un faible rayonnement. Recherche automatique des chaînes télé Réception de programmes numériques Guide des programmes télé Fonction Télétexte (Europe) Lecture multimédia USB Affichage à l'écran multilingue Télécommande avec toutes les fonctions Entrées HDMI, ANT, RJ 45, USB, AV et CI Sorties CASQUE et OPTIQUE... -
Page 10: Pièces Générales
PIÈCES GÉNÉRALES UNITÉ PRINCIPALE Vue de face Vue de dessous 1: Capteur de la télécommande. 2: Indicateur LED : ROUGE VEILLE. 3: “ ” Diminuer le volume et déplacement à gauche “ ” Augmenter le volume et déplacement à droite “... - Page 11 PIÈCES GÉNÉRALES Vue arrière 1. RJ 45 2. OPTIQUE 3. Entrée USB 4. HDMI 5. Entrée AV 6. ANT 7. Fente pour carte CI 8. Prise écouteurs...
-
Page 12: Télécommande
TÉLÉCOMMANDE TÉLÉCOMMANDE 1: ALLUMER/ÉTEINDRE : Pour régler le téléviseur sur les modes Veille ou Mise sous tension. 2: INPUT: Sélectionner parmi les différentes sources de signal. 3: : Appuyer pour ouvrir NETFLIX. 4: : Appuyer pour ouvrir YouTube. 5: Subtitles: Pour activer les sous- titres en mode TNT. - Page 13 14: ▲/▼/◄/► Appuyez dessus pour naviguer dans le menu à l’écran. OK : Pour confirmer la sélection. 15: : Retourner au menu précédent. 16: : Appuyer pour ouvrir/fermer le menu à l’écran. 17: : Appuyer pour ouvrir la page d’accueil. 18:...
-
Page 14: Préparation De La Télécommande
PRÉPARATION DE LA TÉLÉCOMMANDE INSTALLATION DES PILES Installez les piles comme indiqué ci-dessous. Veillez à ce que les bornes + et - sont orientées comme indiqué dans le compartiment à piles (Fig 1). DURÉE DE VIE DES PILES Les piles durent normalement un an, mais cela dépend de la fréquence d’utilisation de la télécommande. -
Page 15: Connexions De Base
CONNEXIONS DE BASE Assurez-vous que tous les câbles sont déconnectés de l’unité principale avant de connecter la source au secteur. Lisez attentivement les instructions avant de connecter d’autres équipements. CONNEXION À LA SOURCE D’ALIMENTATION Vers une prise de courant CONNEXION D’UNE L’ANTENNE EXTERNE Connectez ne antenne externe dans la prise d’antenne pour obtenir une meilleure qualité... - Page 16 CASQUE Connexion d’équipements externes intelligents pour la transmission de données, à l’heure actuelle, le marché a été spécialement conçu pour la télé portable K-song permet à un micro de se connecter à la sortie casque. Le micro sans fil est comme une chanson d’un vent violent, il suffit de le connecter à...
- Page 17 RJ 45 et HDMI Réticule Utilisez un câble RJ 45 pour pouvoir regarder des vidéos sur Internet. Certains téléviseurs permettent également de télécharger des vidéos sur Internet pour les regarder à tout moment. Un câble HDMI connecte un ordinateur au téléviseur et en fait un moniteur capable de synchroniser l’image et le son de l’ordinateur.
-
Page 18: Fonctionnement De Base
AVANT TOUTE UTILISATION VÉRIFIEZ QUE TOUS LES ÉQUIPEMENTS ET LA PRISE D'ALIMENTATION SONT CONNECTÉS CORRECTEMENT ET QUE L'APPAREIL EST RÉGLÉ SUR LE MODE APPROPRIÉ. FONCTIONNEMENT DE BASE Appuyez sur la touche ALLUMER/ÉTEINDRE de la télécommande ou de l’appareil pour l’allumer (le témoin devient bleu) ; appuyer de nouveau pour l’éteindre (mode veille ;... - Page 19 FONCTIONNEMENT DE BASE CONFIGURATION INITIALE Lors de la première prise en marche de votre téléviseur, l’assistant de configuration vous guide dans la configuration des paramètres de base. À effectuer en respectant les conseils de la première configuration. Cette fonction est utilisée pour le code de couplage de la télécommande. Une fois le couplage réussi, vous pouvez utiliser la télécommande Bluetooth pour commander le téléviseur.
- Page 20 FONCTIONNEMENT DE BASE Choisissez «OUI» pour accepter et obtenir les informations sur la localisation de votre appareil afin d’avoir davantage de fonctions. Choisissez «OUI» pour accepter d’envoyer automatiquement des informations de diagnostic à Google afin d’améliorer le pouvoir discriminant. Votre appareil est compatible Android TV, appuyez sur la touche ► pour sélectionner la fonction d'exploration.
- Page 21 FONC CTION NEME NT DE BASE Confirmez à nouveau l e mot de pa asse et le ma aintenir coh érent. Utilis ez la téléco ommande po our entrer le mot de pas sse et termin ner sa confir rmation. Utilisez ▼/ /▲...
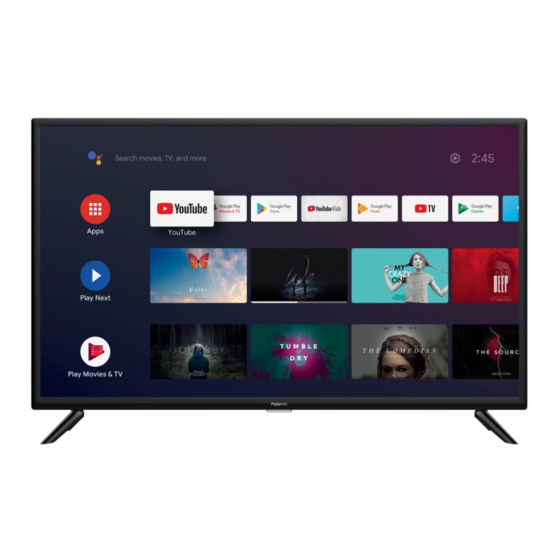
- Page 22 FONCTIONNEMENT DE BASE Appuyez sur la touche OK pour accepter (Clause de non-responsabilité). Vous pouvez regarder la télé une fois la configuration terminée. ÉCRAN D'ACCUEIL Appuyez sur la touche ACCUEIL pour aller à la page d’accueil ① Ouvrez Google assistant lancez une recherche vocale ou utilisez la recherche au clavier ②...
- Page 23 FONCTIONNEMENT DE BASE Appuyez sur la touche SOURCE pour afficher la liste des sources. Vous pouvez sélectionner la source souhaitée. NAVIGATION DANS LES MENUS Il y a deux façons pour accéder. Première façon, appuyez sur la touche MENU pour afficher les options du téléviseur, utilisez ▼/▲/◄/►...
- Page 24 FONCTIONNEMENT DE BASE Utilisez les touches ▼/▲ pour sélectionner l’élément à régler. Appuyez sur la touche OK pour effectuer le réglage. Une fois le réglage terminé, appuyez sur la touche OK pour enregistrer et retourner au menu précédent. CHAÎNE Chaînes : Afficher le sous-menu de recherche en fonction des différents modes d’installation des chaînes.
- Page 25 FONCTIONNEMENT DE BASE Antenne Menu -› Paramètres -› Chaînes -› Mode d’installation des chaînes, choisissez Antenne ou Câble. Accédez à Menu -› Paramètres -› Chaîne -› Chaînes. La recherche des chaînes accède directement dans l’interface de la plate-forme de recherche automatique TVA + TNT d’Antenne.
- Page 26 FONC CTION NEME NT DE BASE Simple rec cherche RF : Recherche e manuelle TNT, à gauc che et à dro ite après la sélection d du canal RF, OK pour re cherche dire ecte. Câble Menu - -› Paramètre es -›...
- Page 27 FONCTIONNEMENT DE BASE COMPTES ET CONNEXION Appuyez sur les touches HAUT/BAS pour sélectionner Connexion ou Ignorer. APPLICATIONS Dans ce menu, vous pouvez définir les autorisations de l’application et afficher les listes des applications. Utilisez les touches ▼/▲ pour sélectionner l’élément à régler. Appuyez sur la touche OK pour effectuer le réglage.
- Page 28 FONCTIONNEMENT DE BASE DATE et HEURE Date et heure automatiques- Utilisez les touches ▼/▲ pour sélectionner une option, puis appuyez sur OK pour accéder au sous-menu. (En option : Utiliser l’heure fournie par le réseau, Désactivé) Régler la date : Utilisez les touches ▼/▲ pour sélectionner une option, puis appuyez sur OK pour accéder au sous-menu.
- Page 29 FONCTIONNEMENT DE BASE LANGUE : Langue : Utilisez les touches ▼/▲ pour sélectionner une option, puis appuyez sur OK pour choisir une langue. Clavier Clavier actuel : Utilisez les touches ▼/▲ pour sélectionner une option, puis appuyez sur OK pour accéder au sous-menu.
- Page 30 FONCTIONNEMENT DE BASE Extinction automatique de l’appareil : Utilisez les touches ▼/▲ pour sélectionner une option, puis appuyez sur OK pour choisir Activé/désactivé. Allumage automatique du téléviseur : Utilisez les touches ▼/▲ pour sélectionner une option, puis appuyez sur OK pour choisir Activé/désactivé. Version HDMI EDID : Afficher la version EDID.
- Page 31 FONCTIONNEMENT DE BASE du paramètre. Gamma : Appuyez sur les boutons ▼/▲ pour sélectionner l’option, puis sur OK pour accéder au sous-menu. (En option : Sombre, Moyen, Brillant). Temp.de Couleur : Appuyez sur les boutons ▼/▲ pour sélectionner l’option, puis sur OK pour accéder au sousmenu.
- Page 32 FONCTIONNEMENT DE BASE Contrôle de volume automatique : Utilisez les touches ▼/▲ pour sélectionner une option, puis appuyez sur OK pour choisir Activé/désactivé. Mode Downmix : Utilisez les touches ▼/▲ pour sélectionner une option, puis appuyez sur OK pour accéder au sous-menu. (En option : Stéréo, Surround) Restaurer les paramètres par défaut : Restaurer tous les paramètres à...
- Page 33 FONCTIONNEMENT DE BASE Mode vente au détail : Utilisez les touches ▼/▲ pour sélectionner une option, puis appuyez sur OK pour choisir Activé/désactivé. GOOGLE Dans ce menu, vous pouvez définir des applications consultables, filtres de recherche sécurisée, blocage des expressions offensantes et licences open source. Utilisez les touches ▼/▲...
- Page 34 FONC CTION NEME NT DE BASE uches ▼/▲ Quand dém marrer : Util lisez les tou pour sélect tionner une option, puis s appuyez s sur OK pour accéder au u sous-menu u. (En option n : 5 minutes s, 15 minutes s, 30 minute s, 1 heure, 2 2 heures).
- Page 35 FONCTIONNEMENT DE BASE Sous-titre parlé : Utilisez les touches ▼/▲ pour sélectionner une option, puis appuyez sur OK pour choisir Activé/désactivé. Sous-titrage : Utilisez les touches ▼/▲ pour sélectionner une option, puis appuyez sur OK pour accéder au sous-menu. Texte à contraste élevé : Utilisez les touches ▼/▲ pour sélectionner une option, puis appuyez sur OK pour choisir Activé/désactivé.
- Page 36 FONCTIONNEMENT DE BASE Dans ce menu, vous pouvez coupler des appareils Bluetooth. Maintenez appuyées les touches « MENU » et « Gauche » situées en bas de la télécommande pendant 5 secondes. Relâchez les touches dès que le témoin se met à clignoter. La télécommande envoie le signal de couplage au téléviseur et affiche les informations de la télécommande sur le côté...
-
Page 37: Entretien
ENTRETIEN Assurez-vous d’appuyer sur la touche ALLUMER/ÉTEINDRE pour mettre le téléviseur en mode veille et débranchez la fiche d’alimentation avant de l’entretenir. Essuyez le téléviseur avec un chiffon doux et sec. Si la surface est extrêmement sale, essuyez-la avec un chiffon trempé dans une solution d’eau savonneuse que vous essorez bien, puis essuyez à... -
Page 38: Installation Du Support
INSTALLATION DU SUPPORT Votre téléviseur est emballé avec le support et l’écran séparés. Avant d’utiliser ce téléviseur, il faut commencer par installer le support conformément aux consignes ci-dessous. Étape 1 Placez l’écran face vers le bas sur un chiffon doux ou un coussin pour éviter de l’endommager. - Page 39 SPÉCI IFICAT TIONS RÉFÉRENC TVSAND32 2HDPR02.13 N° DE MOD DÈLE TVSAND32 2HDPR02 Nom du mo odèle Écran LED 32 pouces Résolution 1 366 x 768 pixels Nombre de e couleurs 16,7 M Contraste 3000:1 Format d’im mage 16:9 Durée de v 30 000 h Tuner DVB-T, DVB...
- Page 40 Télécomm mande ······· ·················· ·················· ··················· ·················· ·················· ···· 1 Guide d’ut tilisation ··· ··················· ·················· ·················· ·················· ·················· ······ 1 Toutes les s illustratio ons de ce m manuel sont t fournies à à titre de ré éférence, l’ ’apparence e et l’écran peuvent...
-
Page 42: Dépannage
DÉPANNAGE Vérifiez les points suivants avant d’attribuer des dysfonctionnements à cet appareil : Symptôme [COURANT] Solution Pas d’alimentation. Insérez à fond la fiche d’alimentation dans la prise secteur. Pas d’image. Assurez-vous que l’équipement est correctement connecté. Assurez-vous que l’équipement est correctement connecté. ... -
Page 43: Conditions De Garantie
Conditions de garantie MODE DE PRISE EN CHARGE : Votre produit est garanti pendant 2 ans. Pour obtenir de l’aide, contactez le Service à la clientèle au 0 900 778 899 Il vous sera alors demandé la pièce défectueuse et la facture d’origine attestant du règlement du produit. - Page 44 La garantie ne porte que sur le droit à la réparation ou au remplacement du produit garanti. En conséquence, les dommages indirects résultant d’une panne ou d’une détérioration ne sont pas couverts par la garantie et notamment : Les frais de mise en service, de réglage, de nettoyage ; ...
- Page 45 ASSISTANCE Reportez-vous au tableau ci-dessous pour trouver le numéro de téléphone du centre de service après-vente : NUMÉRO DE PAYS E-MAIL TÉLÉPHONE www.mms- (+33) 0811 482 202 sav@market-maker.com support.net (Uniquement pour la France métropolitaine) +352.26.11.00.90 support_BE@market-maker.fr +49359127224626 Service@letmerepair.com 199 309 314 helpdesk@stitaly.it + 34952179479 support_ES@market-maker.fr...
- Page 46 ÉLIMINAT TION DE S PROD UITS ÉLE ECTRIQUE ES ET É ÉLECTRON NIQUES P PAR LES UTILISAT TEURS FIN NAUX DANS S L’UNION N EUROPÉ ENNE Ce symbo ole sur le produit ou u sur le ré écipient in ndique que e ce produ uit ne peu t pas être...
- Page 47 © 2020. To ous droits ré éservés. Les s logos Pola roid, Polaro oid Color Sp ectrum et P Polaroid Cla ssic Border son nt des marqu ues déposé es de PLR IP P Holdings, LLC, utilisé es avec auto orisation.
- Page 48 TVSAND32HDPR02 TVLED HD 32” / A CCESS 32 SERIE 8000 User Manuel...
- Page 49 TVSAND32HDPR02 Imported by Market Maker Brand Licensing – 79/81 Ancienne Route Nationale 7-69570 Dardilly, France...
- Page 50 You may also go to www.polaroid.com and reference Social Responsibility http://www. polaroid.com/social-responsibility to learn more about the specific laws in your area and to locate a collection facility near your home.
- Page 51 PORTAN NT INS STRUC CTIONS SAFETY PR RECAUTION CAUTION RISK OF ELECTRIC C SHOCK DO NOT OP The warn ning sign sh howing an The warnin ng sign sho owing a CAUTION: : TO AVOID D THE RISK exclamat tion point i in a lightning b bolt in a tria...
- Page 52 Do no t attempt t to open or disassemb ble the dev vice. This w would expo ose you to dangerous voltage The slo ots and ope enings of th he device a re intended d for ventila ation and to o ensure its s operation.
- Page 53 CAUTI ION: to avo id accident ts, this devic ce must be securely at ttached to t the floor or wall accord ding to the i installation instruction CAUTION: T TO AVOID E EYE HAZAR RDS: It is be est to have soft indire ct lighting t...
- Page 54 TABLE OF CONTENTS GETTING STARTED IMPORTANT INSTRUCTIONS...................1-3 ACCESSORIES………....................... ..3 FEATURES........................5 GENERAL PARTS......................6-7 REMOTE CONTROL....................8-9 REMOTE CONTROL PREPARATION................10 BASIC CONNECTION....................11-13 OPERATIONS BASIC OPERATIONS.........................14-33 FOR REFERENCE MAINTENANCE......................34 WALL MOUNTING………………………………………………………………........34 STAND INSTALLATION………………………………………………………………….
-
Page 55: Features
FEATURES 32" LED Display This unit has a built-in LED display window to provide clear vision and low radiation. Support Auto TV Scanning Support Digital Broadcasting Reception Support TV Guide Function Support TELETEXT (Europe) Function Support USB Multimedia Playback Support Multi-languages On Screen Display Support Full Function Remote Control Support HDMI, ANT,RJ 45,USB, AV and CI Input Support EARPHONE and OPTICAL... -
Page 56: General Parts
GENERAL PARTS MAIN UNIT Front View Bottom view Remote control sensor. 2: Indicator-LED: RED STANDBY. 3: " " VOL- and move left " " VOL+ and move right " " CH- and move down " " CH+ and move up - short press to confirm enter the menue. - Page 57 GENERAL PARTS Back View 1.RJ 45 2.OPTICAL 3.USB INPUT 4.HDMI 5.AV IN. 6.ANT 7.CI slot. 8.Headphone output.
-
Page 58: Remote Control
REMOTE CONTROL set the TV to Standby or Power On 1. POWER: To REMOTE CONTROL modes 2. INPUT: Open Input menu (TV, HDMI1, HDMI2, etc) Press to open NETFLIX. Press to open the You Tube. 5.Subtitles: To turn on subtitles in DTV mode. Press to stop multimedia play back To disable or enable the speaker sound output. - Page 59 14. ARROWS:Navigate on-screen menu,OK to confirm selection REMOTE CONTROL 15. RETURN: Return to previous menu press to open or close the on- screen menue. press to open the home page. press to open the search interface. 19. VOL+/-: To adjust the sound level. 20.
-
Page 60: Remote Control Preparation
REMOTE CONTROL PREPARATION BATTERY INSTALLATION Install the batteries as the following pictures. Be sure + and – terminals are positioned as indicated in the battery compartment (Fig1). SERVICE LIFE OF BATTERIES - The batteries normally last for one year although this depends on how often the remote control is used. -
Page 61: Basic Connection
BASIC CONNECTION Ensure all the cables are disconnected from the main unit before connecting to AC power source. Read through the instructions before connecting other equipments. CONNECTING TO AC POWER SOURCE CONNECT EXTERNAL ANTENNA TO UNIT Install external antenna into antenna jack for best picture. - Page 62 HEADPHONE Connection of intelligent external equipment for data transmission, at present, the market has been specially designed for portable TV K song make the microphone can connect the headphone jack. Like a violent wind song's wireless microphones, just connect it to TV headphone jack, and acoustics, can enjoy karaoke OPTICAL In the back of audio-visual equipment, there are Optical...
- Page 63 RJ 45 and HDMI Use RJ 45 that You can browse video on the Internet. Some TV sets can also download video on the Internet for watching at any time The HDMI cable connects the computer to the TV, making the TV a monitor for the computer, capable of synchronizing images and sounds from the computer USB and ANT...
-
Page 64: Basic Operations
MAKE SURE ALL THE EQUIPMENTS AND POWER PLUG ARE CONNECTED PROPERLY AND THE UNIT IS SET IN CORRECT MODE BEFORE KINDS OF OPERATIONS. BASIC OPERATION Press POWER button on the unit or remote control to power ON the unit ; press it again to power OFF (standby mode) the unit (indicator will glow red). - Page 65 BASIC OPERATION INITIAL SETUP The first you turn your TV,the setup wizard will guide you through setting up basic settings. Please according to the text tip to first time setup This function is used for the remote control pair code. After the code is successful,you can use the Bluetooth remote control to operate the TV.
- Page 66 Agree to Google to get the location information of your device to get more features,choose “YES” to accept. By agreeing to automatically send diagnostic information to Google to improve discriminative power, choose “YES” to accept. Your device is powered by Android TV and press ► button to select the browsing feature. You can get mroe apps from Google Play and press ►...
- Page 67 For selecting the mode, press ▼ ▲ to select Home mode and press OK to confirm. Confirm the selected mode again. Select “YES” to confirm the selected mode and select “No” to return to the previous step. Let this device be detected as a Google Cast device and allow Google Assistant and other services to wake this device up to respond to Cast commands, even when on standby and the screen is off.
- Page 68 ① open the google assistant start a voice search or use keyboard search. ② Among the applications installed on the TV, the icons for the favourite applications are shown inside here.(Favourite applications can be added/deleted/ changed its order by users.) Apps: Click to jump to Apps screen where all the installed applications are listed.
- Page 69 2.Press▼ ▲ button to select what you want set. 3.Press OK to enter setting. Press BACK to return to the previous menu if the main menu is displayed, pressing BACK will close the on-screen menu. Netwerk & Internet 1.Press▼ ▲ button to select what you want set. 2.
- Page 70 type. Antenna: Set the signal type to antenna. When set to Antenna, theTV can receive analog and digital (DVB-T/DVB-T2) broadcasting signals. Cable: :Set the signal type to cable. When set to Cable, theTV can receive analog and QAM broadcasting signals. Auto Channel Update Parental controls: Press ▼...
- Page 71 Analog Ma nual Scan: Manual ATV V search stat tion. After in nput the freq quency poin t, you can se elect up or down searc ch station.. Single RF-s scan: DTV m manual searc ch, left and r right after se electing RF Channel, dir rectly OK se...
- Page 72 Single RF-scan: manual search station. ACCOUNTS & SIGN IN Press UP/DOWN button to select Sign in or Skip APPS In this menu,you can set the APP permissions,and read the app lists. 1.Press ▼ ▲ button to select what you want set. 2.Press OK button to adjust.
- Page 73 In this menu,you can read the information and settings of TV. 1. Press ▼ ▲ button to select what you want set. 2. Press OK button to adjust. After finishing your adjustment, press BACK button to return to the previous menu. Date &...
- Page 74 Language: Press ▼ ▲button to select the option then press OK button to enter the select language. KEYBOARD Current keyboard: Press ▼ ▲button to select the option then press OK button to enter the sub-menu. Gboard Settings: Press ▼ ▲button to select the option then press OK button to enter the sub-menu. Mange Keyboards: Press ▼...
- Page 75 er: Press ▼ ▲button to Sleep Time select the o option then press OK bu utton to ente er the sub-m menu. (Optional: off, 10 minu tes, 20 minu utes, 30 min nutes, 40 min nutes, 50 m inutes, 60 m minutes, 90 m minutes,120 minutes).
- Page 76 Sound Style: Press ▼ ▲button to select the option then press OK button to enter the sub-menu. (Optional: user, Standard, Vivid, Sport, Movie, Music,News). Balance: press ◄ to decrease the parameter. Press ► increase the parameter Sound Surround: Press ▼ ▲button to select the option then press OK button to select ON/OFF. Equalizer Detail: Press ▼...
- Page 77 HOME SCREEN In this menu, you can set channels, apps, open source licenses. Press ▼ ▲ button to select what you want set. 2. Press OK button to adjust. After finishing your adjustment, Press BACK button return to the previous menu. Retail Mode Retail-mode: Press ▼...
- Page 78 CHROMECASE BUILT-IN In this menu, you can read the information and settings of Chromecast. U kunt in dit menu de informatie en instellingen van Chromecast bekijken. 1. Press ▼ ▲ button to select what you want set. 2. Press OK button to adjust. After finishing your adjustment, Press BACK button return to the previous menu.
- Page 79 Press ▼ ▲b Usage & di iagnostics: button to se elect the opt tion then pre ess OK butto on to choos se ON/OFF. Accessibil ess ▼ ▲but Audio Desc cription: Pre tton to selec ct the option n then press s OK button to choose O ON/OFF..
- Page 80 In this menu, you can pair Bluetooth devices. 1. Press the “MENU” and “LEFT” buttons at the bottom of the remote control for 5 seconds. 2. When the LED starts to flash, release it. The remote controller will send the pairing signal to the TV and display the information of the remote control on the right side of the screen.
-
Page 81: Maintenance
MAINTENANCE Be sure to press POWER button to set the player to the standby mode and disconnect the power plug before maintaining the player. ● Wipe the player with a dry, soft cloth. ● If the surface is extremely dirty, wipe clean with a cloth which has been dipped in a weak soap-water solution and wrung out thoroughly, and then wipe again with a dry cloth. -
Page 82: Stand Installation
STAND INSTALLATION Your TV is packaged with the Stand and the Cabinet separated. Before enjoying this TV, please carry out the Stand Installation according to the instructions below. Step 1 Place the TV faced down on a soft cloth or cushion to prevent the panel from being damaged. - Page 83 SPEC CIFICA ATIES REFERENT TVSAND32 2HDPR02.13 MODEL N° ° TVSAND32 2HDPR02 Model tite LED scree en 32 inches Resolution 1366x768 pixels 16,7 M Color num mber 3000:1 Contrast Ratio 16:9 Lifetime 30000 uur Tuner DVB-T, DV VB-C, DVB-T TV rated v voltage 100-240V- -50/60HZ 1...
- Page 84 Admin istrator, In nc. in the United St tates and o other cou ntries. Spec sh eet about t energy Brand Polaroid Referenc TVSA AND32HDP PR02 Energy ef fficiency g grade Screen si 80 c cm; 31.5 in Eletrical c...
-
Page 86: Troubleshooting
GENERAL TROUBLESHOOTING Check the following points before assuming malfunctions of this unit: Symptom[COMMON] Remedy No power. Insert the power plug securely into the power outlet No picture. Ensure that the equipment is connected properly ● No sound. ● Ensure that the equipment is connected properly. ●... -
Page 87: Warranty Conditions
Warranty conditions OPERATING MANAGEMENT: Your product is guaranteed 2 years. To request support, contact the customer service at 0 900 778 899. You will then be asked the defective part and the original invoice stating the product regulation. We may ask you for photos of your appliance. FAILURE TO PACKING: If it appeared, after unpacking the product or device, a vice preventing the use of the product in its expected configuration, contact the customer service within 72 hours worked. - Page 88 UPPO ease refer you to the e board be elow to fin d easily yo our after s sales numb ber: LAND ELEFOONN NUMMER E-MAIL www.mms- (alleen v voor +33) 0811 4 482 202 sav@mar ket-maker .com support.net grootsted delijk Frankr ijk) support_...
- Page 89 Product features, specifications and appearances are subject to change without notice. Declaration of conformity EU: Market Maker Brand Licensing, hereby declares that this equipment, conforms to the essential requirements and other relevant provisions of Directive 2014/53/UE. The declaration of Conformity can be viewed at the following address: http://www.mms-support.net/OTA/ECD_MMBL_ TVSAND32HDPR02...
- Page 90 ave q uesti ions? ? We’v ve go Answe ers. Visit u us at pol laroid.co om/supp port or give u us a call at 1-800 0-123-456 Instantly re ecognizable. . Instantly reassuring g. The Polaro oid Classic Bo order and Po olaroid Color r Spectrum l logos let you...
- Page 91 TVSAND32HDPR02 TV LED HD 32" /ACCESS 32 SERIE 8000 User Manuel...
- Page 92 TVSAND32HDPR02 Geïmporteerd door Market Maker Brand Licensing – 79/81 Ancienne Route Nationale 7-69570 Dardilly, Frankrijk...
- Page 93 U kunt ook naar www.polaroid.com gaan en verwijzen naar sociale verantwoordelijkheid http://www.polaroid.com/social-responsibility om meer te weten te komen over de specifieke wetten in uw omgeving en om een inzamelpunt bij u in de buurt te vinden.
- Page 94 BELA ANGRIJ JKE INS STRUC CTIES VEILIGHE EIDSVOOR RZORGSM MAATREGE LET OP RISICO V VAN ELEKTRISC CHE SCHOK NIET OPENEN Het waarschu uwingsteken v van een Op het waars schuwingsteke en ziet u LET OP: OM R RISICO OP uitroepteken n in een drieho oek geeft een bliksems...
- Page 95 Behoud altijd een min nimale afstan nd van 10 cm r rondom het a apparaat voor r voldoende v ventilatie. Duw gee en objecten in n het apparaa at door een va an de opening gen, deze kun nnen in conta act komen me et elektrische...
- Page 96 GEBRUIK EN BEHANDELIN NG VAN BATT TERIJEN: LET OP: Er is explosie egevaar als d e batterijen n niet goed gep laatst zijn, of als ze worde en vervangen door een niet-verg gelijkbaar of incompatibel l model. Vervang de batterijen n alleen met b batterijen van...
- Page 97 INHOUDSOPGAVE AAN DE SLAG BELANGRIJKE INSTRUCTIES ························································ 1 TOEBEHOREN ················································································· 3 KENMERKEN ··················································································· 5 ALGEMENE ONDERDELEN ····························································· 6 AFSTANDSBEDIENING ·································································· 8 DE AFSTANDSBEDIENING VOORBEREIDEN ······························· 10 BASISVERBINDING ······································································· 11 BEDIENINGEN ALGEMENE BEDIENING ······························································· 14 TER REFERENTIE ONDERHOUD ················································································ 28 BEVESTIGEN AAN DE MUUR ························································ 28 STEUNINSTALLATIE ····································································...
- Page 98 KENMERKEN 32" LED-scherm Deze speler heeft een ingebouwde LED-scherm voor een duidelijke weergave met weinig straling. Ondersteunt automatische TV scan Ondersteunt digitale omroepontvangst Ondersteunt TV-gids Ondersteunt TELETEXT (Europa) Ondersteunt afspelen van USB-multimedia Ondersteunt meertalige schermweergave Ondersteunt volledig functionele afstandsbediening Ondersteunt HDMI, ANT, RJ 45, USB, AV en CI-ingang Ondersteunt HOOFDTELEFOON en OPTISCH Met afneembare voetstuk Met externe antenneaansluiting...
- Page 99 ALGEMENE ONDERDELEN HOOFDEENHEID Vooraanzicht Onderaanzicht Afstandsbedieningssensor. 2: Indicator-LED: ROOD STAND-BY. 3: " " VOL- en naar links bewegen " " VOL+ en naar rechts bewegen " " KANAAL- en omlaag bewegen " " KANAAL+ en omhoog bewegen - Kort indrukken om te bevestigen of het menu te openen - Ingedrukt houden om uit te schakelen...
- Page 100 Achteraanzicht RJ 45 OPTISCH 3. USB-ingang 4. HDMI 5. AV IN. 6. ANT CI-poort. Hoofdtelefoonaansluiting.
- Page 101 AFSTANDSBEDIENING 1: AAN/UIT: De tv op stand-by zetten of REMOTE CONTROL inschakelen. 2: INPUT: Het ingangsmenu openen (TV, HDMI1, HDMI2, enz.) 3: : Indrukken om NETFLIX te openen. 4: : Indrukken om YouTube te openen. 5: Subtitles: Ondertiteling inschakelen in DTV- modus.
- Page 102 14.NAVIGATIETOETSEN: Schermmenu’s navigeren, OK om selecties te bevestigen. REMOTE CONTROL 15. TERUG: Terugkeren naar het vorige menu Indrukken om het schermmenu te openen of sluiten. Indrukken om de homepagina te openen. Indrukken om de zoekinterface te openen. 19. Het geluidsniveau aanpassen. 20.
- Page 103 DE AFSTANDSBEDIENING VOORBEREIDEN INSTALLATIE VAN DE BATTERIJ Installeer de batterijen zoals aangegeven in de volgende afbeeldingen. Zorg ervoor dat de + en – contacten volgens de markeringen in het batterijvak zijn geplaatst (Afb.1). LEVENSDUUR VAN BATTERIJEN De batterijen gaan gewoonlijk één jaar mee, al hangt dan af van hoe vaak de afstandsbediening wordt gebruikt.
- Page 104 BASISVERBINDING Zorg ervoor dat alle kabels van het hoofdapparaat zijn losgekoppeld voordat u de stekker in het stopcontact steekt. Lees alle instructies voordat u andere apparatuur aansluit. AANSLUITING OP HET STOPCONTACT Naar stopcontact EXTERNE ANTENNE OP HET APPARAAT AANSLUITEN Sluit de externe antenne aan op de antenne-ingang voor optimaal beeld.
- Page 105 HOOFDTELEFOON Verbinding van intelligente externe apparatuur voor gegevensoverdracht, op dit moment is de markt speciaal ontworpen voor draagbare TV K liedjes waarmee de microfoon de hoofdtelefoonaansluiting kan verbinden. Net als de draadloze microfoons van een gewelddadig wind’s liedje, sluit u deze gewoon aan op de hoofdtelefoonaansluiting van de tv en kunt u met akoestiek genieten van karaoke.
- Page 106 RJ 45 en HDMI Gebruik RJ 45 om video’s op het internet te browsen. Sommige tv’s kunnen video’s op het internet ook downloaden, zodat u deze op elk gewenst moment kunt bekijken De HDMI-kabel verbindt de computer met de tv, waardoor de tv als een monitor voor de computer werkt en beelden en geluid van de computer kan synchroniseren...
- Page 107 ZORG ERVOOR DAT ALLE APPARATUUR EN DE VOEDINGSSTEKKER GOED ZIJN AANGESLOTEN EN DAT HET APPARAAT OP DE JUISTE MODUS IS INGESTELD VOORDAT U DEZE IN GEBRUIK NEEMT. ALGEMENE BEDIENING Druk op de toets AAN/UIT op het apparaat of op de afstandsbediening om het apparaat AAN te schakelen;...
- Page 108 AANVANKELIJKE INSTELLING Wanneer u uw tv voor het eerst inschakelt, dan zal het instellingsprogramma u door alle algemene instellingen begeleiden. Volg a.u.b. de informatie op het scherm om de aanvankelijke instellingen uit te voeren. Deze functie wordt gebruikt voor de koppelingscode van de afstandsbediening. Nadat de code is geslaagd, kunt u de Bluetooth- afstandsbediening gebruiken om de tv te bedienen.
- Page 109 Ga akkoord met Google zodat zij de lokale informatie van uw apparaat kunnen krijgen en u meer functies kunnen bieden; kies “JA” om te accepteren. Door akkoord te gaan met het automatisch versturen van diagnostische informatie naar Google, wordt discriminerende kracht verbeterd;...
- Page 110 Voer hetzelfde wachtwoord nogmaals in om te bevestigen. Gebruik de afstandsbediening om het wachtwoord in te voeren en de bevestiging van het wachtwoord te voltooien. Voor het selecteren van de modus, drukt u op de toets ▼ ▲ om de Thuismodus te kiezen en drukt u ter bevestiging op OK. Bevestig de geselecteerde modus opnieuw, selecteer “Ja”...
- Page 111 Druk op de toets OK om akkoord te gaan met (Disclaimer). Nadat de instellingen zijn voltooid, kunt u tv kijken. HOMEPAGINA Druk op HOME om naar de homepagina te gaan ① Open de Google Assistent om een gesproken zoekopdracht te starten of gebruik het toetsenbord om te zoeken. ②...
- Page 112 HET SCHERMMENU NAVIGEREN Er zijn twee manieren om te openen. De eerste: druk tijdens Live TV op de menutoets om de tv-opties weer te geven, druk op ▼ ▲ ◄ ► om het instellingsmenu te selecteren en druk ter bevestiging op OK. De tweede: druk in de HOME-interface op de toets ►...
- Page 113 Antenne Menu->In stellingen->Ka anaal->Installat tiemodi kanale en, kies Antenn e of Kabel. 2. Open Men nu->Instellinge en->Kanaal->Ka analen. 3. Kanaalsca an opent de AT TV+DTV automa atische zoekint terface van Ant tenne automat isch. Update scan: : Zoekt automa atisch opnieuw naar frequenti iepunten buite n het station.
- Page 114 hebben de e modi Vooruit t, Snel en Volled dige Scan. Enkele RF-sca an: handmatig naar stations z zoeken. ACCOUNTS & & AANMELDEN Druk op de toe ets OMHOOG/ OMLAAG om A anmelden of O Overslaan te se lecteren. APPS U kunt in dit m menu de APP-to oestemmingen...
- Page 115 Druk op d de toets OK om m aan te passen Nadat de e afstelling is af fgerond, drukt u op de toets B BACK om terug te keren naar het vorige men DATUM & TIJD oets ▼ ▲ om de Automatische e datum &...
- Page 116 openen. INGANGEN ▼ ▲ om de op Ingangen: Dr uk op de toets ptie te selectere en en druk verv volgens op de t toets OK om he et submenu te openen. e toets ▼ ▲ om HDMI-bedien ning: Druk op d m de optie te s electeren en d ruk vervolgens...
- Page 117 de toets ▼ ▲ HDR: Druk op om de optie te selecteren bu tton en druk ve ervolgens op de e toets OK om het submenu t te openen. (Optioneel: aa an, uit) op de toets ▼ ▲ om de optie Geavanceerd de video: Druk e te selecteren...
- Page 118 HOMEPAGINA U kunt in dit m menu kanalen, a apps en licentie es voor open b bronnen instelle e toets ▼ ▲ om Druk op d m de optie te s electeren die u u wilt instellen. 2. Druk op d e toets OK om aan te passen Nadat de...
- Page 119 te openen. (Op ptioneel: Sche rm uitschakele en, Achtergrond d, Kleuren). p de toets ▼ ▲ ▲ om de optie te Wanneer te st tarten: Druk op e selecteren b utton en druk v vervolgens op d de toets OK om m het submenu te openen.
- Page 120 AFSTANDSBE EDIENING & AC CCESSOIRES U kunt in dit m menu Bluetooth h-apparatuur ko oppelen. Druk 5 sec conden lang op p de toetsen “M MENU” en “LIN NKS” onder op d de afstandsbed diening. 2. Laat de to oetsen los wann neer de LED be egint te knipper ren.
- Page 121 ONDERHOUD Zorg ervoor dat u op de toets AAN/UIT drukt om de speler in de stand-by-modus te zetten en de stekker uit het stopcontact haalt voordat u de speler gaat onderhouden. Veeg de speler af met een droge, zachte doek. ...
- Page 122 STEUNINSTALLATIE Uw tv is verpakt met de steun en de behuizing afzonderlijk. Voordat u deze TV in gebruik neemt, installeer de steun a.u.b. volgens de instructies hieronder. Stap 1 Plaats de TV met het scherm omlaag op een zachte doek of kussen om beschadiging aan het paneel te voorkomen.
- Page 123 SPEC CIFICA ATIES REFERENT TVSAND32 2HDPR02.1 Modelnum mmer. TVSAND32 2HDPR02 Modeltite LED-scher rm 32 inch Resolutie 1366x768 pixels Aantal kle euren 16,7G Contrast 3000:1 Verhoudin 16:9 Levensdu 30000 uur Tuner DVB-T.DVB B-C.DVB-T2 Nominale e spanning van tv 100-240V- -50/60Hz 1 Verbruik 48 W Afmetinge...
- Page 124 De termen HD DMI en HDMI Hoge Definitie e Multimedia I nterface en he et HDMI-logo zijn handelsm merken of gede eponeerde handelsmerk ken van HDMI Licensing Adm ministrator, In c. in de Veren igde Staten en n andere lande Specificat ties over e energie...
- Page 126 PROBLEEMOPLOSSING Controleer de volgende punten voordat u aanneemt dat dit apparaat een storing vertoont: Symptoom [ALGEMEEN] Oplossing Geen voeding. Steek de voedingsstekker stevig in het stopcontact. Geen beeld. Controleer of de apparatuur goed is aangesloten. • Geen geluid. • Controleer of de apparatuur goed is aangesloten. •...
- Page 127 Garantievoorwaarden GEBRUIK: Het product heeft een garantieperiode van 2 jaar. U kunt ondersteuning aanvragen via de klantendienst op 0 900 778 899. Geef aan welk onderdeel defect is. Zorg ervoor dat u de originele factuur met de productgegevens bij de hand hebt. Mogelijk vragen wij om foto's van het apparaat. VERPAKKINGSFOUTEN: Wanneer bij het uitpakken van het product of apparaat blijkt dat er een defect is waardoor het product niet op de verwachte manier kan worden gebruikt, neemt u binnen 72 uur contact op met de...
- Page 128 ONDE ERSTEU UNING Raadplee eg a.u.b. het o overzicht hier ronder waar u u gemakkelijk k het nummer r van uw klant tendienst kun nt vinden: TELEFOO ONNUMMER E-MAIL (+33) 08 11 482 202 sav@m market-maker.c www.mms-sup port.net (alleen voor g grootstedelijk Fran krijk)
- Page 129 PLR IP Holdings, LLC, haar licentiehouders en filialen stemmen volledig in met alle richtlijnen m.b.t. elektronische afvalapparatuur. Om het milieu te beschermen en overtreding van de huidige wetgeving te voorkomen, dient u dit product op correcte wijze af te danken in overeenstemming met alle toepasbare regelgevingen, richtlijnen en andere bepalingen in uw woonomgeving.
- Page 130 1-800 0-123-4 4567 Direct herk kenbaar. Dire geruststell lend. De Pola aroid Classic c Border- en n Polaroid Co olor Spectrum m-logo's late je weten da at je een pro oduct hebt ge ekocht dat een vo orbeeld is va...
- Page 131 TVSAND32HDPR02 TV LED HD 32" /ACCESS 32 SERIE 8000 User Manuel...
- Page 132 TVSAND32HDPR02 Importado por Market Maker Brand Licensing – 79/81 Ancienne Route Nationale 7- 69570 Dardilly, Francia...
- Page 133 También puede acceder a www.polaroid.com y abrir Responsabilidad Social http://www.polaroid.com/social-responsibility para saber más sobre las leyes específicas de su región y localizar unas instalaciones de recogida cercanas a su casa.
- Page 134 NSTRU UCCIO ONES IM MPORT TANTES PRECAUC CIONES DE E SEGURID PRECAUCIÓ ÓN IESGO DE DESC CARGA ELÉCTRICA NO ABRIR El símbolo d de advertencia a con un signo El símbolo de e advertencia c con un rayo de exclama ación dentro d e un triángulo dentro de un...
- Page 135 Deje sie mpre alreded dor una separ ración mínima a de 10 cm pa ara garantizar r una ventilac ción suficient No intro oduzca nunca a un objeto en estas ab erturas, ya q que podría e entrar en con ntacto con c componentes eléctrico...
- Page 136 USO Y MANEJ JO DE LAS PI LAS: PRECAU UCIÓN: riesgo o de explosió ón si las pilas no están cor rectamente c colocadas o s si se reemplaz zan por un modelo que no sea si imilar o sea in ncompatible.
- Page 137 ÍNDICE GUÍA DE INICIO INSTRUCCIONES IMPORTANTES ······································································ 1 ACCESORIOS ······································································································ 3 FUNCIONES ········································································································· 5 PRESENTACIÓN GENERAL ·················································································· 6 MANDO A DISTANCIA ························································································· 8 PREPARACIÓN DEL MANDO A DISTANCIA ······················································ 10 CONEXIÓN BÁSICA ···························································································· 11 MANEJO FUNCIONAMIENTO BÁSICO ············································································· 14 COMO REFERENCIA MANTENIMIENTO ······························································································...
- Page 138 FUNCIONES Pantalla LED de32" Este producto tiene incorporada una pantalla LED que proporciona una visión clara y una baja radiación. Búsqueda automática de canales de TV Recepción de emisiones digitales Compatible con guía TV Compatible con TELETEXTO (Europa) Compatible con reproducción multimedia mediante USB Instrucciones en pantalla en varios idiomas Mando a distancia con todas las funciones Entradas HDMI, ANTENA, RJ 45, USB, AV y CI...
- Page 139 PRESENTACIÓN GENERAL UNIDAD PRINCIPAL Vista frontal Vista inferior Sensor del mando a distancia. 2: Indicador LED: ROJO EN ESPERA. 3: " " VOL- y mover a la izquierda " " VOL+ y mover a la derecha " " CH- y mover hacia abajo "...
- Page 140 Vista posterior RJ 45 ÓPTICA 3. Entrada USB 4. HDMI 5. ENTRADA AV 6. ANT Ranura CI. Salida de auriculares...
- Page 141 MANDO A DISTANCIA 1: ENCENDIDO: encender el televisor o ponerlo en REMOTE CONTROL espera 2: INPUT: abrir el menú de entradas (TV, HDMI1, HDMI2, etc.) 3: pulse para abrir NETFLIX 4: pulse para abrir YouTube 5: Subtitles: activar los subtítulos en el modo DTV 6:...
- Page 142 14: FLECHAS: navegar por el menú en pantalla, OK para confirmar la selección REMOTE CONTROL 15: VOLVER: volver al menú anterior pulse para abrir o cerrar el menú en pantalla. pulse para abrir la página de inicio. pulse para abrir la pantalla de búsqueda. 19.
- Page 143 PREPARACIÓN DEL MANDO A DISTANCIA COLOCACIÓN DE LAS PILAS Instale las pilas como se muestra en las ilustraciones siguientes. Asegúrese de que los polos + y - están colocados como se indica en el compartimento de las pilas (Fig. 1). VIDA ÚTIL DE LAS PILAS Las pilas suelen durar un año, aunque depende de la frecuencia con la que se utilice el mando a distancia.
- Page 144 CONEXIÓN BÁSICA Asegúrese de que todos los cables están desconectados de la corriente antes de conectarlo a una fuente de alimentación de CA. Lea detenidamente las instrucciones antes de conectar otros equipos. CONEXIÓN A UNA FUENTE DE ALIMENTACIÓN DE CA A la toma de corriente CONEXIÓN DE LA ANTENA EXTERNA AL APARATO...
- Page 145 AURICULARES Conexión para equipos externos inteligentes, actualmente el mercado está diseñado especialmente para karaokes portátiles para TV, pudiendo conectarse el micrófono a la toma para auriculares. Como un micrófono inalámbrico para canciones con viento fuerte, solo hay que conectarlo a la toma de auriculares del TV y la acústica le permitirá disfrutar del karaoke.
- Page 146 RJ 45 y HDMI Utilice la RJ 45 para ver vídeos de Internet. En algunos televisores también puede descargarse el vídeo de Internet para verlo en cualquier momento El cable HDMI conecta el ordenador con el TV, haciendo de este un monitor, capaz de sincronizar imágenes y sonido procedente del ordenador.
- Page 147 ASEGÚRESE DE QUE TODOS LOS COMPONENTES Y EL ENCHUFE ESTÁN CONECTADOS CORRECTAMENTE Y QUE LA UNIDAD ESTÁ AJUSTADA EN EL MODO CORRECTO ANTES DE CUALQUIER TIPO DE OPERACIÓN. FUNCIONAMIENTO BÁSICO Pulse el botón de ENCENDIDO en la unidad o en mando a distancia para encender la unidad; vuelva a pulsarlo para apagarla (modo en espera, el indicador se ilumina en rojo).
- Page 148 CONFIGURACIÓN INCIAL La primera vez que encienda el TV, el asistente de configuración la guiará para realizar los ajustes iniciales. Realice los ajustes respetando los consejos para la configuración inicial. Esta función se utiliza para el código de emparejamiento del mando a distancia. Una vez introducido el código correctamente, puede utilizar el mando a distancia por Bluetooth para manejar el TV.
- Page 149 Seleccione "SÍ" para aceptar que Google acceda a la información de localización de su dispositivo para ofrecerle más funciones. Seleccione "SÍ" para aceptar enviar automáticamente información de diagnóstico a Google para mejorar la capacidad de discriminación. Su dispositivo funciona con Android TV pulse el botón ► para seleccionar la función de exploración. Puede obtener más aplicaciones en Google Play, pulse ►...
- Page 150 Confirme nuevamente la contraseña. Utilice el mando a distancia para introducir la contraseña y realizar la confirmación de la misma. Para seleccionar el modo, pulse el botón ▼ ▲ para seleccionar Inicio y después OK para confirmar. Confirme nuevamente el modo, seleccione "SÍ" para confirmar el modo seleccionado o "NO" para volver al paso anterior. Permita que el dispositivo sea detectado como dispositivo Google Cast y permita que el Asistente de Google y otros servicios lo activen para responder a las instrucciones de emisión, aunque esté...
- Page 151 Pulse el botón OK para aceptar (Exención de responsabilidad). Una vez finalizada la configuración, puede ver el TV. PANTALLA DE INICIO Pulse página de INICIO para Ir a la página inicio. ① Abra el asistente de Google para iniciar una búsqueda por voz o utilice el teclado para buscar ②...
- Page 152 NAVEGAR POR EL MENÚ EN PANTALLA Hay dos formas de acceder. La primera, en TV en directo, pulse el botón MENU para mostrar las opciones de TV, pulse ▼ ▲ ◄ ► para seleccionar el menú de ajustes y a continuación OK para confirmar. La segunda, en la pantalla de INICIO, pulse el botón ►...
- Page 153 Canales: Se m muestra el subm menú de búsqu ueda según los s diferentes mo odos de instala ción de canale Modo de inst alación de can nales: seleccio one la fuente de e canales en el menú en panta alla.
- Page 154 Cable Menú->Aj ustes->Canal-> >Modo de insta alación de cana ales, seleccion nar Cable. Vaya a Me enú->Ajustes-> Canal->Canale Acceder a a la búsqueda d de canal, donde e los números son los operad dores locales y el modo de bú úsqueda predet t erminado es avanzado ;...
- Page 155 ACERCA DE En este menú , puede ver la i nformación y lo os ajustes del T botón ▼▲ para Pulse el b a seleccionar l o que desee aj ustar. Pulse el b botón OK para realizar el ajus ste.
- Page 156 TECLADO tón ▼ ▲ para s Teclado actu al: pulse el bot seleccionar la o opción y pulse a continuación n OK para acce eder al submen ú. ▼ ▲ para sele Configuració ón de Gboard: p pulse el botón eccionar la opc ión y pulse a co ontinuación OK...
- Page 157 Modo imagen: pulse el botón ▼ ▲ para seleccionar la opción y pulse a continuación OK para acceder al submenú. (Opciones: usuario, estándar, intenso, deportes, película, juegos, ahorro de energía). Iluminación de fondo/brillo/contraste/saturación/tono/nitidez: Pulse el botón▼ ▲ para seleccionar la opción. Pulse ◄ para disminuir el valor.
- Page 158 Modo Downm mix (mezcla aut tomática): pul se el botón par ra seleccionar la opción y pul lse a continuac ción OK para ac cceder al submenú. (Op pciones: estére eo, envolvente) Restablecer a ajustes predet terminados: R establecer tod dos los ajustes a los valores p redeterminado...
- Page 159 CHROMECAS ST INTEGRADO En este menú , puede ver la i nformación y lo os ajustes del C Chromecast. otón ▼ ▲ para Pulse el b a seleccionar lo o que desee aju ustar. 2. Pulse el b otón OK para r realizar el ajust Después d de finalizar los...
- Page 160 e el botón ▼ ▲ pa Subtítulos: pulse ara seleccionar la o opción y pulse a co ontinuación OK pa ara acceder al sub menú. botón ▼ ▲ para se Texto de alto co ntraste: pulse el b eleccionar la opció ón y pulse a contin nuación OK para s eleccionar ENCEN...
- Page 161 MANTENIMIENTO Asegúrese de poner el botón de encendido en el modo en espera (stanby) y desconectar el enchufe antes de realizar el mantenimiento. Limpie el aparato con un paño suave y seco. Si la superficie está muy sucia, pase un paño humedecido en una solución de agua y un jabón suave, frote a conciencia y pase a continuación un paño seco.
- Page 162 INSTALACIÓN DEL SOPORTE El televisor está embalado con el soporte y el cuerpo separados. Antes de comenzar a disfrutar del TV, realice la instalación del soporte de acuerdo con las instrucciones expuestas a continuación. Paso 1 Coloque el TV hacia abajo sobre un paño suave o cojín para evitar que la pantalla se dañe.
- Page 163 ESPEC CIFICAC IONES REFERENC TVSAND32 2HDPR02.13 Núm. de m modelo TVSAND32 2HDPR02 Denominac ción del mo odelo Pantalla L LCD de 32 pu ulgadas Resolución 1366x768 píxeles Número de e colores 16,7G Contraste 3000:1 Formato 16:9 Vida útil 30.000 hr Sintonizad DVB-T.DV B-C.DVB-T2...
- Page 164 Ficha de especif ficaciones e energéticas Marca laroid Referencia TVSAND3 32HDPR02 Nivel de efi iciencia ene ergética Tamaño de e pantalla 80 cm - 31 1,5 pulgadas Consumo e eléctrico en modo ence ndido (W) Consumo e eléctrico anu ual para 4 ho oras/día, 36 65 días/año 57 kW...
- Page 166 SOLUCIÓN DE PROBLEMAS Compruebe los puntos siguientes antes de considerar un fallo de funcionamiento en la unidad: Síntoma [COMÚN] Solución No se enciende. Introduzca el enchufe bien ajustado en la toma de corriente. No hay imagen. Asegúrese de que el equipo está correctamente conectado. •...
- Page 167 Condiciones de la garantía FUNCIONAMIENTO: El producto cuenta con una garantía de 2 años. Para solicitar asistencia, póngase en contacto con el servicio de atención al cliente en el 0 900 778 899 Se le solicitará la pieza defectuosa y la factura original indicando la regulación del producto. Puede que se le soliciten fotografías de su dispositivo.
- Page 168 ASISTEN NCIA T TÉCNIC Consulte e en la siguien nte tabla el nú úmero del ser rvicio posven ta que le corr responda: AÍS NÚMERO DE TELÉFONO RREO ELECTRÓ ÓNICO (+33) 0 811 482 202 sav@ @market-make r.com www.mms-s support.net (sólo par ra Francia metrop...
- Page 169 PLR IP Holdings, LLC, sus concesionarios y afiliados, apoyan totalmente todas las iniciativas relativas a los residuos electrónicos. Como responsable de la gestión medioambiental y para evitar infringir de las leyes establecidas, debe eliminar estos productos de forma apropiada, cumpliendo todas las normativas, directivas y directrices aplicables en la zona en la que resida.
- Page 170 Instan ntáneamente fiable. Los lo ogotipos Pola aroid borde clá ásico y Espec ctro de Color P Polaroid le ind dican que ha adquirido un n producto qu ue ejemplifica a las mejores c calidades de n nuestra marca...
Need help?
Do you have a question about the TVSAND32HDPR02 and is the answer not in the manual?
Questions and answers