
Related Manuals for Cheminees Philippe RADIANTE 1200


Summary of Contents for Cheminees Philippe RADIANTE 1200
- Page 1 RADIANTE 1200 INSTALLATION & USER MANUAL WARMTH FROM FRANCE BY WIGNELLS OF MELBOURNE The Original Home Of Cheminées Philippe Australia since 1982...
- Page 2 - Edna Ferber 1885-1968 We thank and appreciate your trust in welcoming our Cheminées Philippe Radiante 1200 into your space. Living with a Cheminées Philippe is truly a most satisfying and memorably rewarding experience.
-
Page 3: Table Of Contents
1.3 PRE-INSTALLATION GUIDELINES 1.4 GENERAL FLUE REQUIREMENTS 1.5 SUITABLE BASE & HEARTH MATERIALS 2. UNIT DIMENSIONS & SPECIFICATIONS 2.1 CHEMINÉES PHILIPPE RADIANTE 1200 3. FREESTANDING 3.1 STEP BY STEP INSTALL GUIDE 3.2 BASE & HEARTH DIMENSIONS 3.3 FREESTANDING CLEARANCES 3.4 SKAMOTEC WALL GUIDELINES 3.5 SKAMTOEC WALL VENTILATION... - Page 4 This document is valid for Australia & New Zealand as of July 29th 2022 for the installation, operation and maintenance of the Cheminées Philippe Radiante 1200 wood fireplace. DISCLAIMER Cheminées Philippe Australia & Wignells of Melbourne bears no liability for installations that do not meet the criteria outlined in this manual, alongside the requirements of Australian &...
- Page 5 IN HAZARDOUS CONDITIONS. WHERE SUCH ACTION IS CONSIDERED THE MANUFACTURER SHOULD BE CONSULTED IN THE FIRST INSTANCE. CAUTION: CRACKED AND BROKEN COMPONENTS, FOR EXAMPLE GLASS PANELS, CAST IRON OR CERAMIC TILES, MAY RENDER THE INSTALLATION UNSAFE. RADIANTE 1200 CHEMINÉES PHILIPPE...
- Page 6 Termination of the flue in a high pressure zone such as on the downstream side of a nearby obstruction to airflow. For example; trees, hills, adjacent buildings or parts of the building where the unit is installed may also prove to cause downdraught conditions in this case refer to page 37 (AS/NZS 2918:2018 extract), RADIANTE 1200 CHEMINÉES PHILIPPE...
- Page 7 No more than 2 x 45 degree bends are allowed » » 90 degree bends are NOT to be used MINIMUM EXTERNAL FLUE HEIGHTS & COWL CLEARANCES - AS PER AS/NZS 2918:2018 *All dimensions in mm *Please keep these instructions for future reference. RADIANTE 1200 CHEMINÉES PHILIPPE...
- Page 8 DO NOT USE » Engineered or composite stone, including but not limited to; casearstone, terrazzo, etc » Skamotec board as the fireplace base » Thin pre-cast concrete » Timber or any combustible material » Glass RADIANTE 1200 CHEMINÉES PHILIPPE...
-
Page 9: Unit Dimensions & Specifications 2.1 Cheminées Philippe Radiante 1200
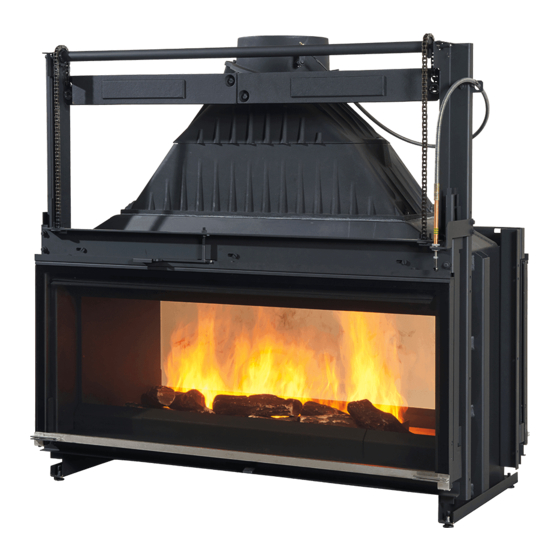
2. UNIT DIMENSIONS & SPECIFICATIONS 2.1 CHEMINÉES PHILIPPE RADIANTE 1200 PLEASE NOTE: Due to the handmade nature of our fireplaces there maybe a slight variance factor of 1-2mm across all unit dimensions and .5kg in unit weight. - Page 10 *Heating output varies depending upon ceiling height, fuel used, building insulation, geographical zone and atmospheric conditions. This unit has been tested and complies with Australian & New Zealand standards AS/NZS 4012 (2014), AS/NZS 4013 (2014) & AS/NZS2918 (2018), and is recommended to be used with hardwood only. RADIANTE 1200 CHEMINÉES PHILIPPE...
-
Page 11: Step By Step Install Guide
3. FREESTANDING 3.1 STEP BY STEP INSTALL GUIDE 3.2 BASE & HEARTH DIMENSIONS 3.3 FREESTANDING CLEARANCES 3.4 SKAMOTEC WALL GUIDELINES 3.5 SKAMTOEC WALL VENTILATION 3.6 FLUE COMPONENTS OVERVIEW 3.7 FLUE SYSTEM CONFIGURATIONS PLEASE NOTE: All diagrams in this manual are for illustration purposes only, DO NOT scale from any of these diagrams. - Page 12 » If the draw is adequate, complete the check list on page 43 and return this as well as this entire booklet to the fireplace owner » If the draw is inadequate please refer to the Balancing Air Pressure section on page 6 RADIANTE 1200 CHEMINÉES PHILIPPE...
- Page 13 **The unit must be placed centrally in the 1830 width hearth *Please keep these instructions for future reference. Unless forming an abutment with a wall, the back and side hearth dimensions MUST NOT be altered, please refer to page 14 for minimum sizes. RADIANTE 1200 CHEMINÉES PHILIPPE...
- Page 14 Brick/Hebel Brick/Hebel 900mm 100mm 900mm 150mm 100mm 150mm 300mm 300mm (Refer to page 13) Hearth 1590mm (Refer to page 13) Hearth 1590mm Combustible Material A minimum 110mm solid brick/hebel thick wall should extend to the ceiling. RADIANTE 1200 CHEMINÉES PHILIPPE...
- Page 15 This will prevent these products from drying out too quickly & adhering incorrectly. A painted finish, stone or tile material can be used to finish the Skamotec surface. For a comprehensive Skamotec install and finish, please only refer to the Skamotec 225 Installers Guide SKAMOTEC COMPOSITION - PLAN VIEW RADIANTE 1200 CHEMINÉES PHILIPPE...
- Page 16 OPTION C: CONCEALED INTERNAL VENTS The minimum concealed surface area of vent is one 720cm2 top (9cm x 80cm) at the top and bottom or 2 x 360cm2 (9cm x 40cm) top and bottom as illustrated RADIANTE 1200 CHEMINÉES PHILIPPE...
- Page 17 10”-14” Cover Cone 10”-14” Cover Cone 10” Anti Down Draught Cowl 10” Anti Down Draught Cowl *All internal 10” flue must be stainless steel FREESTANDING INSTALL OVERVIEW* *SINGLE SKIN FLUE KIT ILLUSTRATION (Will vary depending on roof) RADIANTE 1200 CHEMINÉES PHILIPPE...
- Page 18 Freestanding with External wall 8. Double storey roof space and chimney & offset penetration with single storey offset penetration Some of these flue scenarios may require additional flue components other than those listed on page 17 RADIANTE 1200 CHEMINÉES PHILIPPE...
-
Page 19: Flue Components Overview
4. INBUILT 4.1 STEP BY STEP INSTALL GUIDE 4.2 BASE, HEARTH & MANTEL SHELF DIMENSIONS 4.3 INBUILT CAVITY DIMENSIONS 4.4 DEFLECTOR PLATE & GRILLS 4.5 FLUE COMPONENTS OVERVIEW PLEASE NOTE: All diagrams in this manual are for illustration purposes only, DO NOT scale from any of these diagrams. All measurements are in millimetres unless otherwise stated. - Page 20 » If the draw is adequate, complete the check list on page 43 and return this as well as this entire booklet to the fireplace owner » If the draw is inadequate please refer to the Balancing Air Pressure section on page 6 RADIANTE 1200 CHEMINÉES PHILIPPE...
- Page 21 *Please keep these instructions for future reference. Unless forming an abutment with a wall, the back and side hearth dimensions MUST NOT be altered, please refer to page 22 for minimum sizes. RADIANTE 1200 CHEMINÉES PHILIPPE...
- Page 22 In this case, a minimum 100mm air gap on the back and sides is recommended All dimensions are in millimetres *Refer to pages 8 & 21 RADIANTE 1200 CHEMINÉES PHILIPPE...
- Page 23 22 for minimum sizing Ensure there is nothing obstructing the front of the vent » Air Inlet Clearance: Allow a 600mm clearance in front and 500mm above the vent » Air Outlet Clearance: RADIANTE 1200 CHEMINÉES PHILIPPE...
- Page 24 3 x 10”-12”-14” Triple Skin Flue 900mm* 10”-14” Cover Cone 10”-14” Cover Cone 10” Anti Down Draught Cowl 10” Anti Down Draught Cowl *All internal 9” flue must be stainless steel PARTIAL MASONRY INSTALL OVERVIEW FULL MASONRY INSTALL OVERVIEW RADIANTE 1200 CHEMINÉES PHILIPPE...
- Page 25 5. MECHANISMS & UNIT ASSEMBLY 5.1 MECHANISM GUIDE 5.2 PARTS, GATHER & FLUE COLLAR ASSEMBLY 5.3 DAMPER, SIDE & BACK PLATES ASSEMBLY 5.4 BASES, ASH PANS & GRATES ASSEMBLY 5.5 BAFFLE PLATE ASSEMBLY...
- Page 26 4. Proceed in the reverse order to close the door A steel rod as well as gloves have been supplied with your fireplace, ensure these tools are used to operate the vertical opening and closing of the door for ease of use RADIANTE 1200 CHEMINÉES PHILIPPE...
- Page 27 Carefully apply refractory sealant to all supports and interlocking joints of the flue collar 4. Fix the flue collar onto the spigot ensuring it is secure and tightly sealed 5. Position, drill and fix the tie setting damper RADIANTE 1200 CHEMINÉES PHILIPPE...
- Page 28 3. Pivot it downwards. Do the same assembly for the other side 4. Insert the back plate 5. Put it against the back of the appliance and transfer into the side of the firebox 6. Insert the decorative plate inside the firebox RADIANTE 1200 CHEMINÉES PHILIPPE...
- Page 29 5. Ensure the grates are positioned as per the illustration above 6. There must be a relative slack between each grate, the setting up by force demonstrates an anomaly that could lead to breakage or premature deformation RADIANTE 1200 CHEMINÉES PHILIPPE...
- Page 30 2. Lay the brackets of the baffle on the top of the decorative plates and pivot the baffle 3. Transfer the baffle on the left 4. Rest the back and front ends on the support within the gather RADIANTE 1200 CHEMINÉES PHILIPPE...
- Page 31 6. OPERATION 6.1 BEFORE FIRST IGNITION 6.2 RECOMMENDED FIRE WOOD 6.3 HOW TO LIGHT & BURN SAFELY 34 & 35 6.4 WARNINGS LABELS...
- Page 32 RADIANTE 1200 CHEMINÉES PHILIPPE...
- Page 33 GREY BOX Difficult Excellent RED IRON BARK Difficult Excellent RED BOX Difficult Excellent YELLOW BOX Difficult Excellent RED GUM Fair Good BLUE GUM Good Good STRINGY BARK Good Good NARROW LEAF Good Good PEPPERMINT Fair Poor PINE RADIANTE 1200 CHEMINÉES PHILIPPE...
- Page 34 3.Firestarters should then be evenly positioned between the two layers of kindling on the back, middle and front 4. Once the kindling and hard wood has caught properly close the door adjust the primary and secondary air vents accordingly RADIANTE 1200 CHEMINÉES PHILIPPE...
- Page 35 » Carefully load fire wood into the unit, do not throw or forcefully pack firewood into the unit when reloading. This has the potential to fracture and damage the grate, back and side plates, glass, fire log retainers and over all cast iron internal elements RADIANTE 1200 CHEMINÉES PHILIPPE...
- Page 36 WARNING: DO NOT BURN WOOD THAT IS PAINTED; OR IS COATED WITH PLASTIC; OR HAS BEEN TREATED WITH ANY CHEMICAL CAUTION: DO NOT OPERATE THIS APPLIANCE IF GLASS IS CRACKED OR BROKEN. CAUTION: THIS APPLIANCE SHOULD BE MAINTAINED AND OPERATED AT ALL TIMES IN ACCORDANCE WITH THESE INSTRUCTIONS. RADIANTE 1200 CHEMINÉES PHILIPPE...
- Page 37 7. MAINTENANCE 7.1 SERVICING GUIDE 7.2 TROUBLE SHOOTING 7.3 SPARE PARTS...
- Page 38 Simply spray onto the glass window (ensure the glass is cold), wait thirty seconds to a minute and wipe off with a paper towel or newspaper. For particularly baked on creosote, repeat process. *Reminder to AVOID spraying the cast iron elements RADIANTE 1200 CHEMINÉES PHILIPPE...
- Page 39 The window becomes dirty very quickly - Using a moisture meter check the moisture content of the wood, refer to pages 32 & 33 - Avoid too many long, slow burning fires - Check the secondary air in-take is not blocked RADIANTE 1200 CHEMINÉES PHILIPPE...
- Page 40 » Only use spare parts, in particular the replacement of glass should only be sourced and supplied by Cheminées Philippe Australia » Please refer to common parts list on page 27, for all other parts refer to diagram below RADIANTE 1200 CHEMINÉES PHILIPPE...
- Page 41 8. WARRANTY 8.1 WARRANTY POLICY & EXTENDED WARRANTY 8.2 INSTALLER CHECKLIST FORM...
- Page 42 This can be done online at https://chemphilaust.com.au/product-registration/ In the event of a claim, you must email a copy of your invoice and the installer checklist with the Compliance Certificate, and photos of your fireplace to sales@wignells.com.au RADIANTE 1200 CHEMINÉES PHILIPPE...
- Page 43 FIRST & LAST NAME OF INSTALLER: COMPANY NAME (IF APPLICABLE) CONTACT NUMBER COMPLIANCE CERTIFICATE # SERIAL NUMBER OF UNIT (located inside the base of the ashpan chamber) Email sales@wignells.com.au a copy of this page along with your Compliance Certificate CHEMINÉES PHILIPPE RADIANTE 1200...
- Page 44 CHEMINÉES PHILIPPE AUSTRALIA BY WIGNELLS OF MELBOURNE 430 Johnston St, Abbotsford VIC 3067 180 Whitehorse Rd, Blackburn VIC 3130 (03) 9417 3315 WWW.CHEMPHILAUST.COM.AU...
Need help?
Do you have a question about the RADIANTE 1200 and is the answer not in the manual?
Questions and answers