
Related Manuals for La Germania S9


Summary of Contents for La Germania S9
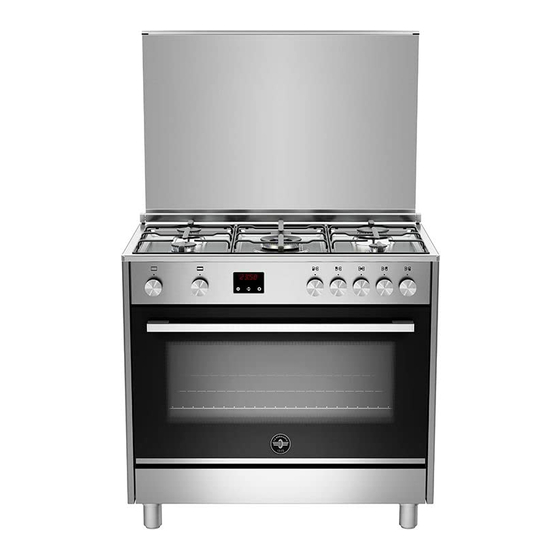
- Page 1 INSTALLATION, MAINTENANCE AND USE INSTRUCTIONS FOR FREE-STANDING COOKERS 90x60 cm GIANT OVEN (MOD.: S9 - SV - R9 - RV) pag.2 3100449...
-
Page 2: Table Of Contents
CONTENTS INSTALLER TECHNICAL MANUAL…………………………………………………………………………… INSTALLING THE COOKER ………………………………………………………………………………….. IMPORTANT INFORMATION FOR THE APPLIANCE………………………………………………………………….. ROOM VENTILATION………………………………………………………………………………………………..…….. LOCATION AND ARERATION………………………………………………………………………………..…………….. INSTALLING THE SYSTEM TO PREVENT OVERTURNING……………………………………………………….. APPLIANCE GAS CONNECTION……………………………………………………………………….. ADAPTATION TO DIFFERENT TYPES OF GAS…………………………………………………………..BURNER ADJUSTMENT…………………………………………………………………………..APPLIANCE ELECTRIC CONNECTION………………………………………………………..APPLIANCE MAINTENANCE……………………………………………………………………… REPLACING PARTS……………………………………………………………………………………………. -
Page 3: Installer Technical Manual
INSTALLATION, MAINTENANCE AND USE INSTRUCTIONS FOR FREE-STANDING COOKERS 90x60 cm GIANT OVEN READ THE INSTRUCTION BOOKLET BEFORE INSTALLING AND USING THE APPLIANCE. The manufacturer will not be responsible for any damage to property or to persons caused by incorrect installation or improper use of the appliance. -
Page 4: Adaptation To Different Types Of Gas
ADAPTATION TO DIFFERENT TYPES OF GAS Before performing any maintenance operation, disconnect the appliance from the gas supply and electricity network. REPLACING THE NOZZLES TO OPERATE WITH ANOTHER TYPE OF GAS: Follow the instructions below to change the burner nozzles on the work surface: 1) Pull out the plug from the electric outlet to avoid any type of electric contact. -
Page 5: Appliance Electric Connection
4) With a slotted screwdriver turn the choking screw (see figure 11) and, while observing the flame at the same time through the cooker porthole, evaluate the consistency of the flame so it remains on when switching quickly from the MINIMUM to the MAXIMUM position. -
Page 6: Replacing Parts
REPLACING PARTS Before performing any maintenance operation, disconnect the appliance from the gas supply and electricity network. To replace parts such as knobs and burners, just remove them from the seats without disassembling any part of the cooker. To replace parts such as nozzle supports, valves and electric components follow the procedure described in the burner adjustment paragraph. -
Page 7: Using Hot Plates
Tips for using burners correctly: - Use suitable pots for each burner (see tab. 5 and Fig.18). - When the liquid is boiling, turn the knob to the MINIMUM position (small flame Fig. 15). - Always use pots with a cover. TABLE N°5: Recommended pot diameters. -
Page 8: Type Of Pan
The diameter of the bottom of the pot (or other container) should be as near as possible the diameter of the burner you are using; using a smaller pot will cause waste of energy due to heat dispersion on the uncovered surface of the plate. The hob surface and the bottom of the pot must be kept clean. -
Page 9: Hob
Holding Function The holding function keeps the temperature of the bottoms of pans at about 65°C. This allows foods to be kept hot with optimal energy consumption and to be heated gently. The holding function can be kept in operation for up to 2 hours. The holding function is and is indicated by the relevant symbols on the cooking zones. -
Page 10: Using The Gas Oven (Single Control)
WARNING: Under no circumstance use aluminium foil or plastic containers to hold the food while cooking on a glass-ceramic hob. WARNING: Do not touch the cooking area as long as the light indicating residual heat on the glass-ceramic hob, is “on”; this indicates that the temperature in the relative area is still high. -
Page 11: Using The Multifunction Oven
USING THE MULTIFUNCTION OVEN (fig.37) Before using the ovens for the first time: Remove all packaging and accessories from inside the ovens. Heat the ovens to 200°C for ½ hour to burn off manufacturing residues. The automatic programmer must be set to Manual mode for ordinary cooking. The oven will not function when set in Automatic mode. -
Page 12: Using The Natural Conventional Electric Oven
The fan circulates the hot air around the oven for uniform cooking of larger quantities of Fan assisted oven food. Use for roasting vegetables, meat and poultry, or baked fish. This function is the best one for cooking frozen potato products and breaded/battered chicken or fish. True fan oven This function is suitable for most recipes and is an efficient way to cook. -
Page 13: Using The Conventional Electric Grill
spindle that projects out from the left side of the oven and resting the front of the skewer into the skewer holder support (fig.38). Afther, insert the tray into one of the lower guides, then light the grill burner according to the instructions described above and press the button that starts the rotisserie IMPORTANT: grill foods with the rotisserie always with the door close. -
Page 14: Using The Touch Clock
Signal The signal after “time out” will stay 7 minutes if it has not been reset with “time of day” button. The following signal will be skipped if time of day is pressed during the last 15 seconds of the timer. Signal frequency If no function is activated, the signal frequency can be selected by pressing the "-"... - Page 15 The symbols on the display: Automatic programme is working. (* in some models there is the writinq 'Auto' instead of A). The appliance is ready for manual use (not automatic). • When blinking, the programmer is in setting hour mode. Timer set.
-
Page 16: Electronic Timer Programmer
or anyway up to see the dot (3) blinking. To update the hour on the display: touch the + or - keys. To change the sound level: touch the M key. On the display appears the writing: Ton.. followed by a number. -
Page 17: Using The Self-Cleaning Oven
NOTE: it is normal to record different temperatures from those indicated on the panel thermometer, when you measure the temperature in the middle of the oven using a different thermometer. The temperature indicated by the thermometer is the mean temperature inside the oven and does not indicate the temperature of any single point. USING THE SELF-CLEANING OVEN On models which have this device, the self-cleaning oven differs from normal ovens because the inner surfaces are coated with a special micro-porous enamel that absorbs and eliminates grease residues during cooking. - Page 18 Fig.A Fig.B Fig. C Fig.D Fig.E Fig.F...
- Page 19 Fig.1 Fig.2 Fig.3 Fig.4 Fig.5 Fig.6 Fig.7 Fig.8 Fig.9 Fig.10 Fig. Fig.12 Fig.13 Fig.14 Fig.15 Fig. 17 (fig.17A –17B) Fig.16 Fig.18 Fig.19 Fig. 20 Fig.21 Fig.22...
- Page 20 Fig.26 Fig.23 Fig.24 fig.25 Fig.27 Fig.28 Fig.29 Fig.30 Fig.31 Fig.32 Fig. 33 Fig.34 Fig.35 Fig.36 Fig.36B Fig. 37 Fig.38 Fig.39 Fig.40 Fig.41 Fig.42 Fig.43 Fig.44 Fig.45 Fig.46...
- Page 21 Fig.47 Fig.48 Fig.49 Fig.50 Fig.51 Fig.52 Fig.53 Fig.54 Fig.55 Fig.56 Fig.57 Fig.58...
- Page 22 تنظيف الجهاز .قبل الشروع في تنظيف الجهاز يجب فصله عن التيار الكهربائي واغالق محبس صمام التغذية بالغاز :تنظيف سطح العمل اء ساخن مخلوط باستخدام م ينبغي تنظيف رؤوس المواقد وحوامل األواني المعدنية المطلية بالمينا واالغطية المطلية بالمينا وطرابيش الشعلة التي يبعث منها اللهب .بالصابون،...
- Page 23 كيفية حذف مؤقت العد التنازلي في الوميض. اضغط على ) الرمز على األقل أو على أي حال حتى يبدأ لمدة ثانيتين ، اضغط على الزر لحذف مؤقت العد التنازلي، والذي يرمز له بـ .و + في آن ٍ واحد الزرين التحقق...
- Page 24 :الرموز على الشاشة البرنامج اآللي قيد التشغيل بدل الحرف ’ ‘ بعض الموديالت تظهر العبارة (في Auto .)الجهاز جاهز لالستخدام اليدوي (ليس تلقائي .عندما يومض، فهذا يعني أن المبرمج في وضع ضبط الساعة • إعداد المؤقت .إ ن ْ قاص األعداد أثناء ضبط المؤقت )مستويات...
- Page 25 ضبط ساعة اليوم /+ اختر وظيفة ساعة اليوم بالضغط على ز ِ ر ي ّ المدة وتوقيت االنتهاء في آن ٍ واحد، ثم اضبط ساعة اليوم بواسطة الزرين . ً يتم إلغاء أي برنامج م ُ عد مسبق ا تشغيل يدوي ويضيء...
- Page 26 إشارة صوتية .” ساعة اليوم “ ما لم يتم توقيفها بواسطة زر “ انقضاء المدة “ ثواني بعد الصوتية طنينها لمدة تواصل اإلشارة .ثانية األخيرة من المؤقت لن ي ُ صدر الفرن إشارة صوتية إذا تم الضغط على زر ساعة اليوم خالل الـ تردد...
- Page 27 ساخن استخدام الشواية الكهربائية المزودة بدفع الهواء ال على الوضع المعني لتشغيل تعد الشواية الكهربائية المزودة بدفع الهواء الساخن ميزة خاصة لم يجهز بها سوي الفرن المتعدد الوظائف. اضبط المفتاح الدوار سط في حين ينبغي وضع الصينية في واط) والمروحة الكهربائية. عموما، لضمان شواء ممتاز، يجب وضع على الرف في الو ( السخان...
- Page 28 الة يتم الشواء بواسطة استعمال السيخ (السفود) الدوار. ولذلك، ينبغي إدخال حامل السيخ (السيخ (السفود) على الرفوف الجانبية في في هذه الح :الشواء بالمشواة يسر من . قم بإدخال األطعمة في السيخ (السفود) ثم إدخال الكل في الفرن، عن طريق إدراج طرف السيخ (السفود) في المغزل البارز على الجانب األ المستوى...
- Page 29 : المروحة العادية Fan Assisted : المروحة + عنصر التسخين الدائري True Fan استعمال الشواية تتكون صينية الشواء من م ِ ن ْ صب وصاج من المينا الالمع. ضع األطعمة في سلك الم ِ ن ْ صب. يمكن استعمال الموضع السفلي لل طهي...
- Page 30 ،ماح بخروج البخار ملم لبضع ثوان للس قد يتولد بخار عن عملية الطهي. ولهذا ومن باب االحتياط، ينبغي فتح الباب دائما على مرحلتين. افتح الباب أوال بمقدار .ثم افتحه بعد ذلك الباب بالكامل. أبعد وجهك ويديك عند فتح الباب جب أبدا طهي األطعمة على ال...
- Page 31 (الشكل استخدام المحول .المستخدم في موديالت فرن الغاز والشواية الكهربائية المحول لتشغيل مروحة وإنارة الفرن؛ و الرمز لتشغيل ال س َ ف ُّ ود الدوار وإنارة الفرن؛ و الرمز .لتشغيل إنارة الفرن الرمز استخدام المن ظ ّ م الحراري الكهربائي (الثرموستات) (الشكل )) (مع...
- Page 32 :ويمكن اشعال مواقد الفرن بطرق مختلفة :)(يمكن استخدامه دائما وحتى في حالة انقطاع التيار الكهربائي اإلشعال اليدوي في ). وقم في الجدول (شكل إلشعال الفرن افتح اوال بابه ثم أدر المقبض الدوار وقم بضبط مؤشره على الوضع المطابق للقيمة المشار اليها تحت رقم )).
- Page 33 جهاز التحقق من األواني .هي بشكل صحيح تتوفر كل عين طهي على جهاز للتحقق من إناء الطهي، ويحول دون انطالق عملية الطهي إذا لم يكن إناء الطهي مناسبا وموضوعا على عين الط فإن الفرن يصدر إشارة لتحذير المستخدم ،صحيح أو مصنوع من مواد غير مناسبة إذا...
- Page 34 وفقا لذلك. إذا تم تخفيض القدرة من خالل تدوير ” القدرة الكاملة “ يمكن زيادة مستوى التسخين في أية لحظة أثناء تشغيل م ُ ع َ ج ّ ِ ل التسخين. وسينتج عنه تعديل مدة .لقائيا ” ت “ A المقبض...
- Page 35 )... لوح حراري من السيراميك (الشكل الطاقة نوع اللوح واط 1700 األمامي على اليسار أ) لوح سيراميك حراري كهربائي واط 1200 ي على اليسار الخلف ب) لوح سيراميك حراري كهربائي واط 2200 1100 الخلفي على اليمين ج) لوح سيراميك حراري كهربائي واط...
- Page 36 :كيفية استخدام األلواح الحرارية دقيقة اهز لمدة تن عند استخدام األلواح الحرارية ألول مرة أو بعد مرور فترة طويلة من عدم االستخدام، فانه ينصح في هذه الحالة بضبطه على الوضع .للتخلص من أية رطوبة سبق امتصاصها بالمواد العازلة الداخلية .وكمثال، فقد أضفنا فيما يلي جدول بياني مدعم باألمثلة يتضمن مستويات الضبط المختلفة لضمان االستخدام السليم لأللواح الحرارية ،طويلة...
- Page 37 أضغط ثم قم بتدوير المقبض المرادف للموقد المطلوب في االتجاه المعاكس لدوران عقارب اشعال المواقد المزودة بجهاز األمان (الزوج الحراري) (الشكل ) اضغط على المقبض وقم بإطالق احدى تجهيزات االشعال المذكورة عند رمز النجمة (لهب كبير، الشكل ” “ ى الحد األقصى الساعة...
- Page 38 م والصيانة دليل االستخدا واحد وقت في الشواية ومواقد الفرن استخدام ينبغي ال تحذير أبعاد موقد الغاز )األبعاد (ملم الموقد الثانوي Ø الشبه السريع Ø السريع Ø فائق السرعة Ø فائق السرعة ثنائي Ø الكهربائي الحراري اللوح أبعاد األبعاد نوع اللوح ي...
- Page 39 مباشر بشكل الكهربائي بالتيار اإلمداد بشبكة التوصيل كان إذا مم كحد اسب مع الحمل الكهربي للجهاز وبه فجوة بين الوصالت قدرها يجب تركيب مفتاح قاطع للدائرة أحادي القطب بين الجهاز ومنبع التيار الكهربائي يتن .أدني .تذكر أنه ال يجب فصل سلك التأريض بواسطة المفتاح األحادي القطب .وكبديل...
- Page 40 ضبط الموقد : ” “ ) ضبط الموقد على الحد األدنى MINIMUM :” “ اتبع التعليمات التالية لضبط موقد السطح على الحد األدنى :ضبط موقد السطح MINIMUM .)(لهب صغير ” “ موقد ثم اضبط المقبض الدوار على وضع الحد األدنى ) أوقد...
- Page 41 الجدول السعة المقدرة قطر الفوهة الضغط أنواع الغاز الموقد كيلوكال/س كيلوات ل/س غ/س .ملم مللي بار طبيعي الثانوي بوتان بروبان 1505 1.75 طبيعي السريع الشبه 1505 1.75 بوتان 1505 1.75 بروبان 2580 طبيعي السريع 2580 بوتان 2580 بروبان 3655 4.25 طبيعي...
- Page 42 توصيل الجهاز بمصدر الغاز أو على الجانب الخلفي للموقد عمة ط أل لجهاز بشبكة الغاز، تأكد من مطابقة البيانات الواردة على لوحة المواصفات الفنية المثبتة على درج م ُ سخ ِ ن ا بل توصيل ا ق .لبيانات شبكة توزيع الغاز )أو...
- Page 43 .ينبغي قراءه دليل االستخدام قبل الشروع في تركيب واستعمال الجهاز أو بسبب استخدام الجهاز بطريقة ال تتحمل الشركة المنتجة المسؤولية عن أية خسائر تلحق بالممتلكات أو أية إصابات لألشخاص ناجمة عن أخطاء في التركيب .غير صحيحة . باإلضافة إلى ذلك فأن ال...
- Page 44 تعليمات تركيب وصيانة واستخدام موقد التنصيب الحر سم الفرن العمالق 60x90 تعليمات تركيب وصيانة واستخدام سم الفرن العمالق 60x90 موقد التنصيب الحر 3100449...
Need help?
Do you have a question about the S9 and is the answer not in the manual?
Questions and answers