
Related Manuals for oneConcept 10029361


Summary of Contents for oneConcept 10029361
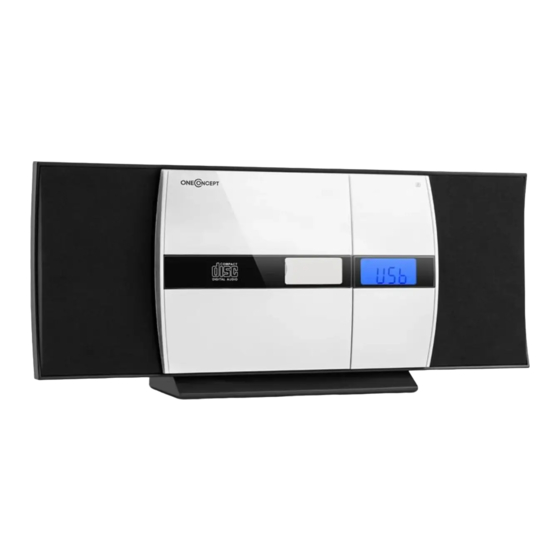
- Page 1 V-15 Stereoanlage Stereo System Equipo estéreo Chaîne stéréo Impianto stereo 10029361 10029362 10029363 10029364...
-
Page 3: Table Of Contents
AUX IN 13 Uhrzeit / Wecker / Sleeptimer 13 Spezielle Entsorgungshinweise für Verbraucher in Deutschland 14 Hinweise zur Entsorgung 16 Konformitätserklärung 16 TECHNISCHE DATEN Artikelnummer 10029361, 10029362, 10029363, 10029364 Stromversorgung 220-240 V ~ 50 Hz Radio 87,5–108 MHz Nur 10029363 & 10029364... -
Page 4: Sicherheitshinweise
SICHERHEITSHINWEISE Allgemeine Sicherheitshinweise VORSICHT Verletzungsgefahr! Hören Sie nicht mit übermäßig hoher Lautstärke Musik, da dies zu Hörschäden führen kann. • Kinder ab 8 Jahren, psychisch, sensorisch und körperlich eingeschränkte Menschen dürfen das Gerät nur benutzen, wenn sie vorher von einer für sie verantwortlichen Aufsichtsperson ausführlich mit den Funktionen und den Sicherheitsvorkehrungen vertraut gemacht wurden und die damit verbundenen Risiken verstehen. - Page 5 Belüftung • Blockieren oder bedecken Sie keinesfalls die Belüftungsöffnungen, Löcher oder Öffnungen des Geräts, mit Gegenständen wie Teppichen, Tüchern und ähnlichem, da andernfalls die Funktionalität und/oder die Belüftung für eine sicherer Verwendung nicht gewährleistet werden können. • Die Unterseite des Geräts kann warm werden, wenn das Gerät über einen längeren Zeitraum verwendet wird.
-
Page 6: Bedienelemente
BEDIENELEMENTE Linker Speaker IR Sensor (für Fernbedienung) CD-Fach Rechter Speaker Standfuß Display USB-Anschluss VOL - On / Standby OPEN/CLOSE MODE VOL+ Play / Pause / FM Scan Stop... - Page 7 FM-Antenne Netz-Eingang AUX-Eingang (3,5 mm)
- Page 8 On / Standby MODE SLEEP PLAY MODE/ST/FM MONO MEM / CLK Play / Pause / FM Scan FOLDER ON/OFF X-BASS Stop / (Pair) Voriger Titel/Sender Nächster Titel/Sender MUTE VOL - OPEN/CLOSE VOL + TIME...
-
Page 9: Vorbereitung Und Wandmontage
VORBEREITUNG UND WANDMONTAGE Fernbedienung vorbereiten • Drücken Sie den Batteriehalter wie auf den Bild zu sehen (1) und ziehen Sie diesen heraus (2). • Ersetzen Sie die Batterie. Beachten Sie hierbei die richtige Polung (3). • Setzen Sie den Batteriehalter wieder in die Fernbedienung ein (4). Gebrauch der Fernbedienung Halten Sie die Fernbedienung in Richtung des Geräts. -
Page 10: Basisfunktionen
Wandmontage • Sie können den Standfuß der Stereoanlage abnehmen und das Gerät direkt an einer tragfähigen Wand montieren. Bitten Sie eine handwerklich geschickte / geschulte Person um Hilfe, falls Sie sich nicht sicher sind. • Nutzen Sie Schrauben (es werden 2 Schrauben benötigt), die zu Wandmaterial und genutzen Dübeln passen. -
Page 11: Radio
Drücken Sie die EQ-Taste mehrfach, um Klangvoreinstellungen für verschiedene Sendungen/Inhalte zu wechseln (Classic - Pop - Jazz - Rock - EQ off). RADIO Hinweis: Bei der Sendersuche und beim Hören von Radiosendern wird auf dem Display keine Frequenz angezeigt. Automatische Sendersuche (FM Scan) Sie können die Funktion FM SCAN verwenden, um automatisch nach neuen digitalen Radiosendern zu suchen und inaktive Sender zu entfernen. -
Page 12: Cd / Usb
CD / USB • Schalten Sie das Gerät ein und wählen Sie mit MODE den CD- oder den USB-Modus. • Drücken Sie OPEN/CLOSE, um das CD-Fach zu öffnen und legen Sie eine Musik-CD mit der bedruckten Seite nach vorn ein. Die CD wird automatisch eingelesen. -
Page 13: Aux In
AUX IN • Nutzen Sie ein 3.5mm-Audiokabel, um externe Abspielgeräte (PC, Smartphone, MP3-Player o.ä.) mit der Anlage zu verbinden. Stellen Sie sicher, dass die Ausgabelautstärke des externen Geräts auf ein adäquates Niveau eingestellt ist. • Schalten Sie das Gerät ein und wählen Sie mit MODE den AUX-Modus. •... -
Page 14: Spezielle Entsorgungshinweise Für Verbraucher In Deutschland
SPEZIELLE ENTSORGUNGSHINWEISE FÜR VERBRAUCHER IN DEUTSCHLAND Entsorgen Sie Ihre Altgeräte fachgerecht. Dadurch wird gewährleistet, dass die Altgeräte umweltgerecht verwertet und negative Auswirkungen auf die Umwelt und menschliche Gesundheit vermieden werden. Bei der Entsorgung sind folgende Regeln zu beachten: • Jeder Verbraucher ist gesetzlich verpflichtet, Elektro- und Elektronikaltgeräte (Altgeräte) sowie Batterien und Akkus getrennt vom Hausmüll zu entsorgen. - Page 15 • Bei einem Vertrieb unter Verwendung von Fernkommunikationsmitteln ist die unentgeltliche Abholung am Ort der Abgabe auf Elektro- und Elektronikgeräte der Kategorien 1, 2 und 4 gemäß § 2 Abs. 1 ElektroG, nämlich „Wärmeüberträger“, „Bildschirmgeräte“ (Oberfläche von mehr als 100 cm²) oder „Großgeräte“ (letztere mit mindestens einer äußeren Abmessung über 50 Zentimeter) beschränkt.
-
Page 16: Hinweise Zur Entsorgung
Importeur für Großbritannien: Berlin Brands Group UK Ltd PO Box 1145 Oxford, OX1 9UW United Kingdom Hiermit erklärt Chal-Tec GmbH, dass der Funkanlagentyp V-15 der Richtlinie 2014/53/ EU entspricht. Der vollständige Text der EU- Konformitätserklärung ist unter der folgenden Internetadresse verfügbar: use.berlin/10029361... - Page 17 BT (Only 10029363 & 10029364) 26 AUX IN 27 Clock / Timer / Sleeptimer 27 Disposal Considerations 28 Declaration of Conformity 28 TECHNICAL DATA 10029361, 10029362, 10029363, Item number 10029364 Power supply 220-240 V ~ 50 Hz Radio 87.5–108 MHz Only 10029363 &...
-
Page 18: Safety Instructions
SAFETY INSTRUCTIONS General safety instructions CAUTION Risk of injury. Do not listen to music at excessive volume as this may result in a loss of hearing. • This device may be only used by children 8 years old or older and persons with limited physical, sensory and mental capabilities and / or lack of experience and knowledge, provided that they have been instructed in use of the device by a responsible person who understands the associated... - Page 19 Ventilation • Do not block or cover the ventilation holes, vents, or openings of the unit with anything, such as carpet, cloth, or similar, as otherwise the openings may not be able to ensure functionality and / or ventilation for safe use. •...
-
Page 20: Controls
CONTROLS Left speaker IR sensor CD tray Right speaker Stand Display USB slot VOL - On / Standby OPEN/CLOSE MODE VOL+ Play / Pause / FM Scan Stop... - Page 21 FM antenna AC IN AUX-IN (3.5mm)
- Page 22 On / Standby MODE SLEEP PLAY MODE/ST/FM MONO MEM / CLK Play / Pause / FM Scan FOLDER ON/OFF X-BASS Stop / (Pair) Previous Preset / Folder Next Preset / Folder MUTE VOL - OPEN/CLOSE VOL + TIME...
-
Page 23: Preparation And Wall Mounting
PREPARATION AND WALL MOUNTING Preparing the remote control • irst push to inside as the direction indicated by the arrow (See 1) and then Remove the battery holder as the direction indicated by the arrow (See 2). • Replace the battery Set a new battery property with (+) side up as illustrated (See 3). -
Page 24: Basic Functions
Wall mounting • You can remove the stand of the stereo system and mount the unit directly on a load-bearing wall. Ask a skilled / trained person for help if you are unsure. • Use screws (2 screws are required) that match the wall material and use wall plugs. -
Page 25: Radio
Press repeatedly to toggle pre-set equalizing (Classic - Pop - Jazz - Rock - EQ off). RADIO Note: When searching for stations or listening to radio stations, no frequency is shown on the display. Automatic station search (FM Scan) You can use the FM Scan function to automatically scan for new digital radio stations and remove inactive stations. -
Page 26: Cd / Usb
CD / USB • Press On / Standby to switch the device on, then press MODE for the CD mode or USB mode. • Press OPEN/CLOSE to open the CD tray and insert a CD with the printed side facing to- wards you. CDs will be read in automatically. Insert USB drives with music files into the USB slot on the top of the device. -
Page 27: Aux In
AUX IN • Press MODE repeatedly to select AUX mode. • Connect the AUX wire from the out jack of your Personal Player such as portable MP3 player to the AUX input jack. • Turn on your player to begin playing, adjust the volume to desire listening level. -
Page 28: Disposal Considerations
V-15 is in compliance with Directive 2014/53/EU. The full text of the EU declaration of conformity is available at the following internet address: use.berlin/10029361 For Great Britain: Hereby, Chal-Tec GmbH declares that the radio equipment type V-15 is in compliance with the relevant statutory requirements. - Page 29 BT (uniquement 10029363 & 10029364) 38 AUX IN 39 Heure / réveil / Veille 39 Conseils pour le recyclage 40 Déclaration de conformité 40 FICHE TECHNIQUE 10029361, 10029362, 10029363, Numéro d'article 10029364 Alimentation 220-240 V ~ 50 Hz Radio 87,5–108 MHz Uniquement 10029363 &...
-
Page 30: Consignes De Sécurité
CONSIGNES DE SÉCURITÉ Consignes générales de sécurité ATTENTION Risque de blessures ! n‘écoutez pas de musique à trop fort volume, car cela peut endommager votre audition. • Cet appareil peut être utilisé par des enfants de 8 ans ou plus et des personnes ayant des capacités physiques, sensorielles et mentales limitées et / ou dénuées d‘expérience et de connaissances, à... - Page 31 Ventilation • Ne pas obstruer ni couvrir les ouvertures de ventilation, les trous ou les ouvertures de l‘appareil avec des objets tels que des tapis, tissus et similaires, car la fonctionnalité et/ou la ventilation en toute sécurité ne pourraient pas être garanties. •...
-
Page 32: Éléments De Commande
ÉLÉMENTS DE COMMANDE Capteur IR (pour Haut-parleur gauche télécommande) Compartiment à CD Haut-parleur droit Socle Affichage Prise USB VOL - Marche / veille OPEN/CLOSE MODE VOL+ Play / Pause / FM Scan Arrêt... - Page 33 Antenne FM Prise secteur Entrée AUX (3,5 mm)
- Page 34 Marche / veille MODE SLEEP PLAY MODE/ST/FM MONO MEM / CLK Play / Pause / FM Scan FOLDER ON/OFF X-BASS Arrêt / (Couplage) Titre/station précédente Titre/station suivante MUTE VOL - OPEN/CLOSE VOL + TIME...
-
Page 35: Préparation Et Montage Mural
PRÉPARATION ET MONTAGE MURAL Préparation de la télécommande • Appuyer sur le support de pile comme illustré ci-dessous (1) et le ressortir (2). • Remplacer la pile. Veiller à respecter les polarités exactes (3). • Réinsérer le support de pile dans la télécommande (4). Utilisation de la télécommande Pointer la télécommande en direction de l’appareil. -
Page 36: Fonctions Basiques
Montage mural • Il est possible de retirer le pied de la chaîne hifi pour monter directement l’appareil sur un mur pouvant le supporter. Demandez de l’aide à une personne formée / douée pour les travaux manuels si vous n’êtes pas sûr. •... -
Page 37: Radio
Appuyez plusieurs fois sur la touche EQ pour changer les préréglages de son pour différentes émissions/contenus (Classique - Pop - Jazz - Rock - EQ off). RADIO Remarque : Lors de la recherche de stations ou de l‘écoute de stations de radio, aucune fréquence n‘est affichée à... -
Page 38: Cd / Usb
CD / USB • Allumer l’appareil avec Marche / veille et sélectionner le mode CD ou USB avec MODE. • Appuyer sur OPEN/CLOSE pour ouvrir le lecteur CD et insérer un CD de musique avec la face imprimée vers l’avant. Le CD est lu automatiquement. Insérer un stick USB avec des fichiers musicaux dans le port USB sur le dessus pour les lire. -
Page 39: Aux In
AUX IN • Utiliser un câble audio de 3.5mm- pour connecter des appareils de reproduction externes (PC, Smartphone, lecteur MP3 entre autres) avec la chaîne hifi. S’assurer que le volume de l’appareil externe est réglé à un niveau adéquat. • Allumer l’appareil avec Marche / veille puis sélectionner le mode AUX à... -
Page 40: Conseils Pour Le Recyclage
PO Box 1145 Oxford, OX1 9UW United Kingdom Le soussigné, Chal-Tec GmbH, déclare que l’équipement radioélectrique du type V-15 est conforme à la directive 2014/53/UE. Le texte complet de la déclaration UE de conformité est disponible à l’adresse internet suivante : use.berlin/10029361... - Page 41 BT (solo 10029363 y 10029364) 50 Entrada AUX 51 Hora/despertador/temporizador de apagado 51 Retirada del aparato 52 Declaración de conformidad 52 DATOS TÉCNICOS 10029361, 10029362, Número de artículo 10029363, 10029364 Fuente de alimentación 220-240 V ~ 50 Hz Radio 87,5–108 MHz Sólo 10029363 &...
-
Page 42: Indicaciones De Seguridad
INDICACIONES DE SEGURIDAD Advertencias generales de seguridad ATENCIÓN Riesgo de lesiones. No escuche la música a un volumen demasiado alto, pues podría provocar daños auditivos. • Este aparato puede ser utilizado por niños mayores de 8 años y personas con discapacidades físicas, sensoriales y mentales y/o con falta de experiencia y conocimientos, siempre y cuando hayan sido instruidos sobre el uso del aparato y comprendan los peligros y riesgos asociados. - Page 43 Ventilación • Nunca bloquee ni tape los orifi cios de ventilación, agujeros o aperturas del aparato con objetos como alfombras, paños o similares, pues podrían poner en riesgo su funcionalidad y/o ventilación en cuanto a un uso seguro. • La parte inferior del aparato puede calentarse si se utiliza durante un periodo de tiempo prolongado.
-
Page 44: Elementos De Control
ELEMENTOS DE CONTROL Sensor IR para mando a Altavoz izquierdo distancia Unidad lectora de CD Altavoz derecho Base Pantalla Puerto USB VOL - On/Standby OPEN/CLOSE MODE VOL+ Reproducir/Pausar/Escaneo Detener... - Page 45 Antena FM Entrada de toma de corriente Entrada AUX (3,5 mm)
- Page 46 On / Standby MODE SLEEP PLAY MODE/ST/FM MONO MEM / CLK Play / Pause / FM Scan FOLDER ON/OFF X-BASS Stop/Acoplar Pista/Emisora anterior Siguiente pista/emisora MUTE VOL - OPEN/CLOSE VOL + TIME...
-
Page 47: Preparación Y Montaje En Pared
PREPARACIÓN Y MONTAJE EN PARED Preparación del mando a distancia • Apriete el compartimento de pilas como se ilustra en la imagen (1) y extraiga la tapa (2). • Inserte las pilas. Asegúrese de que la polaridad es la correcta (3). •... -
Page 48: Funciones Básicas
Montaje en la pared • Puede desmontar las patas de apoyo del equipo estéreo y montarlo directamente a una pared sólida. Si no está seguro, pida ayuda a una persona cualificada o experta. • Utilice tornillos (se requieren 2 tornillos) que sean aptos para el material de la pared y los tacos. -
Page 49: Radio
Pulse EQ varias veces para cambiar las preconfiguraciones de sonido de las diferentes emisoras/contenido (Clásico - Pop - Jazz - Rock - EQ OFF). RADIO Nota: al buscar o escuchar emisoras de radio, en la pantalla no se muestra ninguna frecuencia. Búsqueda automática de emisoras (FM Scan) Puede utilizar la función de escaneo de FM para buscar automáticamente nuevas emisoras de radio digitales y eliminar las emisoras inactivas. -
Page 50: Cd/Usb
CD/USB • Encienda el aparato y seleccione el modo CD o USB con el botón MODE. • Pulse OPEN/CLOSE para abrir el compartimento de CD e introduzca un CD con la cara impresa mirando hacia arriba. El CD se reproducirá automáticamente. -
Page 51: Entrada Aux
ENTRADA AUX • Utilice un cable de audio de 3,5 mm para conectar aparatos de reproducción externos (PC, teléfono inteligente, reproductor de MP3, etc.) al sistema estéreo. Asegúrese de que el volumen del aparato externo esté ajustado a un nivel apropiado. •... -
Page 52: Retirada Del Aparato
Oxford, OX1 9UW United Kingdom Por la presente, Chal-Tec GmbH declara que el tipo de equipo radioeléctrico V-15 es conforme con la Directiva 2014/53/UE. El texto completo de la declaración UE de conformidad está disponible en la dirección Internet siguiente: use.berlin/10029361... - Page 53 CD / USB 62 BT (solo 10029363 & 10029364) 62 AUX IN 63 Ora / sveglia / sleep timer 63 Smaltimento 64 Dichiarazione di conformità 64 DATI TECNICI 10029361, 10029362, 10029363, Articolo numero 10029364 Alimentazione 220-240 V ~ 50 Hz Radio 87,5–108 MHz Solo 10029363 &...
-
Page 54: Avvertenze Di Sicurezza
AVVERTENZE DI SICUREZZA Avvertenze di sicurezza generiche ATTENZIONE Pericolo di lesione! Non ascoltare la musica a volume eccessivamente altro, in quanto può provocare danni all’udito. • Questo dispositivo può essere utilizzato da bambini a partire da 8 anni e da persone con limitate capacità fi siche e psichiche o con conoscenza ed esperienza limitate, solo se sono stati istruiti sulle modalità... - Page 55 Ventilazione • Non bloccare in nessun caso le fessure di ventilazione, i fori o le aperture del dispositivo con oggetti, come tappeti, teli e similari, altrimenti non possono essere garantite funzionalità e/o ventilazione per un utilizzo sicuro. • Il lato inferiore del dispositivo può diventare caldo dopo utilizzi prolungati. Questo è...
-
Page 56: Comandi
COMANDI Altoparlante sinistro Sensore IR (per telecomando) Vano CD Altoparlante destro Piedistallo Display Collegamento USB VOL - On / Standby OPEN/CLOSE MODE VOL+ Play / Pause / FM Scan Stop... - Page 57 Antenna FM Ingresso di rete Ingresso AUX (3,5 mm)
- Page 58 On / Standby MODE SLEEP PLAY MODE/ST/FM MONO MEM / CLK Play / Pause / FM Scan FOLDER ON/OFF X-BASS Stop / (Pair) Emittente/brano precedente Emittente/brano successivo MUTE VOL - OPEN/CLOSE VOL + TIME...
-
Page 59: Preparazione E Montaggio A Parete
PREPARAZIONE E MONTAGGIO A PARETE Preparare il telecomando • Premere il supporto per pile come indicato nella figura (1) ed estrarlo (2). • Sostituire la pila facendo attenzione alla polarità corretta (3). • Reinserire il supporto per pile nel telecomando (4). Utilizzo del telecomando Rivolgere il telecomando in direzione del dispositivo. -
Page 60: Funzioni Di Base
Montaggio a parete • È possibile staccare il piedistallo dell’impianto stereo e montare il dispositivo a una parete in grado di sostenere il carico. Rivolgersi a una persona esperta/qualificata se non si è certi di riuscire a farlo da soli. •... -
Page 61: Radio
Premere più volte il tasto EQ per cambiare le impostazioni sonore per svariate emittenti/contenuti (Classic - Pop - Jazz - Rock - EQ off). RADIO Nota: sul display non appare la frequenza durante la ricerca e l’ascolto dell’emittente. Ricerca automatica dell’emittente (FM Scan) Si può... -
Page 62: Cd / Usb
CD / USB • Accendere il dispositivo e selezionare la modalità CD o USB con MODE. • Premere OPEN/CLOSE per aprire il vano CD e inserire un disco musicale con il lato stampato davanti. Il CD viene letto automaticamente. Inserire una penna USB contenente file musicali nello slot USB sul lato superiore per riprodurre i file. -
Page 63: Aux In
AUX IN • Utilizzare un cavo audio da 3,5 mm per collegare i dispositivi di riproduzione esterni (PC, smartphone, lettori MP3 o altri) con l’impianto. Assicurarsi che il volume del dispositivo esterno sia impostato a un livello adeguato. • Accendere il dispositivo e selezionare la modalità AUX con MODE. •... -
Page 64: Smaltimento
PO Box 1145 Oxford, OX1 9UW United Kingdom Il fabbricante, Chal-Tec GmbH, dichiara che il tipo di apparecchiatura radio V-15 è conforme alla direttiva 2014/53/UE. Il testo completo della dichiarazione di conformità UE è disponibile al seguente indirizzo Internet: use.berlin/10029361...
Need help?
Do you have a question about the 10029361 and is the answer not in the manual?
Questions and answers