
Related Manuals for oneConcept Stereoanlage 10006663


Summary of Contents for oneConcept Stereoanlage 10006663
- Page 1 Stereoanlage 10006663 10006664 10009511 10009512 10009513 10009514 10027657 10027658...
- Page 2 Sehr geehrter Kunde, wir gratulieren Ihnen zum Erwerb Ihres Gerätes. Lesen Sie die folgenden Hinweise sorgfäl- tig durch und befolgen Sie diese, um möglichen Schäden vorzubeugen. Für Schäden, die durch Missachtung der Hinweise und unsachgemäßen Gebrauch entstehen, übernehmen wir keine Haftung. Sicherheitshinweise 1.
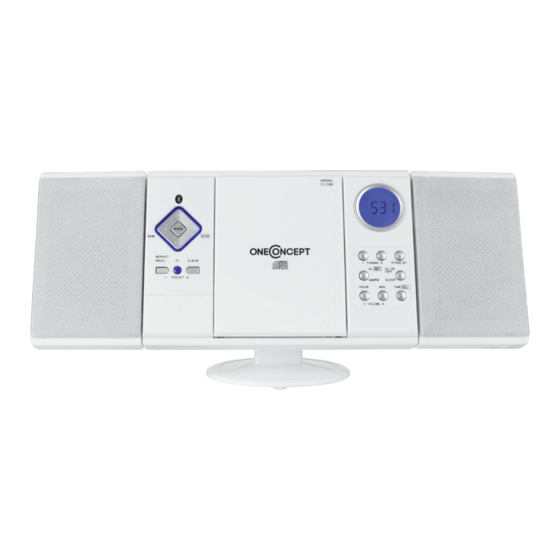
- Page 3 Geräteübersicht 1 USB-Eingang 11 VOL+ / Minute 21 Wiederholen/Prog/Preset- 2 SD-Slot 12 Alarm An/Aus 22 Fernbedienungssensor 3 Betriebsmoduswahlschalter 13 Zeit 23 Album- / Preset+ 4 CD-Tür 14 Kopfhörer-Anschluss 24 Lautsprecher 5 LCD-Display 15 AUX-Eingang 25 Wandmontagelöcher 6 Sendersuche (abwärts) 16 Abdeckung 26 Lautsprecherständer 7 Sendersuche (aufwärts) 17 Abspielen/Pause / SCAN...
-
Page 4: Montage
Montage Standfuß Verbindung zwischen Lautsprechern und Haupteinheit... -
Page 5: Inbetriebnahme Und Bedienung
Wandmontage Inbetriebnahme und Bedienung Stromversorgung Betreiben Sie das Gerät ausschließlich an Steckdosen mit 230V ~ 50Hz. Die Ganghilfe des Gerätes arbeitet mit 2 AA-Batterien. Die Fernbedienung des Gerätes arbeitet mit 2 AAA- Batterien. Uhrzeit stellen Die Uhrzeit muss bei der ersten Inbetriebnahme eingestetlt werden. Wenn Sie das Gerät ans Netz an- schließen, wird die Uhrzeit “12:00”... - Page 6 Radiobetrieb 1. Schalten Sie das Gerät ein. 2. Wählen Sie den Radiomodus mit dem FUNKTIONSWAHLSCHALTER. 3. Wählen Sie das gewünschte Band mit dem BANDWAHLSCHALTER. 4. Stellen Sie mit dem RADIOTUNER die gewünschte Frequenz ein. 5. Stellen Sie die gewünschte Lautstärke ein. 6.
- Page 7 Titel programmieren Hinweis: Sie können diese Funktion nur im STOP-Modus benutzen. 1. Drücken Sie den PROGRAMMIERKNOPF einmal. Titelnummer und die Indikation “PROG” werden nun auf dem Display erscheinen. 2. Drücken Sie die TITELSPRUNG, TITELSUCHE VORWÄRTS bzw. -RÜCKWÄRTS-Knopf, um zu dem Titel zu gelangen, den Sie programmieren wollen. 3.
- Page 8 Externe Audiogeräte nutzen Sie können externe Audiogeräte – wie Laptops und MP3-Player – über das Gerät betreiben. 1. Schieben Sie die ABDECKUNG nach unten. 2. Verbinden Sie das externe Audiogerät mit der Anlage. 3. Wählen Sie AUX mit dem FUNKTIONSWAHLSCHALTER. 4.
-
Page 9: Fehlersuche Und Fehlerbehebung
CD-Alarm definieren Definieren Sie eine Weckzeit, stellen Sie den FUNKTIONSWAHLSCHALTER auf CD, legen Sie eine CD ein und passen Sie die Lautstärke an, schalten Sie das Gerät aus. Alarm mit Weckgeräusch definieren 1. Setzen Sie den FUNKTIONSAUSWAHLSCHALTER auf ALARM. 2. Mit Erreichen des Weckzeitpunktes wird das Gerät 3 Minuten lang ein Weckgeräusch einblenden. -
Page 10: Hinweise Zur Entsorgung
Hinweise zur Entsorgung Befi ndet sich die linke Abbildung (durchgestrichene Mülltonne auf Rädern) auf dem Produkt, gilt die Europäische Richtlinie 2012/19/EU. Diese Produkte dürfen nicht mit dem normalen Hausmüll entsorgt werden. Informieren Sie sich über die örtlichen Regelungen zur getrennten Sammlung elektrischer und elektronischer Gerätschaften. Richten Sie sich nach den örtlichen Re- gelungen und entsorgen Sie Altgeräte nicht über den Hausmüll. -
Page 11: Safety Instructions
Dear Customer, Congratulations on purchasing this equipment. Please read this manual carefully and take care of the following hints to avoid damages. Any failure caused by ignoring the mentioned items and cautions mentioned in the instruction manual are not covered by our warranty and any liability. -
Page 12: Product Description
Product Description 1. USB SLOT 11. VOLUME +/MINUTE 21. REPEAT/PROG/PRESET- 2. SD CARD SLOT 12. ALARM ON/OFF SLEEP 22. REMOTE SENSOR 3. RADIO/CD/USB/SD/BT SHIFT 13. TIME 23. ALBUM BUTTON/PRESET+ 4. CD DOOR (OPEN/CLOSE) 14. STEREO HEADPHONE JACK 24. SPEAKERS 5. LCD DISPLAY 15. - Page 13 Mounting Mounting on Stand Connecting Speakers and Main Unit...
-
Page 14: Use And Operation
Mounting on Wall Use and Operation Power Sources This Music System operates on 230V~ 50Hz. Do not attempt to operate the radio on any other power source. You could cause damage to the unit and void your warranty. Please be sure the power outlet you plug this unit into is working and receives constant (unswitched) power. -
Page 15: Setting The Clock
Setting the clock 1. Under stand-by status, hold TIME button, the time display will flsh. 2. Press VOLUME -/HOUR and VOLUME +/MINUTE button to adjust the time. Radio operation 1. To turn the radio on, press the STAND-BY BUTTON once. The LCD DISPLAY lights up. 2. Press MODE BUTTON to choose the „RADIO“ mode. 3. -
Page 16: Usb/Sd Operation
REPEAT MODE When the REPEAT BUTTON is pressed once, the REPEAT 1 Indicator, ‘REP 1’, will appear in the LCD DISPLAY. The current track will be played repeatedly. When the REPEAT BUTTON is pressed twice, the REPEAT INDICATOR, “REP ALL” will light in the LCD DISPLAY. The whole disc will be played continuously. -
Page 17: Aux Operation
BT Operation (10009513, 10009514) 1.Turn on the Music System by pressing the STAND-BY BUTTON. The LCD DISPLAY lights on. 2. Press MODE button to choose the BT mode. The BT light will flash. 3.Open the BT device and search other BT devices. Choose V329 and connect. 4. Play the music: The BT will remember the last connection and will connect it automati- cally. -
Page 18: Specifications
TURNING ALARM FUNCTION ON/OFF 1. Press the AL.ON/OFF Button once to turn the alarm function on. The ALARM INDICATOR, “ ” will appear in the DISPLAY. 2. Press the AL.ON/OFF Button again to turn the alarm function off. The ALARM INDICA- TOR, “ ” will disappear in the DISPLAY. CHECKING THE WAKE UP TIME Whenever you want to check the wake up time, simply press the ALARM SET button. -
Page 19: Troubleshooting
Troubleshooting Problem Possible Cause Solution Noise or sound dis- Station not tuned properly. Retune the broadcast station. torted on AM or FM FM Wire antenna is not extended. FM: Extend the FM Wire antenna AM or FM no sound Unit not in “RADIO” function mode. Slide FUNCTION SELECTOR to RADIO. -
Page 20: Hints On Disposal
Hints on Disposal According to the European waste regulation 2012/19/EU this symbol on the product or on its packaging indicates that this product may not be treated as household waste. Instead it should be taken to the appropriate collection point for the recycling of electrical and electronic equipment. By ensuring this product is disposed of correctly, you will help prevent potential negative consequences for the environment and human health, which could other- wise be caused by inappropriate waste handling of this product. -
Page 21: Consignes De Sécurité
Chère cliente, cher client, Toutes nos félicitations pour l’acquisition de ce nouvel appareil. Veuillez lire attentivement et respecter les instructions de ce mode d’emploi afin d’éviter d’éventuels dommages. Nous ne saurions être tenus pour responsables des dommages dus au non-respect des consignes et à la mauvaise utilisation de l’appareil. Consignes de sécurité 1. -
Page 22: Éléments De Commande
Éléments de commande 1 Prise USB 11 VOL+ / Minute 21 Répétition/Prog/Présélection- 2 Fente SD 12 Réveil on/off 22 Capteur de télécommande 3 Sélecteur de fonction 13 Heure 23 Album- / Présélection+ 4 Compartiment à CD 14 Prise casque 24 Haut-parleur 5 Écran LCD 15 Entrée AUX 25 Trous de montage mural 6 Recherche de station (arrière) - Page 23 Montage Pied Connexion entre les haut-parleurs et l‘unité principale...
-
Page 24: Mise En Marche Et Utilisation
Montage mural Mise en marche et utilisation Alimentation N‘alimentez l‘appareil qu‘avec des prise de 230V ~ 50Hz. L‘aide à la marche de l‘horloge fonctionne avec 2 piles AA. La télécommande fonctionne avec 2 piles AAA. Régler l‘horloge L‘horloge doit être réglée lors de la première utilisation. En branchant l‘appareil, l‘horloge affiche “12:00” suivez alors les étapes suivantes: 1. -
Page 25: Fonctionnement De La Radio
Fonctionnement de la radio 1. Allumez l‘appareil. 2. Sélectionnez le mode radio avec le SÉLECTEUR DE FONCTION. 3. Sélectionnez la fréquence avec le SÉLECTEUR DE STATIONS. 4. Sélectionnez la fréquence désirée avec le bouton RADIO TUNER. 5. Réglez le volume. 6. - Page 26 NOTES SUR LA PROGRAMMATION NOTE: Vous ne pouvez utiliser cette fonction que lorsque la lecture est stoppée. 1. Appuyez sur le bouton PROGRAMMATION une fois. Les numéros de titres et “PROG” s‘affichent sur l‘écran. 2. Appuyez sur SAUTS DE PISTES AVANT ET ARRIERE pour sélectionner les titres que vous souhaitez programmer.
- Page 27 Utiliser des appareils externes Vous pouvez jouer des appareils externes – ordinateurs ou lecteurs MP3 par exemple – sur l‘appareil. 1. Relevez le COUVERCLE. 2. Connectez l‘appareil externe sur votre chaîne. 3. Sélectionnez AUX avec le SÉLECTEUR DE FONCTION. 4. Allumez la chaîne. 5.
- Page 28 Alarme via CD Programmer l‘heure de réveil, positionnez le SELECTEUR de fonction sur CD, insérez un CD, réglez le volume et éteignez l‘appareil. Alarme via buzzer 1. Positionnez le sélecteur de fonction sur ALARME. 2. Le buzzer retentira pendant 3 minutes. . 3.
-
Page 29: Déclaration De Conformité
Recyclage Vous trouverez sur le produit l’image ci-contre (une poubelle sur roues, barrée d‘une croix), ce qui indique que le produit se trouve soumis à la directive européenne 2012/19/UE. Renseignez-vous sur les disposi- tions en vigueur dans votre région concernant la collecte séparée des appareils électriques et électroniques. -
Page 30: Avvertenze Di Sicurezza
Gentile Cliente, La ringraziamo per aver acquistato il dispositivo. La preghiamo di leggere attentamente le seguenti istruzioni per l’uso e di seguirle per evitare possibili danni tecnici. Non ci assu- miamo alcuna responsabilità per danni scaturiti da una mancata osservazione delle avver- tenze di sicurezza e da un uso improprio del dispositivo. -
Page 31: Descrizione Del Dispositivo
Descrizione del dispositivo 1 Ingresso USB 11 VOL+ / Minuti 21 Ripetere / Prog / Preset 2 Slot SD 12 Alarm ON / OFF 22 Sensore telecomando 3 Interruttore per selezionare la 13 Tempo 23 Album- / Preset+ modalità 4 Sportello CD 14 Connessione cuffie 24 Altoparlanti 5 Display LCD... - Page 32 Montaggio Piede d’appoggio Collegamento tra altoparlanti e unità principale...
-
Page 33: Messa In Funzione E Utilizzo
Montaggio a parete Messa in funzione e utilizzo Alimentazione Utilizzare il dispositivo solo con una presa elettrica da 230V ~ 50Hz. Il supporto di funziona- mento del dispositivo lavora con 2 pile AA. Il telecomando funziona con 2 pile AAA. Impostare l’ora L’ora deve essere impostata al primo utilizzo. -
Page 34: Funzionamento Radio
Funzionamento radio 1. Accendere il dispositivo. 2. Selezionare una modalità radio con l’INTERRUTTORE PER SELEZIONARE LA MODALITÀ. 3. Selezionare la banda desiderata con l’INTERRUTTORE PER SELEZIONARE LA BANDA. 4. Impostare la frequenza desiderata con il SINTONIZZATORE RADIO. 5. Impostare il volume desiderato. 6. - Page 35 Programmare titoli Avvertenza: questa funzione può essere utilizzata solo in modalità STOP. 1. Premere il tasto di PROGRAMMAZIONE una volta. Sul display compaiono il numero del titolo e l’indicazione “PROG”. 2. Premere SALTA TITOLO, CERCA TITOLO AVANTI o INDIETRO per raggiungere il titolo che volete programmare.
- Page 36 Utilizzare dispositivi audio esterni Potete utilizzare dispositivi audio esterni, come laptop e lettori MP3, attraverso il dispositivo. 1. Abbassare la copertura. 2. Collegare il dispositivo audio esterno all’impianto. 3. Selezionare AUX con l’INTERRUTTORE PER SELEZIONARE LA MODALITÀ. 4. Accendere l’impianto. 5.
-
Page 37: Ricerca E Correzione Degli Errori
Definire sveglia CD Definire l’ora della sveglia, posizionare l’INTERRUTTORE PER SELEZIONARE LA MODALITÀ su CD, inserire un CD, regolare il volume e spegnere il dispositivo. Definire un allarme con rumore della sveglia 1. Posizionare l’INTERRUTTORE PER SELEZIONARE LA MODALITÀ su ALARM. 2. Raggiunta l’ora della sveglia, il dispositivo emetterà per 3 minuti un rumore di sveglia. 3. -
Page 38: Avviso Di Smaltimento
Avviso di smaltimento Se sul prodotto è presente la fi gura a sinistra (il bidone dei rifi uti con le ruo- te), si applica la direttiva europea 2012/19/UE. Questi prodotti non possono essere smaltiti con i rifi uti normali. Informarsi sulle disposizioni vigenti per la raccolta di dispositivi elettrici ed elettronici. Attenersi alle disposizioni vigenti e non smaltire i vecchi dispositivi con i rifi uti domestici. Grazie al corretto smaltimento dei vecchi dispositivi si tutela il pianeta e la salute delle persone da possibili conseguenze negative.
Need help?
Do you have a question about the Stereoanlage 10006663 and is the answer not in the manual?
Questions and answers