Table of Contents
Advertisement
Available languages
Available languages
Quick Links
Advertisement
Chapters
Table of Contents

Related Manuals for Electrolux KGG75372K


Summary of Contents for Electrolux KGG75372K
- Page 1 KGG75372K KGG75372W User Manual Piano cottura Istruzioni per l’uso...
-
Page 2: Table Of Contents
11. ENVIRONMENTAL CONCERNS..............20 WE’RE THINKING OF YOU Thank you for purchasing an Electrolux appliance. You’ve chosen a product that brings with it decades of professional experience and innovation. Ingenious and stylish, it has been designed with you in mind. So whenever you use it, you can be safe in the knowledge that you’ll get great results every time. - Page 3 ENGLISH of incorrect installation or usage. Always keep the instructions in a safe and accessible location for future reference. 1.1 Children and vulnerable people safety This appliance can be used by children aged from 8 • years and above and persons with reduced physical, sensory or mental capabilities or lack of experience and knowledge if they have been given supervision or instruction concerning the use of the appliance in a...
- Page 4 WARNING: The appliance and its accessible parts • become hot during use. Care should be taken to avoid touching heating elements. WARNING: Unattended cooking on a hob with fat or • oil can be dangerous and may result in fire.
-
Page 5: Safety Instructions
ENGLISH Where the appliance is directly connected to the • power supply, an all-pole isolating switch with a contact gap is required. Complete disconnection in compliance with the conditions specified in overvoltage category III must be guaranteed. The earth cable is excluded from this. When you route the mains cable, make sure that the •... - Page 6 2.3 Gas connection • Before carrying out any operation make sure that the appliance is disconnected from the power supply. CAUTION! • Make sure that the parameters on the When using a gas cylinder, rating plate are compatible with the...
- Page 7 ENGLISH • The vapours that very hot oil releases CAUTION! can cause spontaneous combustion. The use of a gas cooking • Used oil, that can contain food appliance results in the remnants, can cause fire at a lower production of heat, moisture temperature than oil used for the first and products of combustion time.
-
Page 8: Installation
2.5 Care and cleaning 2.6 Service • To repair the appliance contact the WARNING! Authorised Service Centre. Use Do not remove the buttons, original spare parts only. knobs or gaskets from the control panel. Water may get 2.7 Disposal inside the appliance and cause damage. - Page 9 ENGLISH If the supplied pressure has not the 5. Attach the label with the new type of specified value, it is necessary to gas supply near the gas supply pipe. assemble a proper pressure regulator in You can find this label in the package compliance with the standard UNI EN 88.
- Page 10 1. Connect the green and yellow (earth) socket. wire to the terminal which is marked • Always use a correctly installed with the letter 'E', or the earth symbol shockproof socket.
- Page 11 ENGLISH CAUTION! Install the appliance only on a worktop with flat surface. 3.8 Installing hob under the hood If you install the hob under a hood, please see the installation instructions of the hood for the minimum distance between the appliances.
-
Page 12: Product Description
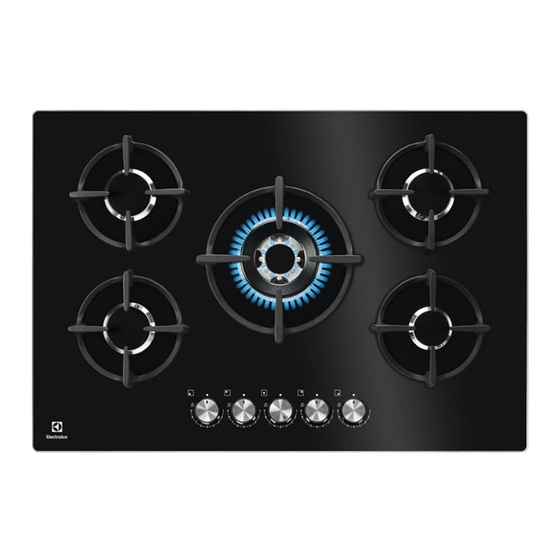
4. PRODUCT DESCRIPTION 4.1 Cooking surface layout Semi-rapid burner Multi Crown burner Auxiliary burner Control knobs 4.2 Control knob Symbol Description Symbol Description minimum gas supply no gas supply / off posi‐ 1 - 9 power levels tion ignition position / maxi‐... -
Page 13: Hints And Tips
ENGLISH 5.2 Ignition of the burner CAUTION! In the absence of electricity Always light the burner you can ignite the burner before you put on the without electrical device; in cookware. this case approach the burner with a flame, turn the WARNING! control knob counter- Be very careful when you... - Page 14 CAUTION! Burner Diameter of Make sure that pot handles cookware are not above the front edge (mm) of the cooktop. Multi Crown 220 - 260 CAUTION! Make sure that the pots are Semi-rapid (rear left) 120 - 240 placed centrally on the...
-
Page 15: Care And Cleaning
ENGLISH Food categories Recipes Burner type Power level Mushrooms with sea‐ Semi-rapid sonings Caponata with vegeta‐ Vegetables Multi Crown bles Frozen spinach with Rapid butter French fries Multi Crown Fried dishes Donuts Multi Crown Roasting nuts Semi-rapid Snacks cooked with Croutons of bread Multi Crown Pancakes... -
Page 16: Troubleshooting
7.2 Pan supports 7.4 Cleaning the hob • Remove immediately: melted plastic, The pan supports are not plastic foil, sugar and food with sugar, resistant to washing in a otherwise, the dirt can cause damage dishwasher. They must be to the hob. - Page 17 ENGLISH 8.1 What to do if... Problem Possible cause Remedy There is no spark when The hob is not connected Check if the hob is correct‐ you try to activate the to an electrical supply or it ly connected to the electri‐ spark generator.
-
Page 18: Technical Data
8.3 Labels supplied with the accessories bag Stick the adhesive labels as indicated below: MOD. MOD. MOD. TYPE PROD.NO. IP20 PROD.NO. PROD.NO. SER.NO. 0049 SER.NO SER.NO 03 IT DATA DATA MADE IN ITALY A. Stick it on Guarantee Card and send C. -
Page 19: Energy Efficiency
NOMINAL GAS FLOW g/h POWER POWER MARK G30 28-30 G31 37 mbar mbar Multi Crown 3,55 Semi-rapid Auxiliary 0,33 10. ENERGY EFFICIENCY 10.1 Product information according to EU 66/2014 Model identification KGG75372W, KGG75372K Type of hob Built-in hob Number of gas burners... -
Page 20: Environmental Concerns
Left rear - Semi-rapid 58.5% Right rear - Rapid 60.8% Energy efficiency per gas burner Centre middle - Multi Crown 57.7% (EE gas burner) Left front - Semi-rapid 54.5% Right front - Auxiliary not applicable Energy efficiency for the gas hob 57.9%... -
Page 21: Informazioni Di Sicurezza
11. CONSIDERAZIONI SULL'AMBIENTE............40 PENSIAMO A TE Grazie per aver acquistato un elettrodomestico Electrolux. Hai scelto un prodotto che ha alle spalle decenni di esperienza professionale e innovazione. Ingegnoso ed elegante, è stato progettato pensando a te. Quindi, in qualsiasi momento lo utilizzi, avrai la certezza di ottenere sempre i migliori risultati. - Page 22 Conservare sempre le istruzioni in un luogo sicuro e accessibile per poterle consultare in futuro. 1.1 Sicurezza dei bambini e delle persone vulnerabili Quest’apparecchiatura può essere usata da bambini a •...
- Page 23 ITALIANO in agriturismi e altre sistemazioni simili in cui tale utilizzo non superi i livelli di utilizzo domestico (medi). AVVERTENZA: L’elettrodomestico e le parti • accessibili si riscaldano molto durante l'uso. Fare attenzione a non toccare gli elementi riscaldanti. AVVERTENZA: Non lasciare mai il piano cottura •...
-
Page 24: Istruzioni Di Sicurezza
– dell'apparecchiatura, non utilizzare l'apparecchiatura. – Se il cavo di alimentazione è danneggiato, deve • essere sostituito dal produttore, da un centro di assistenza autorizzato o da una persona qualificata per evitare situazioni di pericolo. - Page 25 ITALIANO guanti di sicurezza e le calzature • Assicurarsi che sia installata una adeguate. protezione contro gli urti. • Proteggere le superfici di taglio con • Utilizzare il serracavo sul cavo. un materiale di tenuta per evitare che • Assicurarsi che il cavo l'umidità...
- Page 26 • Prima di procedere con l’installazione, • Rimuovere tutto l'imballaggio, le verificare che le condizioni di etichette e la pellicola protettiva (se distribuzione locale (pressione e tipo presente), prima del primo utilizzo. di gas) e i valori preimpostati • Assicurarsi che le aperture di dell’apparecchiatura siano compatibili.
-
Page 27: Installazione
ITALIANO • Non lasciare mai un bruciatore • Pulire regolarmente l'apparecchiatura acceso con o senza tegami vuoti per evitare il deterioramento dei sopra. materiali che compongono la • Non mettere fogli di alluminio superficie. sull'apparecchiatura. • Disattivare l'apparecchiatura e • Le pentole in ghisa, alluminio o con il lasciarla raffreddare prima di fondo danneggiato possono graffiare procedere con la pulizia. - Page 28 La targhetta dei dati è applicata sul lato inferiore del piano di cottura. Modello ......PNC ......... Numero di serie ......3.2 Collegamento gas AVVERTENZA! A. Estremità dell'albero con dado Le seguenti istruzioni B. Rondella fornita in dotazione con...
- Page 29 ITALIANO 3.4 Regolazione del livello • Non tirare il cavo di alimentazione per scollegare l’apparecchiatura. Tirare minimo sempre dalla spina. • Collegando l'apparecchiatura a una Per regolare il livello minimo dei prolunga, adattatore o presa multipla bruciatori: esiste il rischio di incendio. Accertarsi 1.
- Page 30 2. Collegare il filo di colore blu (neutro) al morsetto contrassegnato dalla lettera 'N' o colorato di blu. 3. Collegare il cavo di fase marrone (tensione) al terminale contrassegnato con la lettera "L".
-
Page 31: Descrizione Del Prodotto
ITALIANO 3.8 Installazione del piano di Unità da cucina con porta cottura sotto la cappa da cucina 30 mm Se si installa il piano di cottura sotto a una cappa da cucina, fare riferimento alle min 20 mm istruzioni per l'installazione (max 150 mm) 60 mm della cappa per la distanza... -
Page 32: Utilizzo Quotidiano
5. UTILIZZO QUOTIDIANO AVVERTENZA! AVVERTENZA! Fare riferimento ai capitoli Fare attenzione in fase di sulla sicurezza. utilizzo di fiamme libere all'interno della cucina. Il produttore declina qualsiasi 5.1 Panoramica bruciatore responsabilità in caso di cattivo utilizzo delle fiamme. 1. Premere la manopola di regolazione... -
Page 33: Consigli E Suggerimenti Utili
ITALIANO ATTENZIONE! Il generatore di scintille si In assenza di elettricità è avvia in modo automatico possibile accendere il all'accensione delle prese, bruciatore senza utilizzare il dopo l'installazione o dopo dispositivo elettrico; in tal un'interruzione di corrente. caso sarà sufficiente Non si tratta di un'anomalia avvicinarsi al bruciatore con di funzionamento. - Page 34 6.2 Diametro delle pentole Bruciatore Diametro del‐ ATTENZIONE! le pentole Usare pentole con diametro (mm) adatto alle dimensioni dei Semirapido (posteriore 120 - 240 bruciatori. destro) Bruciatore Diametro del‐ Semirapido (anteriore 120 - 220 le pentole sinistro) (mm) Ausiliario...
-
Page 35: Pulizia E Cura
ITALIANO Categorie cibo Ricette Tipo di bruciatore Livello di po‐ tenza Patatine fritte Multi corona Piatti fritti Ciambelle Multi corona Noccioline arrostite Semi rapido 2 - 5 Snack cotti con padella Crouton di pane Multi corona Pancake Semi rapido Caramello Ausiliario 1 - 5 Dessert... -
Page 36: Risoluzione Dei Problemi
7.4 Pulizia del piano di cottura 1. È possibile rimuovere i supporti pentole e pulire in modo facile il • Togliere immediatamente: plastica piano di cottura. sciolta, pellicola in plastica, zucchero Fare molta attenzione e alimenti con zucchero, in caso... - Page 37 ITALIANO 8.1 Cosa fare se... Problema Causa possibile Rimedio Il gas non si accende Il piano di cottura non è Accertarsi che il piano di quando si preme il pulsan‐ collegato a una fonte di ali‐ cottura sia collegato corret‐ te di accensione.
-
Page 38: Dati Tecnici
8.3 Etichette fornite con il sacchetto degli accessori Attaccare le etichette adesive come indicato di seguito: MOD. MOD. MOD. TYPE PROD.NO. IP20 PROD.NO. PROD.NO. SER.NO. 0049 SER.NO SER.NO 03 IT DATA DATA MADE IN ITALY A. Attaccarla sul Foglietto di garanzia C. -
Page 39: Efficienza Energetica
MINIMA INIETTORE G30 28-30 G31 37 mbar mbar Multi corona 3,55 Semi rapido 1,9 Ausiliario 0,33 10. EFFICIENZA ENERGETICA 10.1 Informazioni prodotto conformi alla norma UE 66/2014 Identificativo modello KGG75372W, KGG75372K Tipo di piano di cottura Piano cottura a incasso... -
Page 40: Considerazioni Sull'ambiente
Numero di bruciatori a gas Posteriore sinistro - Semirapi‐ 58,5% Posteriore destro - Rapido 60,8% Efficienza energetica per brucia‐ tore a gas Centrale al centro - Multi coro‐ 57,7% (EE gas burner) Anteriore sinistro - Semirapido 54,5% Anteriore destro - Ausiliario... - Page 44 www.electrolux.com/shop...
Need help?
Do you have a question about the KGG75372K and is the answer not in the manual?
Questions and answers