Cisco NSS324 Quick Start Manual
Smart storage
Hide thumbs
Also See for NSS324:
- Brochure (2 pages) ,
- Administration manual (200 pages) ,
- Administration manual (265 pages)
Table of Contents
Advertisement
Cisco Small Business
NSS324 and NSS326 Smart Storage
Package Contents
• Smart Storage
• Power Cord
• Quick Start Guide
• Ethernet Cable (2)
• Disk Tray Screws (2 Packs)
• Inline Switch Module
• HDD Sequence Label
• Product CD
Quick Start Guide
Versión en Español para México en el CD
Version en français sur CD
Versione italiana sul CD
Deutsch Version auf CD
Advertisement
Table of Contents

Related Manuals for Cisco NSS324


Summary of Contents for Cisco NSS324
- Page 1 Quick Start Guide Cisco Small Business NSS324 and NSS326 Smart Storage Package Contents • Smart Storage • Power Cord • Quick Start Guide • Ethernet Cable (2) Versión en Español para México en el CD • Disk Tray Screws (2 Packs) Version en français sur CD...
-
Page 2: Before You Begin
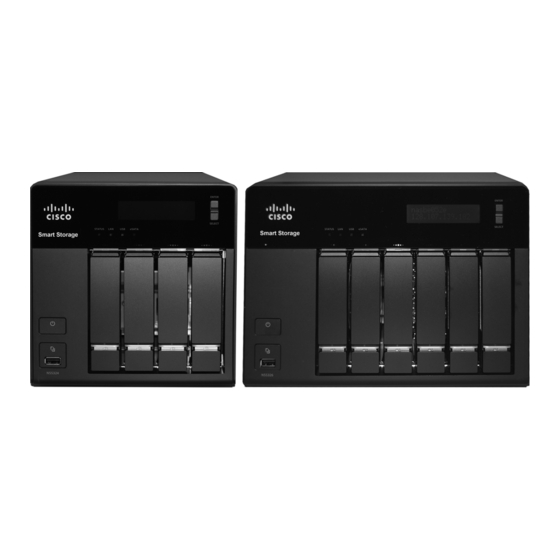
• The NSS326 is a 6-bay desktop Network Attached Storage device. This guide describes how to physically install your NAS and launch the Cisco Setup Wizard. If you are a new NAS user, you are strongly encouraged to use the Setup Wizard that is available on the product CD. -
Page 3: Front Panel
Strongly recommended to provide backup power and reduce the risk of system damage after power interruptions. After the initial installation of the NAS device, see the Cisco Small Business NSS300 Series Smart Storage Administration Guide to configure the NAS to communicate with the UPS. - Page 4 Solid green when the NAS is powered up and finished booting. (Orange) Flashes when there is network traffic to or from the NAS. Solid orange when the NAS is connected to the network. Cisco Small Business NSS324 and NSS326 Smart Storage...
-
Page 5: Back Panel
Back Panel Model No.: NSS326 Smart Storage Number Item Description Power Connector Connects the device to a standard power outlet. eSATA (2) eSATA ports for accessing external eSATA-attached storage. Use eSATA connector. Cisco Small Business NSS324 and NSS326 Smart Storage... -
Page 6: Placement Tips
Fans Dual system fans. Installing the NSS324 and NSS326 Please place your NSS324 or NSS326 on a desktop or flat surface. Placement Tips • Ambient Temperature—To prevent the device from overheating, do not operate it in an area that exceeds an ambient temperature of 104°F (40°C). -
Page 7: Installing The Disk Drives
When installing the disk drives, follow the suggestions in Electrostatic Discharge and Grounding Best Practices , located on the product CD. Follow these steps to install disk drives in the NSS324 or NSS326 NAS chassis. Remove the contents of the NAS package from the box. - Page 8 2.5-inch disk drive (use the included black screws) 2.5 inch 3.5 inch Insert the tray back in the correct sequence into the empty bay of the chassis. Drive trays should not be swapped from slot to slot. Cisco Small Business NSS324 and NSS326 Smart Storage...
- Page 9 There is also a HDD sequence label included in the package contents that can be placed on the top of the chassis, showing the disk drive sequence. For example, 1-4 for the NSS324 and 1-6 for the NSS326. HDD Sequence...
-
Page 10: Locking And Unlocking The Disk Trays
Gently push the disk tray lever down. Repeat steps 3 through 8 to install disk drives from slot 2 to slot 4 for the NSS324 and slot 2 to slot 6 for the NSS326. Locking and Unlocking the Disk Trays An icon is located on the silver tab indicating: •... -
Page 11: Connecting The Equipment
Connect the supplied Ethernet cable to one of the Ethernet ports on the back of the chassis. Connect the other end of the Ethernet cable to a switch or router on your network. Cisco Small Business NSS324 and NSS326 Smart Storage... -
Page 12: Verifying The Hardware Installation
– Power the device off, then back on to recognize the disk drives. If you need help resolving a problem, visit the Cisco Small Business Support Community at www.cisco.com/go/smallbizsupport. For technical documentation and other links, see Where to Go From Here,... -
Page 13: Starting Nas Configuration
• System Configuration Using the Mac Setup Wizard—The Setup Wizard guides you through the initial configuration settings. • System Configuration Using Linux or Mac OS X—Quick installation that uses more default settings. Cisco Small Business NSS324 and NSS326 Smart Storage... -
Page 14: System Configuration Using The Windows Setup Wizard
From the drop- down list, select a NAS device. Click Next to continue. You are directed to a configuration window to complete the settings step by step. The Welcome window displays. Cisco Small Business NSS324 and NSS326 Smart Storage... - Page 15 Enter the IP address, subnet mask, and default gateway for this server. You can either acquire the IP address automatically from a DHCP server or choose to configure a static IP address. Cisco Small Business NSS324 and NSS326 Smart Storage...
- Page 16 Select the disk configuration. The options are: • Disk configuration: It is recommended to configure the NSS324 or NSS326 with RAID 5 if there are three or more disks installed. Do not set disk configuration—If you have created disk volume configuration or plan to create multiple disk configurations, select not to initialize the disk drives.
- Page 17 Click Next. The Finish window displays the server configuration. Click Start Installation. System begins initializing and the configuration progress is displayed. When the configuration is Cisco Small Business NSS324 and NSS326 Smart Storage...
-
Page 18: System Configuration Using The Lcd Display
RAID 5—Combines three or more disks in a way that protects data against loss of any one disk. • RAID 6—Combines four or more disks in a way that protects data against loss of any two disks. Cisco Small Business NSS324 and NSS326 Smart Storage... - Page 19 Listen for one beep. Wait a minute until you hear a second beep. The power light will turn solid green. The NAS device has started successfully and you can configure the device using the First Time Installation Wizard. Cisco Small Business NSS324 and NSS326 Smart Storage...
- Page 20 The Welcome window displays. Click Next. You are redirected to a window where you can enter the name for this server. In the Server Name field, enter a name to identify the NAS device. Cisco Small Business NSS324 and NSS326 Smart Storage...
- Page 21 DHCP server or choose to configure a static IP address. • Obtain TCP/IP settings automatically via DHCP—Click this check box to acquire the IP address from a DHCP server. This is enabled by default. Cisco Small Business NSS324 and NSS326 Smart Storage...
- Page 22 Select the disk configuration. The options are: • Disk configuration: It is recommended to configure the NSS324 or NSS326 with RAID 5 if there are three or more disks installed. Do not set disk configuration—If you have created disk volume configuration or plan to create multiple disk configurations, select not to initialize the disk drives.
- Page 23 Click Next. The Finish window displays the server configuration. Click Start Installation. System begins initializing and the configuration progress is displayed. When the configuration is Cisco Small Business NSS324 and NSS326 Smart Storage...
-
Page 24: Mapping A Network Drive
You can map a network drive using the following options: • Mapping a Network Drive from the Windows Setup Wizard • Mapping a Network Drive From Windows • Mapping a Network Drive from the Mac Setup Wizard Cisco Small Business NSS324 and NSS326 Smart Storage... - Page 25 Click Next. The Mapping Success window opens. Click More to map another drive or click Next to continue to the Client Utility Installation. See Installing the Client Utility for Windows, page Cisco Small Business NSS324 and NSS326 Smart Storage...
-
Page 26: Mapping A Network Drive From Windows
To accept the End-User License Agreement, check the I accept this agreement check box and click Next. The First Time Installation Wizard window opens. Click Next. Click Skip until you reach the Map Network Drive window. Cisco Small Business NSS324 and NSS326 Smart Storage... -
Page 27: Installing The Client Utility For Windows
Discovery Tool provides functions for you to search, configure, and manage your NAS devices. If you receive Windows firewall warnings during this process, you may need to allow the NSS Discovery Tool to unblock the firewall settings. Cisco Small Business NSS324 and NSS326 Smart Storage... -
Page 28: Installing The Tool
Next. The First Time Installation Wizard window opens. Click Next. Click Skip until you reach the Client Utility Installation window. Click Next. The NSS Discovery Tool window opens. Cisco Small Business NSS324 and NSS326 Smart Storage... -
Page 29: Installing The Client Utility For Mac
Insert the product CD. Double-click the CD icon on the desktop to view the contents in Finder. From the …\MAC\ folder, double-click CISCO_NSSCD_V..dmg. From the ..\AutoRun\ folder, double-click AutoRun to launch the Setup Wizard. Cisco Small Business NSS324 and NSS326 Smart Storage... -
Page 30: Accessing The Management Gui Using A Web Browser
When the login window opens, enter the administrator username and password. For more information about the Applications, Languages, and SSL Login, see the Cisco Small Business NSS300 Series Smart Storage Administration Guide. Cisco Small Business NSS324 and NSS326 Smart Storage... -
Page 31: Suggested Next Steps
• Remote Replication—Back up the files on the NAS to another NAS or rsync server over the LAN or Internet. • Mozy Online Backup—Mozy backup on the Cisco Smart Storage provides small businesses with a secure enterprise-level disaster recovery solution for their critical data. -
Page 32: Reset Network Settings And Password
Set Up Cisco Access Now Remote Access Cisco Access Now is the secure, easy-to-use way to access and manage your Smart Storage devices from a web browser anywhere, anytime. For more information, see the Cisco Small Business NSS300 Series Smart Storage Administration Guide. -
Page 33: Inline Power Switch Module
Power button to shut down the NAS. Wait for the device to fully shut down before connecting and using the inline switch. Failure to do so may result in data loss. Cisco Small Business NSS324 and NSS326 Smart Storage... -
Page 34: Where To Go From Here
Notes, Approved Vendor List, Regulatory Compliance and Safety Information) Add-on PKG Applications www.cisco.com/go/storage-apps Cisco Small Business Cisco Partner Central for www.cisco.com/web/partners/sell/smb Small Business (Partner Login Required) Cisco Small Business Home www.cisco.com/smallbusiness Marketplace www.cisco.com/go/marketplace Cisco Small Business NSS324 and NSS326 Smart Storage... - Page 35 Cisco Small Business NSS324 and NSS326 Smart Storage...
- Page 36 San Jose, CA 95134-1706 www.cisco.com Small Business Support, Global: www.cisco.com/go/sbsc Cisco and the Cisco Logo are trademarks of Cisco Systems, Inc. and/or its affiliates in the U.S. and other countries. A listing of Cisco's trademarks can be found at www.cisco.com/go/ trademarks.
Need help?
Do you have a question about the NSS324 and is the answer not in the manual?
Questions and answers