Table of Contents
Advertisement
Quick Links
Advertisement
Table of Contents

Related Manuals for SNOWJOE sunjoe 24V-X2-21LMSP-RM


Summary of Contents for SNOWJOE sunjoe 24V-X2-21LMSP-RM
- Page 1 CORDLESS LAWN MOWER 48V MAX* | 4.0 Ah | 21-INCH OPERATOR’S MANUAL Model 24V-X2-21LMSP-RM A Division of Snow Joe , LLC Form No. SJ-24V-X2-21LMSP-RM-880E-M-V1 ® © 2022 by Snow Joe , LLC ® SAVE THESE INSTRUCTIONS All rights reserved. Original instructions.
- Page 2 CORDLESS LAWN MOWER 48V MAX* | 4.0 Ah | 21-INCH OPERATOR’S MANUAL Model 24V-X2-21LMSP-RM A Division of Snow Joe , LLC Form No. SJ-24V-X2-21LMSP-RM-880E-M-V1 ® IMPORTANT! A damaged blade or worn blade nut may break off the mower assembly and cause serious injury. Replace the Safety Instructions damaged blade or blade nut before using the mower.
-
Page 3: Electrical Safety
® ® To reduce the risk of injury, charge the 1-866-SNOWJOE (1-866-766-9563). 24V iON+ lithium-ion battery packs only in the designated 24V 2. If charging the power tool in a damp location is iON+ lithium-ion charger. Other types of chargers present risk unavoidable, use a residual current device (RCD) of fire, personal injury and damage. -
Page 4: Information About The Charger And The Charging Process
® ® 9. Avoid damage and shocks. Immediately replace batteries at 1-866-SNOWJOE (1-866-766-9563). that have been dropped from a height of more than one meter or those that have been exposed to violent shocks, • Battery chemicals cause serious burns – Never let a even if the housing of the battery packs appear to be damaged battery pack contact the skin, eyes or mouth. -
Page 5: Protection From Environmental Influences
® ® ® 6. Protect batteries from overheating. Overloads, customer service center at 1-866-SNOWJOE overcharging and exposure to direct sunlight will result (1-866-766-9563). in overheating and cell damage. Never charge or work 3. Electrical plugs must match the outlet. Never modify with batteries that have been overheated –... -
Page 6: Slope Operation
® ® ® mow it. Sun Joe customer service center at 1-866-SNOWJOE ® (1-866-766-9563). Only identical replacement parts should • Mow across the face of slopes; never mow slopes be utilized for repairs. This will ensure that the safety of following an up and down traverse. -
Page 7: Safety Symbols
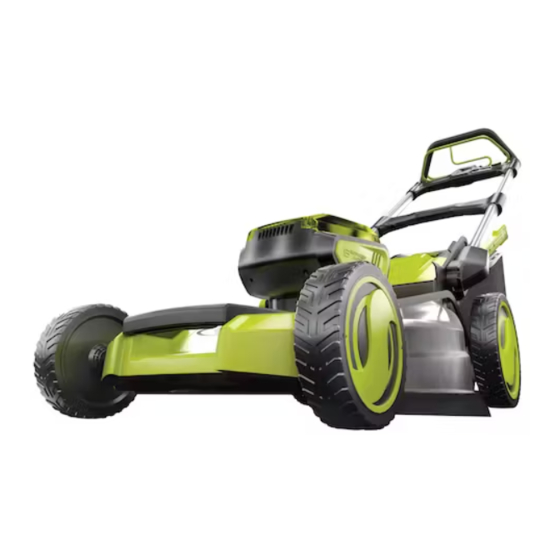
Safety Symbols The following table depicts and describes safety symbols that may appear on this product. Read, understand and follow all instructions on the machine before attempting to assemble and operate. Descriptions Symbols Descriptions Symbols DANGER! Rotating blades. Keep bystanders and children a safe Keep hands and feet away. - Page 8 Know Your Cordless Lawn Mower Read the owner’s manual and safety instructions carefully before operating the mower. Compare the illustration below to the mower in order to become familiar with the location of the various controls and adjustments. Save this manual for future reference.
-
Page 9: Battery Pack Operation
Technical Data IMPORTANT! The equipment and packaging material are not toys. Do not let children play with plastic bags, foils, or small Brushless Motor ..........Input: 1100 W parts. These items can be swallowed and pose a suffocation Output: 900 W risk! Battery Voltage Max* ........ -
Page 10: Charger Operation
® ® Batteries 1-866-SNOWJOE (1-866-766-9563) for assistance. 6. When charging is complete, remove the batteries from the charger by pressing the push lock buttons and sliding the batteries backward to unlock them from the charger 2. Check that the mains voltage is the same as that marked (Fig. -
Page 11: Charging A Hot Or Cold Battery Pack
Assembly Fig. 4 WARNING! Do not insert the batteries until assembly is complete. Failure to comply could result in accidental starting and serious personal injury. WARNING! Before performing any maintenance, make sure the batteries and the safety key are removed from the unit. - Page 12 2. Press down the handle releasing button located on the 2. With the ejector flap lifted up, hold the grass collection middle bar of the handle frame, meanwhile pull the upper bag by the handle and hook the ends of the support rod handle frame to extend it to full length (Fig.
-
Page 13: Operation
Side Discharge Chute Assembly + Fitting Ejector flap Fig. 11 Use the side discharge chute on your mower when the grass is too tall to mulch or when side discharging is preferred. Mulching plug The grass clippings produced by the side discharge chute are noticeably larger than those produced by the mulching plug. - Page 14 Fig. 15 Fig. 13 Switch lever Height adjustment lever Safety button 3. Insert the lever into the desired slot. 3. Once the machine powers on, release the safety lock 7-Position Height Adjustment (From front to rear): button and proceed with operation. (1) 1.2 in.
-
Page 15: Grass Bag Filling Level Indicator
To operate the self-propelled system with the blade rotating for cutting: Fig. 18 Grass indicator window 1. Start the lawn mower as indicated by step 1 to step 3 in Starting + Stopping section. 2. While holding the switch lever against the handle with your left hand, push the self-propel lever to the handle with your right hand. -
Page 16: Maintenance & Care
• Always carefully fasten the ejector flap and grass • To maximize your mower's longevity, all screwed parts, collection bag. Switch off the motor before emptying the including the wheels and axles, should be cleaned and grass collection bag. Always ensure that a safe distance lubricated. -
Page 17: Recycling + Disposal
8. Press and hold the handle latch. Gently pivot the handle frame toward the front of the mower until you hear and feel the handle frame locks in the storage position (Fig. 22). Blade Fig. 22 Lug nut Fig. 20 Storage position 5. -
Page 18: Service & Support
If your Sun Joe 24V-X2-21LMSP-RM cordless lawn mower ® Class B device: requires service or maintenance, please call 1-866-SNOWJOE (1-866-766-9563) for assistance. NOTE: This equipment has been tested and found to comply Model + Serial Numbers with the limits for a Class B digital device, pursuant to part 15 of the FCC Rules. -
Page 19: Troubleshooting
Troubleshooting • Remove the batteries and the safety key before carrying out maintenance on the machine or when checking that its parts are in proper working order. • To avoid unnecessary hassles, consult the following table before contacting a qualified repair person with any mechanical issues. - Page 20 NOTE: Accessories are subject to change without any obligation on the part of Snow Joe + Sun Joe to provide notice of such ® ® changes. Accessories can be ordered online at sunjoe.com or via phone by contacting the Snow Joe + Sun Joe customer ® ® service center at 1-866-SNOWJOE (1-866-766-9563).
- Page 21 To obtain a replacement part or product, please visit warranty. Some states do not allow exclusions of incidental or snowjoe.com/help or email us at help@snowjoe.com for consequential damages so the above exclusions may not apply instructions. Please be sure to register your unit beforehand to in all states.
- Page 24 sunjoe.com...
Need help?
Do you have a question about the sunjoe 24V-X2-21LMSP-RM and is the answer not in the manual?
Questions and answers