Table of Contents
Advertisement
Quick Links
Advertisement
Table of Contents

Related Manuals for Blaupunkt BP700USG9200


Summary of Contents for Blaupunkt BP700USG9200
- Page 1 Instruction Manual 70” 4K Ultra HD Android TV - BP700USG9200...
-
Page 3: Table Of Contents
CONTENTS General Safety Installation Wall Mounting Instructions Controls and Connections Remote Control Initial Setup Android TV - Home Screen Google Play Store Google Assistant Inputs Settings Network Channel Menu Device Preferences About & Time Settings Input Settings Power Settings Picture Settings Sound Settings Home Screen &... -
Page 4: General Safety
GENERAL SAFETY Read this manual thoroughly before you start using the TV. Store this manual, the completed warranty card, your receipt and the product packaging. The safety precautions instructions reduces the risk of fire, electric shock and injury when correctly complied to. Please follow all instructions and take notice of all warnings. - Page 5 GENERAL SAFETY (CONT.) IMPORTANT INFORMATION • Do not expose this appliance to rain or moisture as it may result in fire or an electric shock hazard • Do not tamper or change or modify the product in any way. • Only use Accessories outlined and recommended by the manufacturer. •...
- Page 6 GENERAL SAFETY (CONT.) • Please beware that Dust could accumulate over time on the unit and cause it to generate heat and or deteriorate insulation, which in turn may result in an electrical fire. • The product is not intended for use by persons (including children) with reduced physical, sensory or mental capabilities, or young children of any age, They must be supervised product by a person responsible for their safety.
- Page 7 GENERAL SAFETY (CONT.) Please make sure upon positioning this product, the place is: • Not wet or damp and Well ventilated • Away from direct sunlight or heaters. • Away from splashes or food. • Protected from excessive dust or grease. •...
-
Page 8: Installation
INSTALLATION Install the stand as described below, or if you want to mount it to a wall, please contact a professional installer. Please ensure the TV is not plugged into the wall socket and furthermore we recommend to get another person to assist in the following task. Attaching the stand Step 1 Place a soft cushioned material on top of a flat surface to prevent damaging the screen... -
Page 9: Wall Mounting Instructions
INSTALLATION (CONT.) Wall-Mounting Instructions Please ensure the TV is not plugged into the wall socket and furthermore we recommend to get another person to assist in the following task. • We recommend you use a professional installer as we assume no liability for any eventual damage to the product or injury to yourself if you mount the TV on your own. -
Page 10: Controls And Connections
CONTROLS AND CONNECTIONS Channel Up / Up (menu) Long Press - Standby Short Press - Select Volume Up/ Volume Down/ Left (menu) Right (menu) Channel Down / Down (menu) - Page 11 CONTROLS AND CONNECTIONS SIDE PORTS BOTTOM PORTS USB INPUT HDMI 1 / ARC HEADPHONE PORT RJ45 (ETHERNET) OPTICAL 2X USB INPUT HDMI 3 HDMI 4 HDMI 2 MINI AV INPUT ANTENNA (RF) USB connection Insert a USB storage device into the USB port to record, playback of video/music/photo.
-
Page 12: Remote Control
REMOTE CONTROL... - Page 13 REMOTE CONTROL (CONT.) POWER: Turn the TV on/off. INPUT: Open Input menu (DTV, HDMI1, HDMI2, etc) Open Netflix Open YouTube Start recording DTV Channel (must have USB drive inserted) STOP: Stop multimedia playback, Recording and Timeshift mode MUTE: Turn the sound on or off REWIND: Rewind playback in multimedia/timeshift mode 9.
- Page 14 REMOTE CONTROL (CONT.) Using the Remote Control • Do not mix old and new batteries in the remote • Do not use different types of battery • If you do not intend to use the unit for a long time, please remove batteries from the remote to avoid accident.
-
Page 15: Initial Setup
INITIAL SETUP For the first initial setup, on screen setup wizard will guide you through setting up your TV. Please follow according to onscreen guide to setup your TV correctly. Be sure to follow the below prompts to pair your Bluetooth remote control. After the pairing is successful, you can now operate the TV. - Page 16 INITIAL SETUP (CONT.) Iif you just want to use your TV normally, please select “SKIP” To connect your Android Smartphone to your TV, Select “Continue”. Press to select your Wi-Fi you wish to connect to, enter the password and then confirm to connect.
- Page 17 INITIAL SETUP (CONT.) Select “YES” if you want your location identified on your ANDROID TV. (Note: Select “YES” you want google to inform you on weather more accurately based on location). By Agreeing and selecting “YES”, you agree to automatically send diagnostic information to Google to help improve your Google experience.
- Page 18 INITIAL SETUP (CONT.) Informational screens will now appear, you can scroll through steps by press “RIGHT” directional button to continue. Select the country you are using the device in with the directional buttons. Used to set a password of your TV for security purposes.
- Page 19 INITIAL SETUP (CONT.) Select the TimeZone you are using the device in with the directional buttons. “HOME” Please be sure in this step, select if you are using this TV for use at home. Make sure to confirm once you have selected “HOME”. Let this device be detected as a Google Cast device and allow Google Assistant and other services to wake this device up to respond to Cast commands, even when on standby and the screen is off.
-
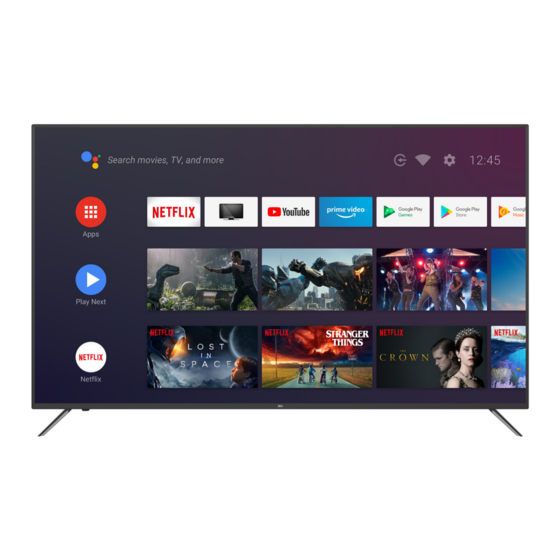
Page 20: Android Tv - Home Screen
ANDROID TV - HOME SCREEN Once you have completed initial setup, you will now enter the ANDROID TV home screen. Open Google Assitant to start a voice search. Selected the Multi-dot red circle to have access to all your applications. “Google Play Store”... -
Page 21: Google Play Store
GOOGLE PLAY STORE To have access and to download Google Play Store, applications from the you must sign in with a Gmail account. Once you open Google Play Store, you will be prompted to sign in or create a new account. Once you have signed in, you will be brought to the below page, scroll through the list of applications available for download OR go to the search button, and search via entering Text or speaking to Google Assistant via your remote control. -
Page 22: Google Assistant
GOOGLE ASSISTANT You now have access to Google Assistant via the (#1 on page 20) or by pressing (Google Assistant) button on your remote control to commence. “Listening” Allow for the voice box to appear at the bottom of your TV screen, stating: then speak clearly towards the top of your remote control for Google Assistant to hear you. -
Page 23: Inputs
INPUT MENU To access INPUT menu, either select INPUT (#4 on page 20) via the HOME screen or press the SOURCE button on your remote control to have quick access to INPUT menu. AVAILABLE PORTS The options that are will be highlighted, that are not in use, you will not be able to access. -
Page 24: Settings
SETTINGS To access SETTINGS menu, select SETTINGS (#6 on page 20) via the HOME screen. -
Page 25: Network
NETWORK & INTERNET To access NETWORK menu, select WIFI icon (#5 on page 20) via the HOME screen or go into Settings (#6 on page 20) menu and go down and select Network & Internet. -
Page 26: Channel Menu
CHANNEL MENU CHANNEL SETTING icon (#6 on page 20) To access menu, select via the HOME screen. Then go down and select “CHANNEL”. Channels Display the scan sub-menu based on different channel installatino modes. Antenna - Set the signal type to antenna, when set to antenna the TV can now receive digital broadcasting signals. -
Page 27: Device Preferences
DEVICE PREFERENCES - ABOUT ABOUT To access menu, select SETTING icon (#6 on page 20) the HOME screen. Then go down and select “ABOUT”. TIME DATE & TIME To access menu, select SETTING icon (#6 on page 20) via the HOME screen. -
Page 28: Input Settings
INPUT SETTINGS MENU To access INPUT SETTINGS menu, 1. Select SETTING icon (#6 on page 20) via the HOME screen. “Device Preferences” 2. Select 3. Then go down and select “INPUTS”. -
Page 29: Power Settings
POWER SETTINGS MENU To access POWER SETTINGS menu, 1. Select SETTING icon (6) via the HOME screen. “Device Preferences” 2. Select 3. Then go down and select “POWER”. Sleep Timer - Options of Off, 10 mins, 20 mins, 30 mins, 40 mins, 50 mins, 60 mins, 90 mins and 120 mins to auto turn off your TV. -
Page 30: Picture Settings
PICTURE SETTINGS MENU To access PICTURE SETTINGS menu, 1. Select SETTING icon (6) via the HOME screen. “Device Preferences” 2. Select 3. Then go down and select “PICTURE”. Picture Mode - Options to choose from - Standard, Vivid, Sport, Movie, Game, Energy Saving, User. -
Page 31: Sound Settings
SOUND SETTINGS MENU To access SOUND SETTINGS menu, 1. Select SETTING icon (6) via the HOME screen. “Device Preferences” 2. Select 3. Then go down and select “SOUND”. Sound Style - Options to choose from - Standard, Vivid, Sports, Movie, Music, News, User. Speakers - TV Speakers or External Speaker (This will force the TV to output sound through the chosen option). -
Page 32: Home Screen & Screen Saver
HOME SCREEN To access HOME SCREEN menu, 1. select SETTING icon (#6 on page 20) via the HOME screen. “Device Preferences” 2. Select 3. Then go down and select “HOME SCREEN”. SCREEN SAVER SCREEN SAVER To access menu, 1. select SETTING icon (#6 on page 20) via the HOME screen. -
Page 33: Google Assistant Settings
GOOGLE ASSISTANT To access GOOGLE ASSISTANT menu, 1. Select SETTING icon (#6 on page 20) via the HOME screen. “Device Preferences” 2. Select “GOOGLE ASSISTANT”. Then go down and select Accounts will only be accessible if you have connected a Gmail account via the “Google Play Store”. -
Page 34: Parental Control
PARENTAL CONTROL To access PARENTAL CONTROL menu, 1. Select SETTING icon (#6 on page 20) via the HOME screen. “Device Preferences” 2. Select 3. Then go down and select “CHANNEL”. 4. Select “Parental Control” From here you have the option to select and create a new password to lock the channels you want to lock. -
Page 35: Pvr (Personal Video Recorder)
PVR (PERSONAL VIDEO RECORDER) To access RECORDING menu, (PVR) 1. While watching Live TV, press “MENU” on remote control. “TV Options” “DOWN” will appears, Press arrow on remote control to go to “RECORD” menu (as image shown below) IMPORTANT - USB Drive You must have a inserted into the USB Port of the TV to in order to... -
Page 36: Faqs
FAQS GENERAL PROBLEMS WITH TV SET... - Page 37 FAQS TURN OFF SUBTITLES ON LIVE TV? To turn off subtitles on your Android TV, while watching Live TV: Press “MENU” on your Remote Control ADVANCED SETTINGS Go right and select SUBTITLE Go down and select Switch all choices of subtitles to Once all options for subtitle are switched off, then you can exit and continue watching Live TV! If the Subtitle persists to appear, you may need a software update or for further...
-
Page 38: Specifications
SPECIFICATIONS Operating System Android TV 9.0 HDR (High Dynamic Range) Resolution 3840 x 2160 Display Colours 1.07 Billion Contrast ratio: 4000:1 Aspect Ratio 16 : 9 Refresh Rate 60Hz ETHERNET / WiFi Yes/ 802.11 b/g/n/ac Movie: MPEG, TS, TRP, TP, MP4, MOV, 3GPP, 3GP, AVI, MKV, ASF, DIVX, FLV, SWF, RM, WEBM Multimedia Playback Music: MPEG1, MPEG2, VORBIS, LPCM, FLAC, DTS LBR, DTS... - Page 39 THIS PAGE HAS BEEN LEFT BLANK ON PURPOSE.
- Page 40 CUSTOMER SUPPORT: info@ayonz.com DISTRIBUTED BY: Ayonz Pty Ltd...
Need help?
Do you have a question about the BP700USG9200 and is the answer not in the manual?
Questions and answers