
Related Manuals for Oricom UHF5400


Summary of Contents for Oricom UHF5400
- Page 1 Operating Instructions UHF5400 80 Channel UHF Citizen Band Radio Keep this user guide for future reference. Always retain your proof of purchase in case of warranty service. www.oricom.com.au...
- Page 2 When a narrowband radio receives a transmission from an older wideband radio the speech may sound loud and distorted – simply adjust your radio volume for the best listening performance. When an older wideband radio receives a signal from a new narrowband radio the speech may sound quieter - simply adjust your radio volume for best listening performance.
-
Page 3: Table Of Contents
Controls and Indicators ........13 Operations .............15 UHF CB Channels and Frequencies ....26 Express Warranty ...........31 Need Help? If you need assistance setting up or using your Oricom product now or in the future, call Oricom Support. Australia (02) 4574 8888 www.oricom.com.au Mon-Fri 8am –... -
Page 4: Safety Information And Warnings
• Always keep out of direct sunlight in confined environments. Information on Safe Operation Read This Information Before Using Your Oricom Radio. The operation of your UHF radio in Australia and New Zealand is subject to conditions in the following licenses:... - Page 5 Off near electrical blasting caps in a "blasting area" or in areas posted: "Turn off two way radios". Obey all signs and instructions. Exposure to Radio Frequency Energy Your Oricom two-way radio complies with Australian Communication Authority Radio communications (Electromagnetic Radiation-Human Exposure) Standard,2003.
- Page 6 Safety Information and Warnings To ensure optimal radio performance and to make sure human exposure to radio frequency electromagnetic energy is within the guidelines set out in the above standards, always adhere to the following procedures: WARNING Transmit and Receive Procedure Your two-way radio contains a transmitter and a receiver.
- Page 7 Safety Information and Warnings To avoid the possibility of electromagnetic interference and/ or compatibility conflicts, turn off your radio in any location where posted notices instruct you to do so such as health care facilities. WARNING Aircraft When instructed to do so, turn off your radio when onboard an aircraft.
-
Page 8: Introduction
Introduction Introduction Thank you for choosing the Oricom UHF5400 5 Watt Handheld Radio. Key Features • 5/1 watt switchable TX power • Long life battery: Lithum-Ion rechargeable 1200 mAh • 12V mains power adaptor and 12V car charger • Die cast metal chassis •... - Page 9 Introduction Customized multi menu function 1. TX power HI(5W)/LO(1W) 2. Digital Squelch setting (Auto, 1 to 5 levels) 3. User selectable 38 CTCSS and 104 DCS codes 4. Scrambler setting (Off, 1 to 5 different frequencies) 5. Duplex On/Off 6. VOX sensitivity (Off, 1 to 3 levels) 7.
-
Page 10: Pack Contents
Pack Contents The following items are included in your UHF5400 single pack. Belt Clip Lithium-ion Battery pack Car Charger AC Adaptor Antenna User Guide UHF5400 Radio Oricom UHF5400 Accessories The following Oricom UHF5400 accessories can be purchased directly from Oricom. Visit www.oricom.com.au or call (02) 4574 8888. -
Page 11: Installation
If left unused, your transceiver’s battery pack will discharge itself within a few months. If you have not used your UHF5400 for some time, you will need to recharge the battery pack before use. Warning: Use only the supplied power adaptor. The use of other... - Page 12 Installation Charging the Radio Plug the supplied mains power adaptor into an household outlet, and then plug the DC jack directly into the charging Jack on the radio. It takes approximately 3 hours to fully recharge with the radio powered off.
-
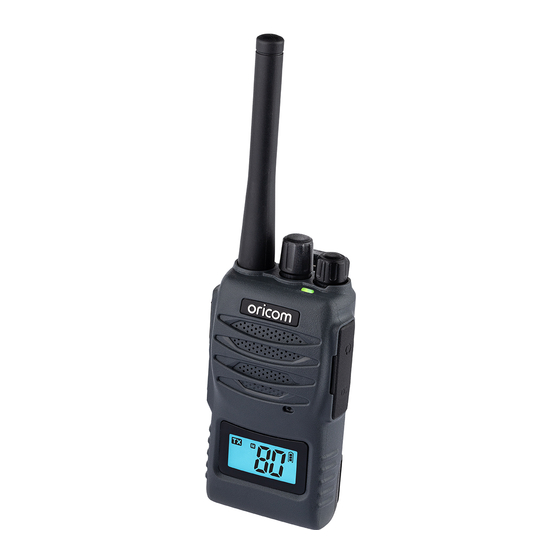
Page 13: Controls And Indicators
Controls and Indicators Basic Control 1. Antenna 2. Channel switch 3. Power On/Off and volume adjust 4. Push to talk (PTT)/Melody call 5. Monitor On/Triple Watch 6. Scan/Menu 7. Charging, External speaker & Microphone jack 8. RX/TX LED indicator 9. Microphone 10. - Page 14 Controls and Indicators LCD Display A. TX indicator H. CTCSS/DCS code B. Duplex on I. Function C. Memory J. Scrambler on D. Channel display K. Tri Watch on E. Battery indicator L. Key Lock F. CTCSS on M. Low TX power G.
-
Page 15: Operations
Operations When(PTT) is pressed at low battery, an error tone sounds and transmission is disabled. Once at low battery the unit will automatically shutdown. Recharge when convenient. When battery is empty, charge time is approximately 3 hours to fully charge. Power On/Off To turn on the transceiver, turn the volume knob clockwise until you hear a click. - Page 16 Operations Triple Watch Function Pressing and holding the monitor button activates the Triple watch function. The Triple Watch feature allows for monitoring of 2 or 3 channels, this includes the currently selected channel and the channels stored in TRI 1 and TRI 2. These channels can be set in the menu under TR1 and TR2 with any additional features set (CTCSS/DCS/Duplex).
- Page 17 Operations General Your radio has a Repeater Access function to allow use of local repeater stations (if available in your area). Repeaters are a shared radio system installed by interested parties (clubs, local businesses etc.) that pick transmissions on specific channels and re-transmit (or repeat) the received signal to another channel.
- Page 18 Operations Your UHF5400 allows you to pre-select Duplex operation individually on each channel. Simplex mode Transmit/ Duplex Mode Transmit/ Receiver Receiver CH and number Frequency (MHz) Frequency (MHz) 476.425 477.175 CH31 476.450 477.200 CH32 476.475 477.225 CH33 476.500 477.250 CH34 476.525...
- Page 19 Operations 1. Press and hold the Menu button, the first menu function is displayed. 2. Briefly press the menu button to cycle through each available function. After the last function has been selected, the cycle returns to the beginning. 3. Use the channel up or down dial to change the parameters of the selected function.
- Page 20 Operations * Please see below menu modes. Control Functions Step Display Default TX Power High or Low High SQ level Auto or 1 to 5 Auto CTCSS or DCS TSQ38 or DCS104 Scrambler Off or 1 to 5 MENU Duplex On or Off Off or 1 to 3 Priority Channel...
- Page 21 38 CTCSS codes. CTCSS 1-38, followed by DCS 1-104, displayed as 1 to A4. Scanning The UHF5400 has two types of scanning: Open scanning (OS) and Priority scanning (GS). Scanning allows you to search for active channels programmed in the memory.
- Page 22 PRIORITY SCAN ..Transmit RF Power Control The maximum RF transmit power of UHF5400 is 5 watts. You can switch to low power mode in the menu, when low power is selected “LO” appears on the LCD display. VOX Sensitivity Level Setting In VOX mode, the radio will transmit a signal only when it is activated by your voice or other sound around you.
- Page 23 Operations Priority Channel Set To store a Priority Channel, select the required channel in menu mode. The letter “PRI” will appear when the selected channel is set to Priority. This Channel will then be automatically monitored during the Priority Scan. NOTE: You can only store one channel as your priority channel.
- Page 24 Operations Memory On/Off The factory has pre-programmed all the UHF CB channels into the Open SCAN channel memory. However, you can change or customize the channels in this menu. To remove the channel from memory, press up or down in this menu. The memory icon “M”...
- Page 25 Operations Factory Reset If the radio’s display locks up or stops functioning properly, you might need to reset your UHF radio. Caution: This procedure clears all the information you have stored in your UHF radio. Before you reset your UHF radio, try turning it off and on again. If your UHF radio is still not functioning correctly, you may need to reset the UHF radio.
-
Page 26: Uhf Cb Channels And Frequencies
UHF CB Channels and Frequencies Channel Frequency Table Radiocommunications (Citizen Band Radio Stations) Class Licence 2002 No licence is required to own or operate this radio in Australia and New Zealand. The Radiocommunications (Citizen Band Radio Stations) Class Licence 2002 contains the technical parameters, operating requirements, conditions of licence and relevant standards for Citizen Band (CB) radios. - Page 27 UHF CB Channels and Frequencies Channel Freq Freq Channel Freq Freq 476.4250 476.4250 476.9250 476.9250 476.4375 476.4500 476.4500 476.9500 476.9500 476.4625 476.4750 476.4750 476.9750 476.9750 476.4875 476.5000 476.5000 477.0000 477.0000 476.5125 477.0125 477.0125 476.5250 476.5250 477.0250 477.0250 476.5375 477.0375 477.0375 476.5500 476.5500 477.0500...
- Page 28 UHF CB Channels and Frequencies The primary use for these channels is repeater operation using 750 kHz offset. Channels 1-8 and 41-48 inclusive are used for mobile reception and channels 31-38 and 71-78 for mobile transmission. In addition, any designated repeater channel may be used for simplex operation in areas where it is not used for repeater operation.
- Page 29 UHF CB Channels and Frequencies 38 CTCSS CODE LIST CODE Frequency (Hz) CODE Frequency (Hz) 131.8 67.0 136.5 71.9 141.3 74.4 146.2 77.0 151.4 79.7 156.7 82.5 162.2 85.4 167.9 88.5 173.8 91.5 179.9 94.8 186.2 97.4 192.8 100.0 203.5 103.5 210.7 107.2...
- Page 30 UHF CB Channels and Frequencies DCS codes table DCS Code DCS Code DCS Code Code No. Code No. Code No. (Octal) (Octal) (Octal) 100 (A0) 101 (A1) 102 (A2) 103 (A3) 104 (A4)
-
Page 31: Express Warranty
You are also entitled to have the goods repaired or replaced if the goods fail to be of acceptable quality and the failure does not amount to a major failure. Oricom warrants that the product is free from defects in materials or workmanship during the Express Warranty Period. This Express Warranty does not extend to any product from which the serial number has been removed or was purchased outside of Australia. - Page 32 No change to the conditions of this Express Warranty is valid unless it is made in writing and signed by an authorised representative of Oricom. Oricom will not be liable under this Express Warranty, and to the extent permitted by law will not be liable for any defect, loss, damage or injury arising out of or in connection with a: 1.
- Page 33 Please note that if a Customer Support Team member advises that your product does not qualify for return, this warranty does not apply to your product. Products that are authorised to be returned to Oricom in Australia must include all of the following: •...
- Page 34 Express Warranty Important Information Repair Notice Please be aware that the repair of your goods may result in the loss of any user generated data (such as stored telephone numbers, text messages and contact information). Please ensure that you have made a copy of any data saved on your goods before sending for repair.
- Page 36 Oricom Support - Australia For all product enquiries, troubleshooting or to discuss the range of Oricom products, feel free to contact Oricom or visit our website for answers to frequently asked questions. (02) 4574 8888 Monday - Friday 8am - 6pm AEST Email: support@oricom.com.au...
Need help?
Do you have a question about the UHF5400 and is the answer not in the manual?
Questions and answers
How to set up a oricom uhf 5400