Table of Contents
Advertisement
Available languages
Available languages
Quick Links
Limited One Year Warranty
T&S warrants to the original purchaser
(other than for purposes of resale) that such
product is free from defects in material and
workmanship for a period of one (1) year
from the date of purchase. During this one-
year warranty period, if the product is found
to be defec ve, T&S shall, at its op ons,
repair and/or replace it. To obtain warranty
service, products must be returned to...
T&S Brass and Bronze Works, Inc.
A n: Warranty Repair Department
2 Saddleback Cove
Travelers Rest, SC 29690
Shipping, freight, insurance, and other
transportation charges of the product
to T&S and the return of repaired or
replaced product to the purchaser are the
responsibility of the purchaser. Repair
and/or replacement shall be made within a
reasonable me a er receipt by T&S of the
returned product. This warranty does not
cover Items which have received secondary
fi nishing or have been altered or modifi ed
a er purchase, or for defects caused by
physical abuse to or misuse of the product,
or shipment of the products.
Any express warranty not provided
herein, and any remedy for Breach of
Contract which might arise, is hereby
excluded and disclaimed. Any implied
warran es of merchantability or fi tness for
a par cular purpose are limited to one year
in dura on. Under no circumstances shall
T&S be liable for loss of use or any special
consequen al costs, expenses or damages.
Some states do not allow limitations
on how long and implied warranty lasts
or the exclusion or limita on of incidental
or consequen al damages, so the above
limita ons or exclusions may not apply to
you. Specifi c rights under this warranty and
other rights vary from state to state.
P/N: 098-005241-45 Rev 5
Date: 01-14-15
Drawn: TEH
Checked: JRM 01-26-15
Approved: JHB 01-26-15
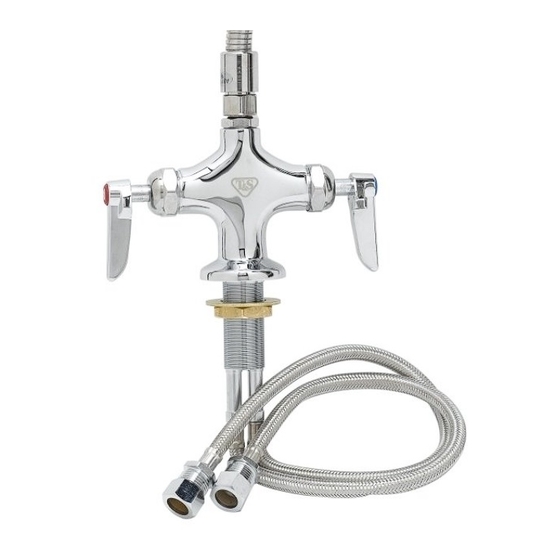
Installation and
Maintenance
Instructions
BASE FAUCET
ASSEMBLY
Deutsch:
Installa ons- und War-
tungsanleitungen
Español:
la Instalación y las
Instrucciones de Man-
tenimiento
Français:
les Instruc ons d'Instal-
la on et d'Entre en
Advertisement
Table of Contents

Related Manuals for T&S B-0102-A


Summary of Contents for T&S B-0102-A
- Page 1 Installation and Maintenance Instructions Limited One Year Warranty T&S warrants to the original purchaser (other than for purposes of resale) that such product is free from defects in material and workmanship for a period of one (1) year from the date of purchase. During this one- year warranty period, if the product is found to be defec ve, T&S shall, at its op ons, repair and/or replace it.
-
Page 2: Exploded View
Exploded View... -
Page 3: Part Number Guide
Part Number Guide Base Faucet Assembly Base Faucet Asm, Spindle LH - Eterna with Spring Checks 002711-40 Asm, Spindle LH - Eterna 002713-40 Asm, Spindle RH - Eterna with Spring Checks 002712-40 Asm, Spindle RH - Eterna 002714-40 Washer, Body 002290-45 Locknut, Shank 000965-45... -
Page 4: General Instructions
General Instructions Faucet Installa on: 1. Shut off water supply and drain lines. Drill a hole approximately 1-1/2” diameter in countertop where you are installing no.1. 2. Remove no.5 and no.4 from no.1. 3. Place no.1 through hole in sink, align hot and cold sides parallel to sink line. -
Page 5: Instrucciones Generales
Instrucciones Generales Instalación de la canilla: 1. Cierre el suministro de agua y líneas de drenaje. Perfore un agujero de aproximadamente 3,81 cm de diámetro en el mostrador donde va a instalar el no. 1. 2. Remueva el no. 5 y el no. 4 del no. 1. 3. -
Page 6: Instructions Générales
Instructions Générales Installa on du Robinet: 1. Fermez l’arrivée d’eau et vidanger les tuyauteries. Percez un trou d’environ 3,81 cm de diamètre dans le comptoir où vous installez le No. 2. Re rez le No.5. et No.4. du No.1. 3. Placez le No.1. dans le trou de l’évier, alignez les cotés chauds et froids parallèles à... -
Page 7: Allgemeine Anleitungen
Allgemeine Anleitungen Wasserhahn Installa on: 1. Wasserzufuhr ausschalten und Rohre entleeren. An der Stelle in der Arbeitsfl äche, wo Nr. 1 installiert werden soll, wird eine Öff nung mit einem Durchmesser von 3,81 cm gebohrt. 2. Nr. 5 und Nr. 4 von Nr. 1 en ernen. 3. - Page 8 RELATED T&S BRASS PRODUCT LINE B-20K Parts Kit B-0220-LN Deck Mixing Faucet T&S BRASS AND BRONZE WORKS, INC. A fi rm commitment to application-engineered plumbing products 2 Saddleback Cove, P.O. Box 1088, T & S Brass-Europe Travelers Rest, SC 29690 ‘De Veenhoeve’...
-
Page 9: Maintenance Instructions
Installation and Maintenance Instructions Limited One Year Warranty T&S warrants to the original purchaser (other than for purposes of resale) that such product is free from defects in material and workman- ship for a period of one (1) year from the date of purchase. - Page 10 Exploded View...
- Page 11 Grey Grey Part Number Guide PARTS PARTS FOR ANY GREY T&S SPRAY VALVE Ring, Hold Down 000907-45 1,2,3 #27 Washer 010476-45 Body, Spray Valve 000065-40 Grey Handle 001120-45 Nut, Handle 003198-45 Screw, Handle 003199-45 PARTS FOR ANY GREY BONNET ASSEMBLY Bonnet Assembly 002856-40 1,2,3...
- Page 12 Blue Blue Part Number Guide PARTS PARTS FOR ANY BLUE T&S SPRAY VALVE Ring, Hold Down 000907-45 4,5,6,7 #27 Washer 010476-45 Body, Spray Valve 000065-40 Blue Handle 011454-45 Nut, Handle 003198-45 Screw, Handle 003199-45 PARTS FOR ANY BLUE BONNET ASSEMBLY Bonnet Assembly 010594-40 4,5,6,7...
- Page 13 General Instructions 8. For EB-0107/UK-0107 & B-0107 To replace worn parts: ONLY: To replace no.9, unscrew 1. Shut off water supply and drain no.11 and disassemble. Make sure lines. For ease of disassembly and the groove side of no.9 fi ts over reassembly, the handle grip can be no.8, and no.10 rest on ridge side.
- Page 14 RELATED T&S BRASS PRODUCT LINE B-0108 JeTSpray Spray Valve B-0108-C JeTSpray Low Flow Spray Valve T&S BRASS AND BRONZE WORKS, INC. A fi rm commitment to application-engineered plumbing products 2 Saddleback Cove, P.O. Box 1088, T & S Brass-Europe Travelers Rest, SC 29690 ‘De Veenhoeve’...
-
Page 15: Installation And Maintenance Instructions
Installation and Maintenance Instructions Limited One Year Warranty T&S warrants to the original purchaser (other than for purposes of resale) that such product is free from defects in material and workmanship for a period of one (1) year from the date of purchase. During this one-year warranty period, if the product is found to be defective, T&S shall, at its options, repair and/ or replace it. - Page 16 Exploded View * Some items are listed for instructional purposes and may not be sold as separate parts.
- Page 17 Part Number Guide Faucet Assembly Asm, Faucet (Rigid) 002829-40 Faucet Body (Rigid) Asm, Coupling Flange 002893-40 Washer 001019-45 Asm, Cartridge LH, w/Spring Checks 002711-40 RH, w/Spring Checks 002712-40 Handle, Lever - Hot 001637-45 Handle, Lever - Cold 001636-45 Index, Button Hot (Red) 001661-45 Cold (Blue)
- Page 18 Part Number Guide - con’t Nozzle Assembly Asm, Nozzle Swing Nozzle, 6” 059X Nozzle, 12” 062X Nozzle, 18” 065X Repair Kit*** 011643-45 "O"-Ring Sleeve, Swivel Swivel Piece Washer, Swivel Piece Nut, Swivel ***Repair kit includes items #16 and #17.
- Page 19 General Instructions Nozzle Installation: Note: Nozzles should be installed first. See diagram below: If installing to an existing rigid pre- Enlarged View rinse unit or base faucet Faucet Installation: 1. Shut off water supply and drain lines. Remove no.21 from no.2. 1.
- Page 20 General Instructions Installation of Control Valve: 1. Apply Teflon tape on threaded ends of no.21. Place no.21 into no.22, tighten by hand. Apply loctite on no.26, insert between no.22 and no.27, tighten no.27 with a wrench. 2. Apply Teflon tape or pipe joint compound to no.21 and place into no.11 and tighten by hand.
-
Page 21: Instrucciones Generales
Instrucciones Generales Instalación de la boquilla: Nota: Las boquillas deben de ser instaladas primero. Vea el diagrama abajo: Vista Ampliada Si esta instalando a una unidad existente rígida de pre-enjuage o a la Instalación de la Canilla: base de una canilla 1. - Page 22 Instrucciones Generales Instalación de la Válvula de Control: 1. Aplique cinta de Teflon a los extremos con rosca de la parte No.21. Coloque la parte No.21 dentro de la parte No.22, y apriete a mano. Aplique Loctite en la parte No.26, y inserte dentro de las partes No.22 y No.27, Apriete la parte No.27 con una llave.
-
Page 23: Instructions Générales
Instructions Générales L’Installation De L’Ajutage: Noter: Les ajutages devoir être installer au début.Voir le diagramme ci-dessous: La Vue Aggrandie Si vous installer à l’ élément Prérinçage existant ou le robinet L’Installation Du Robinet : de la base 1. Percer (2) deux trous, avec un 1.Fermer la réserve de l’eau et diamètre de 1-1/4”... - Page 24 Instructions Générales Installation de soupape de commande: 1.Appliquer le ruban en Téflon ou le composé pour les tuyaux à l’extrémité de Nº.21 avec les filets. Mettre Nº.21 dans Nº.22 et resserrer par le main . Appliquer le “Loctite” sur Nº.26, insérer entre Nº.22 et Nº.27, resserrer Nº.27 avec une clef anglaise.
-
Page 25: Allgemeine Anleitungen
Allgemeine Anleitungen Installation der Schwenkdüse: Hinweis: Schwenkdüsen sollten als erstes installiert werden. Sehen Sie dazu das Diagramm unten: Vergrößerte Ansicht Falls an einer bereits vorhandenen Installation des Vorspüleinheit oder einem einfachen Wasserhahnes: Wasserhahn installiert wird 1. Bohren Sie (2) zwei Löcher 1. - Page 26 Allgemeine Anleitungen Installation des Kontrollventils: 1. Tragen Sie Teflonband auf die Gewindeenden der Nr. 21 auf. Setzen Sie Nr. 21 in Nr. 22 und ziehen Sie dieses von Hand fest an. Loctite auf Nr. 26 auftragen und zwischen Nr. 22 und Nr. 27 einfügen, dann Nr. 27 mit einem Schraubenschlüssel fest anziehen.
- Page 27 RELATED T&S BRASS PRODUCT LINE B-0175 Wall Mounted Faucet with 12” Swing Nozzle and Spray Unit B-0176 Deck Mounted Faucet with 12” Swing Nozzle and Spray Unit T&S BRASS AND BRONZE WORKS, INC. A firm commitment to application-engineered plumbing products 2 Saddleback Cove, P.O.
Need help?
Do you have a question about the B-0102-A and is the answer not in the manual?
Questions and answers