
Related Manuals for Samsung RF23M8570SR


Summary of Contents for Samsung RF23M8570SR
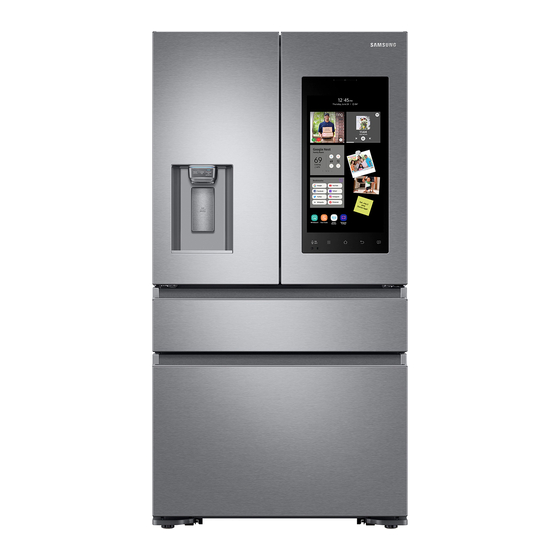
- Page 1 Refrigerator User manual Free Standing Appliance Untitled-1 1 2020-04-09 AM 10:48:47...
-
Page 2: Table Of Contents
Critical disposal warnings Installation Refrigerator at a glance Step-by-step installation Operations User interface SmartThings SMART GRID Function (Demand Response) Recommendations for voice recognition Samsung Family Hub Dispenser panel Special features Maintenance Handling and care Cleaning Replacement English Untitled-1 2 2020-04-09 AM 10:48:47... - Page 3 Troubleshooting General Do you hear abnormal sounds from the refrigerator? SmartThings Samsung Family Hub Smart Grid LIMITED WARRANTY (U.S.A.) SAMSUNG REFRIGERATOR Regulatory Notice FCC Notice IC Notice English 3 Untitled-1 3 2020-04-09 AM 10:48:47...
-
Page 4: Safety Information
• Because the following instructions cover various models, the characteristics of your refrigerator may differ slightly from the refrigerator described in this manual. • If you have any question, contact us at 1-800-SAMSUNG or find help and information online at www.samsung.com. -
Page 5: Important Safety Symbols And Precautions
Important safety symbols and precautions: Please follow all safety instructions in this manual. This manual uses the following safety symbols. WARNING Hazards or unsafe practices that may result in severe personal injury, property damage, and/or death. CAUTION Hazards or unsafe practices that may result in severe personal injury and/or property damage. - Page 6 Safety information • The installation location should not be exposed to direct sunlight and not placed near any electric appliance or heat source, e.g. stove, oven or hob, radiator, etc. • If you use two products side by side, for safety reason, be sure to use certified products in explosive gas atmospheres.
-
Page 7: Severe Warning Signs For Transportation And Site
This appliance is intended to be used in household and similar applications such • staff kitchen areas in shops, offices and other working environments; • farm houses and by clients in hotels, motels and other residential type environments; • bed and breakfast type environments; •... -
Page 8: Critical Installation Warnings
Safety information Critical installation warnings WARNING • Do not install the refrigerator in a damp location or place where it may come in contact with water. - Deteriorated insulation on electrical parts may cause an electric shock or fire. • Do not place this refrigerator in direct sunlight or expose it to the heat from stoves, room heaters, or other appliances. - Page 9 - Deteriorated insulation on electrical parts may cause an electric shock or fire. • If large amounts of dust or water enter the refrigerator, disconnect the power plug and contact a Samsung Electronics service center. - Otherwise there is a risk of fire.
-
Page 10: Installation Cautions
Safety information Installation cautions CAUTION • Allow sufficient space around the refrigerator and install it on a flat surface. - Keep the ventilation space in the appliance enclosure or mounting structure clear of obstructions. • After you have installed the refrigerator and turned it on, allow the appliance to stand for 2 hours before loading it with food. - Page 11 • Do not place or use electrical appliances inside the refrigerator/freezer, unless they are of a type recommended by the manufacturer. • If you smell smoke, pull out the power plug immediately, and then contact a Samsung Electronics service center.
- Page 12 - Failing to do so may result in an electric shock, fire, problems with the product, or injury. • If the interior or exterior LED lamp has gone out, contact your nearest Samsung service center. • If the refrigerator emits a burning smell or smoke, unplug the refrigerator immediately and contact a Samsung service center.
-
Page 13: Usage Cautions
• If you experience difficulty changing a non-LED light, contact a Samsung service center. • If the product is equipped with LED lamps, do not disassemble the Lamp Covers and LED lamps yourself. - Contact a Samsung service center. • Plug the power plug into the wall socket firmly. -
Page 14: Cleaning Cautions
- Printed letters on the display may come off. • If any foreign substance such as water has entered the appliance, unplug the power plug and contact your nearest Samsung service center. - Failing to do so may result in an electric shock or fire. -
Page 15: Critical Disposal Warnings
• Do not use abrasive or harsh cleansers such as window sprays, scouring cleansers, flammable fluids, muriatic acid, cleaning waxes, concentrated detergents, bleaches, or cleansers containing petroleum products on exterior surfaces (doors and cabinet), plastic parts, door and interior liners, and gaskets. - These can scratch or damage the material. -
Page 16: Installation
Installation Follow these instructions carefully to ensure a proper installation of this refrigerator and to prevent accidents before using it. WARNING • Use the refrigerator only for its intended purpose as described in this manual. • Any servicing must be performed by a qualified technician. •... - Page 17 • When a door opens, the interlock switch automatically disables the auger motor of the ice maker for safety reasons. • If the internal or external LED lamp is out of order, contact a local Samsung service center. Door bins Your refrigerator ships with door bins of different types and sizes.
-
Page 18: Step-By-Step Installation
Installation Step-by-step installation STEP 1 Select a site Select a site that: • Has a solid, level surface without carpeting or flooring that may obstruct ventilation • Is away from direct sunlight • Has adequate room for opening and closing the door •... - Page 19 RF23M857*** Model RF23M859*** RF23M858*** 2" 2" (50 mm) (50 mm) 135° 135° 62” 64” (1575 mm) (1624 mm) " " (333.5 mm) (358 mm) " " (908 mm) (908 mm) 24" 24" (610 mm) (610 mm) " " (64 mm) (64 mm) "...
- Page 20 Installation STEP 2 Flooring If the refrigerator cannot pass through the entrance due to its size, see STEP 3 Door removal for entrance. NOTE To prevent floor damage, make sure the front levelling legs are in the upright position. • The surface you install the refrigerator must support a fully loaded refrigerator.
- Page 21 STEP 3 Door removal for entrance If the refrigerator cannot pass through the entrance to your home or kitchen due to its size, follow these instructions to remove and then re-install the refrigerator's doors. If you do not need to remove the doors, go to page 28 to continue the installation procedure. WARNING Unplug the power cord of the refrigerator before removing the doors.
- Page 22 Installation Detach the fridge doors 1. With the door opened, remove the screws from the top cover. 2. Disconnect the wires and the water tube from the left-side door. Do the following sequentially: • Decouple the connector. • While holding down one end of the water line coupler, disconnect the water tube.
- Page 23 4. Lift straight up to remove the door. • Repeat this step on the other side. CAUTION Do not remove both doors simultaneously. Make sure to remove one door at a time. Otherwise, any of the doors may fall and cause physical injury.
- Page 24 Installation Detach the FlexZone™ drawer 1. Lift up to remove the FlexZone™ basket. 2. Remove the wire cover with harness using a flat-head screwdriver. 3. Press the locking tab to disconnect the wire connector. 4. Remove the hex-head bolt from each side using a socket wrench ( ", 10 mm) or a screwdriver.
- Page 25 5. Lift up to remove the drawer front of the FlexZone™ from the rail assembly. CAUTION • Use caution when removing the rail assembly, which may fall off causing damage to the floor. • Make sure to put the FlexZone™ drawer in place after removing or mounting the FlexZone™...
- Page 26 Installation Detach the freezer drawer 1. Push the upper basket to the end, and then pull up to remove. 2. Pull up to remove the lower basket from the rail assembly. 3. Press down the hooks to unlock the rail assembly.
- Page 27 CAUTION • Make sure you mount the freezer baskets in the right position. Otherwise, the drawer will not open or close properly, which causes frost to build up. • Do not store too much food in the freezer baskets. This prevents the freezer drawer from closing properly, resulting in frost buildup.
- Page 28 Installation STEP 4 Levelling the refrigerator CAUTION • The refrigerator must be levelled on a flat, solid floor. Failing to do so can cause damage to the refrigerator or physical injury. • Levelling must be performed with the refrigerator empty. Make sure no food items are inside the refrigerator.
- Page 29 STEP 5 Adjust the door height and the door gap Snap rings The height of a door can be adjusted using the provided snap rings, which come in 4 different sizes (1 mm, 1.5 mm, 2 mm, and 2.5 mm). To adjust the height of a door 1.
- Page 30 Installation STEP 6 Connect the water dispenser line A water dispenser with a filter is one of the helpful features on your new refrigerator. To help promote better health, the water filter removes unwanted particles from your water. However, it does not sterilize or destroy microorganisms. You may need to purchase a water purifying system to do that.
- Page 31 Connect the water supply line to the refrigerator There are several items you must purchase to complete this connection. You may find these items sold as a kit at your local hardware store. • " copper tubing Copper Tubing • "...
- Page 32 Installation CAUTION • If you use plastic tubing (A), do not use it without the molded end (Bulb). • Leaving the water line disconnected may cause the water valve to produce a buzzing sound over time. If this is the case, make sure that the ice making function is turned “OFF”...
- Page 33 STEP 7 Initial settings By completing the following steps, the refrigerator should be fully functioning. CAUTION Before installing the refrigerator, make sure to remove the Cover Interlock (1) from the top of the fridge door. Otherwise, injuries may be caused by the ice crushing blade.
-
Page 34: Operations
Operations User interface NOTE • For detailed information about the refrigerator's functions, and apps, see the on-screen user manual available on the LCD display of your refrigerator. • The content of apps and widgets, or their design is subject to change. Support for apps and widgets may be discontinued without notice, depending on the content provider’s policy. - Page 35 01 Home screen 01 Apps & Widgets • Tap a desired app or widget to launch • Tap and hold an app or widget to enter Edit mode. A grid appears. In Edit mode, you can drag and drop an app or widget to a new position on the grid.
- Page 36 Operations Indicates there is a notification message. Notification ( ) Cloud sync ( ) Indicates Family Hub is receiving data from the cloud server. 02 Task bar Tap to turn on or off the voice recognition function. 01 Microphone The microphone icon turns red when it is turned off.
- Page 37 Fridge Manager On the Home screen, tap the Fridge Manager app. • You can set the desired temperature or modes for each compartment. • For more detailed information on the Fridge Manager app, check the online manual. • To access the online manual from your Family Hub refrigerator, tap Setting > Help & Contact Us >...
-
Page 38: Smartthings
SmartThings Installation Visit the Google Play Store, Galaxy Apps, or Apple App Store and search for “SmartThings”. Download and install the SmartThings app provided by Samsung Electronics to your smart device. NOTE • The SmartThings app is not available for some tablet and iPad and some smartphone. - Page 39 Samsung account You are required to register your Samsung account to use the app. If you don’t have a Samsung account, follow the app’s onscreen instructions to create a free Samsung account. Getting started Turn on the device you want to connect, open the SmartThings app on your phone, and then follow the instructions below.
- Page 40 Operations Category Item Description You can turn the ice making function on or off, and check the current settings of the function. Ice making You can also check the status and progress of ice making. You can turn Power Cool on or off, and check Power Cool the current settings.
-
Page 41: Smart Grid Function (Demand Response)
SMART GRID Function (Demand Response) When the refrigerator operates in SMART GRID (Demand Response) mode, the Energy Management Refrigerator function can control energy usage or delay the operation of some functions to save money when energy prices or demand are the highest. NOTE •... - Page 42 Operations • Temporary Appliance Load Reduction (L4): The refrigerator responds to a TALR signal by aggressively reducing the load for a short time period. This function reduces energy consumption by stopping the compressor and controlling the functions that consume a lot of energy such as the defrost cycle and making ice.
- Page 43 Using the Energy Management Function The Energy Management function enables you to control and monitor your Energy Management refrigerator using the SmartThings app for your convenience. NOTE • To use the Energy Management refrigerator functions, you have to install the corresponding app first.
- Page 44 1. SGIP Open Standards (Smart Energy Profile 2.0 - http://www.csep.org/) - Energy Consumption Reporting - Demand Response 2. Samsung OPEN API - Operational Status, User Settings & Messages - ICE Maker Status: GET /icemaker/status/vs/0 - Door Open Alarm: GET /doors/vs/0...
-
Page 45: Recommendations For Voice Recognition
Family Hub”. Download and install the Samsung Family Hub app provided by Samsung Electronics to your smart device. NOTE • The Samsung Family Hub app is not available for some tablet and iPad and some smartphone. - support that [Android] OS 6.0 or higher(minimum 2GB RAM Size) - support that [iOS]10.0 or higher/iPhone6 or higher. - Page 46 Operations Samsung account You are required to register your Samsung account to use the app. If you don’t have a Samsung account, follow the app’s onscreen instructions to create a free Samsung account. NOTE To connect your smartphone and the refrigerator, register your Samsung account in Settings ...
-
Page 47: Dispenser Panel
Dispenser panel 01 Water / Lock 02 Cubed Ice 03 Crushed Ice / Lighting 04 Dispenser mood light 01 Water / Lock (3 sec) To dispense chilled water, press Water. The corresponding Water indicator turns on. To prevent use of the dispenser panel buttons and the dispenser Lock lever, press and hold Water for more than 3 seconds. - Page 48 Operations 03 Crushed Ice / Lighting (3 sec) Press Crushed Ice to dispense crushed ice. The corresponding Crushed Ice indicator turns on. By default, the dispenser lamp turns on only when the dispenser is used. To keep the dispenser lamp turning on, press and hold Lighting Crushed Ice for 3 seconds.
-
Page 49: Special Features
Special features Water tank (Auto Water Fill) The Auto Water Fill function lets you enjoy cold brewed tea in your refrigerator. 01 Lid 02 Sealed mouth 03 Infuser 04 Body To fill the water tank 1. Grasp a handle groove of the sealed mouth, and then pull up to open the lid. - Page 50 Operations 5. To drink tea, open the door and detach the water tank. Pull it straight out. CAUTION • We recommend consuming fruit infused water within 24 hours. After that, the infused water can spoil over time. • You must clean the water tank after you have consumed up the infused water or when a long time has passed without using the water tank.
- Page 51 However, if the "Overflowing" status remains, there could be a system failure. Contact your local Samsung service center. Water/Ice dispenser Using the dispenser, you can dispense water with or without ice. The water dispenser offers 3 options: chilled water, cubed ice, and crushed ice. To dispense chilled water, press Water on the dispenser panel.
- Page 52 Operations To dispense water with ice 1. With the Ice Maker enabled, press Cubed Ice or Crushed Ice to select the ice type. 2. Put a water glass under the dispenser, and then push the dispenser lever with the glass. Ice will be dispensed from the dispenser.
- Page 53 CAUTION • If the ice making chime rings repeatedly, contact your waterline installer or a local Samsung service center. • Do not press Test repeatedly after the ice tray is filled with ice or water. Water may overflow or ice may jam.
- Page 54 Operations FlexZone™ divider You can change the divider position. To do this, unlock the divider by turning the divider dial counter clockwise. Then, move the width and height bars as appropriate. When done, turn the dial clockwise to lock the divider. NOTE If the divider lock does not function, wipe the bars to remove moisture on them.
-
Page 55: Maintenance
Maintenance Handling and care Ice bucket If you do not dispense ice for an extended period, ice may form clumps inside the bucket. If this happens, remove and empty the ice bucket. 1. While grabbing the handle of the ice bucket, slightly lift up the bucket, and then remove it to the front. - Page 56 Maintenance If the ice bucket is not firmly inserted, turn the ice screw 90 degrees, and then try again. CAUTION • Do not apply excessive force to the bucket cover. The cover may break. • Do not forcefully close the door. Water may spill over the ice maker. •...
- Page 57 Auto Water Fill 1. Grasp a handle groove of the sealed mouth, and then pull up to remove. 2. Grasp both sides of the sealed mouth, and then lift to remove. 3. While slightly twisting the infuser, pull it out of the sealed mouth. 4.
- Page 58 Maintenance Fridge shelves The appearance of the shelves differs by model. • To remove a shelf, fully open the corresponding door. Hold the front of the shelf, and then gently lift up and slide out. NOTE Do not lift up the shelf fully when removing or reinserting the shelf.
- Page 59 Foldable shelf To remove, slide up the front of the shelf so that it folds. Then gently lift up and pull out. To reinsert, place the shelf on the angled frame in the main unit, and then, press down to unfold. CAUTION After sliding the foldable shelf in and folding it, the front of the shelf can be...
- Page 60 Maintenance Vegetable shelf 1. Slide out the left-side vegetable drawer. 2. Fully open the door, and then remove the shelf. 3. While supporting the vegetable shelf with one hand, slide it out with the other hand. NOTE To use the space that is opened up after removing the foldable shelf, take out the vegetable shelf.
- Page 61 Door bins • To remove the top door bin, hold the front sides of the bin, and then gently lift up to remove. • To reinsert, insert the door bin slightly above its final location making sure that the back of the bin is against the door. Hold the rear of the door bin with both hands, and then press down so that it fits snugly.
- Page 62 Maintenance Fridge drawers Vegetable / fruit drawers Gently lift up the front of the drawer and slide out. • We recommend that you remove the door bins before removing the drawer. This is to prevent damage to the door bins. •...
- Page 63 3. As the divider has the width and length bars, push the lower part of each bar inward to unlock. See the figures for details. 4. Hold the divider and pull up to remove. 5. Turn over the basket to remove the metal cooling plate.
- Page 64 Maintenance Freezer baskets Upper basket • To remove, fully slide open the freezer drawer. Push the upper basket to the end, and then pull up to remove. • To reinsert, align the front wheels of the upper basket with the end of the lower basket.
-
Page 65: Cleaning
Cleaning Interior and exterior WARNING • Do not use benzene, thinner, home/car detergent, or Clorox™ to clean the refrigerator. They may damage the surface of the refrigerator and cause a fire. • Do not spray water onto the refrigerator. This may cause electric shock. Regularly use a dry cloth to remove all foreign substances such as dust or water from the power plug terminals and contact points. - Page 66 Maintenance Inner-view camera NOTE Use a cotton swab or microfiber cloth to clean the camera on the left-side door of the fridge. Rear panel To keep cords and exposed parts of the rear panel free of dirt, vacuum the panel once or twice a year.
-
Page 67: Replacement
• Do not use third-party water filters. Use only Samsung-provided or -approved filters. • Unapproved filters may leak and damage the refrigerator, causing electric shock. Samsung is not responsible for any damage that may occur from use of third-party water filters. - Page 68 Maintenance 3. Insert a new filter cartridge. Use only Samsung-provided or approved filters. 4. Turn the cartridge knob clockwise to lock into place. 5. On the Home screen, tap Fridge Manager > Fridge Settings > Water Filter, and then select RESET. The filter indicator turns off.
- Page 69 To purchase a new water filter, contact a local Samsung service center. LED Lamps To replace the lamps of the refrigerator, contact a local Samsung service center. WARNING • The lamps are not user-serviceable. Do not attempt to replace a lamp yourself. This can cause electric shock.
- Page 70 Troubleshooting Before calling for service, review the checkpoints below. Any service calls regarding normal situations (No Defect Cases) will be charged to users. General Temperature Symptom Possible causes Solution • Power cord is not plugged • Properly plug in the power in properly.
- Page 71 Symptom Possible causes Solution • To prevent condensation from forming, the refrigerator has heat-proof piping in the front corners. If the ambient temperature rises, this equipment may • Refrigerator has heat-proof not work effectively. This is Interior wall is hot. piping in the interior wall.
- Page 72 Troubleshooting Condensation Symptom Possible causes Solution • Remove the moisture and • If door is left open, moisture do not leave a door open enters the refrigerator. for extended periods of Condensation forms time. on the interior walls. • Food with high moisture •...
- Page 73 Water does not dispense. • Dispenser Lock is activated. • Deactivate dispenser Lock. • Use only Samsung-provided or approved filters. • A third-party water filter • Unapproved filters may was installed. leak and damage the refrigerator.
- Page 74 Troubleshooting Do you hear abnormal sounds from the refrigerator? Before calling for service, review the checkpoints below. Any service calls related to normal sounds will be charged to the user. These sounds are normal. • When starting or ending an operation, the refrigerator may make sounds similar to a car engine ignition.
- Page 75 • As the refrigerator cools or freezes, refrigerant gas moves through sealed pipes, causing bubbling sounds. Bubbling! • As the refrigerator temperature increases or decreases, plastic parts contract and expand, creating knocking noises. These noises occur during the defrosting cycle or when electronic parts are working.
- Page 76 • The old Samsung Smart Refrigerator app cannot connect with fails to operate. Samsung Smart Home models. • You must log into your Samsung account to use the app. The SmartThings app • Make sure that your router is operating normally.
- Page 77 Samsung Family Hub Symptom Action • The Samsung Family Hub app is not available for some tablet Could not find and iPad and some smartphone. “Samsung Family - support that [Android] OS 6.0 or higher(minimum 2GB Hub” in the app RAM Size) market.
- Page 78 Management System) supporting SEP (Smart Energy profile). • Download the SmartThings app from the Google Play Store, Apple App Store, or Samsung Galaxy Apps. • Install and run the SmartThings app on your smartphone. • Make sure that your home router is operating normally with proper Internet service and connection.
- Page 79 Symptom Action • This refrigerator can connect only with Samsung Smart TV Launched in 2015~17 : J/K/MU6400 series or above. Launched in 2018 : NU7400 series or above, Launched in Cannot connect to my 2018 : Q60R series or above. Please check the model name of your TV first.
- Page 80 If the product is located in an area where service by a SAMSUNG authorized servicer is not available, you may be responsible for a trip charge or required to bring the product to a SAMSUNG authorized service center for service.
- Page 81 Visits by an authorized servicer to explain product functions, maintenance or installation are not covered by this limited warranty. Please contact SAMSUNG at the number below for assistance with any of these issues. EXCLUSION OF IMPLIED WARRANTIES...
- Page 82 PROFITS, FAILURE TO REALIZE SAVINGS OR OTHER BENEFITS REGARDLESS OF THE LEGAL THEORY ON WHICH THE CLAIM IS BASED, AND EVEN IF SAMSUNG HAS BEEN ADVISED OF THE POSSIBILITY OF SUCH DAMAGES. Some states do not allow exclusion or limitation of incidental or consequential damages, so the above limitations or exclusions may not apply to you.
- Page 83 Regulatory Notice FCC Notice FCC CAUTION: Any changes or modifications not expressly approved by the party responsible for compliance could void the user’s authority to operate the equipment. Contains Transmitter Module FCC ID: A3LWCM730Q This device complies with Part 15 of FCC Rules. Operation is Subject to the following two conditions: (1) This device may not cause harmful interference, and (2) This device must accept any interference received including interference that cause...
- Page 84 Regulatory Notice IC Notice Contains Transmitter Module IC: 649E-WCM730Q The term “IC” before the radio certification number only signifies that Industry Canada technical specifications were met. Operation is subject to the following two conditions : (1) this device may not cause interference, and (2) this device must accept any interference, including interference that may cause undesired operation of the device.
- Page 85 Applied Rules Samsung Electronics Co., Ltd. Manufacturer (Maetan dong) 129, Samsung-ro, Yeongtong-Gu, Suwon-Si, Gyeonggi-Do 16677 Korea We hereby declare that the equipment bearing the trade name and model number specified above was tested conforming to the applicable FCC Rules under the most...
- Page 86 Memo Untitled-1 86 2020-04-09 AM 10:49:18...
- Page 87 Memo Untitled-1 87 2020-04-09 AM 10:49:18...
- Page 88 How-to Videos and Live Shows * Requires reader to be installed on your smartphone Contact SAMSUNG WORLD WIDE If you have any questions or comments relating to Samsung products, please contact the SAMSUNG Customer Care Center. Country Contact Center Web Site 1-800-SAMSUNG (726-7864) U.S.A...
- Page 89 Refrigerador Manual del usuario Electrodoméstico independiente Untitled-2 1 2020-04-09 AM 10:54:24...
- Page 90 Descripción breve del refrigerador Instalación paso a paso Funcionamiento Interfaz del usuario SmartThings Función SMART GRID (Respuesta a la demanda) Recomendaciones relativas al reconocimiento de voz Samsung Family Hub Panel del dispensador Funciones especiales Mantenimiento Manipulación y cuidado Limpieza Reemplazo Español...
- Page 91 Solución de problemas General ¿Se oyen ruidos anómalos procedentes del refrigerador? SmartThings Samsung Family Hub Smart Grid GARANTÍA LIMITADA (EE.UU.) REFRIGERADOR SAMSUNG Aviso regulatorio Aviso de la FCC (Federal Communications Commission) Aviso de la IC Español 3 Untitled-2 3 2020-04-09 AM 10:54:25...
-
Page 92: Información Sobre Seguridad
Información sobre seguridad Antes de utilizar su nuevo refrigerador Samsung, lea detenidamente este manual a fin de aprender a usar las funciones que ofrece de manera segura y eficiente. Qué debe saber sobre las instrucciones de seguridad • Este electrodoméstico no debe ser utilizado por personas (incluidos niños) con capacidades mentales, sensoriales o físicas reducidas, o por personas que carezcan de experiencia y de conocimientos, a... -
Page 93: Símbolos Y Advertencias De Seguridad Importantes
Símbolos y advertencias de seguridad importantes: Sírvase seguir todas las instrucciones de seguridad del presente manual. En el presente manual se utilizan los siguientes símbolos de seguridad. ADVERTENCIA Riesgos o prácticas inseguras que pueden causar graves lesiones personales, daños a la propiedad y/o incluso la muerte. - Page 94 Información sobre seguridad • Si coloca dos productos uno junto al otro, por razones de seguridad, asegúrese de utilizar productos certificados en atmósferas de gas explosivas. • Nunca debe poner en marcha un electrodoméstico que presente signos de haber sido dañado. Si tiene alguna inquietud, consulte a su distribuidor.
-
Page 95: Señales De Advertencia Importantes Para El Transporte Y El Emplazamiento
Este electrodoméstico está diseñado para uso doméstico y en lugares como • zonas de cocina de tiendas, oficinas y otros entornos de trabajo • granjas y zonas de uso de los clientes en hoteles, moteles u otros entornos de tipo residencial •... -
Page 96: Advertencias Muy Importantes Para La Instalación
Información sobre seguridad Advertencias muy importantes para la instalación ADVERTENCIA • No instale el refrigerador en un lugar húmedo o donde pueda entrar en contacto con agua. El aislamiento deficiente de las piezas eléctricas puede provocar una descarga eléctrica o un incendio. - Page 97 • Si ingresaran grandes cantidades de polvo o agua al refrigerador, desenchufe el cable de alimentación y comuníquese con un Centro de Servicio de Samsung Electronics. Si no lo hace, existe el riesgo de que se produzca un incendio. •...
-
Page 98: Precauciones Para La Instalación
Información sobre seguridad Precauciones para la instalación PRECAUCIÓN • Deje espacio suficiente alrededor del refrigerador e instálelo sobre una superficie plana. Mantenga libre de obstáculos el espacio de ventilación en el gabinete o la estructura de montaje del electrodoméstico. • Una vez que haya instalado el refrigerador y lo haya encendido, permita que funcione durante 2 horas antes de cargarlo con alimentos. - Page 99 • Si ingresaran grandes cantidades de polvo o agua al refrigerador, desenchufe el cable de alimentación y comuníquese con el Centro de Servicio de Samsung Electronics. Si no lo hace, existe el riesgo de que se produzca un incendio. •...
- Page 100 • En caso de sentir olor a quemado o a humo en el refrigerador, desenchúfelo de inmediato y comuníquese con un Centro de Servicio Samsung. No seguir esta recomendación podría causar una descarga eléctrica o un incendio. • Desenchufe el refrigerador antes de cambiar las lámparas internas.
-
Page 101: Precauciones De Uso
• Garantía de servicio y modificación. El servicio de garantía de Samsung no cubre los cambios o las modificaciones realizadas por un tercero a este electrodoméstico; Samsung tampoco es responsable de los problemas relacionados con la seguridad que puedan surgir a causa de modificaciones hechas por terceros. -
Page 102: Precauciones Para La Limpieza
Las letras impresas en el visor pueden borrarse. • Si cualquier sustancia extraña, tal como agua, ingresa en el refrigerador, desenchúfelo y comuníquese con su Centro de Servicio Samsung más cercano. No seguir esta recomendación podría causar una descarga eléctrica o un incendio. •... -
Page 103: Advertencias Muy Importantes Para La Eliminación De Residuos
• No utilice limpiadores abrasivos ni muy fuertes, como limpiacristales, limpiadores corrosivos, líquidos inflamables, ácido clorhídrico, ceras limpiadoras, detergentes concentrados, blanqueadores o limpiadores que contengan petróleo en las superficies externas (puertas y paneles), piezas de plástico, revestimientos de puertas e interiores y juntas. Pueden rayar o dañar el material. -
Page 104: Instalación
Instalación Siga las instrucciones cuidadosamente a fin de garantizar la instalación adecuada del refrigerador y de evitar accidentes antes de utilizarlo. ADVERTENCIA • Utilice el refrigerador solamente para su uso previsto como se describe en este manual. • Todas las reparaciones deben estar a cargo de un técnico calificado. •... - Page 105 • Si la lámpara LED interna o externa no funcionan, comuníquese con un centro de servicio Samsung. Compartimientos de las puertas Su refrigerador se despacha con compartimientos de las puertas de distintos tipos y tamaños. Si los compartimientos de las puertas de su refrigerador se embalaron por separado, utilice la siguiente figura como guía para colocar los compartimentos correctamente.
-
Page 106: Instalación Paso A Paso
Instalación Instalación paso a paso PASO 1 Seleccione un lugar Seleccione un lugar que: • Tenga una superficie sólida, nivelada sin alfombrado ni pisos que puedan obstruir la ventilación • Esté alejado de la luz solar directa • Cuente con el lugar adecuado para abrir y cerrar la puerta •... - Page 107 RF23M857*** Modelo RF23M859*** RF23M858*** 2" 2" (50 mm) (50 mm) 135° 135° 62” 64” (1575 mm) (1624 mm) " " (333.5 mm) (358 mm) " " (908 mm) (908 mm) 24" 24" (610 mm) (610 mm) " " (64 mm) (64 mm) "...
- Page 108 Instalación PASO 2 Piso Si el refrigerador no pasa por la puerta por su tamaño, consulte PASO 3 Extracción de la puerta para la entrada. NOTA Para evitar que se dañe el piso, asegúrese de que las patas de nivelación delanteras estén en posición vertical.
- Page 109 PASO 3 Extracción de la puerta para la entrada Si el refrigerador no pasa por la entrada de su casa o de la cocina por una cuestión de tamaño, siga estas instrucciones para extraer y colocar nuevamente las puertas del refrigerador. Si no necesita retirar las puertas, vaya a la página 28 para continuar con el procedimiento de instalación.
- Page 110 Instalación Retire las puertas del refrigerador 1. Con la puerta abierta, retire los tornillos de la cubierta superior. 2. Desconecte los cables y el tubo de agua de la puerta izquierda. Haga lo siguiente en orden: • Desconecte el conector. •...
- Page 111 4. Levante la puerta en línea recta para retirarla. • Repita este paso del otro lado. PRECAUCIÓN No retire ambas puertas simultáneamente. Asegúrese de retirar una puerta por vez. De lo contrario, alguna podría caerse y provocar lesiones. 5. Retire la bisagra del medio. •...
- Page 112 Instalación Retire el cajón FlexZone™ 1. Levante la cesta FlexZone™ para retirarla. 2. Retire la cubierta del cable con arnés con un destornillador plano. 3. Presione la pestaña de bloqueo y desenchufe el conector del cable. 4. Retire el perno de cabeza hexagonal de cada lado con una llave de tubo ( ", 10 mm) o un destornillador.
- Page 113 5. Levante el frente del cajón de FlexZone™ para retirarlo del conjunto de riel. PRECAUCIÓN • Tenga cuidado al retirar el conjunto de riel, ya que podría caerse y dañar el piso. • Asegúrese de colocar el cajón FlexZone™ en su lugar antes de retirar o instalar la cesta FlexZone™.
- Page 114 Instalación Retire el cajón del congelador 1. Empuje la cesta superior hasta el final y luego levántela para quitarla. 2. Tire de la cesta inferior para retirarla del conjunto de riel. 3. Presione los ganchos para desbloquear el conjunto de riel. 4.
- Page 115 PRECAUCIÓN • Asegúrese de instalar las cestas del congelador en la posición correcta. De lo contrario, el cajón no se podrá abrir ni cerrar correctamente, lo que provocará la acumulación de escarcha. • No almacene demasiados alimentos en las cestas del congelador. Esto hará que el cajón del congelador no se cierre correctamente y se acumule escarcha.
- Page 116 Instalación PASO 4 Nivelación del refrigerador PRECAUCIÓN • El refrigerador debe estar sobre un piso plano y sólido. No hacerlo puede provocar daños al refrigerador o lesiones personales. • La nivelación debe realizarse con el refrigerador vacío. Asegúrese de que no haya alimentos dentro del refrigerador.
- Page 117 PASO 5 Ajuste de la altura de la puerta y del espacio de la puerta Anillos elásticos Es posible ajustar la altura de la puerta mediante los anillos elásticos provistos que vienen en 4 tamaños diferentes (1 mm, 1.5 mm, 2 mm y 2.5 mm).
- Page 118 Instalación PASO 6 Conectar la tubería del dispensador de agua El dispensador de agua con filtro es una de las funciones útiles de su nuevo refrigerador. Con el fin de promover la buena salud, el filtro de agua elimina las partículas no deseadas del agua. No obstante, no la esteriliza ni destruye los microorganismos.
- Page 119 Conecte la tubería de suministro de agua al refrigerador Para llevar a cabo la conexión, necesita adquirir varios elementos. Posiblemente su ferretería local los venda todos juntos en un equipo. • Tubería de cobre de " Tubería de cobre • Tuerca de compresión de "...
- Page 120 Instalación PRECAUCIÓN • Si utiliza una tubería de plástico (A), no la use sin el extremo moldeado (bulbo). • Dejar la tubería de agua desconectada puede causar que con el tiempo la válvula de agua emita un zumbido. En este caso, asegúrese de desactivar la fábrica de hielo colocándola en “OFF” y no intente usar el dispensador de agua.
- Page 121 PASO 7 Configuración inicial Al completar los siguientes pasos, el refrigerador quedará en perfectas condiciones de funcionamiento. PRECAUCIÓN Antes de instalar el refrigerador, asegúrese de retirar la cubierta protectora (1) de la parte superior de la puerta del refrigerador. De lo contrario, podrían producirse lesiones con la cuchilla trituradora de hielo.
-
Page 122: Funcionamiento
Funcionamiento Interfaz del usuario NOTA • Para obtener una información detallada de las funciones y aplicaciones del refrigerador, consulte el manual de usuario en pantalla disponible en el visor LCD de su refrigerador. • El contenido de las aplicaciones y widgets, así como su diseño, están sujetos a modificaciones. El soporte técnico para aplicaciones y widgets puede interrumpirse sin aviso dependiendo de la política del proveedor de contenidos. - Page 123 01 Pantalla de Inicio 01 Aplicaciones y widgets • Toque la aplicación o el widget deseado para iniciarlo. • Mantenga presionada la aplicación o el widget para ingresar al modo de edición. Aparece una cuadrícula. En el modo Editar, puede arrastrar y soltar una aplicación o un widget en una nueva ubicación de la cuadrícula.
- Page 124 Funcionamiento Indica que hay un mensaje de notificación. Notificaciones ( ) Sincronización de nube Indica que Family Hub está recibiendo datos del servidor de nube. 02 Barra de tareas Toque para activar o desactivar la función de reconocimiento de voz. 01 Micrófono El icono del micrófono se pone rojo cuando está...
- Page 125 Administrador del refrigerador En la pantalla de Inicio, toque la aplicación Fridge Manager (Administrador del refrigerador). • Puede configurar la temperatura o modo deseados para cada compartimiento. • Consulte el manual en línea para obtener más información sobre la aplicación Fridge Manager (Administrador del refrigerador).
-
Page 126: Smartthings
Internet para recibir asistencia técnica. • La configuración de firewall de su sistema de red puede impedir que su Samsung Smart Refrigerator acceda a Internet. Comuníquese con su proveedor de servicios de Internet para recibir asistencia técnica. - Page 127 Cuenta Samsung Debe registrar su cuenta Samsung para utilizar la aplicación. Si no tiene una cuenta Samsung, siga las instrucciones en pantalla de la aplicación para crear una cuenta Samsung gratuita. Cómo comenzar Encienda el dispositivo que desea conectar, abra la aplicación SmartThings en su teléfono y siga las instrucciones que figuran a continuación.
- Page 128 Funcionamiento Categoría Elemento Descripción Puede activar o desactivar esta función y verificar su configuración actual. Fabricación de hielo También puede consultar el estado y avance de la fabricación de hielo. Puede activar o desactivar la función de refrigeración Refrigeración rápida rápida y ver la configuración actual.
-
Page 129: Función Smart Grid (Respuesta A La Demanda)
Función SMART GRID (Respuesta a la demanda) Cuando el refrigerador opera en modo SMART GRID (respuesta a la demanda), la función de gestión de energía del refrigerador permite controlar el uso de la energía o demorar algunas funciones para ahorrar dinero cuando el precio de la energía o la demanda son más elevados. - Page 130 Funcionamiento Para verificar la dirección MAC 1. Toque el icono Ajustes en la pantalla de Inicio. 2. Desplácese hacia abajo hasta Acerca del dispositivo y ábralo. 3. La pantalla muestra (entre otras cosas) la dirección MAC de Wi-Fi. Modo de anulación Cuando desee que el refrigerador ignore la señal SMART GRID (respuesta a la demanda) de la compañía de servicio eléctrico, puede activar el modo OVERRIDE (ANULAR).
- Page 131 Uso de la función de gestión de energía La función de gestión de energía permite controlar y supervisar con mayor comodidad el refrigerador Energy Management mediante la aplicación SmartThings. NOTA • Para usar las funciones del refrigerador Energy Management, en primer lugar debe instalar la aplicación correspondiente.
- Page 132 1. SGIP Open Standards (Smart Energy Profile 2.0 http://www.csep.org/) Informe del consumo de energía Respuesta a la demanda 2. Samsung OPEN API Estado de funcionamiento, ajustes del usuario y mensajes Estado de la fabricación de hielo: GET /icemaker/status/vs/0 Alarma de puerta abierta: GET /doors/vs/0...
-
Page 133: Recomendaciones Relativas Al Reconocimiento De Voz
3 pies (1 metro) o si habla demasiado bajo. Samsung Family Hub Instalación Visite Google Play Store, Galaxy Apps o Apple App Store y busque “Samsung Family Hub”. Descargue e instale la aplicación Samsung Family Hub provista por Samsung Electronics en su dispositivo inteligente. NOTA •... - Page 134 Funcionamiento Cuenta Samsung Debe registrar su cuenta Samsung para utilizar la aplicación. Si no tiene una cuenta Samsung, siga las instrucciones en pantalla de la aplicación para crear una cuenta Samsung gratuita. NOTA Para conectar el teléfono inteligente y el refrigerador, registre su cuenta Samsung en Ajustes Perfil.
-
Page 135: Panel Del Dispensador
Panel del dispensador 01 Water (Agua) / Lock (Bloqueo) 02 Cubed Ice (Hielo en cubos) 03 Crushed Ice (Hielo triturado) / Lighting (Luz) 04 Luz ambiente del dispensador 01 Agua / Bloqueo (3 s) Para dispensar agua fría presione Water (Agua). Se enciende el indicador Water (Agua) correspondiente. - Page 136 Funcionamiento 03 Hielo triturado / Luz (3 s) Crushed Ice (Hielo Presione Crushed Ice (Hielo triturado) para dispensar hielo triturado. Se triturado) enciende el indicador correspondiente. En forma predeterminada, la luz del dispensador se enciende únicamente cuando se lo utiliza. Para mantener la luz del dispensador encendida, Lighting (Luz) mantenga Crushed Ice (Hielo triturado) presionado durante 3 segundos.
-
Page 137: Funciones Especiales
Funciones especiales Tanque de agua (Llenado automático de agua) La función de llenado automático de agua le permite disfrutar de té frío preparado en el refrigerador. 01 Tapa 02 Boca sellada 03 Infusor 04 Cuerpo Para llenar el tanque de agua 1. - Page 138 Funcionamiento 5. Para beber té, abra la puerta y retire el tanque de agua. Tire de este en línea recta. PRECAUCIÓN • Se recomienda consumir el agua infusionada de frutos antes de que transcurran 24 horas. Después de este tiempo, el agua infusionada se puede estropear. •...
- Page 139 "Desbordamiento" permanece, puede deberse a una falla del sistema. Comuníquese con el Centro de Servicio Samsung local. Dispensador de agua/hielo Usando el dispensador, puede obtener agua con o sin hielo. El dispensador de agua ofrece 3 opciones: agua fría, hielo en cubos y hielo triturado. Para dispensar agua fría, presione Agua en el panel del dispensador.
- Page 140 Funcionamiento Para dispensar agua con hielo 1. Con la fábrica de hielo activada, presione Hielo en cubos o Hielo triturado para seleccionar el tipo de hielo. 2. Coloque un vaso para agua bajo el dispensador y presione la palanca del dispensador con el vaso.
- Page 141 • Si la señal sonora de fabricación de hielo suena repetidamente, comuníquese con el instalador de la tubería de agua o un Centro de Servicio Samsung local. • No presione el botón Prueba continuamente una vez que la charola de hielo esté llena de hielo o agua.
- Page 142 Funcionamiento Separador de FlexZone™ Puede modificar la posición del separador. Para ello, destrabe el separador girando el dial del separador en el sentido contrario al de las agujas del reloj. Luego, mueva las barras de ancho y alto según corresponda. Cuando termine, gire el dial en el sentido de las agujas del reloj para trabar el separador.
-
Page 143: Mantenimiento
Mantenimiento Manipulación y cuidado Cubeta de hielo Si no sirve hielo durante un período prolongado, el hielo puede apelmazarse en la cubeta. Si esto ocurriera, retire y vacíe la cubeta de la fábrica de hielo. 1. Sosteniendo la manija de la cubeta de hielo, levante la cubeta ligeramente y luego retírela hacia adelante. - Page 144 Mantenimiento Si la cubeta de hielo no estuviera bien insertada, gire el tornillo 90 grados e inténtelo nuevamente. PRECAUCIÓN • No use fuerza excesiva sobre cubierta de la cubeta. La cubierta puede romperse. • No cierre la puerta por la fuerza. Puede derramarse agua sobre la fábrica de hielo. •...
- Page 145 Infusor de autollenado 1. Sujete una de las ranuras de la manija de la boca sellada y tire hacia arriba para retirar. 2. Sujete ambos lados de la boca sellada y luego levántela para retirarla. 3. Quite el infusor de la boca sellada girándolo ligeramente.
- Page 146 Mantenimiento Estantes del refrigerador El aspecto de los estantes varía según el modelo. • Para retirar un estante, abra la puerta correspondiente por completo. Sostenga la parte delantera del estante y luego levántelo suavemente y deslícelo hacia afuera. NOTA No levante el estante por completo al retirar o reinsertar el estante.
- Page 147 Estante plegable Para retirarlo, deslice el frente del estante hacia arriba para que se pliegue. Luego, levántelo suavemente y tire hacia afuera. Para volver a colocarlo, coloque el estante en el marco de la unidad principal y luego, presiónelo para desplegarlo.
- Page 148 Mantenimiento Estante para vegetales 1. Deslice hacia afuera el cajón de vegetales izquierdo. 2. Abra la puerta completamente y retire el estante. 3. Mientras sujeta con una mano el estante de vegetales, deslícelo hacia afuera con la otra mano. NOTA Para utilizar el espacio que queda después de retirar el estante plegable, extraiga el estante de vegetales.
- Page 149 Compartimientos de las puertas • Para retirar el compartimiento superior de la puerta, sostenga ambos lados delanteros del compartimiento y levántelo suavemente para retirarlo. • Para volver a colocarlo, coloque el compartimiento de la puerta ligeramente por encima de su ubicación final asegurándose de que la parte posterior del compartimiento esté...
- Page 150 Mantenimiento Cajones del refrigerador Cajones de vegetales/frutas Levante suavemente el frente del cajón y deslícelo hacia afuera. • Se recomienda retirar los compartimientos de la puerta antes de retirar el cajón. Esto es para evitar que se dañen. • Para volver a colocarlo, inserte el cajón en los rieles y deslícelo hacia adentro.
- Page 151 3. Puesto que el separador tiene barras a lo ancho y a lo largo, empuje la parte inferior de cada barra para destrabarlo. Consulte las figuras para obtener más detalles. 4. Sostenga el separador y levántelo para separarlo. 5. Dé vuelta la cesta para retirar la placa para enfriamiento metálica.
- Page 152 Mantenimiento Cestas del congelador Cesta superior • Para retirarla, abra el cajón del congelador completamente. Empuje la cesta superior hasta el final y luego levántela para quitarla. • Para volver a colocarla, alinee las ruedas delanteras de la cesta superior con el extremo de la cesta inferior.
-
Page 153: Limpieza
Limpieza Interior y exterior ADVERTENCIA • No limpie el refrigerador con benceno, disolvente, detergente para automóviles/hogareño o Clorox™ (blanqueador). Pueden dañar la superficie del refrigerador y provocar un incendio. • No rocíe agua sobre el refrigerador. Puede provocar una descarga eléctrica. Utilice un paño seco regularmente para retirar cualquier sustancia extraña como polvo o agua de las terminales del enchufe de alimentación y los puntos de contacto. - Page 154 Mantenimiento Cámara de visión interna NOTA Use un hisopo de algodón o un paño de microfibra para limpiar la cámara de la puerta del lado izquierdo del refrigerador. Panel posterior Para mantener los cables y las partes expuestas del panel posterior libres de polvo, aspire el panel una o dos veces al año.
-
Page 155: Reemplazo
• Los filtros no aprobados pueden provocar pérdidas y daños al refrigerador y descargas eléctricas. Samsung no se hace responsable por los daños que puedan generarse a partir del uso de filtros de terceros. El indicador de restablecimiento del filtro) ( ) se pone rojo para recordarle que es momento de cambiar el filtro. - Page 156 Mantenimiento 3. Inserte un nuevo cartucho de filtro. Utilice únicamente filtros provistos o aprobados por Samsung. 4. Gire la perilla del filtro en el sentido de las agujas del reloj para trabarlo en su posición. 5. En la pantalla de inicio, toque Administrador del refrigerador >...
- Page 157 Pedir un filtro nuevo. Para comprar un nuevo filtro de agua, comuníquese con un centro de servicios Samsung local. Lámparas de LED Para reemplazar las lámparas del refrigerador, comuníquese con un centro de servicios Samsung local. ADVERTENCIA • El usuario no debe reemplazar las lámparas. No intente reemplazar la lámpara usted mismo. Puede provocar una descarga eléctrica.
- Page 158 Solución de problemas Antes de solicitar servicio técnico revise los siguientes puntos de verificación. En el caso de solicitudes de servicio para situaciones normales (cuando no existe ningún defecto), se exigirá un cargo a los usuarios. General Temperatura Síntoma Causas posibles Solución •...
- Page 159 Síntoma Causas posibles Solución • A fin de evitar que se forme condensación, el refrigerador cuenta con tuberías a prueba de calor en los ángulos frontales. Si la temperatura aumenta, es posible que el equipo no • El refrigerador cuenta con La pared interna está...
- Page 160 Solución de problemas Condensación Síntoma Causas posibles Solución • Retire la humedad y no deje la • Si se deja la puerta abierta, entra puerta abierta durante períodos humedad en el refrigerador. Se forma condensación en prolongados. las paredes internas. •...
- Page 161 Síntoma Causas posibles Solución • El hielo puede atascarse si el • Si no utilizará el refrigerador dispensador de hielo no se por un periodo de tiempo utiliza durante un periodo largo prolongado, vacíe la cubeta de de tiempo (aproximadamente 3 hielo y apague la fábrica de semanas).
- Page 162 No se dispensa agua. activado. dispensador. • Utilice únicamente filtros provistos o aprobados por • Se instaló un filtro de agua de Samsung. terceros. • Los filtros no aprobados pueden provocar pérdidas y daños al refrigerador. • Reemplace el filtro de agua.
- Page 163 ¿Se oyen ruidos anómalos procedentes del refrigerador? Antes de solicitar servicio técnico revise los siguientes puntos de verificación. En el caso de solicitudes de servicio relacionado con ruidos normales se exigirá un cargo al usuario. Dichos ruidos son normales. • Cuando se inicia o finaliza una operación, el refrigerador puede emitir unos sonidos similares al encendido del motor de un auto.
- Page 164 Solución de problemas • Cuando el refrigerador enfría o congela, el gas refrigerante circula por las tuberías selladas y produce ruidos de burbujas. Burbujeo • Cuando la temperatura del refrigerador aumenta o disminuye, las partes plásticas se contraen y se expanden y producen ruidos de golpeteo.
- Page 165 No se puede iniciar una aplicación. sesión en la aplicación. • Si no tiene una cuenta Samsung, siga las instrucciones en pantalla de la aplicación para crear una. Cuando trato de registrar • Easy Connection puede fallar como resultado de la distancia con mi refrigerador aparece respecto al punto de acceso (PA) o una interferencia eléctrica del...
- Page 166 Debe iniciar una sesión con su cuenta Samsung para utilizar la No se puede iniciar una aplicación. sesión en la aplicación. • Si no tiene una cuenta Samsung, siga las instrucciones en pantalla de la aplicación para crear una. Español Untitled-2 78 2020-04-09 AM 10:54:48...
- Page 167 Para usar las funciones Smart Grid (respuesta a la demanda) y de gestión de energía del refrigerador, se necesita lo siguiente: Dispositivos • Un punto de acceso inalámbrico (enrutador) • Un refrigerador que admita Samsung Energy Management • Un teléfono inteligente ¿Qué necesito para Registro utilizar las funciones •...
- Page 168 Acción • Este refrigerador solo puede conectarse con televisores inteligentes Samsung presentados entre 2015 y 2017 : Serie J/K/MU6400 o superior. Presentado en 2018 : Serie NU7400 o superior, presentado en No puedo conectarme al 2018 : Serie Q60R o superior. Revise primero el nombre de modelo de televisor.
- Page 169 Para recibir el servicio técnico de la garantía, el comprador debe comunicarse con SAMSUNG en la dirección o con el número de teléfono detallado en esta garantía con el fin de que se determine el problema y los procedimientos del servicio. El servicio de garantía solo puede realizarse a través de un Centro de Servicio autorizado por SAMSUNG.
- Page 170 Las visitas de un técnico de servicio autorizado para explicar las funciones, el mantenimiento o la instalación del producto no están cubiertas por esta garantía limitada. Comuníquese con SAMSUNG al número que figura a continuación si necesita asistencia en los anteriores casos.
- Page 171 SU ÚNICA COMPENSACIÓN ES LA REPARACIÓN DEL PRODUCTO, EL REMPLAZO DEL PRODUCTO O LA DEVOLUCIÓN DEL MONTO DE LA COMPRA, SEGÚN DECIDA SAMSUNG, DE ACUERDO A LO ESTIPULADO EN ESTA GARANTÍA LIMITADA. SAMSUNG NO SERÁ RESPONSABLE DE DAÑOS IMPREVISTOS O DERIVADOS, QUE INCLUYEN PERO NO SE LIMITAN AL TIEMPO Y FORMA DEL TRABAJO, HOTELES Y/O COMIDAS DE RESTAURANTES, GASTOS DE REMODELACIÓN, PÉRDIDA DE INGRESOS O GANANCIAS, NO OBTENCIÓN DE...
- Page 172 Aviso regulatorio Aviso de la FCC (Federal Communications Commission) PRECAUCIÓN de la FCC: Todos los cambios y modificaciones que no cuenten con la aprobación expresa de la parte responsable del cumplimiento pueden invalidar la autoridad del usuario para operar el equipo. Contiene módulo transmisor FCC ID: A3LWCM730Q Este dispositivo cumple con la sección 15 de las Normas de la FCC.
- Page 173 Aviso de la IC Contiene módulo de transmisor IC: 649E-WCM730Q El término “IC” antes del número de certificación de radio solo significa que cumple con las especificaciones técnicas de la Industria de Canadá. El funcionamiento se encuentra sujeto a las siguientes dos condiciones: (1) Este aparato no puede causar interferencia dañina, y (2) este aparato debe aceptar la recepción de cualquier interferencia, incluidas aquellas que puedan causar un funcionamiento indeseado.
- Page 174 Notas Untitled-2 86 2020-04-09 AM 10:54:48...
- Page 175 Notas Untitled-2 87 2020-04-09 AM 10:54:48...
- Page 176 Contacte a SAMSUNG WORLD WIDE Si tiene preguntas o comentarios relacionados con los productos Samsung, póngase en contacto con el Servicio de Atención al Cliente de SAMSUNG. País Centro de contacto Sitio web 1-800-SAMSUNG (726-7864) U.S.A www.samsung.com/us/support 1-844-SAM-PAYS (726-7297) 1-800-SAMSUNG (726-7864) www.samsung.com/ca/support (English)
Need help?
Do you have a question about the RF23M8570SR and is the answer not in the manual?
Questions and answers
My ice maker is not producing ice. It is grinding and water is dispersed but not ice. Please suggest a solution. I could not remove the ice maker box.
If the Samsung RF23M8570SR ice maker is making a grinding noise but not producing ice, follow these troubleshooting steps:
1. Check Water Supply: Ensure the water supply line is properly connected and the stop cock is open.
2. Wait After Installation: If the unit was just installed, wait at least 12 hours for ice production to begin.
3. Set Freezer Temperature: Make sure the freezer temperature is below 0 °F (-18 °C), or -4 °F (-20 °C) in warm ambient conditions.
4. Turn On Ice Maker: Verify that the ice maker is turned on.
5. Deactivate Dispenser Lock: Make sure the dispenser lock is not activated.
6. Insert Ice Bucket Properly: Confirm that the ice bucket is inserted correctly. If needed, turn the ice screw 90 degrees and try again.
7. Clear Ice Jams: If the dispenser has not been used for around 3 weeks, ice may jam. Remove and empty the ice bucket, then reinstall it.
8. Ensure Proper Water Pressure: Water pressure should be between 20 and 120 psi (138–827 kPa).
These steps help diagnose and resolve common issues with the ice maker grinding but not producing ice.
This answer is automatically generated