Table of Contents
Advertisement
Available languages
Available languages
Quick Links
EN
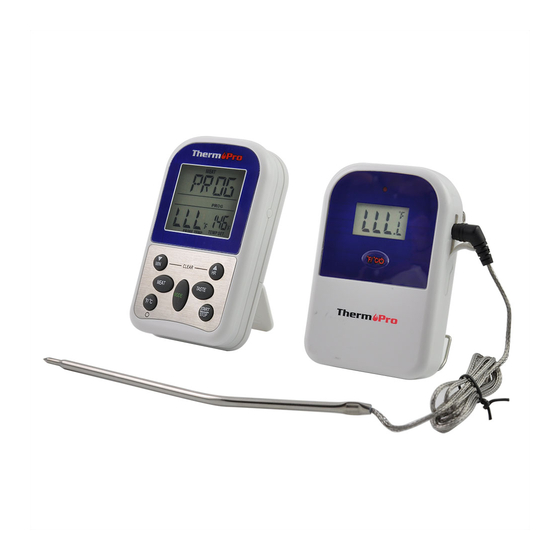
Remote Food Thermometer
Model No. TP-11
Introduction
Congratulations on your purchase of the Professional Remote Cooking Thermometer,
a programmable radio frequency food thermometer. You will now be able to remotely
monitor the time and temperature of food cooking on your grill, smoker or oven.
Components
1. 1 - receiver unit.
2. 1 - transmitter unit.
3. 1 - detachable stainless steel probe sensor.
4. 2 - 2* AAA batteries.
Receiver Features
LCD (Liquid Crystal Display) – Displays all icons, temperature and timer. The
backlight will flash Blue once the temperature increases by 10 ºF from when
cooking starts, then it will change to Green when the temperature is within 15 ºF
of the set temperature and will turn Red when it reaches the set temperature.
See LCD diagram for detailed information.
Battery compartment – Holds 2 AAA batteries.
Stand – Swings out and allow you to stand the receiver on tabletop.
-1-
Advertisement
Table of Contents

Subscribe to Our Youtube Channel
Related Manuals for ThermoPro TP-11


Summary of Contents for ThermoPro TP-11
- Page 1 Remote Food Thermometer Model No. TP-11 Introduction Congratulations on your purchase of the Professional Remote Cooking Thermometer, a programmable radio frequency food thermometer. You will now be able to remotely monitor the time and temperature of food cooking on your grill, smoker or oven.
- Page 2 Buttons Transmitter Features 1. MODE – Press to select thermometer or timer mode. Press and hold for 2 seconds Sensor socket hole to enter Synchronization/Pairing mode. 2. HR – In timer mode, press once to set hour. Press and hold for 2 seconds, the hours will increase by 10 hours per second.
- Page 3 a. Insert the stainless steel probe into the plug in of the transmitter. Measure meat temperature to USDA doneness temperature range b. Open the battery compartment of transmitter and insert two “AAA” batteries. The transmitter will show the current temperature on its LCD display and 1.
-
Page 4: Helpful Hints
use in the rain. d o w n b e l o w 1 h o u r 1 : 0 0 t h e d i s p l a y w i l l c h a n g e t o 5 9 ' 5 9 ” t o i n d i c a t e , 5 9 minutes 59 seconds. -
Page 5: Customer Service
LIMITED 90 DAYS WARRANTY Empfänger Funktionen ThermoPro warrants this product to be free of defects in parts, materials and workmanship for a period of 90 days, from date of purchase. Should any repairs or servicing under this warranty be required, contact Customer Service by phone or email for instructions on how to pack and ship the product to ThermoPro. -
Page 6: Sender Funktionen
Batteriegehäuse – Beinhaltet 2 Batterien der Größe AAA. Thermometer mode Ständer – Schwenken Sie ihn nach außen um den Empfänger auf den Tisch zu stellen. Tasten 1 . M O D E – D r ü c k e n S i e d i e s e Tas t e u m d e n T h e r m o m e t e r - M o d u s o d e r d e n Timer-Modus auszuwählen. - Page 7 c. Schalten Sie den Empfänger durch das Drücken und Halten für 2-3 Sekunden Einbau der Batterien der °F/°C/ -Taste ein. Öffnen Sie das Batteriefach des Empfängers und legen Sie zwei Batterien des d. Drücken Sie die Mode-Taste und halten Sie sie 2-3 Sekunden lang gedrückt um Typs 'AAA' mit der richtigen Polung ein.
-
Page 8: Hilfreiche Hinweise
Stellen Sie die Fleischtemperatur nach ihrem eigenen angezeigt wird. Drücken Sie die START/STOP-Taste um den Timer zu starten. Drücken Sie die MODE-Taste um in den Thermometer-Modus zurückzukehren. Geschmack ein 11. Sie können den Empfänger bis zu 100 Meter weit vom Grill entfernt platzieren. 1. - Page 9 D e n E d e l s t a h l - M e s s f ü h l e r u n d d i e M e s s l e i t u n g f ü r K i n d e r u n z u g ä n g l i c h 4.
- Page 10 DIE GEWÄHRLEISTUNG IST AUF 90 TAGE BESCHRÄNKT ThermoPro garantiert vom Zeitpunkt des Verkaufs für 90 Tage, dass dieses Produkt Manuel d'instructIon pour thermom tre è frei von Fehler bei Teilen, Materialien oder der Herstellung ist. barbecue a distance S o l l t e e i n K u n d e n d i e n s t o d e r e i n e R e p a r a t u r w ä h r e n d d i e s e s Z e i t r a u m e s Modèle No.
- Page 11 Fonctionnalités du Transmetteur COMPARTIMENT DES PILES – pour 2 piles AAA. Entrée du capteur Boutons Lampe LED d'Indication 1. MODE – Appuyez pour sélectionner le mode thermomètre ou minuteur. Appuyez et maintenez enfoncé pendant deux secondes pour vous connecter au transmetteur. 2.
- Page 12 Le transmetteur s'éteindra automatiquement si la température mesurée est inférieure à 50°C (122°F) pendant 120 minutes. Option 1: a. Insérez le capteur de la tige en acier inoxydable à l'entrée du transmetteur. Mesurer la température de la viande selon les critères de b.
-
Page 13: Astuces Utiles
Utiliser le Minuteur 3. Placez le steak et les hot dogs sur la grille du barbecue. 4. Insérez le capteur de la tige au centre de la partie la plus épaisse du steak. Compte à Rebours Évitez de toucher les os, ou les zones de graisse. Vérifiez que la température 1. -
Page 14: Service Client
à mains nues. Laissez le capteur en acier inoxydable de la tige et le fil hors de la portée des ThermoPro garantit ce produit de tout défaut dans ses composants, matériaux et enfants. fabrication pendant une période de 90 jours, à partir de la date d'achat.
Need help?
Do you have a question about the TP-11 and is the answer not in the manual?
Questions and answers