Table of Contents
Advertisement
Quick Links
Advertisement
Table of Contents

Subscribe to Our Youtube Channel
Related Manuals for VivoLink VL120000


Summary of Contents for VivoLink VL120000
- Page 1 User Manual VL120000 Compact Scaler Switcher...
- Page 2 SAFETY PRECAUTIONS To insure the best from the product, please read all instructions carefully before using the device. Save this manual for further reference. Unpack the equipment carefully and save the original box and packing material for possible future shipment ...
- Page 3 Please read this user manual carefully before using this product. The item PoC is short for Power over Cable, and when the power adapter is connecting with VL120001R, VL120000 can’t be energized through PoC. The receiver works with VL120000 can only be VL120001R.
-
Page 4: Table Of Contents
4.4.1 Installation/uninstallation of RS232 Control Software ......19 4.4.2 Basic Settings ..................19 4.4.3 RS232 Communication Commands ............16 4.4.4 Control VL120000 or 3rd Party Device from Local ........ 21 4.4.5 Control VL120000 from Local or Remote ..........22 4.5 Operations in OSD Menu................. 23... - Page 5 Compact Scaler Switcher (with PoC) 4.5.1 Option ....................30 4.5.2 Picture ....................32 4.5.3 Sound ....................32 4.5.4 Setup ..................... 33 4.6 Instructions of VGA Converting Cable ............. 34 5. Specification ......................35 6. Panel Drawing ......................37 7. Troubleshooting & Maintenance ................37 8.
-
Page 6: Introduction
1. Introduction 1.1 Introduction to VL120000 VL120000 is a compact mini scaler switcher with 5 video inputs (3 HDMI, 2 VGA) and 6 audio inputs (3 HDMI audio & 2 VGA audio: switched following the video; 1 MIC audio input). As the VGA input supports VGA, YPbPr and C-video, so the scaler switcher is compliant with multiple video signals. -
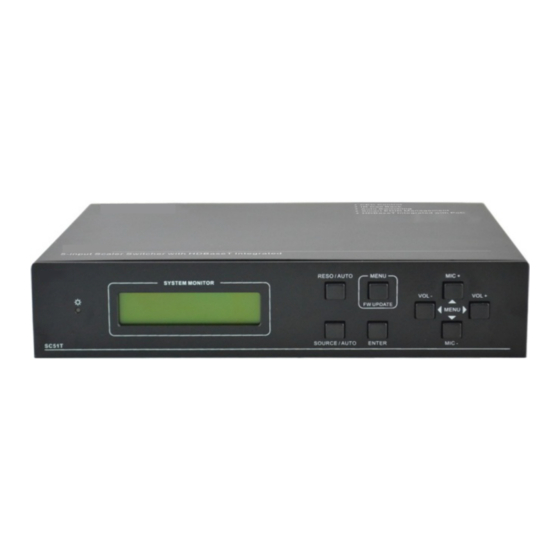
Page 7: Product Appearance
Please confirm if the product and the accessories are all included, if not, please contact with the dealers. 2. Product Appearance 2.1 VL120000 Front Panel ① Power indicator Illuminate red when power on, turn green in standby mode. ② LCD screen Show real-time system working status ③... - Page 8 Compact Scaler Switcher (with PoC) ④ ENTER Confirm selection in menu. ⑤ RESO/AUTO Manual-switching mode: Press this button to select the resolution of HDMI local output & HDBaseT output manually. The resolution can be selected among 1920x1200, 1920x1080, 1600x1200, 1360x768, 1280x800, 1280x720, 1024x768.
-
Page 9: Vl120000 Rear Panel
Audio output port, the audio comes from the input audio corresponding to the selected video source and mixed with MIC audio. ③ IR OUT 5 in total, connect with IR emitters to control local source devices or VL120000 from remote, switched along with corresponding video source. ④ IR IN Connects with IR receiver (with carrier wave only), to receive IR signal send by the IR remote or remote controller of other input/output device. -
Page 10: System Connection
Compact Scaler Switcher (with PoC) microphone), MIC mode (connect with dynamic microphone) and LINE mode (connect with wireless microphone or line audio). ⑨ VIDEO INPUT Video input ports, include 3 HDMI inputs & 2 VGA inputs. VGA ports support YPbPr, C-video and VGA format. Factory default is VGA format. ⑩... -
Page 11: Connection Procedure
Both VL120000 and VL120001R have IR IN and OUT. When one model is connected with IR receiver, the other model should connect with an IR transmitter. For example: When “IR IN” of VL120000 connects with an IR receiver, the IR transmitter must connect to IR OUT of VL120001R. - Page 12 Compact Scaler Switcher (with PoC) and “ ” to ground. MIC input MIC input has a low frequency characteristics, and wide frequency response. When switch to “MIC”, the microphone input is used for connecting with dynamic microphone. There are two different connection methods: 1) Unbalanced connection: “+”...
-
Page 13: Application
2) Balanced connection: “+” connects to positive, “-” connects to negative and “ ” connects to ground. 3.5 Application VL120000 has a good application in various occasions, such as computer realm, monitoring, conference room, big screen displaying, television education, command & control center and smart home etc. 4. System Operations 4.1 Operations of Front Panel Buttons... -
Page 14: Switching Operations
Once rebooted, VL120000 will automatically enter auto-switching mode, and then detect all inputs and memorize their connection status for future rebooting using. If the last displayed signal is still available, VL120000 will output the signal. If not, there will be no signal on output devices. -
Page 15: Volume Adjusting
Connect INPUT 3 with a source device, and then it will choose INPUT 3 to output. Remove the signal of INPUT 3, VL120000 will detect from INPUT 1 to INPUT 5. And when it detects that input 2 is available, it will choose INPUT 2 to output. -
Page 16: Operations Of Ir
4.2 Operations of IR 4.2.1 IR Remote As IR signal can be transmitted bi-directionally between VL120000 and VL120001R, it is able to use the IR remote at the far-end to control VL120000 or HDMI source devices (via CEC function buttons). ① Standby button Enter/ exit standby mode ②... -
Page 17: Ir Operations
The 5 IR OUT ports correspond to the 5 video inputs separately, and the IR signals are switched following the corresponding video source. 1) Control far-end device from local Control VL120000 or far-end display device from local through corresponding IR remote. VL120001R 2) Control local device from remote Control VL120000 or local device from local through corresponding IR remote. -
Page 18: Operations Of Cec Function
Compact Scaler Switcher (with PoC) VL120001R 4.3 Operations of CEC Function VL120000 supports CEC, it can be turned on/ off by sending RS232 commands or OSD menu operations. The default setting is ON. Commands pertaining to CEC: “50686%” (enable CEC) and “50687%” (disable CEC) -
Page 19: Operations Of Rs232 Control
As RS232 can be transmitted bi-directionally between VL120000 and VL120001R, so it is able to control a third party RS232 device from local or control VL120000 from remote. When to control a third party RS232 device, the baud rate of this device should be 2400, 4800, 9600, 19200, 38400, 57600 or 115200. - Page 20 Compact Scaler Switcher (with PoC) Parameter Configuration area Monitoring area, indicates if the command sent works. Command Sending area Please set the parameters of COM number, bound rate, data bit, stop bit and the parity bit correctly, and then you are able to send command in Command Sending Area.
-
Page 21: Rs232 Communication Commands
Compact Scaler Switcher (with PoC) 4.4.3 RS232 Communication Commands Communication protocol: RS232 Communication Protocol Baud rate: 9600 Data bit: 8 Stop bit: 1 Parity bit: none Command Function Feedback Example Switch Commands 50701% Switch to HDMI 1 input Switch to HDMI 1 50702% Switch to HDMI 2 input Switch to HDMI 2... - Page 22 Compact Scaler Switcher (with PoC) Command Function Feedback Example Mic precedence: XXXX (XXXX= Check Mic precedence status 50696% enable / disable) 50724% MIC volume up MIC Volume: xx (xx=00~60) 50725% MIC volume down MIC Volume: xx (xx=00~60) Set MIC volume MIC Volume: xx (xx=00~60) 508xx% Choose embedded audio as HDMI 1...
- Page 23 Compact Scaler Switcher (with PoC) Command Function Feedback Example Change the resolution to1600X1200 Resolution: 1600x1200 50621% UXGA Setup Commands 50604% Lock the front panel buttons Front Panel lock Unlock the front panel buttons Front Panel Unlock 50605% Set the volume to xx. LINE Volume: xx (xx=00~60) 501xx% 502xx%...
- Page 24 Compact Scaler Switcher (with PoC) Command Function Feedback Example Embedded Audio Output: Disable HDMI embedded audio output 50649% disable 50761% Not display mute icon of LINE audio LINE Mute Icon: disable 50762% Display mute icon of LINE audio LINE Mute Icon: enable Not display mute icon of MIC audio MIC Mute Icon: disable 50763%...
- Page 25 Compact Scaler Switcher (with PoC) Command Function Feedback Example EDID: bypass EDID: user EDID management, copy the best EDID manage 50782% resolution data of one output to HDMI Resolution:1920x1080 input Enable serial control mode 1: control RS232 Mode 1: RS232 Control 50787% Scaler &...
- Page 26 Compact Scaler Switcher (with PoC) Command Function Feedback Example ×768/ 1280×800/ 1280×720/ 1024×768 Picture Mode: xx (xx= Dynamic/ 50633% Check the image mode Standard/ Mild/ User) Sound Mode: xx (xx= Standard/ 50634% Check the audio mode Music/ Movie/ Sports/ User) Aspect Ratio: xx (xx= 16:9/ 4:3/ auto/ panorama/ justscan/ 50635%...
- Page 27 Compact Scaler Switcher (with PoC) Command Function Feedback Example Mic Volume:XX Input:XXXX Display status including MIC, LINE audio, Resolution, Output Audio Resolution:XXXX on/off, Manual/ Auto-switching modes Digital Sound Ouput: XXXX Switch status: XXXX Adjustment Commands 50678% Enable screen output adjusting Enter Output Position Adjust Disable screen output adjusting Exit Output Position Adjust...
- Page 28 Firstly, connect the RS232 port of VL120000 to RS232 port of PC. Secondly, send command 50787% (serial control mode 1, factory default) via RS232 communication software. Lastly, send the right command of VL120000 or other remote RS232 device connected in present system. Connect as below:...
-
Page 29: Control Vl120000 From Local Or Remote
4.4.5 Control VL120000 from Local or Remote Control VL120000 from local Firstly, connect the RS232 port of VL120000 to RS232 port of PC. Secondly, send command 50788% via RS232 communication software. Lastly, send the right command to control VL120000. Connect as below: Control VL120000 from local ... -
Page 30: Operations In Osd Menu
Compact Scaler Switcher (with PoC) Firstly, connect the RS232 port of far-end RS232 device to RS232 port of PC. Secondly, send command 50788% via RS232 communication software. Lastly, send the right command to control VL120000. Connect as below: VL120001R Control VL120000 from remote 4.5 Operations in OSD Menu... - Page 31 HDMI3 Audio Select: switch between Embedded and Line to choose the desired audio output port for HDMI3. Software Update (USB): Insert the USB flash disk with updating file to USB port of VL120000, to update the software through this menu.
-
Page 32: Picture
Compact Scaler Switcher (with PoC) 4.5.2 Picture Including Picture Mode, Color Temperature, Aspect Ratio, Noise Reduction, Screen and Color Range. Please check the picture below: Picture mode: Includes Dynamic, Standard, Mild, and User. Only in User mode, will it be able to set the image contrast, brightness, color and sharpness. Color Temperature: Includes Cool, Medium, Warm and User. -
Page 33: Setup
Compact Scaler Switcher (with PoC) Sound mode: Includes Standard, Music, Movie, Sports and User. Only User mode supports to set treble and bass. Surround Sound: Includes Off, Surround and SRS Trusurround XT. EQ: To adjust the sound balance. 4.5.4 Setup Including OSD Language, Restore Factory Default, Blending, HDMI CEC, OSD Duration and version inquiry... -
Page 34: Instructions Of Vga Converting Cable
VERSION: Displays software version 4.6 Instructions of VGA Converting Cable As VGA source supports YPbPr and C-video source, VL120000 provides with 2 VGA converting cables to compliant with these signals. When need to select these signals as input source, please switch to channel INPUT 4 (or INPUT 5), and then set the signal type in OSD. -
Page 35: Specification
Compact Scaler Switcher (with PoC) A. Operation Examples: 1. Via front panel buttons & OSD Press MENU button on front panel to enter in OSD, and then enter in OPTION setting menu: set “INPUT 4 Select” to AV1, and “INPUT 5 Select” to AV2. After setting, press SOURCE/AUTO button on front panel to switch to AV1 or AV2 source. - Page 36 2 = TX, 3 = RX, 5 = Remote RS232 Configuration General Temperature -10 ~ +40℃ Humidity 10% ~ 90% 8W, supply power to VL120000 and VL120001R separately Power Power DC12V ± 0.5V Supply Consumption 16W, VL120000 supplies power to VL120001R...
-
Page 37: Panel Drawing
Compact Scaler Switcher (with PoC) 6. Panel Drawing 7. Troubleshooting & Maintenance Problems Causes Solutions Output image with Bad quality of the Try another high quality snowflake connecting cable cable. Fail or loose connection Make sure the connection is good No output image when No signal at the input / Check with oscilloscope... - Page 38 Compact Scaler Switcher (with PoC) POWER indicator doesn’t Fail connection of power Make sure the power cord work or no respond to any cord. connection is good. operation EDID management does The HDMI cable is broken Change for another HDMI not work normally at the output end.
-
Page 39: After-Sales Service
Compact Scaler Switcher (with PoC) 8. After-sales Service If there appear some problems when running VL120000, please check and deal with the problems referring to this user manual. Any transport costs are borne by the users during the warranty. 1) Product Limited Warranty: VivoLink warrants that its products will be free from defects in materials and workmanship for three years, which starts from the first day you buy this product (The purchase invoice shall prevail).
Need help?
Do you have a question about the VL120000 and is the answer not in the manual?
Questions and answers